
ATTACK SHARK R6 White
ATTACK SHARK R6 Wireless Gaming Mouse User Manual
Model: R6 White
Introduction
Thank you for choosing the ATTACK SHARK R6 Wireless Gaming Mouse. This ultra-lightweight, high-performance gaming mouse is designed to provide an exceptional gaming and working experience with its advanced features and versatile connectivity options. This manual will guide you through the setup, operation, and maintenance of your new mouse.
Safety Information
- Do not expose the mouse to extreme temperatures or humidity.
- Avoid dropping or subjecting the mouse to strong impacts.
- Do not attempt to disassemble or modify the mouse, as this will void the warranty and may cause damage.
- Keep the mouse away from liquids and dust.
- Use only the provided charging cable for optimal performance and safety.
Package Contents
Please check the package contents to ensure all items are present:
- ATTACK SHARK R6 Wireless Gaming Mouse
- USB-C Charging Cable
- 2.4G Wireless Receiver (8KHz)
- User Manual (this document)
Product Overview
Familiarize yourself with the components of your ATTACK SHARK R6 mouse.
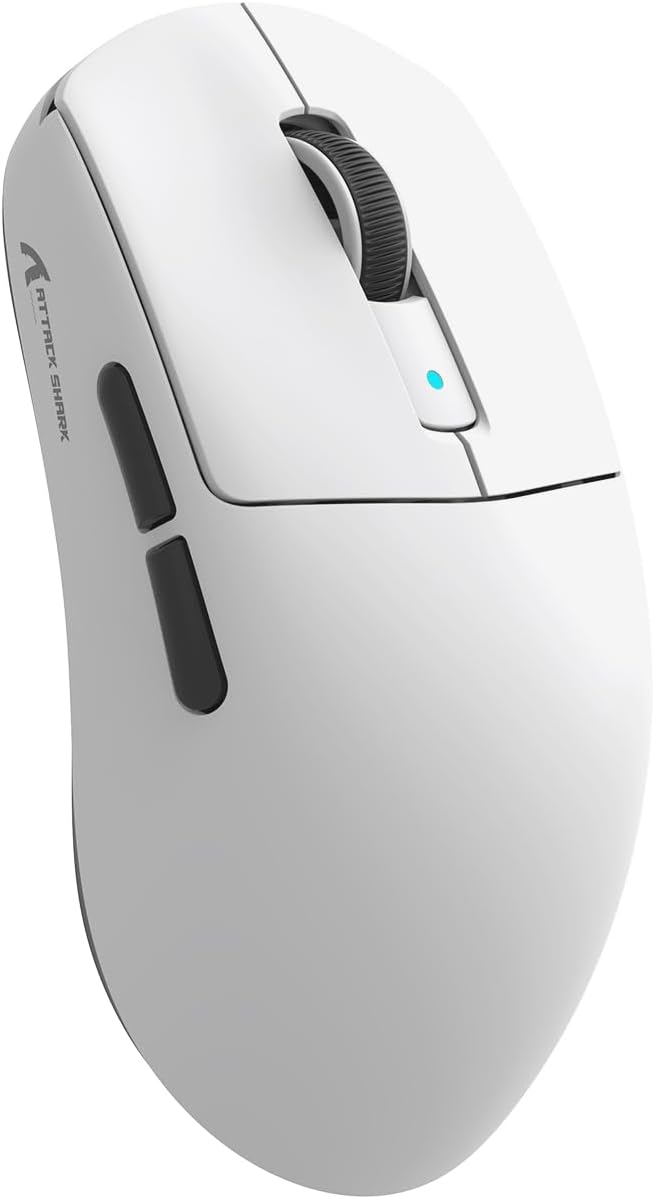
Image: Top-down view of the ATTACK SHARK R6 Wireless Gaming Mouse, showing the scroll wheel, left and right click buttons, and side buttons.

Image: Detailed diagram showing the internal components and dimensions of the ATTACK SHARK R6 mouse, including the PAW3950MAX sensor, Nordic52840 chip, OMRON optical switch, and lightweight structure.
Key Features:
- 3-Mode Connectivity: Wired, 2.4G Wireless, and Bluetooth for versatile use across various devices.
- Ultra-Lightweight Design: Weighs approximately 38 grams for effortless movement.
- PAW3950MAX Sensor: Advanced Pixart sensor with up to 42000 DPI, 750 IPS, and 50G acceleration for precise tracking.
- Nordic52840 Master Control: Ensures low latency and low power consumption.
- 8KHz Return Rate: Provides faster data transmission and smoother cursor movement with the dedicated 8K receiver.
- OMRON Optical Switch: Offers 3x faster response and a lifespan of over 70 million keystrokes.
- Native Ice Sensitive Coating: For an enhanced grip and comfortable feel.
- Web Cloud Driver: Browser-based driver for easy customization of DPI, return rate, macros, and more.
Setup
1. Charging the Mouse
Before first use, it is recommended to fully charge the mouse. Connect the USB-C charging cable to the mouse's Type-C port and the other end to a USB power source (e.g., computer USB port, wall adapter).

Image: The ATTACK SHARK R6 mouse connected to a USB-C charging cable, illustrating the charging process. A full charge typically takes 2-3 hours.
The mouse features a 300mAh battery, providing extended usage. The charging indicator light will show the charging status.
2. Connecting via 2.4G Wireless Mode
- Locate the 2.4G wireless receiver.
- Plug the 2.4G wireless receiver into an available USB port on your computer.
- Toggle the switch on the bottom of the mouse to the 2.4G wireless mode position.
- The mouse should automatically connect to your computer.

Image: The compact 8K Mini Receiver, highlighting its low latency and high-density output capabilities for the ATTACK SHARK R6 mouse.
3. Connecting via Bluetooth Mode
- Toggle the switch on the bottom of the mouse to the Bluetooth (BT) mode position.
- On your computer or device, open Bluetooth settings and search for new devices.
- The mouse should appear as "ATTACK SHARK R6" or similar. Select it to pair.
- If prompted, confirm the pairing code.
4. Connecting via Wired Mode (USB-C)
- Connect the USB-C charging cable to the mouse's Type-C port.
- Connect the other end of the USB-C cable to an available USB port on your computer.
- The mouse will automatically switch to wired mode and function as a plug-and-play device. This mode also charges the mouse.

Image: Illustration of the tri-mode switch on the ATTACK SHARK R6 mouse, detailing how to select between Bluetooth, 2.4G Wireless, and Wired connectivity options.
Operating Instructions
DPI Adjustment
The ATTACK SHARK R6 mouse features a PAW3950MAX sensor with adjustable DPI up to 42000. DPI settings can be customized using the R6 Web Cloud Driver.

Image: Diagram highlighting the PAW3950MAX Gaming Sensor, emphasizing its capabilities such as 42000 DPI adjustment, 750 IPS speed, 50G acceleration, and 8000Hz return rate.
Using the R6 Web Cloud Driver
The R6 Web Cloud Driver provides an innovative, lightweight, and browser-ready interface for customizing your mouse settings without the need for downloads or installations.
- Open your web browser.
- Navigate to the official ATTACK SHARK R6 Web Cloud Driver website (refer to product packaging or official website for the exact URL).
- Once connected, you can adjust settings such as:
- DPI levels and profiles
- Polling rate (up to 8000Hz)
- Button assignments and custom keystrokes
- Macro recording and management
- Competitive mode settings

Image: A visual representation of the R6 Web Cloud Driver interface, showing options for adjusting DPI, return rate, and customizing buttons and macros.
Button Functions
The ATTACK SHARK R6 mouse features programmable buttons for enhanced control.
- Left Click Button: Standard primary click function.
- Right Click Button: Standard secondary click function.
- Scroll Wheel: Scrolls up/down, and acts as a middle click button.
- Side Buttons (Forward/Backward): Default navigation functions, customizable via Web Cloud Driver.
- DPI Button (if present/programmable): The mouse does not have a dedicated physical DPI button. DPI adjustments are made through the Web Cloud Driver. You can assign a button to switch DPI profiles via the software.

Image: An internal view of the OMRON Optical Switch, illustrating its mechanism and highlighting its 3X faster response time and extended lifespan compared to traditional mechanical switches.
Maintenance
Proper maintenance ensures the longevity and optimal performance of your ATTACK SHARK R6 mouse.
- Cleaning: Use a soft, dry cloth to wipe the surface of the mouse. For stubborn dirt, slightly dampen the cloth with water or a mild cleaning solution. Avoid using harsh chemicals or abrasive materials.
- Sensor Care: Keep the optical sensor on the bottom of the mouse clean and free from dust or debris. Use a cotton swab or compressed air if necessary.
- Storage: When not in use for extended periods, store the mouse in a cool, dry place away from direct sunlight.
- Battery: To preserve battery life, avoid fully discharging the mouse frequently. Charge it when the battery indicator is low.
Troubleshooting
If you encounter issues with your ATTACK SHARK R6 mouse, please refer to the following common solutions:
| Problem | Possible Solution |
|---|---|
| Mouse not responding (Wireless) |
|
| Cursor movement is erratic or jumpy |
|
| Buttons not responding |
|
| Mouse not charging |
|
Specifications
| Feature | Detail |
|---|---|
| Model | R6 White |
| Connectivity | 2.4Ghz Wireless, Bluetooth, USB (Wired) |
| Sensor | Pixart PAW3950MAX Optical Sensor |
| DPI Range | 50 - 42000 DPI (Adjustable) |
| Acceleration | 50G |
| IPS (Tracking Speed) | 750 IPS |
| Polling Rate | Up to 8000Hz (with 8K receiver) |
| Switches | OMRON Optical Switches (70+ million clicks lifespan) |
| Main Control Chip | Nordic52840 |
| Weight | Approx. 38g (Ultra-Lightweight) |
| Battery Capacity | 300mAh |
| Charging Time | 2-3 hours |
| Coating | Native Ice Sensitive Coating |
| Dimensions (Package) | 6.81 x 4.13 x 2.83 inches |
| Country of Origin | China |
Warranty and Support
ATTACK SHARK products are manufactured to the highest quality standards. For warranty information and technical support, please refer to the official ATTACK SHARK website or contact their customer service directly. Keep your purchase receipt as proof of purchase for warranty claims.
For the latest drivers, FAQs, and support resources, visit the official ATTACK SHARK website: www.attackshark.com
Related documentsR6 White


Ask a question about this manual
Ask about setup, troubleshooting, compatibility, parts, safety, or missing instructions. Manuals+ will review the question and use this page’s manual context to help answer it.