1. Introduction
This manual provides detailed instructions for the installation, operation, and maintenance of your Yonvim DC339C Dash Cam. Please read this manual thoroughly before using the product to ensure proper function and to maximize your user experience. The Yonvim DC339C is a dual-channel dash camera system designed to record both front and rear views of your vehicle in 2.5K QHD resolution, featuring a 3.39-inch IPS display, G-Sensor, night vision, and loop recording capabilities.

Image 1.1: Yonvim DC339C Dash Cam system components.
2. What's in the Box
Verify that all items listed below are present in your package:
- 1x Dash Camera (Front)
- 1x Rear Camera
- 1x 64GB Memory Card
- 1x Car Charger (Cigarette Lighter Power Cord, 11.5ft)
- 1x Product Manual
- 1x Windshield Sticker
- 4x Adhesive Pads (for front camera)
- 1x Rear Adhesive Pad (for rear camera)
- 2x Screws (for rear camera installation, if preferred)

Image 2.1: Package contents of the Yonvim DC339C Dash Cam.
3. Product Overview and Features
The Yonvim DC339C Dash Cam is equipped with advanced features to provide reliable vehicle surveillance.
Key Features:
- 2.5K QHD Resolution: Captures clear video footage from both front and rear cameras.
- 3.39-inch IPS Display: Provides a clear interface for viewing recordings and settings.
- 160° Wide Angle Lens: Covers multiple lanes for comprehensive road coverage.
- Night Vision: Enhanced low-light performance with F1.8 aperture and 8-layer optical lens.
- G-Sensor: Automatically detects collisions and locks emergency footage to prevent overwriting.
- Loop Recording: Continuously records, overwriting the oldest unlocked files when the memory card is full.
- Flexible Disassembly: The main dash cam unit can be easily removed from its mount after installation.
- USB-C Compatibility: Supports connection for the rear camera.
- 24-Hour Parking Monitoring: Requires an optional hardwiring kit for continuous surveillance when the vehicle is parked.
- Included 64GB Memory Card: Ready for immediate use, supports up to 256GB.
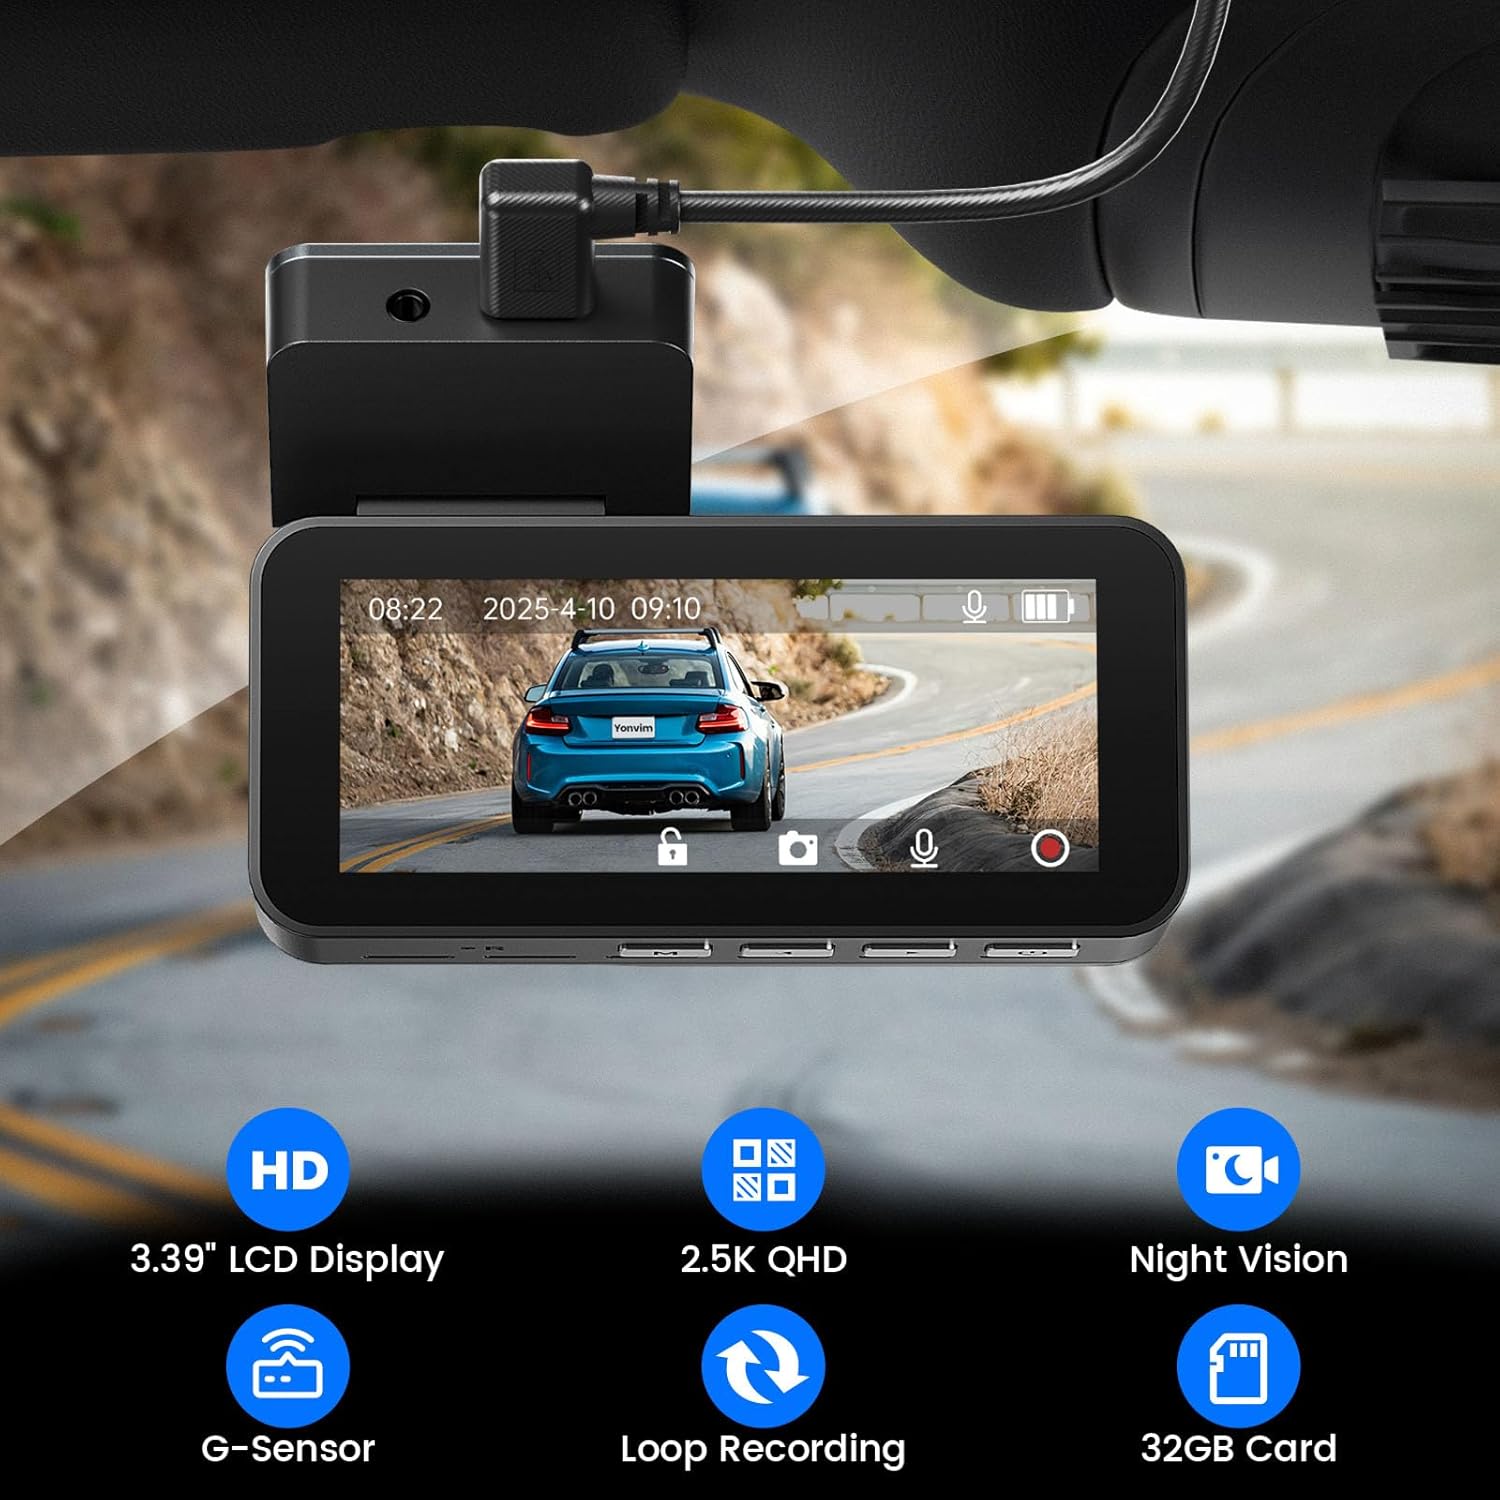
Image 3.1: Overview of key features displayed on the dash cam screen.

Image 3.2: Detail of the dash cam's night vision capabilities.

Image 3.3: Visual representation of day and night recording performance.
4. Setup and Installation
4.1 Inserting the Memory Card
Before installation, ensure the included 64GB memory card is inserted into the dash cam. The device supports up to 256GB memory cards.

Image 4.1: Memory card insertion for loop recording.
4.2 Front Camera Installation
- Clean the windshield area where the dash cam will be mounted.
- Attach one of the adhesive pads to the dash cam mount.
- Securely attach the dash cam mount to the windshield, ensuring a clear view of the road. Avoid vertical windshields as they are not applicable for this mounting method.
- Connect the car charger to the dash cam and route the cable neatly along the windshield edge and down to the cigarette lighter socket.

Image 4.2: Front camera mounting and flexible disassembly feature.
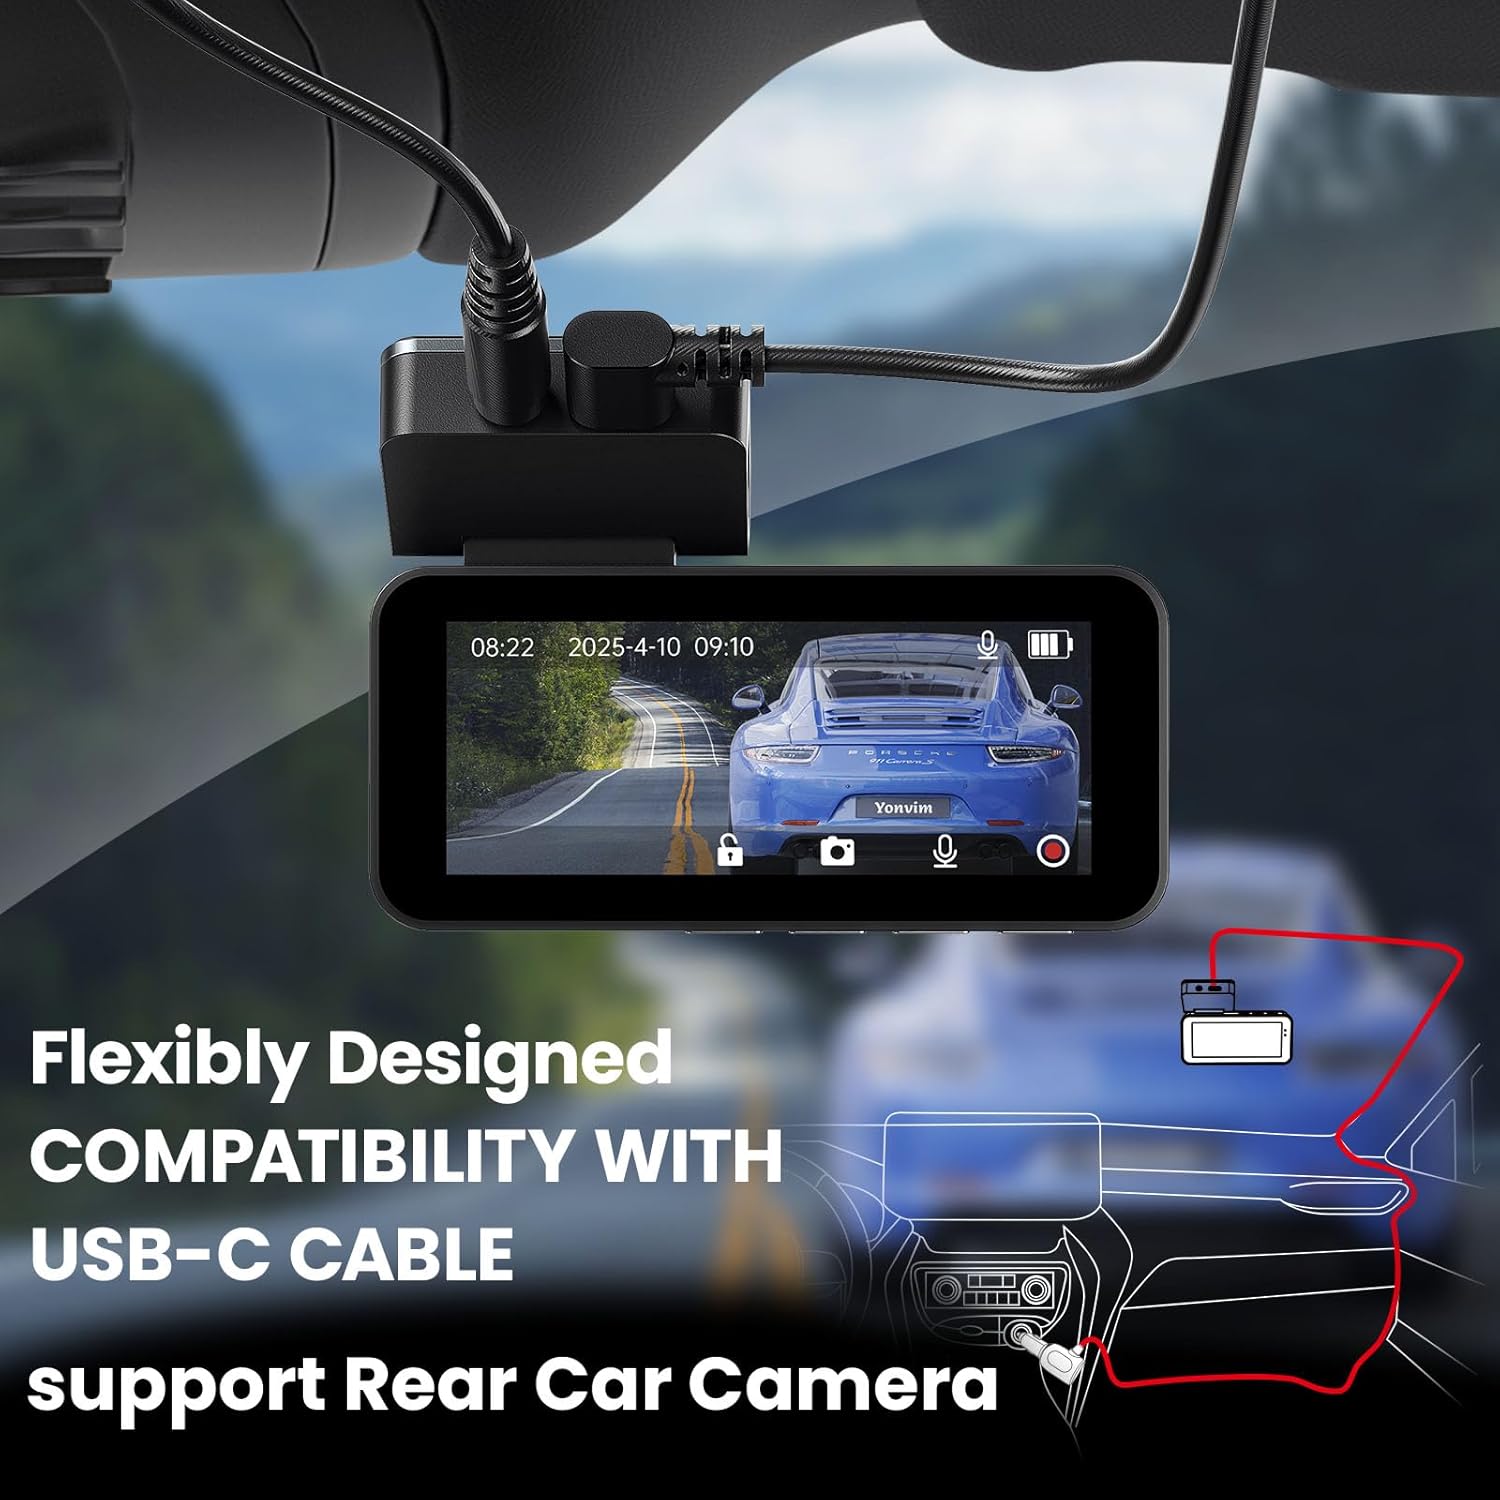
Image 4.3: USB-C cable connection for power and rear camera.
4.3 Rear Camera Installation
- Choose a suitable location on your rear windshield for the rear camera, ensuring a clear view.
- Use the provided rear adhesive pad to secure the camera. Alternatively, use the included screws for a more permanent installation.
- Connect the rear camera cable to the main dash cam unit and route the cable discreetly.

Image 4.4: Dual camera setup and cable routing.
5. Operation
5.1 Powering On/Off
The dash cam will automatically power on and begin recording when your vehicle's ignition is turned on. It will power off automatically when the ignition is turned off.
5.2 Basic Recording
Once powered on, the dash cam will continuously record video. The footage is saved in segments to the memory card. When the card is full, the oldest unlocked files will be overwritten by new recordings (Loop Recording).
5.3 G-Sensor (Emergency Recording)
The built-in G-Sensor detects sudden impacts or rapid deceleration. In such events, the current video segment will be automatically locked and protected from being overwritten, ensuring critical footage is preserved.
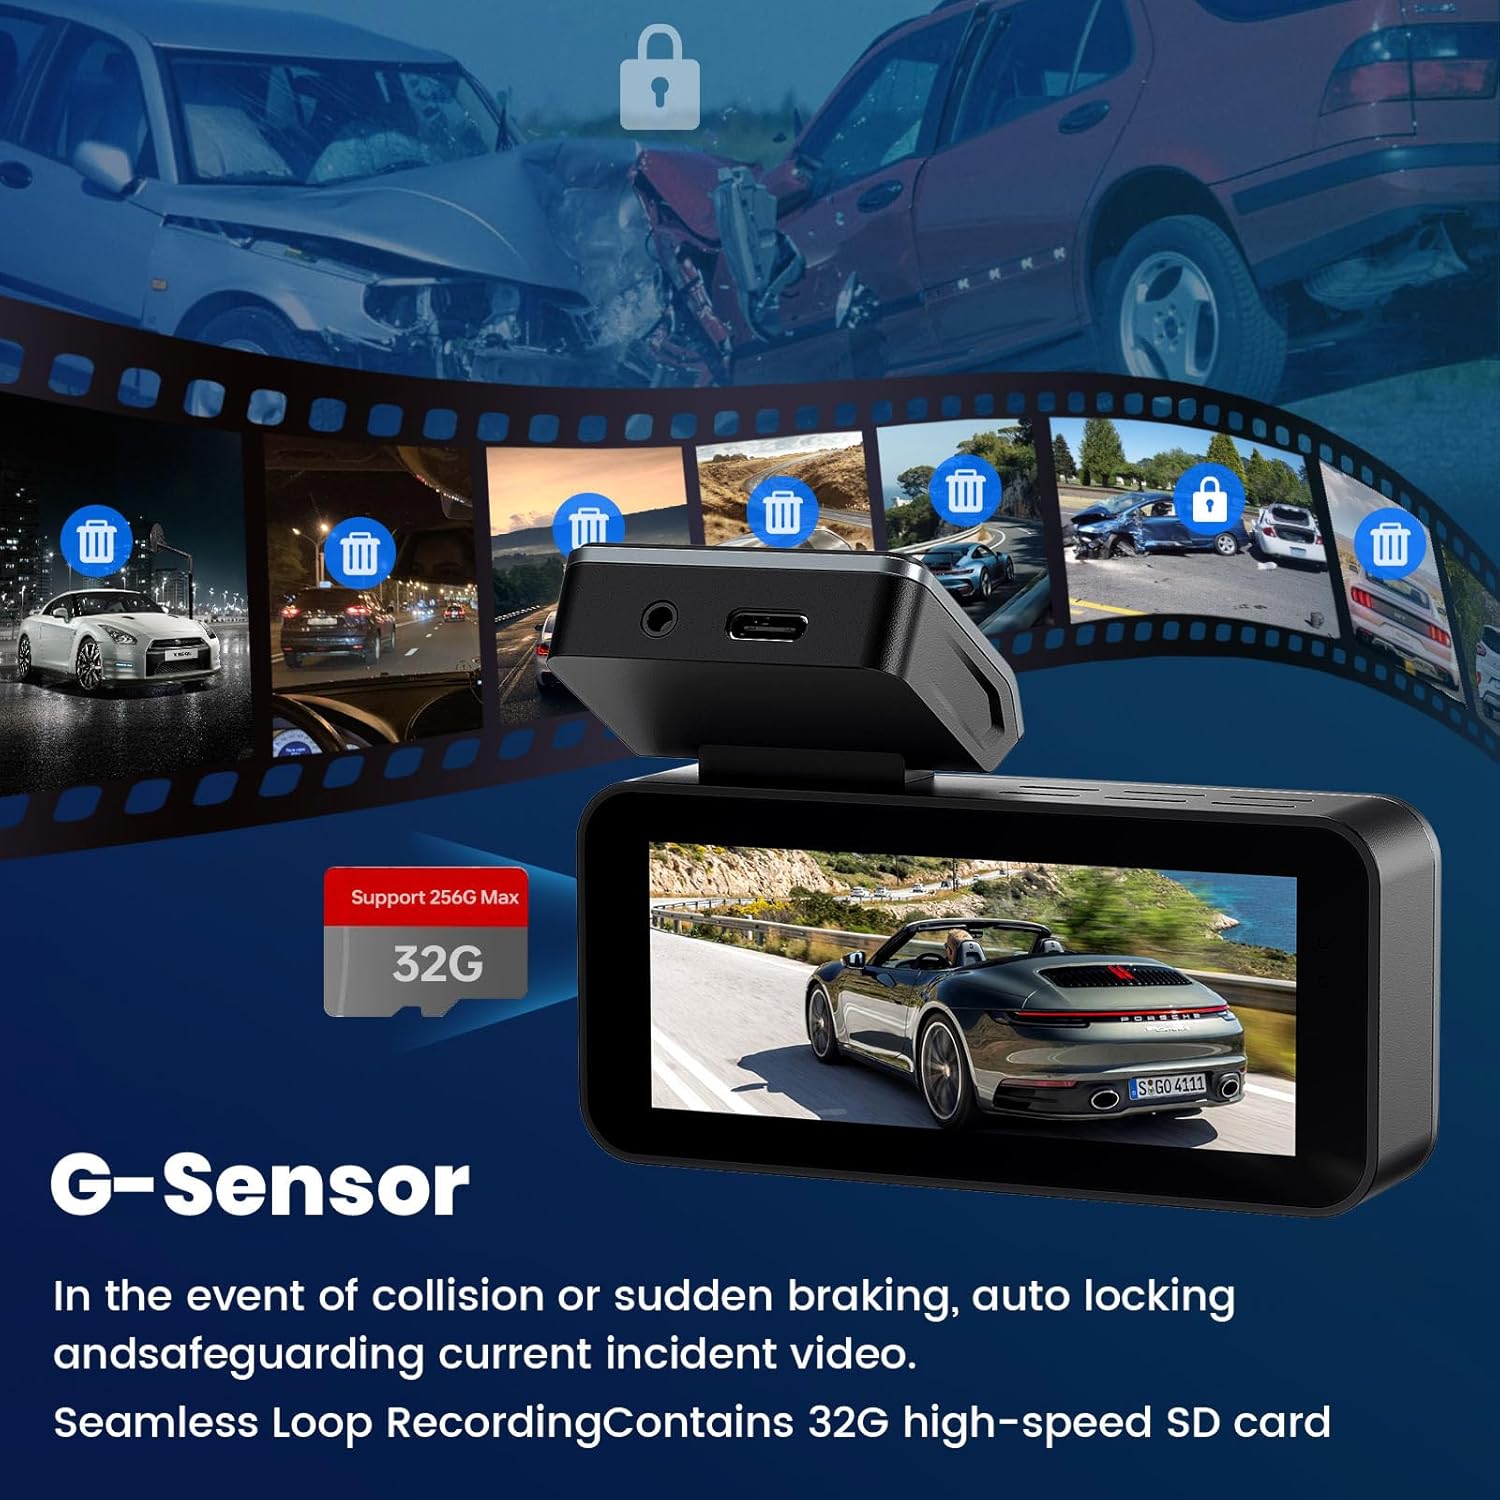
Image 5.1: G-Sensor automatically locks incident videos.

Image 5.2: G-Sensor locking files during an accident.
5.4 Parking Monitoring (Optional)
For 24-hour parking surveillance, an optional hardwiring kit is required (not included). When installed, the dash cam will automatically record if it detects vibration or impact while the vehicle is parked.

Image 5.3: 24-hour parking monitoring setup (hardwire kit needed).

Image 5.4: Example of a hardwiring kit for continuous power.
5.5 Viewing Footage
Footage can be reviewed directly on the 3.39-inch IPS display of the dash cam. Alternatively, remove the memory card and view files on a computer using a compatible card reader.
6. Maintenance
- Cleaning: Use a soft, dry cloth to clean the camera lenses and display screen. Avoid abrasive cleaners.
- Memory Card: Periodically format the memory card (at least once a month) to ensure optimal performance and prevent data corruption. Back up any important files before formatting.
- Temperature: Operate the dash cam within its specified working temperature range (-4°F to 158°F / -20°C to 70°C) to prevent damage.

Image 6.1: Dash cam working temperature range.
7. Troubleshooting
| Problem | Possible Cause | Solution |
|---|---|---|
| Dash cam does not power on. | No power supply; faulty car charger; loose connection. | Check car charger connection and ensure vehicle ignition is on. Test charger in another port or with another device. |
| Recording stops unexpectedly. | Memory card full; memory card error; faulty memory card. | Format the memory card. Replace with a new, high-quality memory card if issues persist. Ensure loop recording is enabled. |
| Video footage is blurry or unclear. | Protective film on lens; dirty lens; incorrect focus. | Remove any protective film. Clean the lens with a soft cloth. Ensure the camera is securely mounted and not vibrating. |
| Dash cam falls off windshield. | Adhesive failure due to heat or improper application. | Clean windshield thoroughly before applying adhesive. Use a new adhesive pad. Consider alternative mounting if issues persist in extreme temperatures. |
8. Specifications
| Feature | Detail |
|---|---|
| Model Name | DC339C |
| Video Capture Resolution | 2.5K QHD (Front and Rear) |
| Display Size | 3.39 inches IPS |
| Field of View | 160 Degrees (Front and Rear) |
| Special Features | G-Sensor, Night Vision, Loop Recording, 24H Parking Monitoring (with optional hardwire kit) |
| Connectivity Technology | USB |
| Mounting Type | Windshield Mount (Adhesive) |
| Supported Memory Card | MicroSD, up to 256GB (64GB included) |
| Product Dimensions | 2.76 x 1.97 x 4.72 inches |
| Item Weight | 15.8 ounces |
| Operating Temperature | -4°F to 158°F (-20°C to 70°C) |
9. Warranty and Customer Support
Yonvim products are backed by comprehensive warranties and dedicated customer support. For technical assistance, warranty claims, or any product-related inquiries, please contact our support team.
- Technical Assistance: Available 24/7.
- Contact Email: support@yonvim.tech
Please refer to your purchase documentation for specific warranty period details.


