
1. Introduction
The ZOYI ZT-82 is a versatile and portable digital multimeter designed for accurate electrical measurements. It features a wide-screen display and offers both manual and auto-ranging modes, making it suitable for new users, students, and professional electricians. This device is rated CAT III 600V, ensuring safety for a broad range of applications.
The ZT-82 accurately measures AC/DC voltage, AC/DC current, resistance, capacitance, and temperature. It also includes functions for continuity, diode testing, data hold, relative measurement (REL), and non-contact voltage (NCV) detection. Its robust design, backlit LCD screen, and compact size make it an essential tool for various electrical and electronic troubleshooting tasks.
2. Safety Information
To ensure safe operation and service of the multimeter, follow these safety precautions:
- Always adhere to local and national safety codes.
- Do not apply more than the rated voltage, as marked on the meter, between terminals or between any terminal and ground.
- Use caution when working with voltages above 30V AC RMS, 42V peak, or 60V DC. These voltages pose a shock hazard.
- Before making resistance, continuity, or diode measurements, disconnect power to the circuit and discharge all high-voltage capacitors.
- Replace the battery as soon as the low battery indicator appears to ensure accurate readings.
- Do not operate the meter with the case open or if the battery cover is not securely closed.
- Use the correct terminals, function, and range for your measurements.
- Inspect test leads for damaged insulation or exposed metal before use. Replace if damaged.
- Ensure the rotary switch is in the correct position before connecting test leads to the circuit.
3. Package Contents
Verify that all items are present in your ZOYI ZT-82 package:
- ZOYI ZT-82 Digital Multimeter
- Test Leads (one pair)
- Instruction Manual

Image: Contents of the ZOYI ZT-82 Multimeter package, including the multimeter, test leads, and instruction manual.
4. Product Overview
The ZOYI ZT-82 Multimeter is designed for ease of use and durability. Key features include:
- 5-in-1 Versatile Multimeter: Measures AC/DC voltage, current, resistance, capacitance, and temperature.
- High-Precision Testing: 4000-count display for precise readings.
- Auto-Ranging & Data Hold Function: Automatically selects the appropriate measurement range and allows freezing of readings.
- Backlit LCD Screen: Bright, easy-to-read display for low-light conditions.
- Durable & User-Friendly Design: Sturdy outer casing with anti-slip grip, foldable stand, and rubber protective cover.
- Compact & Portable: Lightweight and easy to carry.

Image: Front view of the ZOYI ZT-82 Multimeter, showing the display and rotary dial.

Image: ZOYI ZT-82 Multimeter with its integrated kickstand extended, showing it in an upright position.
5. Setup
5.1 Battery Installation
- Ensure the multimeter is powered off and disconnect all test leads.
- Locate the battery compartment cover on the back of the unit.
- Use a screwdriver to loosen the screw securing the battery cover.
- Remove the battery cover.
- Insert two AAA batteries, observing the correct polarity (+/-) as indicated inside the compartment.
- Replace the battery cover and secure it with the screw.
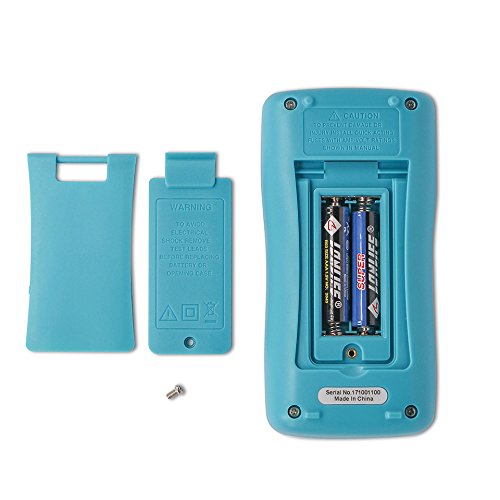
Image: Open battery compartment of the ZOYI ZT-82 Multimeter, revealing the battery slots and a screw.
5.2 Connecting Test Leads
Connect the red test lead to the 'VΩmA' input jack and the black test lead to the 'COM' input jack for most measurements (voltage, resistance, continuity, diode, capacitance, temperature, and small current). For measuring currents up to 10A, connect the red test lead to the '10A' input jack and the black test lead to the 'COM' input jack.
6. Operating Instructions
6.1 Power On/Off
Rotate the central dial from 'OFF' to any measurement function to power on the multimeter. To power off, rotate the dial back to 'OFF'. The multimeter also features an auto-power-off function to conserve battery life.
6.2 Mode Selection
The ZT-82 offers both AUTO mode and specific manual ranges. In AUTO mode, the meter automatically selects the appropriate measurement range. For specific functions like AC/DC voltage or current, rotate the dial to the desired setting. Use the 'SEL/REL' button to toggle between AC and DC modes or other sub-functions within a dial setting.
6.3 Measuring AC/DC Voltage
- Connect the red test lead to 'VΩmA' and the black lead to 'COM'.
- Rotate the dial to 'V' (for voltage measurement). The meter will typically start in AUTO mode.
- Press 'SEL/REL' to switch between AC (~) and DC (---) voltage if needed.
- Connect the test probes in parallel to the circuit or component being measured.
- Read the voltage value on the display.
6.4 Measuring AC/DC Current
Caution: Always connect the multimeter in series with the circuit when measuring current. Never connect it in parallel to a voltage source.
- For currents up to 400mA, connect the red test lead to 'VΩmA'. For currents up to 10A, connect the red test lead to '10A'. Connect the black lead to 'COM'.
- Rotate the dial to 'mA' or '10A' depending on the expected current.
- Press 'SEL/REL' to switch between AC (~) and DC (---) current if needed.
- Open the circuit where you want to measure current and connect the test probes in series.
- Read the current value on the display.
6.5 Measuring Resistance
- Connect the red test lead to 'VΩmA' and the black lead to 'COM'.
- Rotate the dial to 'Ω' (resistance measurement).
- Ensure the circuit is de-energized and all capacitors are discharged.
- Connect the test probes across the component to be measured.
- Read the resistance value on the display.
6.6 Measuring Capacitance
- Connect the red test lead to 'VΩmA' and the black lead to 'COM'.
- Rotate the dial to 'Capacitance' (often shared with another function, use 'SEL/REL' if necessary).
- Ensure the capacitor is fully discharged before connecting the test probes.
- Connect the test probes across the capacitor terminals.
- Read the capacitance value on the display.
6.7 Measuring Temperature
- Connect the red test lead to 'VΩmA' and the black lead to 'COM'.
- Rotate the dial to '°C/°F' (temperature measurement).
- Insert the temperature probe (if included and compatible) into the input jacks, observing polarity.
- Place the tip of the temperature probe on or near the object whose temperature is to be measured.
- Read the temperature value on the display.
6.8 Continuity Test
- Connect the red test lead to 'VΩmA' and the black lead to 'COM'.
- Rotate the dial to the continuity symbol (often shared with resistance or diode). Press 'SEL/REL' to select continuity mode.
- Ensure the circuit is de-energized.
- Connect the test probes across the component or wire.
- An audible beep indicates continuity (low resistance).
6.9 Diode Test
- Connect the red test lead to 'VΩmA' and the black lead to 'COM'.
- Rotate the dial to the diode symbol (often shared with resistance or continuity). Press 'SEL/REL' to select diode mode.
- Ensure the diode is disconnected from the circuit.
- Connect the red probe to the anode and the black probe to the cathode. The display will show the forward voltage drop.
- Reverse the probes. The display should show 'OL' (open loop) for a good diode.
6.10 Data Hold Function
Press the 'HOLD' button to freeze the current reading on the display. Press it again to release the hold and resume live measurements.
6.11 REL (Relative Measurement) Function
The 'REL' function allows you to store a measurement as a reference value and then display subsequent measurements as a deviation from this reference. Press the 'SEL/REL' button (when not used for mode selection) to activate this function.
6.12 NCV (Non-Contact Voltage) Function
Rotate the dial to 'NCV'. Bring the top part of the multimeter near an AC voltage source. The meter will detect the presence of AC voltage without direct contact and indicate it with an audible beep and/or visual indicator.
7. Maintenance
7.1 Cleaning
Wipe the case with a damp cloth and mild detergent. Do not use abrasives or solvents. Keep the terminals free from dirt and moisture.
7.2 Battery Replacement
Refer to Section 5.1 for instructions on battery replacement. Replace batteries when the low battery indicator appears on the display to ensure measurement accuracy.
7.3 Fuse Replacement
If the current measurement function fails, the fuse may need replacement. Ensure the replacement fuse has the correct rating (e.g., FUSED 10A MAX, as indicated on the meter) and type (e.g., fast-acting). Refer to the back panel for fuse specifications and consult a qualified technician if unsure.
8. Troubleshooting
- No Display: Check battery installation and ensure batteries are not depleted.
- Incorrect Readings: Verify correct function selection, proper test lead connection, and ensure the circuit is de-energized for resistance/continuity/diode tests. Check battery level.
- 'OL' (Overload) Display: The measured value exceeds the selected range. Switch to a higher range or ensure the meter is in AUTO mode. For current measurements, ensure the correct input jack (10A vs. mA) is used.
- No Continuity Beep: Check if continuity mode is selected. Ensure the circuit is de-energized.
- Current Measurement Failure: Check if the fuse is blown. Replace if necessary (refer to Section 7.3).
9. Specifications
| Specification | Value |
|---|---|
| Brand | ZOYI |
| Model Number | ZT-82 |
| Display Counts | 4000 Counts |
| Safety Rating | CAT III 600V |
| Power Source | Battery Powered (AAA batteries) |
| Item Dimensions (L x W x H) | 6 x 3 x 2 Centimeters |
| Included Components | ZOYI ZT-82, Test Leads, Instruction Manual |
10. Warranty and Support
The ZOYI ZT-82 Multimeter is typically covered by a manufacturer's warranty against defects in materials and workmanship. For specific warranty terms, duration, and to claim warranty service, please refer to the documentation provided with your purchase or contact the seller directly. Extended warranty options may also be available through third-party providers.
For technical support, troubleshooting assistance beyond this manual, or inquiries regarding parts and service, please contact your point of purchase or the official ZOYI customer support channels.