
1. Introduction
Thank you for choosing the Technaxx SUP Battery Air Pump TX-266. This device is designed to provide efficient and convenient inflation for various inflatables, including Stand-Up Paddle Boards, tents, and other items. It features a dual-stage inflation system, a digital display for pressure control, and a built-in power bank function. Please read this manual thoroughly before operating the device to ensure safe and optimal use.
2. Safety Instructions
- Do not operate the pump in wet conditions or immerse it in water.
- Keep the device away from children.
- Ensure the correct pressure setting for your inflatable to prevent over-inflation and damage.
- Do not block the air intake or outlet during operation.
- Use only the provided accessories and charging cables.
- Store the pump in a cool, dry place when not in use.
- If the device shows signs of damage, do not use it and contact customer support.
3. Package Contents
Verify that all items are present in the package:
- SUP Battery Air Pump TX-266
- 6 x Nozzles (various sizes)
- 1 x Pump Hose (1 meter)
- 1 x 12V Car Charging Cable
- 1 x USB-C Charging Cable
- 1 x User Manual (this document)
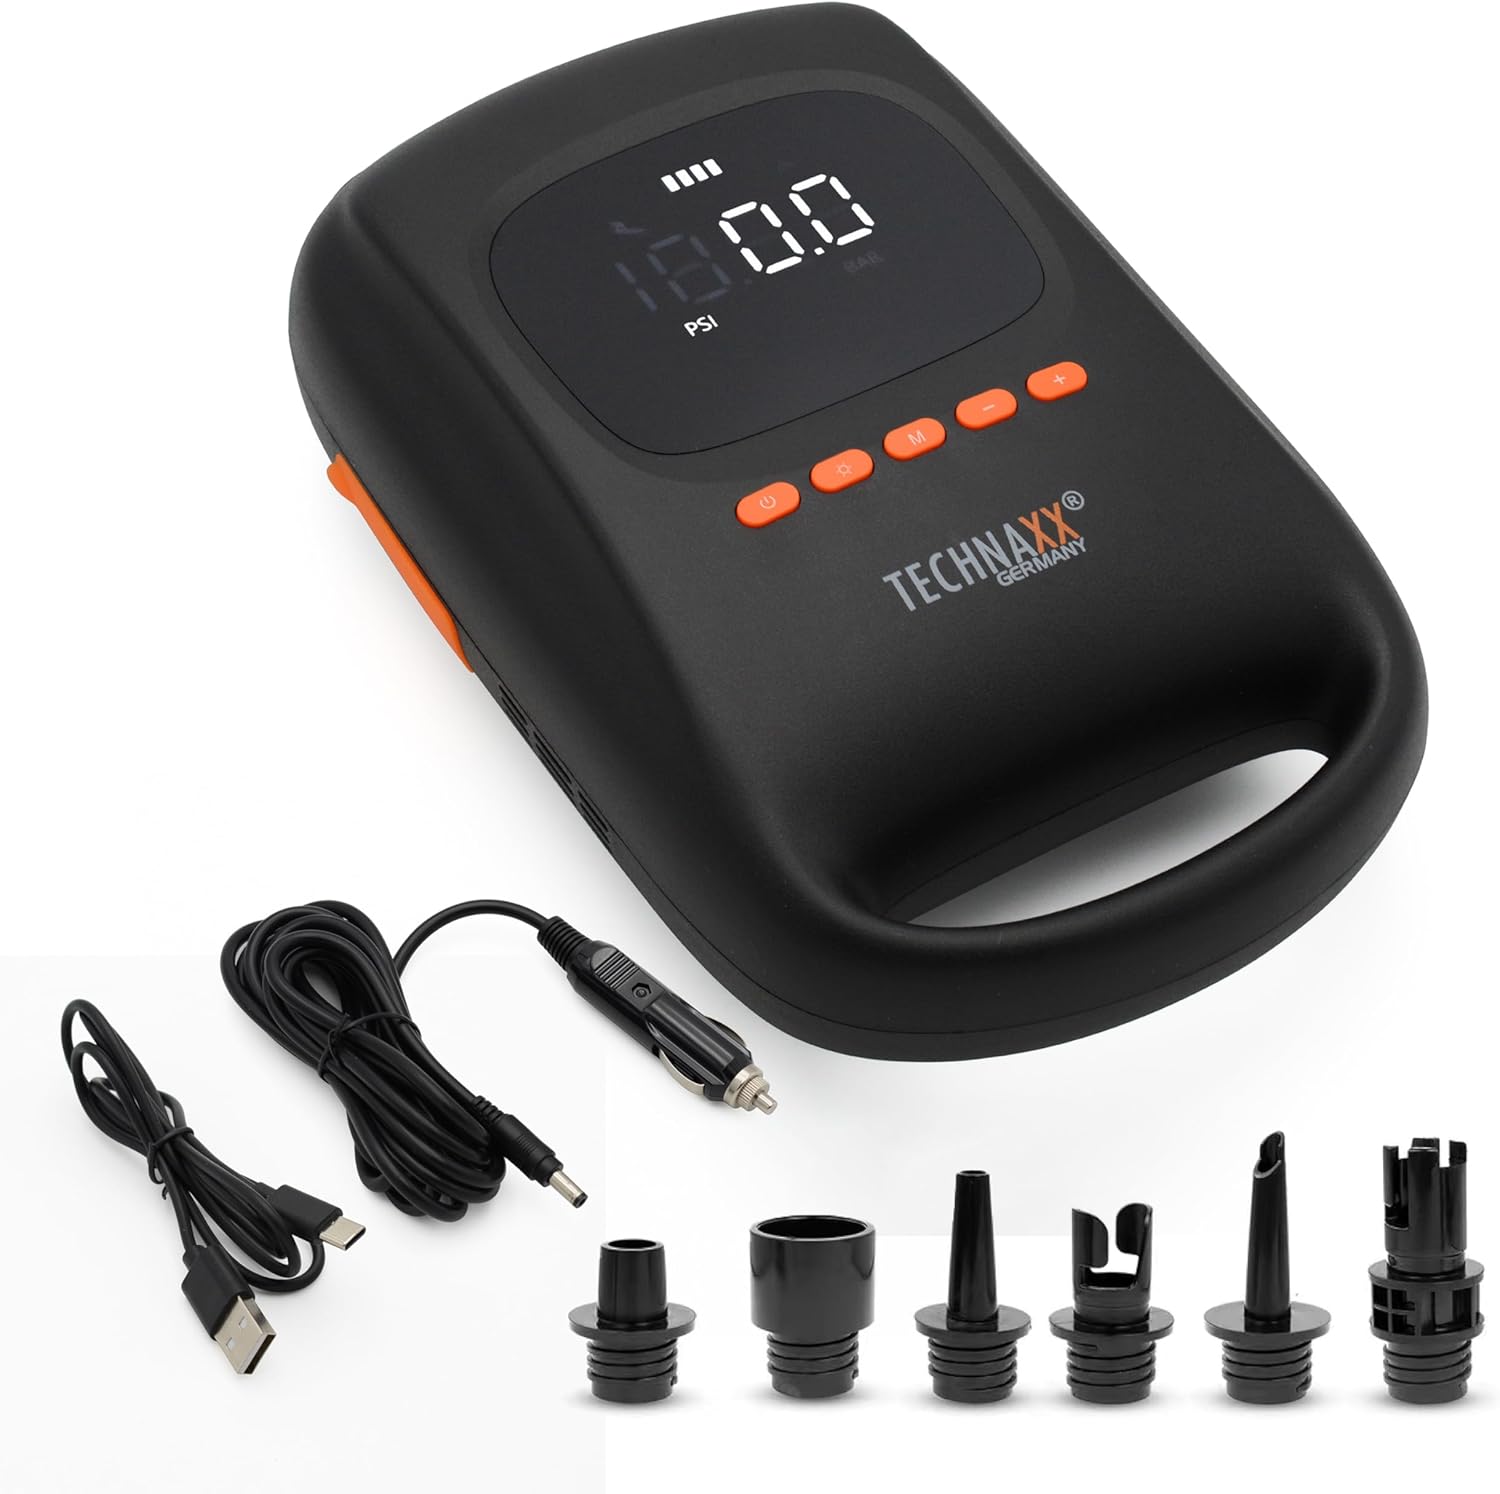
Image: The Technaxx SUP Battery Air Pump TX-266 shown with its complete set of accessories, including the pump unit, various nozzles, pump hose, 12V car charger, and USB-C charging cable.
4. Product Overview
Familiarize yourself with the main components of the Technaxx SUP Battery Air Pump TX-266.

Image: A close-up view of the Technaxx SUP Battery Air Pump TX-266, highlighting the digital display, control buttons, attached hose, and the array of included nozzles for different valve types.
- Digital Display: Shows real-time pressure and battery status.
- Control Buttons: Power, Mode, Pressure Adjustment (+/-).
- Inflation Port: Connect the hose for inflation.
- Deflation Port: Connect the hose for deflation.
- LED Lights: Two integrated LED lights for illumination.
- USB Output (Power Bank): For charging external devices.
- DC Input: For charging the pump's internal battery.
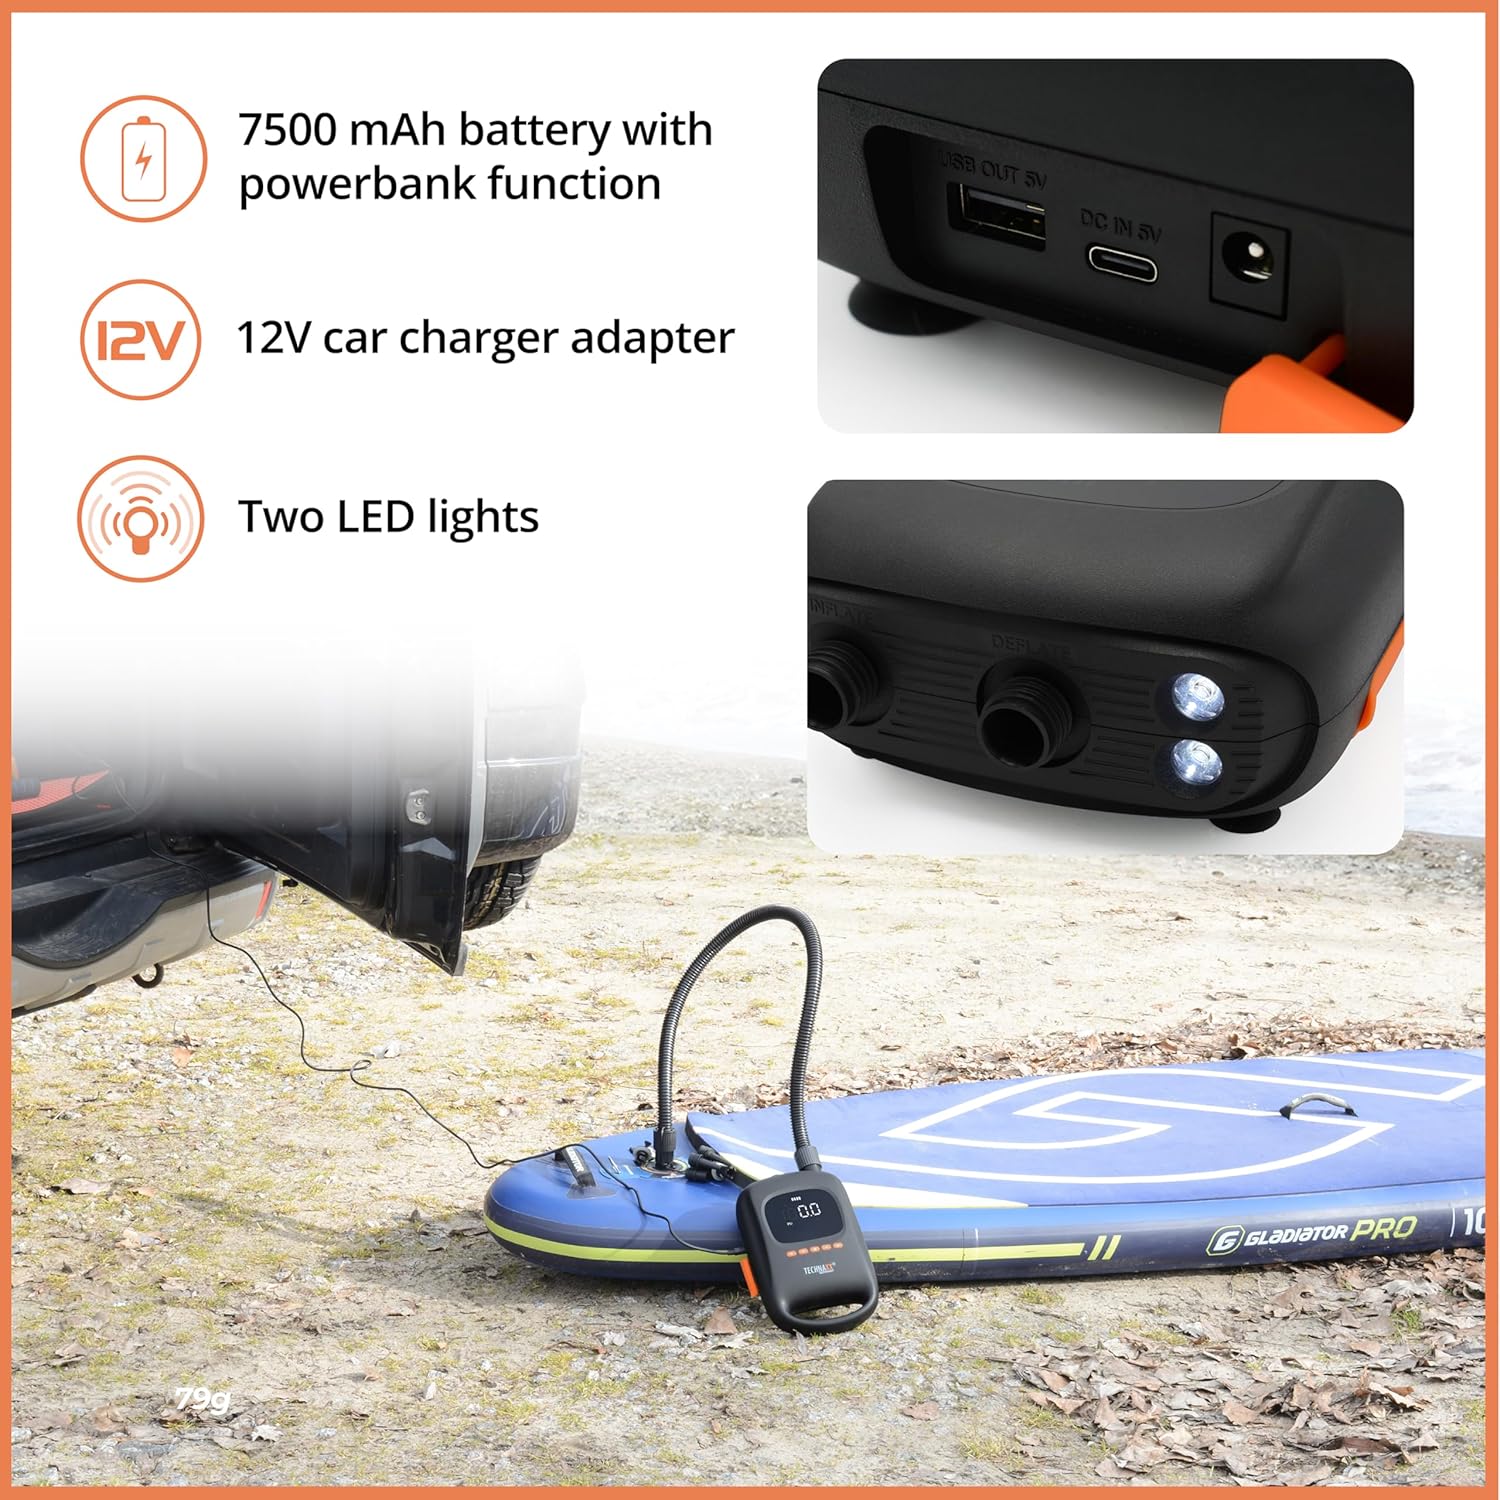
Image: This image illustrates the side of the Technaxx SUP Battery Air Pump TX-266, detailing the USB output for power bank functionality, the DC input for charging, and the two integrated LED lights.
5. Setup
- Charge the Pump: Before first use, fully charge the pump using the provided USB-C cable and a suitable USB power adapter (not included) or the 12V car charger. The battery indicator on the digital display will show charging progress.
- Select Nozzle: Choose the appropriate nozzle for your inflatable's valve type.
- Attach Hose: Securely attach the pump hose to the selected nozzle.
- Connect Hose to Pump: For inflation, connect the other end of the hose to the "INFLATE" port on the pump. For deflation, connect it to the "DEFLATE" port.
6. Operating Instructions
6.1. Inflation
- Power On: Press the power button (U) to turn on the pump. The digital display will illuminate.
- Set Pressure: Use the 'M' button to cycle through preset modes (SUP, TENT) or use the '+' and '-' buttons to manually adjust the target pressure (up to 20 PSI). The unit can be switched between PSI and BAR if available (refer to display for current unit).
- Connect to Inflatable: Insert the nozzle into the inflatable's valve.
- Start Inflation: Press the power button (U) again to start the inflation process. The pump will automatically stop once the set pressure is reached.
- Disconnect: Remove the nozzle from the valve and disconnect the hose from the pump.

Image: The Technaxx SUP Battery Air Pump TX-266 actively inflating a paddleboard on a sandy beach, with the digital display showing the current pressure. Two paddleboards are visible in the background.
6.2. Deflation
To deflate an item, connect the hose to the "DEFLATE" port on the pump and then to the inflatable's valve. Press the power button (U) to start deflation. The pump will run until manually stopped or the item is deflated.
6.3. Power Bank Function
The TX-266 features a 7500 mAh battery that can also function as a power bank. Connect your USB-powered device (e.g., smartphone, tablet) to the USB OUT 5V port on the pump using a compatible USB cable. The pump will begin charging your device.
6.4. LED Lights
The pump is equipped with two LED lights for illumination in low-light conditions. Refer to the device's controls for activating and deactivating the LED lights (usually a dedicated button or a long press of the power button).
7. Preset Modes
The pump offers preset modes for common inflatable types. Press the 'M' button to cycle through these modes:
- SUP Mode: Optimized pressure settings for Stand-Up Paddle Boards.
- TENT Mode: Suitable for inflatable tents and similar items.
- Custom Mode: Allows manual adjustment of pressure for other inflatables like mattresses, furniture, inflatable beds, sleeping pillows, swimming rings, or other inflatable toys.

Image: A collage demonstrating the versatility of the Technaxx SUP Battery Air Pump TX-266, showing it in use with a paddleboard, an inflatable pool, a floating flamingo, and a pool mattress.
8. Charging the Device
The Technaxx TX-266 can be charged using two methods:
- USB-C Cable: Connect the provided USB-C cable to the DC IN 5V port on the pump and to a standard USB power adapter (e.g., phone charger, computer USB port).
- 12V Car Charger: Use the provided 12V car charging cable to connect the pump to your vehicle's cigarette lighter socket.
The battery indicator on the digital display will show the charging status. Ensure the pump is fully charged before extended use for optimal performance.
9. Maintenance
- Cleaning: Wipe the exterior of the pump with a soft, dry cloth. Do not use abrasive cleaners or solvents.
- Storage: Store the pump and its accessories in a clean, dry environment, away from direct sunlight and extreme temperatures.
- Battery Care: For long-term storage, charge the battery to approximately 50-70% every 3-6 months to maintain battery health.
- Air Filter: Periodically check the air intake filter for dust or debris and clean it if necessary to ensure efficient operation.
10. Troubleshooting
| Problem | Possible Cause | Solution |
|---|---|---|
| Pump does not turn on. | Low battery or no charge. | Charge the pump fully using the provided cables. |
| Pump not inflating. | Hose or nozzle not properly connected; target pressure already reached; air intake blocked. | Ensure all connections are secure. Check the set pressure. Clear any obstructions from the air intake. |
| Inaccurate pressure reading. | Nozzle not fully sealed to valve. | Ensure a tight seal between the nozzle and the inflatable's valve. |
| Pump stops prematurely. | Target pressure reached; low battery; overheating. | Check the set pressure. Recharge the battery. Allow the pump to cool down if it has been running for an extended period. |
11. Specifications
| Model: | TX-266 |
| Brand: | Technaxx |
| Battery Capacity: | 7500 mAh Lithium Ion |
| Maximum Pressure: | 20 PSI (138 Kilopascal) |
| Air Flow Capacity: | 350 LPM |
| Power Source: | Battery Powered (1 Lithium Ion battery included) |
| Charging Input: | USB-C, 12V Car Charger |
| Power Bank Output: | USB OUT 5V |
| Material: | ABS housing, Metal pump parts |
| Product Dimensions (LxWxH): | 11.34" x 7.21" x 3.71" |
| Item Weight: | 3.31 Pounds |
| UPC: | 810016320654 |
12. Warranty and Support
This Technaxx product is covered by a 2-Year Manufacturer Warranty from the date of purchase. This warranty covers defects in materials and workmanship under normal use.
For technical support, warranty claims, or further assistance, please contact Technaxx customer service. Refer to the official Technaxx website or your purchase documentation for contact information.
Please retain your proof of purchase for warranty purposes.