Introduction
Thank you for choosing the Wiltec Portable Camping Washing Machine. This compact and efficient appliance is designed for convenient laundry care in various settings, including camping, small apartments, and holiday homes. Its lightweight design and simple operation make it an ideal solution for washing small loads of laundry. This manual provides detailed instructions for safe operation, setup, maintenance, and troubleshooting to ensure you get the best performance from your washing machine.

The Wiltec portable washing machine is perfect for outdoor adventures and compact living spaces.
Important Safety Instructions
Please read all safety instructions carefully before using the appliance to prevent injury or damage. Keep this manual for future reference.
- Ensure the power supply voltage matches the rating label on the appliance.
- Do not immerse the appliance, cord, or plug in water or other liquids.
- Always unplug the machine from the power outlet when not in use, before cleaning, or before performing any maintenance.
- Keep children and pets away from the appliance during operation.
- Do not operate the machine with a damaged cord or plug. Contact qualified service personnel for repair.
- Place the machine on a stable, level surface to prevent tipping during operation.
- Do not overload the washing machine beyond its stated capacity (2.5 kg for washing, 0.8 kg for spinning).
- Avoid washing waterproof materials or items that float excessively, as this may cause imbalance.
- Do not open the lid during the spin cycle. Wait until the spin basket has completely stopped.
- Use only cold or lukewarm water (max 50°C) for washing.
- Ensure the drain hose is properly positioned to prevent water spillage.
Product Overview
Components
Familiarize yourself with the main parts of your Wiltec portable washing machine:

Main view of the Wiltec portable washing machine, showing the transparent tub and spin basket.
- Main Body: The outer casing of the machine.
- Wash Tub: The main compartment for washing clothes.
- Spin Basket: A removable basket used for spinning clothes to remove excess water.
- Lid: Covers the wash tub and spin basket.
- Control Panel: Located on top, with dials for wash timer and wash selector.
- Water Inlet: Port for filling water into the wash tub.
- Drain Hose: For draining water from the machine.
- Rubber Feet: Provide stability and reduce vibration.
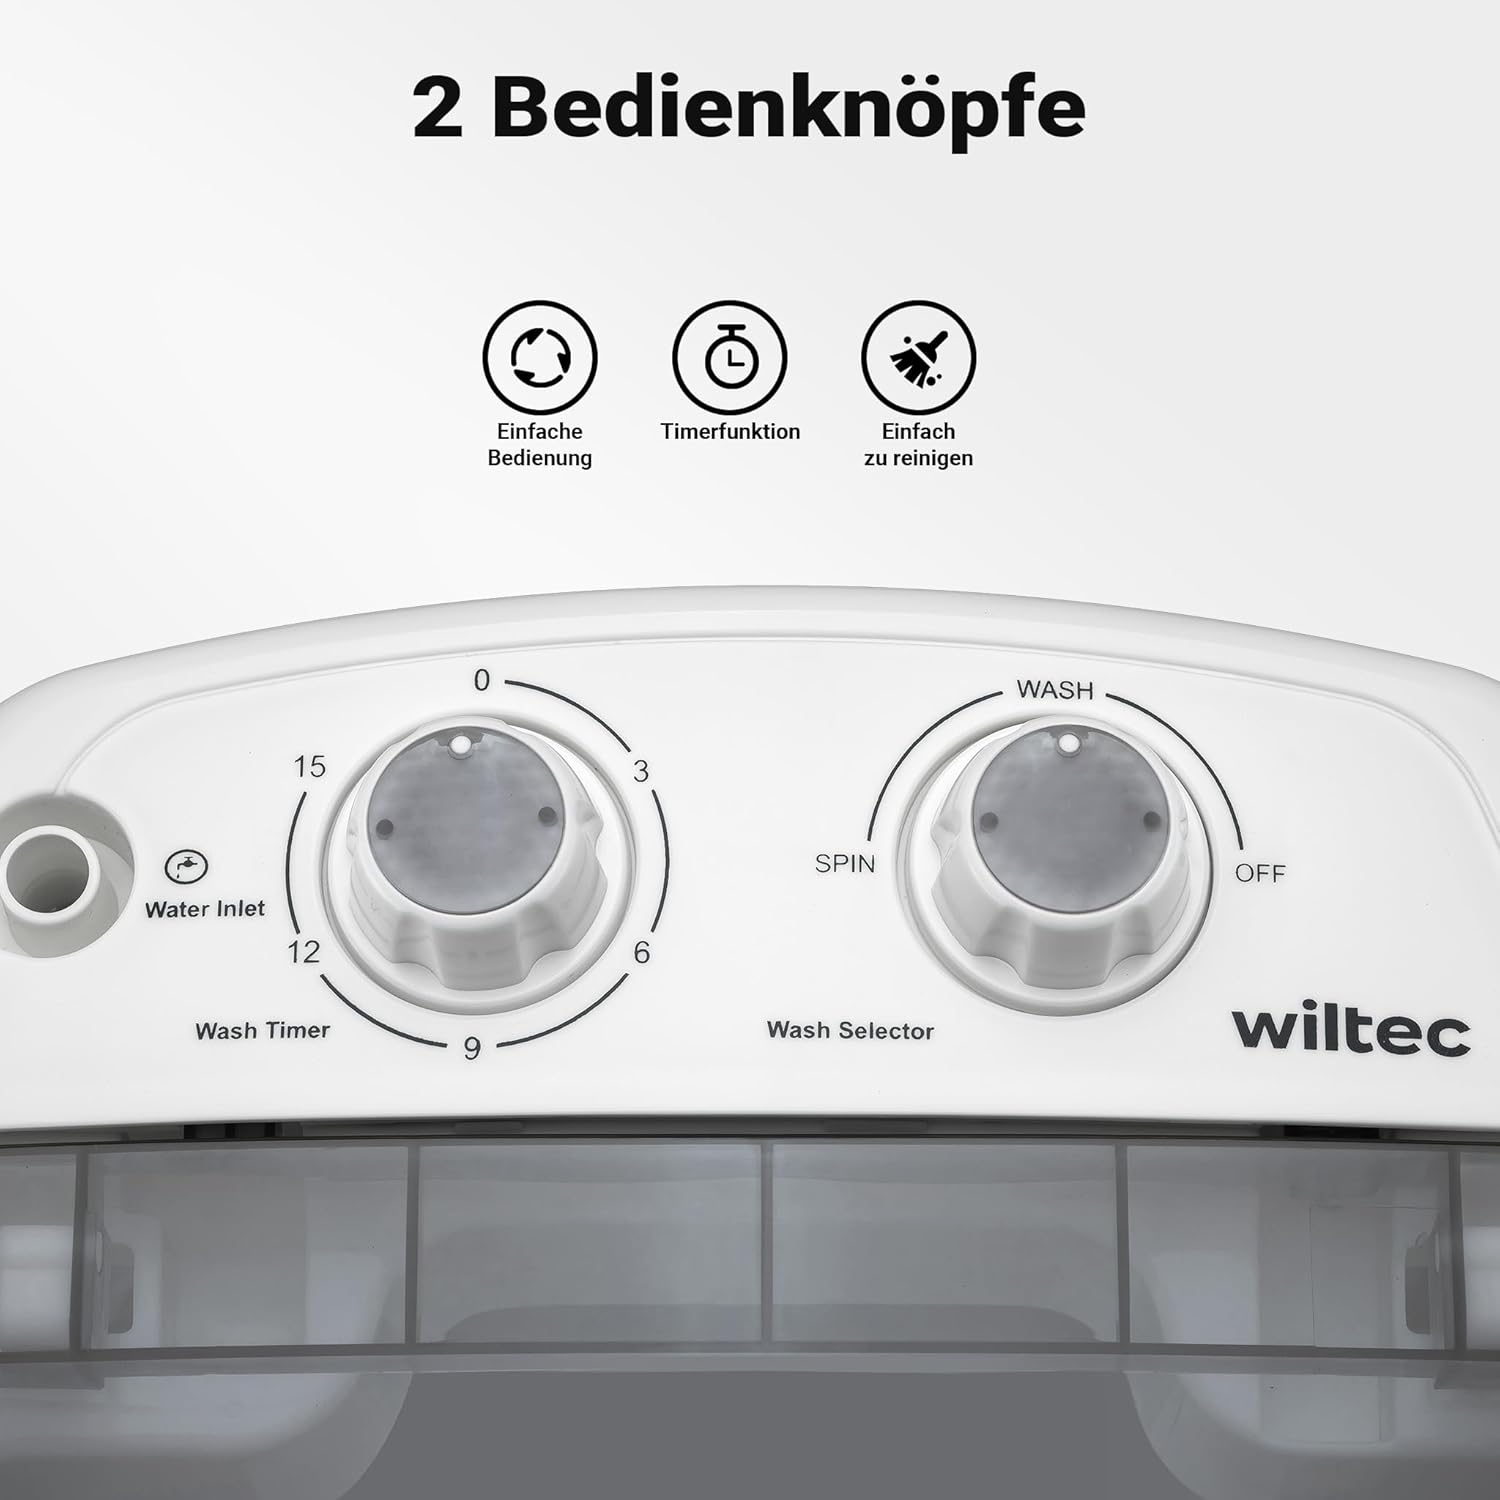
Control Panel
The control panel features two main knobs for easy operation:

The control panel features a Wash Timer and a Wash Selector knob.
- Wash Timer Knob: Sets the duration of the wash cycle (up to 15 minutes).
- Wash Selector Knob: Selects between "WASH" (for washing), "SPIN" (for spinning), and "OFF".
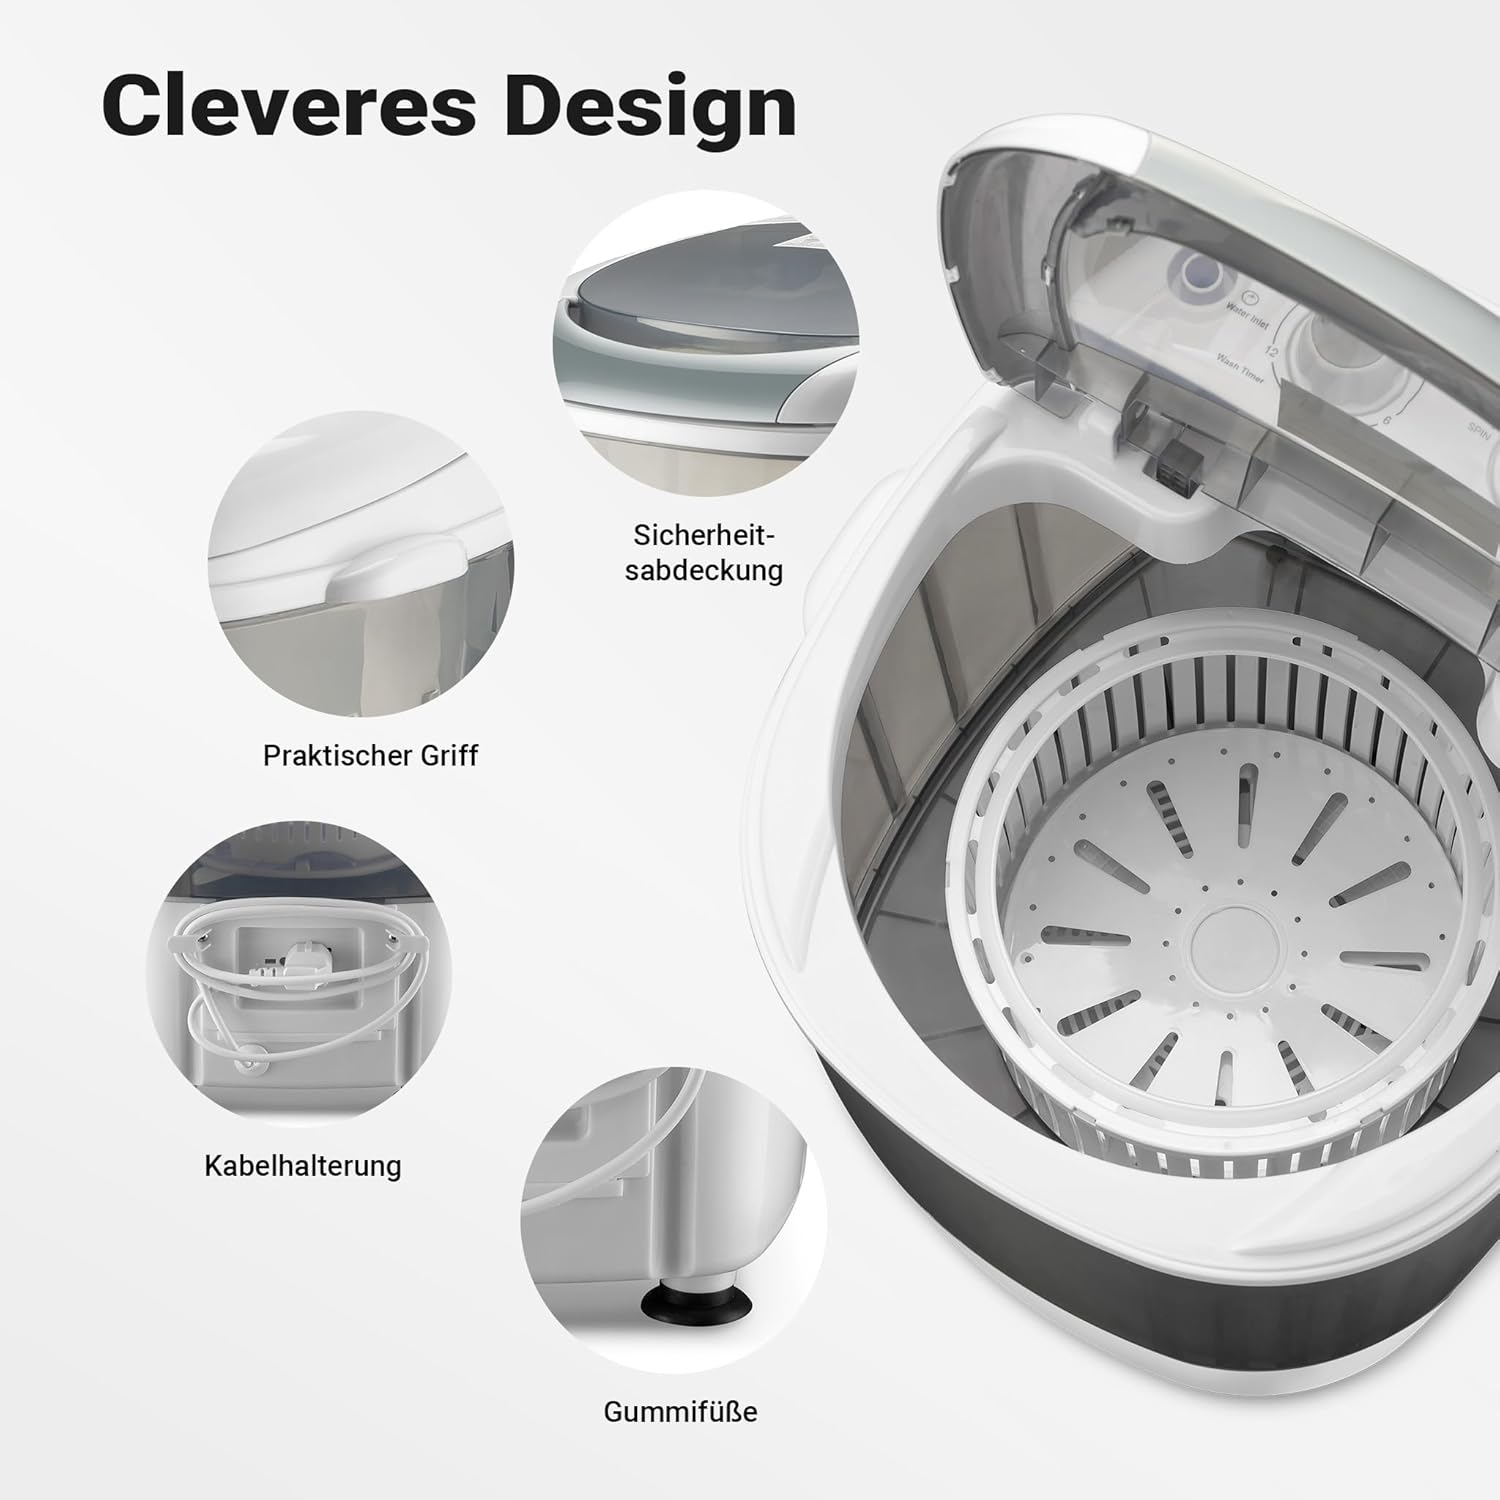
Key design features: practical handle for portability, safety cover, integrated cable holder, and stable rubber feet.
Setup and Installation
Follow these steps to set up your washing machine for first use:
- Unpacking: Carefully remove the washing machine from its packaging. Check for any damage during transit.
- Placement: Place the machine on a firm, flat, and stable surface. Ensure there is enough space around it for ventilation and operation. The machine is compact, with dimensions of 37.3 x 35.1 x 52 cm.
- Drainage: Position the drain hose into a sink, bucket, or drain opening. Ensure the hose is not kinked or blocked. The machine drains water by gravity, so the drain outlet must be lower than the machine's base.
- Power Connection: Plug the power cord into a grounded electrical outlet that matches the machine's voltage requirements (220V AC).
- Water Supply: The machine does not have an automatic water inlet. Water must be manually poured into the water inlet port on the top of the machine.

Product dimensions: 373 mm (width) x 351 mm (depth) x 520 mm (height).
Operating Instructions
This machine offers two primary functions: washing and spinning.
Washing Cycle
The machine supports a washing capacity of 2.5 kg and a spinning capacity of 0.8 kg.
- Load Laundry: Open the lid and place up to 2.5 kg of dry laundry into the wash tub. Do not overload.
- Add Water: Pour the appropriate amount of water (cold or lukewarm, max 50°C) into the water inlet until the clothes are submerged.
- Add Detergent: Add a suitable amount of laundry detergent directly into the wash tub.
- Set Wash Selector: Turn the "Wash Selector" knob to "WASH".
- Set Wash Timer: Turn the "Wash Timer" knob to your desired wash time (e.g., 5-15 minutes, depending on the dirtiness of the clothes). The machine will start washing.
- Drain Water: Once the wash cycle is complete, turn the "Wash Selector" knob to "OFF". Position the drain hose to drain the dirty water.
- Rinse (Optional): For rinsing, you can either fill the tub with clean water and run a short wash cycle (e.g., 3-5 minutes) or rinse the clothes manually. Drain the water after rinsing.
Spin Cycle
- Transfer Laundry: After washing and rinsing, carefully transfer up to 0.8 kg of laundry into the spin basket. Ensure the clothes are evenly distributed to prevent imbalance.
- Insert Spin Basket: Place the spin basket securely into the wash tub.
- Close Lid: Close the machine lid firmly.
- Set Wash Selector: Turn the "Wash Selector" knob to "SPIN".
- Set Wash Timer: Turn the "Wash Timer" knob to the desired spin time (e.g., 1-5 minutes). The machine will begin spinning.
- Wait for Stop: Once the spin cycle is complete, the machine will stop automatically. Wait until the spin basket has completely ceased movement before opening the lid and removing the clothes.
Care and Maintenance
Regular cleaning and proper maintenance will extend the life of your washing machine.
- Cleaning the Exterior: Wipe the exterior of the machine with a soft, damp cloth. Do not use abrasive cleaners or solvents.
- Cleaning the Interior: After each use, rinse the wash tub and spin basket with clean water. You can wipe them dry with a cloth.
- Drain Hose: Ensure the drain hose is clear of debris. Periodically check for blockages.
- Storage: When not in use for an extended period, ensure the machine is clean and dry. Store it in a cool, dry place, away from direct sunlight and extreme temperatures. Leave the lid slightly ajar to allow for air circulation and prevent odors.
- Power Cord: Wrap the power cord neatly using the integrated cable holder on the back of the machine.
Troubleshooting Guide
If you encounter any issues with your washing machine, refer to the table below for common problems and solutions.
| Problem | Possible Cause | Solution |
|---|---|---|
| Machine does not start. | Not plugged in; power outage; timer not set. | Check power connection; check circuit breaker; ensure timer knob is turned. |
| Water does not drain. | Drain hose kinked or blocked; drain hose positioned too high. | Straighten hose, clear blockage; ensure drain hose is lower than the machine's base. |
| Excessive vibration during spin. | Uneven load in spin basket; machine not on a level surface. | Redistribute laundry evenly; place machine on a stable, level surface. |
| Motor makes unusual noise. | Overload; foreign object in tub. | Reduce laundry load; check for and remove any foreign objects. |
| Water leaks from machine. | Overfilled; loose hose connection. | Do not exceed MAX fill line; check all hose connections are secure. |
If the problem persists after trying these solutions, please contact customer support.
Technical Specifications
| Feature | Specification |
|---|---|
| Brand | Wiltec |
| Model Number | 65153 |
| Product Dimensions (L x W x H) | 37.3 x 35.1 x 52 cm |
| Item Weight | 5.2 Kilograms |
| Washing Capacity | 2.5 Kilograms |
| Spin Capacity | 0.8 Kilograms |
| Voltage | 220V AC |
| Material | Polypropylene (PP) |
| Control Type | Knob |
| Installation Type | Freestanding |
| Door Opening | Top Load |
Warranty and Customer Support
Wiltec products are manufactured to high-quality standards and are guaranteed against manufacturing defects. For specific warranty details, please refer to the warranty card included with your purchase or visit the official Wiltec website.
If you have any questions, require technical assistance, or need to report a problem, please contact Wiltec customer support. Have your model number (65153) and purchase information ready when contacting support.
You can find contact information on the official Wiltec website or through your retailer.


