1. Introduction
This manual provides detailed instructions for the setup, operation, maintenance, and troubleshooting of your BenQ GP520 4K HDR 2600lm LED Living Room Projector. Please read this manual thoroughly before using the projector to ensure proper operation and to maximize your viewing experience.
The BenQ GP520 is designed for home entertainment, offering 4K UHD resolution, HDR10+ support, and 2600 ANSI lumens brightness. It features BenQ CinematicColor technology, Google TV built-in, and intelligent ambient adaptation for optimal picture quality in various environments. Integrated 12W x 2 speakers provide immersive audio, and the long-life LED light source ensures extended use.
2. Safety Information
Observe the following safety precautions to prevent damage to the projector and to ensure user safety:
- Do not block ventilation openings. Ensure adequate airflow around the projector.
- Do not expose the projector to rain or moisture to reduce the risk of fire or electric shock.
- Avoid looking directly into the projector lens when the lamp is on.
- Use only the power adapter supplied with the projector.
- Place the projector on a stable, level surface.
- Unplug the projector from the power outlet before cleaning or when not in use for extended periods.
3. What's in the Box
Verify that all items are present:
- BenQ GP520 Projector
- Power Adaptor
- Remote Control
- User Manual (this document)
4. Setup
4.1 Physical Placement
The BenQ GP520 offers flexible placement options, including front, side, high shelf, or ceiling projection. Ensure the projector is positioned to achieve the desired screen size, up to 180 inches diagonally.

Image: Hassle-Free Setup on a Table. The projector can be placed on a table for easy projection.
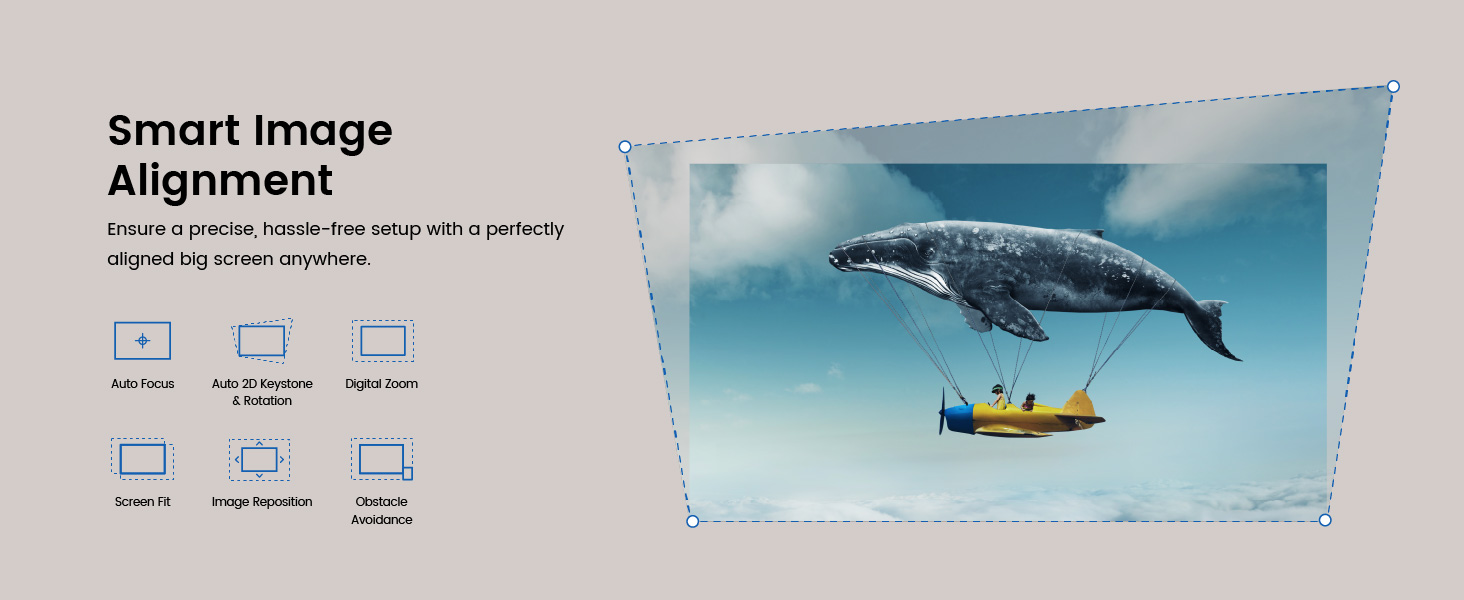
Image: Flexible Setup on a High Shelf. The projector can be inverted and placed on a high shelf for projection.

Image: Effortless Projection to Your Ceiling. The projector can be placed on the floor for upward projection.

Image: Get Your 180-Inch Entertainment. This diagram illustrates the projector's throw distance for various screen sizes, from 50 to 180 inches.
4.2 Connecting Devices
The GP520 offers multiple connectivity options:
- HDMI 2.1: Connect gaming consoles, Blu-ray players, or other HDMI-enabled devices.
- USB-A: For media playback from USB drives or connecting accessories.
- USB-C: Supports power delivery (output), DisplayPort Alt Mode, and media reading.
- Wi-Fi 6: For wireless network connectivity and streaming.
- Bluetooth 5.2: Connect external speakers or headphones wirelessly.
- eARC: Enhanced Audio Return Channel for high-quality audio passthrough.
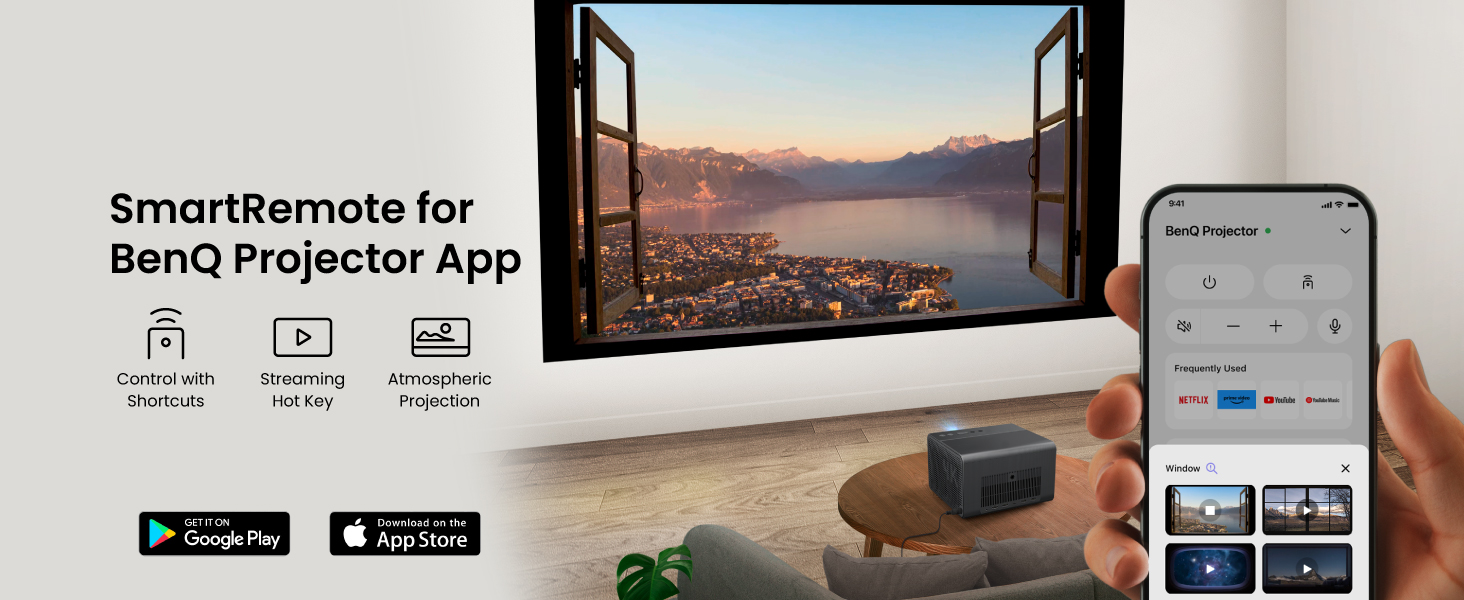
Image: Stay Seamlessly Connected. This image displays the rear panel of the projector with its various input and output ports, including HDMI, USB, and audio connections.

Image: Easy Casting and Charging. The image shows the projector alongside a smartphone, USB drives, and a gaming console, highlighting the versatility of the USB-C port for power delivery, display, and media.
4.3 Initial Power-On and Image Alignment
- Connect the power adaptor to the projector and a power outlet.
- Press the power button on the projector or remote control.
- The projector will automatically perform Auto Focus and Auto Keystone correction.
- The Obstacle Avoidance feature will detect and adjust the image to avoid objects in the projection path.
- Use the remote or on-screen menu to fine-tune Screen Fit or Image Reposition if needed.

Image: Smart Image Alignment. This graphic details the automatic image adjustment features, including auto focus, keystone correction, and obstacle avoidance, ensuring a perfectly aligned picture.
4.4 Google TV Setup
Upon first power-on, follow the on-screen instructions to set up Google TV. This includes connecting to your Wi-Fi network and logging in with your Google account to access streaming services and apps.
5. Operating the Projector
5.1 Basic Controls
Use the supplied remote control to navigate the projector's interface. Key functions include:
- Power Button: Turns the projector on or off.
- Navigation Pad: For menu navigation and selection.
- Volume Buttons: Adjust audio output.
- Input Source: Select connected HDMI or USB devices.
- Google Assistant: Activate voice commands.
5.2 Google TV Interface
The built-in Google TV provides a centralized platform for streaming content. You can access:
- Streaming Apps: Netflix, Prime Video, YouTube, Disney+, Apple TV, Max, and more.
- Google Assistant: Use voice commands to search for content, control smart home devices, and get information.
- Google Cast: Cast content from your smartphone or tablet to the projector.
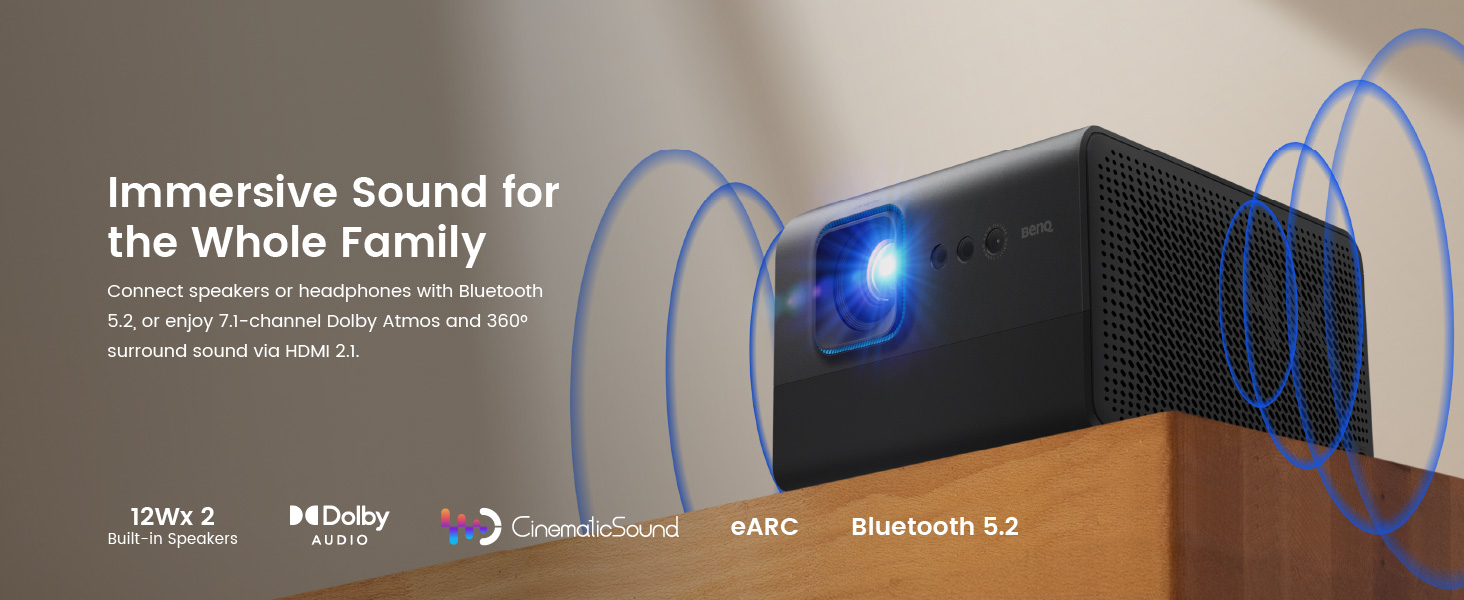
Image: Built-in Google TV and Certified Netflix. This image displays the Google TV home screen with icons for popular streaming services like Netflix, YouTube, and Prime Video.
5.3 Picture Settings and Auto Cinema Mode
The projector automatically optimizes picture quality using Auto Cinema Mode, which includes:
- Ambient Light Adaptation: Adjusts brightness and contrast based on room lighting conditions.
- Wall Color Correction: Compensates for colored walls to maintain accurate color reproduction.
- Distance-Based Adjustment: Optimizes image settings based on projection distance.
For manual adjustments, navigate to the Picture Settings menu to modify brightness, contrast, color, and other parameters.

Image: Auto Cinema Mode. This graphic explains how the projector automatically adapts to ambient light, wall color, and projection distance for optimal viewing.
5.4 Audio Settings
The GP520 features built-in 12W x 2 speakers. You can also connect external audio devices:
- Bluetooth 5.2: Pair with Bluetooth speakers or headphones for wireless audio.
- HDMI 2.1 (eARC): Connect to a soundbar or AV receiver for 7.1 channel Dolby Atmos surround sound.

Image: Immersive Sound for the Whole Family. This image depicts the projector with sound waves emanating, symbolizing its powerful built-in speakers and connectivity options for external audio.
5.5 Gaming Features
For an enhanced gaming experience, the projector supports ALLM (Auto Low Latency Mode) when connected to compatible gaming consoles via HDMI 2.1. This minimizes input lag for smoother gameplay.

Image: Expand Your Entertainment. This image shows two individuals playing a racing game on a large projected screen, highlighting the projector's suitability for gaming.
5.6 SmartRemote App
The BenQ Projector App allows for remote control of the projector from your smartphone. It offers shortcuts, streaming hotkeys, and atmospheric projection options.

Image: SmartRemote for BenQ Projector App. This image shows a smartphone displaying the BenQ Projector App, illustrating its remote control capabilities and additional features.
6. Maintenance
6.1 Cleaning the Projector
- Lens: Gently wipe the lens with a soft, lint-free cloth specifically designed for optical surfaces. Do not use abrasive cleaners.
- Casing: Use a soft, dry cloth to clean the projector's exterior. For stubborn marks, dampen the cloth slightly with water.
- Ventilation: Periodically check and clean the ventilation openings to ensure proper airflow and prevent overheating. Use a soft brush or compressed air.
6.2 LED Light Source
The BenQ GP520 utilizes a long-life LED light source with an estimated lifespan of over 20,000 hours, requiring minimal maintenance and ensuring consistent color performance over time.
7. Troubleshooting
If you encounter issues with your projector, refer to the following common problems and solutions:
7.1 No Image or Poor Image Quality
- Check Power: Ensure the projector is properly connected to a power source and turned on.
- Input Source: Verify that the correct input source (HDMI, USB) is selected.
- Focus/Keystone: Allow the projector to perform Auto Focus and Auto Keystone. Manually adjust if necessary via the on-screen menu.
- Obstacles: Ensure no objects are blocking the projection path. The Obstacle Avoidance feature should adjust automatically.
- Resolution: Confirm that the input device's resolution is compatible with the projector (up to 4K UHD).
- Ambient Light: Reduce ambient light in the room for optimal viewing, or rely on Auto Cinema Mode for adaptation.
7.2 No Sound
- Volume: Check the projector's volume level and ensure it is not muted.
- Audio Output: If using external speakers, ensure they are properly connected via Bluetooth or HDMI (eARC) and powered on.
- Source Audio: Verify that the audio source (e.g., streaming app, connected device) is producing sound.
7.3 Connectivity Issues
- Wi-Fi: Ensure the projector is within range of your Wi-Fi router and the password is correct.
- Bluetooth: For Bluetooth devices, ensure they are in pairing mode and within range.
- HDMI/USB: Check cable connections for looseness or damage. Try a different cable or port if available.
8. Specifications
| Feature | Detail |
|---|---|
| Brand | BenQ |
| Model | GP520 |
| Display Resolution | 3840 x 2160 (4K UHD) |
| Brightness | 2600 ANSI Lumens |
| Light Source | LED (20,000+ hour lifespan) |
| Connectivity Technology | HDMI 2.1, USB-A, USB-C, Wi-Fi 6, Bluetooth 5.2, eARC |
| Special Features | Auto Focus, Auto Obstacle Avoidance, Built-In Media Player, Built-In Speaker, Digital Keystone Correction, Auto Cinema Mode, Google TV |
| Audio | 12W x 2 Built-in Speakers, Dolby, 7.1 Channel Support |
| Item Weight | 5.51 pounds |
| Product Dimensions | 23 x 11.25 x 10 inches |
| Recommended Uses | Gaming, Home Cinema |
9. Warranty and Support
9.1 Manufacturer's Warranty
The BenQ GP520 projector comes with a 3-year manufacturer's warranty. Please retain your proof of purchase for warranty claims.
9.2 Customer Support
For technical assistance, warranty service, or further inquiries, please visit the official BenQ support website or contact their customer service department. Refer to the BenQ website for the most up-to-date contact information and support resources.


