
GIGABYTE X870 GAMING WF6
Contents
GIGABYTE X870 Gaming WIFI6 Motherboard User Manual
Model: X870 GAMING WF6
Introduction
This manual provides comprehensive instructions for the installation, operation, and maintenance of your GIGABYTE X870 Gaming WIFI6 Motherboard. Designed for optimal performance and reliability, this motherboard supports AMD Ryzen 7000/8000/9000 series processors and features advanced technologies for gaming, content creation, and professional use. Please read this manual thoroughly before beginning installation to ensure proper setup and functionality.

Figure 1: GIGABYTE X870 Gaming WIFI6 Motherboard and retail packaging.
Setup and Installation
Proper installation is crucial for the stability and performance of your system. Follow these steps carefully.
1. Preparing the Motherboard
- Ensure you are working in an anti-static environment. Use an anti-static wrist strap if available.
- Place the motherboard on a non-conductive surface, such as the anti-static bag it came in.
2. CPU Installation
The GIGABYTE X870 Gaming WIFI6 Motherboard features an AMD Socket AM5. Handle the CPU by its edges to avoid touching the pins or contacts.
- Open the CPU socket lever.
- Align the triangular mark on the CPU with the mark on the socket.
- Gently place the CPU into the socket. Do not force it.
- Close the CPU socket lever to secure the CPU.

Figure 2: Top-down view of the motherboard, highlighting the AMD Socket AM5 and surrounding components.
3. Memory (RAM) Installation
This motherboard supports Dual Channel DDR5 memory with 4 DIMM slots, supporting AMD EXPO memory modules up to 8000 MHz (OC).
- Open the clips on both ends of the DIMM slot.
- Align the notch on the DDR5 memory module with the key in the DIMM slot.
- Press down firmly on both ends of the memory module until the clips snap into place.
- For dual-channel configuration, refer to your motherboard's specific manual for recommended slot pairing.
4. Storage Device Installation (M.2 SSDs)
The motherboard features 3 M.2 slots, including one PCIe 5.0 x4 slot, protected by M.2 Thermal Guard for efficient heat management.
- Locate the M.2 slots on the motherboard.
- Remove the M.2 Thermal Guard heatsink if present.
- Insert the M.2 SSD into the slot at an angle.
- Gently push down the SSD and secure it with the provided screw or latch mechanism.
- Reattach the M.2 Thermal Guard heatsink.
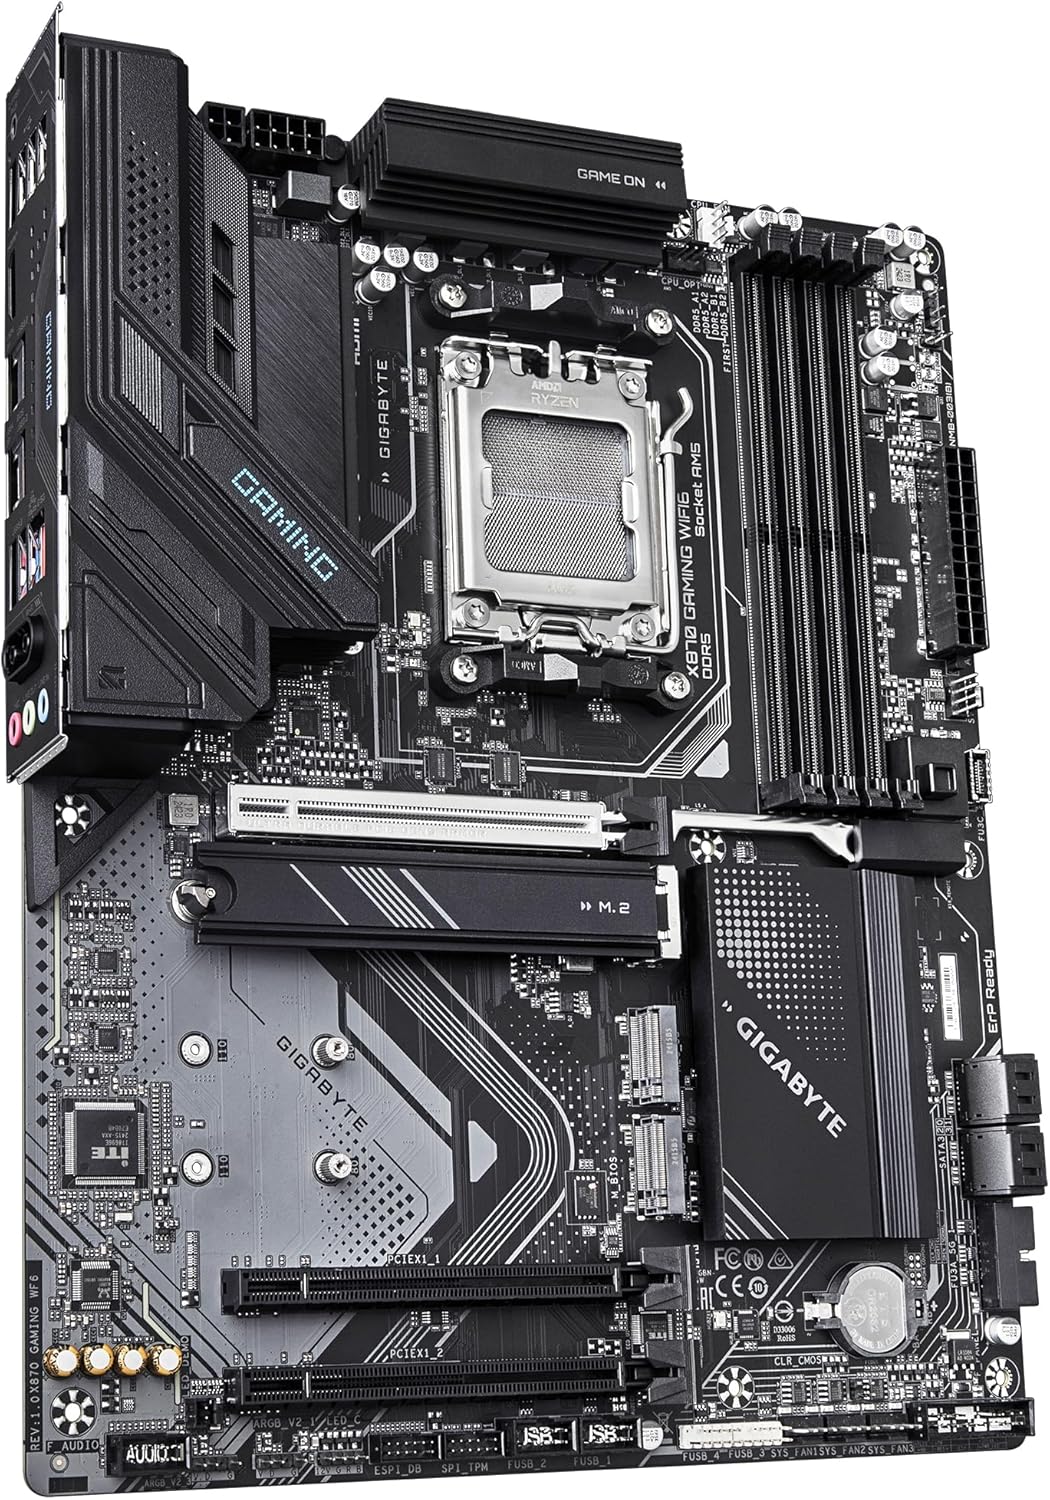
Figure 3: Angled view of the motherboard, illustrating the VRM Thermal Armor Advanced and M.2 Thermal Guard heatsinks.
5. Power Connections
Connect the 24-pin ATX main power connector and the 8-pin (or 4+4 pin) CPU power connector from your power supply to the motherboard.
6. Front Panel and Peripheral Connections
Connect the front panel headers (power button, reset button, HDD LED, power LED), USB ports, audio jacks, and other peripherals to their respective headers on the motherboard. This model includes advanced connectivity such as Dual USB4 Type C, DP Sub, and HDMI ports on the rear I/O.
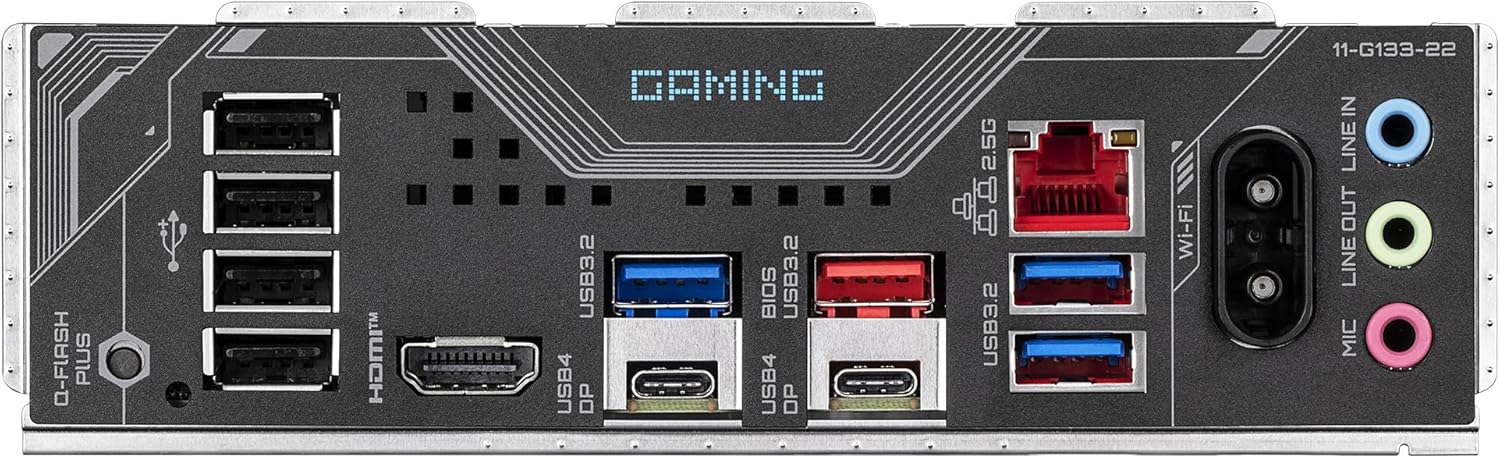
Figure 4: Rear I/O panel, detailing the various connectivity options including USB4 Type-C, HDMI, DisplayPort, 2.5GbE LAN, and Wi-Fi 6 antenna connectors.
Operating Instructions
Once all components are installed and connected, you can power on your system.
1. First Boot and BIOS Setup
- Upon first boot, press the designated key (usually DEL or F2) to enter the BIOS/UEFI setup.
- Configure boot order, enable XMP/EXPO for memory, and set up other system parameters as needed.
- Save changes and exit BIOS.
2. Operating System Installation
Install your preferred operating system (e.g., Windows) from a bootable USB drive or optical disc.
3. Driver Installation
After OS installation, install all necessary drivers for the motherboard components, including chipset, LAN (2.5GbE), Wi-Fi 6, audio, and USB controllers. Drivers are typically available on the GIGABYTE support website.
4. System Performance
The Digital Twin 8+2+2 phase VRM solution ensures stable power delivery to the CPU, supporting high-performance AMD Ryzen 9000 series processors. The efficient total heat management with VRM Thermal Armor Advanced and M.2 Thermal Guard helps maintain optimal temperatures during heavy loads.
Maintenance
Regular maintenance helps ensure the longevity and stable operation of your motherboard.
- Dust Removal: Periodically clean dust from the motherboard and components using compressed air. Ensure the system is powered off and unplugged before cleaning.
- BIOS Updates: Check the GIGABYTE website for the latest BIOS updates. BIOS updates can improve compatibility, stability, and performance. Follow the instructions provided by GIGABYTE carefully when updating the BIOS.
- Driver Updates: Keep your system drivers updated to ensure optimal performance and compatibility with new software and hardware.
- Physical Inspection: Occasionally inspect the motherboard for any loose connections, damaged components, or signs of overheating.
Troubleshooting
If you encounter issues with your motherboard, consider the following troubleshooting steps:
- No Power:
- Check all power connections (24-pin ATX, 8-pin CPU, GPU, etc.).
- Ensure the power supply is switched on and functioning correctly.
- Verify the front panel power button connection to the motherboard.
- No Display:
- Ensure the monitor is connected to the correct display output (integrated graphics or discrete GPU).
- Reseat the graphics card and RAM modules.
- Try booting with only one RAM stick.
- System Instability/Crashes:
- Check CPU and GPU temperatures.
- Verify RAM stability (run memory diagnostic tools).
- Ensure all drivers are correctly installed and up to date.
- Reset BIOS settings to default.
- Peripheral Not Detected:
- Try a different USB port or PCIe slot.
- Install or update relevant drivers for the peripheral.
- Check BIOS settings to ensure the port/slot is enabled.
For more complex issues or if the problem persists, refer to the detailed troubleshooting section in the full GIGABYTE user manual available on their official website or contact GIGABYTE technical support.
Specifications
| Feature | Specification |
|---|---|
| Brand | GIGABYTE |
| Model Name | X870 GAMING WF6 |
| CPU Socket | Socket AM5 |
| Compatible Processors | AMD Ryzen 7000/8000/9000 series |
| RAM Memory Technology | DDR5 (Dual Channel, 4 DIMMs, AMD EXPO support) |
| Memory Clock Speed | Up to 8000 MHz (OC) |
| Chipset Type | AMD X670E |
| PCIe Slots | 1x PCIe 5.0 x16 (for GPU), other slots for expansion |
| Storage | 3x M.2 slots (1x PCIe 5.0 x4), SATA ports |
| Networking | 2.5GbE LAN, Wi-Fi 6 802.11ax |
| USB Ports | Dual USB4 Type C, various USB 3.2 and USB 2.0 ports |
| Video Outputs | DP Sub, HDMI (for integrated graphics) |
| VRM Solution | Digital Twin 8+2+2 phase |
| Thermal Management | VRM Thermal Armor Advanced & M.2 Thermal Guard |
| Product Dimensions | 9.61 x 12.01 x 1.38 inches |
| Item Weight | 2.71 pounds |
| Batteries | 1 Lithium Metal battery required (included) |
| Manufacturer | Gigabyte |
| Platform | Windows |
Warranty and Support
GIGABYTE provides a limited warranty for its motherboards. The specific terms and duration of the warranty may vary by region and product. Please retain your proof of purchase for warranty claims.
- Warranty Information: For detailed warranty terms and conditions, please visit the official GIGABYTE website.
- Technical Support: If you require technical assistance, driver downloads, or BIOS updates, please visit the GIGABYTE support page or contact their customer service.
- Online Resources: Additional information and resources can be found on the GIGABYTE Store on Amazon or the official GIGABYTE website.
Ask a question about this manual
Ask about setup, troubleshooting, compatibility, parts, safety, or missing instructions. Manuals+ will review the question and use this page’s manual context to help answer it.