1. Introduction
Thank you for choosing the Generic 2-in-1 Wet Dry Vacuum Cleaner and Upholstery Carpet Cleaner. This versatile appliance is designed to handle a wide range of cleaning tasks, from vacuuming dry debris and liquids to deep cleaning carpets and upholstery. Please read this manual thoroughly before operating the appliance to ensure safe and efficient use. Keep this manual for future reference.
2. Important Safety Instructions
When using electrical appliances, basic precautions should always be followed to reduce the risk of fire, electric shock, and personal injury.
- Read all instructions before using the appliance.
- Do not leave the appliance unattended when plugged in. Unplug from outlet when not in use and before servicing.
- Do not use outdoors or on wet surfaces.
- Do not allow to be used as a toy. Close attention is necessary when used by or near children.
- Use only as described in this manual. Use only manufacturer’s recommended attachments.
- Do not use with damaged cord or plug. If appliance is not working as it should, has been dropped, damaged, left outdoors, or dropped into water, return it to a service center.
- Do not pull or carry by cord, use cord as a handle, close a door on cord, or pull cord around sharp edges or corners. Do not run appliance over cord. Keep cord away from heated surfaces.
- Do not unplug by pulling on cord. To unplug, grasp the plug, not the cord.
- Do not handle plug or appliance with wet hands.
- Do not put any object into openings. Do not use with any opening blocked; keep free of dust, lint, hair, and anything that may reduce air flow.
- Keep hair, loose clothing, fingers, and all parts of body away from openings and moving parts.
- Do not pick up anything that is burning or smoking, such as cigarettes, matches, or hot ashes.
- Use extra care when cleaning on stairs.
- Do not use to pick up flammable or combustible liquids, such as gasoline, or use in areas where they may be present.
- Do not pick up toxic material, such as chlorine bleach, ammonia, or drain cleaner.
- Do not use without filters in place.
- Always turn off this appliance before connecting or disconnecting hose.
- Store the appliance indoors.
3. Package Contents
Carefully unpack all components and check against the list below. If any items are missing or damaged, contact your retailer.
- Main Unit (Host) x1
- Remote Control Water Spray Hose Assembly x1
- Filter Element x1 (for dry vacuuming)
- Water Receiving Aluminum Tube x1
- Sofa Suction Head with Water Spray x1
- Absorbent Sponge x1 (for wet vacuuming)
- Dust Collection Bag x1 (for dry vacuuming)
- Small Flat Suction Nozzle x1
- Carpet Brush with Water Spray x1

Figure 3.1: Included accessories. From top left: Remote control water spray hose assembly, spray sofa suction head, small flat suction, filter element, absorbent sponge, spray carpet brush, water receiving aluminum pipe, dust collection bag.
4. Product Overview
The vacuum cleaner features a robust design with separated tanks for clean and dirty water, ensuring efficient operation.
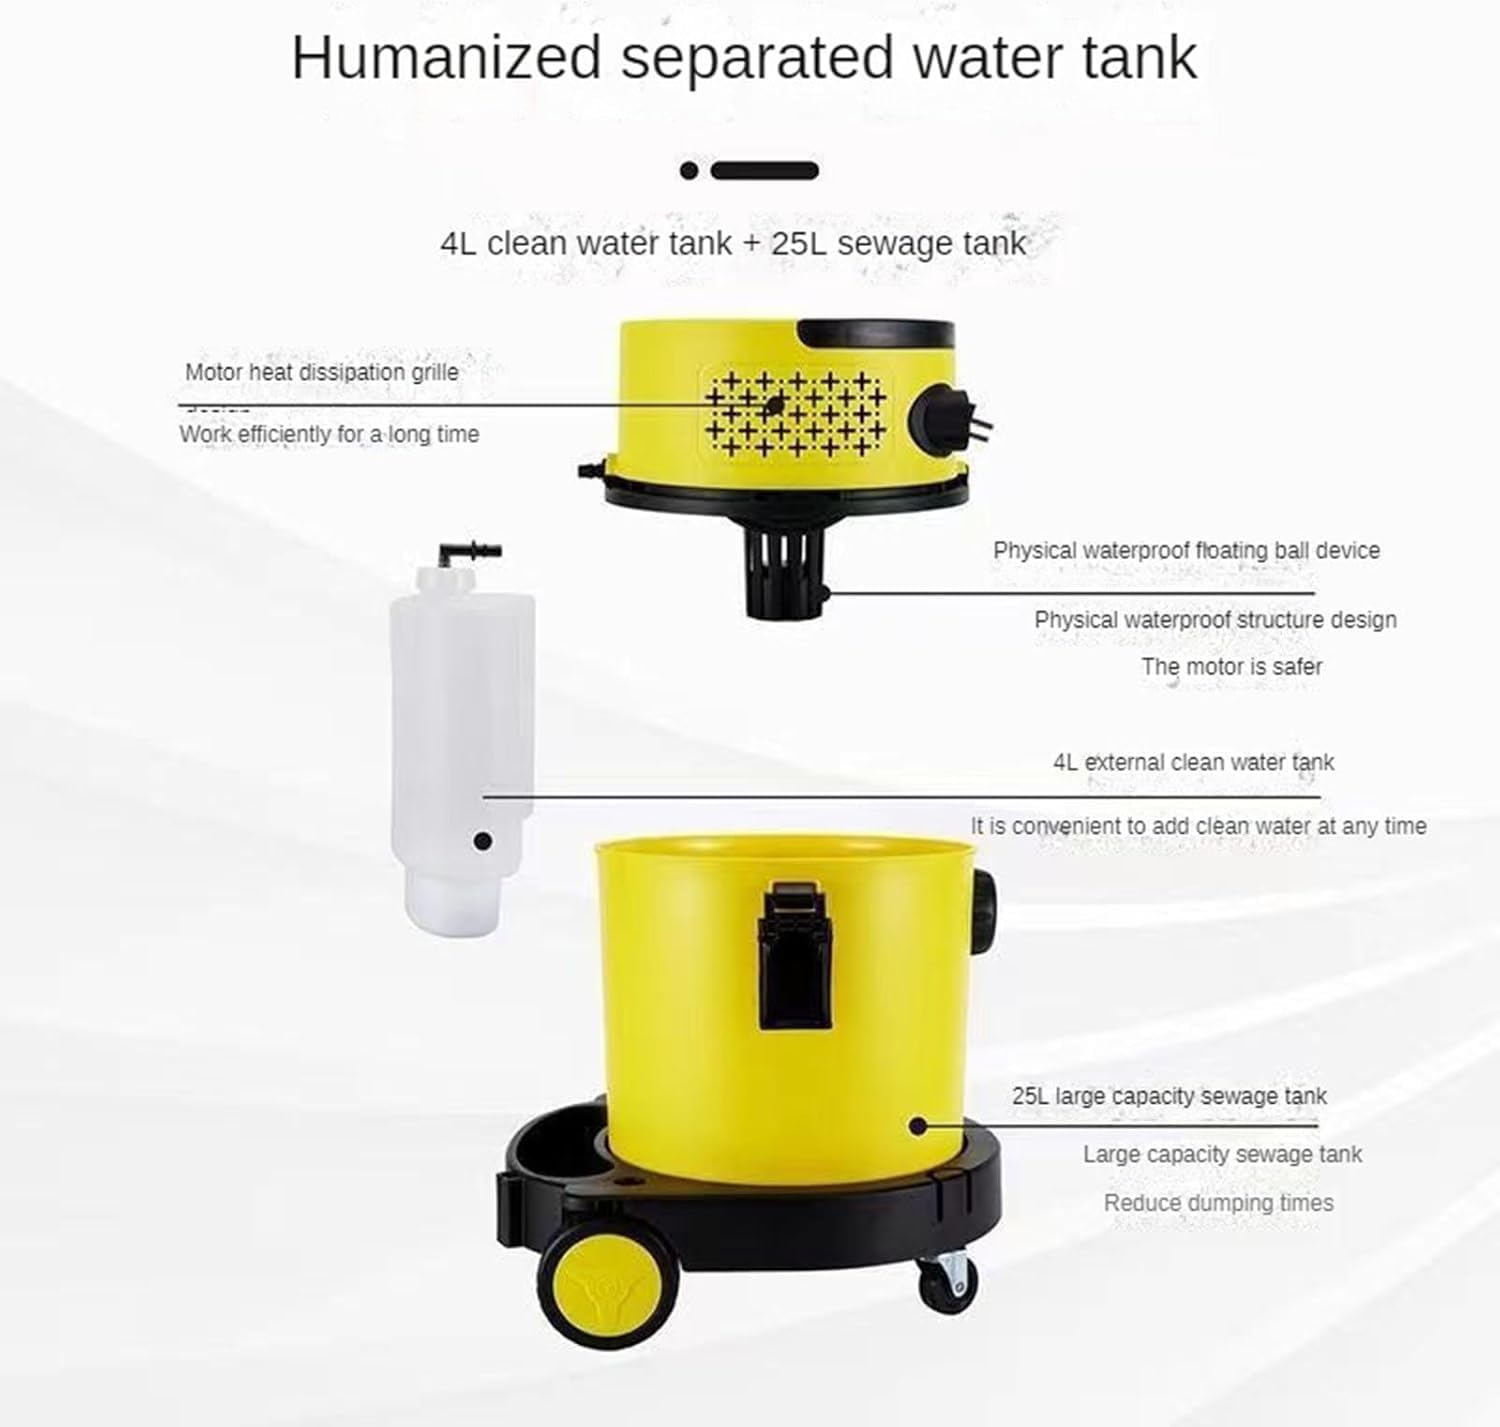
Figure 4.1: Humanized separated water tank system. Features a 4L clean water tank for easy refilling and a 25L large capacity sewage tank to reduce emptying frequency. Includes a motor heat dissipation grille and a physical waterproof floating ball device for motor protection.
Key components include:
- Water Spray/Water Absorption Jack: Easy to install connections for the hose.
- Control Panel: Intuitive icons for operation.
- High-Power Air Vent: Provides both suction and blowing functions.
- Directional Support Wheels: For easy maneuverability.
- Fixed Buckle: Secures the top unit to the main tank.
- Water Tank Pump Interface: Connects the machine with the water tank.
- Multi-Function Head: For spray pumping, suction, and moisture absorption.

Figure 4.2: Quality details of the vacuum cleaner components.
5. Setup
- Unpack: Remove all components from the packaging. Ensure all parts listed in Section 3 are present and undamaged.
- Attach Wheels: If not pre-attached, securely insert the directional support wheels into the base of the main unit.
- Install Filter:
- For dry vacuuming, install the Filter Element (paper filter) into the motor head.
- For wet vacuuming or carpet/upholstery cleaning, install the Absorbent Sponge (foam filter) into the motor head.
- Connect Hose Assembly: Attach the remote control water spray hose assembly to the water spray/water absorption jack on the main unit. Ensure a secure connection.
- Connect Water Receiving Tube: Connect the water receiving aluminum tube to the hose assembly.
- Attach Cleaning Head: Select the appropriate cleaning head (e.g., sofa suction head, carpet brush, small flat suction nozzle) and attach it to the water receiving aluminum tube.
- Fill Clean Water Tank (for wet cleaning): For wet vacuuming or carpet/upholstery cleaning, fill the 4L external clean water tank with clean water (and appropriate cleaning solution if desired, following solution manufacturer's instructions). Insert the clean water tank into its designated slot on the main unit.
- Secure Top Unit: Place the motor head (top unit) onto the 25L sewage tank and secure it using the fixed buckles. Ensure the water outlet on the top unit is aligned with the suction tube inside the main tank.
6. Operating Instructions
This appliance offers both dry and wet cleaning functionalities. Always ensure the correct filter is installed for the task.
6.1. Dry Vacuuming
- Ensure the Filter Element (paper filter) is installed.
- Attach the desired dry vacuuming nozzle (e.g., small flat suction nozzle).
- Plug the power cord into a suitable 220V electrical outlet.
- Turn on the vacuum cleaner using the power switch on the control panel.
- Vacuum dry debris as needed.
- After use, turn off the power, unplug, and empty the dust collection bag and clean the filter.
6.2. Wet Vacuuming
- Ensure the Absorbent Sponge (foam filter) is installed.
- Attach a suitable wet vacuuming nozzle.
- Plug the power cord into a suitable 220V electrical outlet.
- Turn on the vacuum cleaner using the power switch.
- Vacuum liquids. The machine will automatically stop when the 25L sewage tank is full.
- After use, turn off the power, unplug, and empty the sewage tank.
6.3. Upholstery and Carpet Cleaning
This function utilizes water spray and powerful suction for deep cleaning.
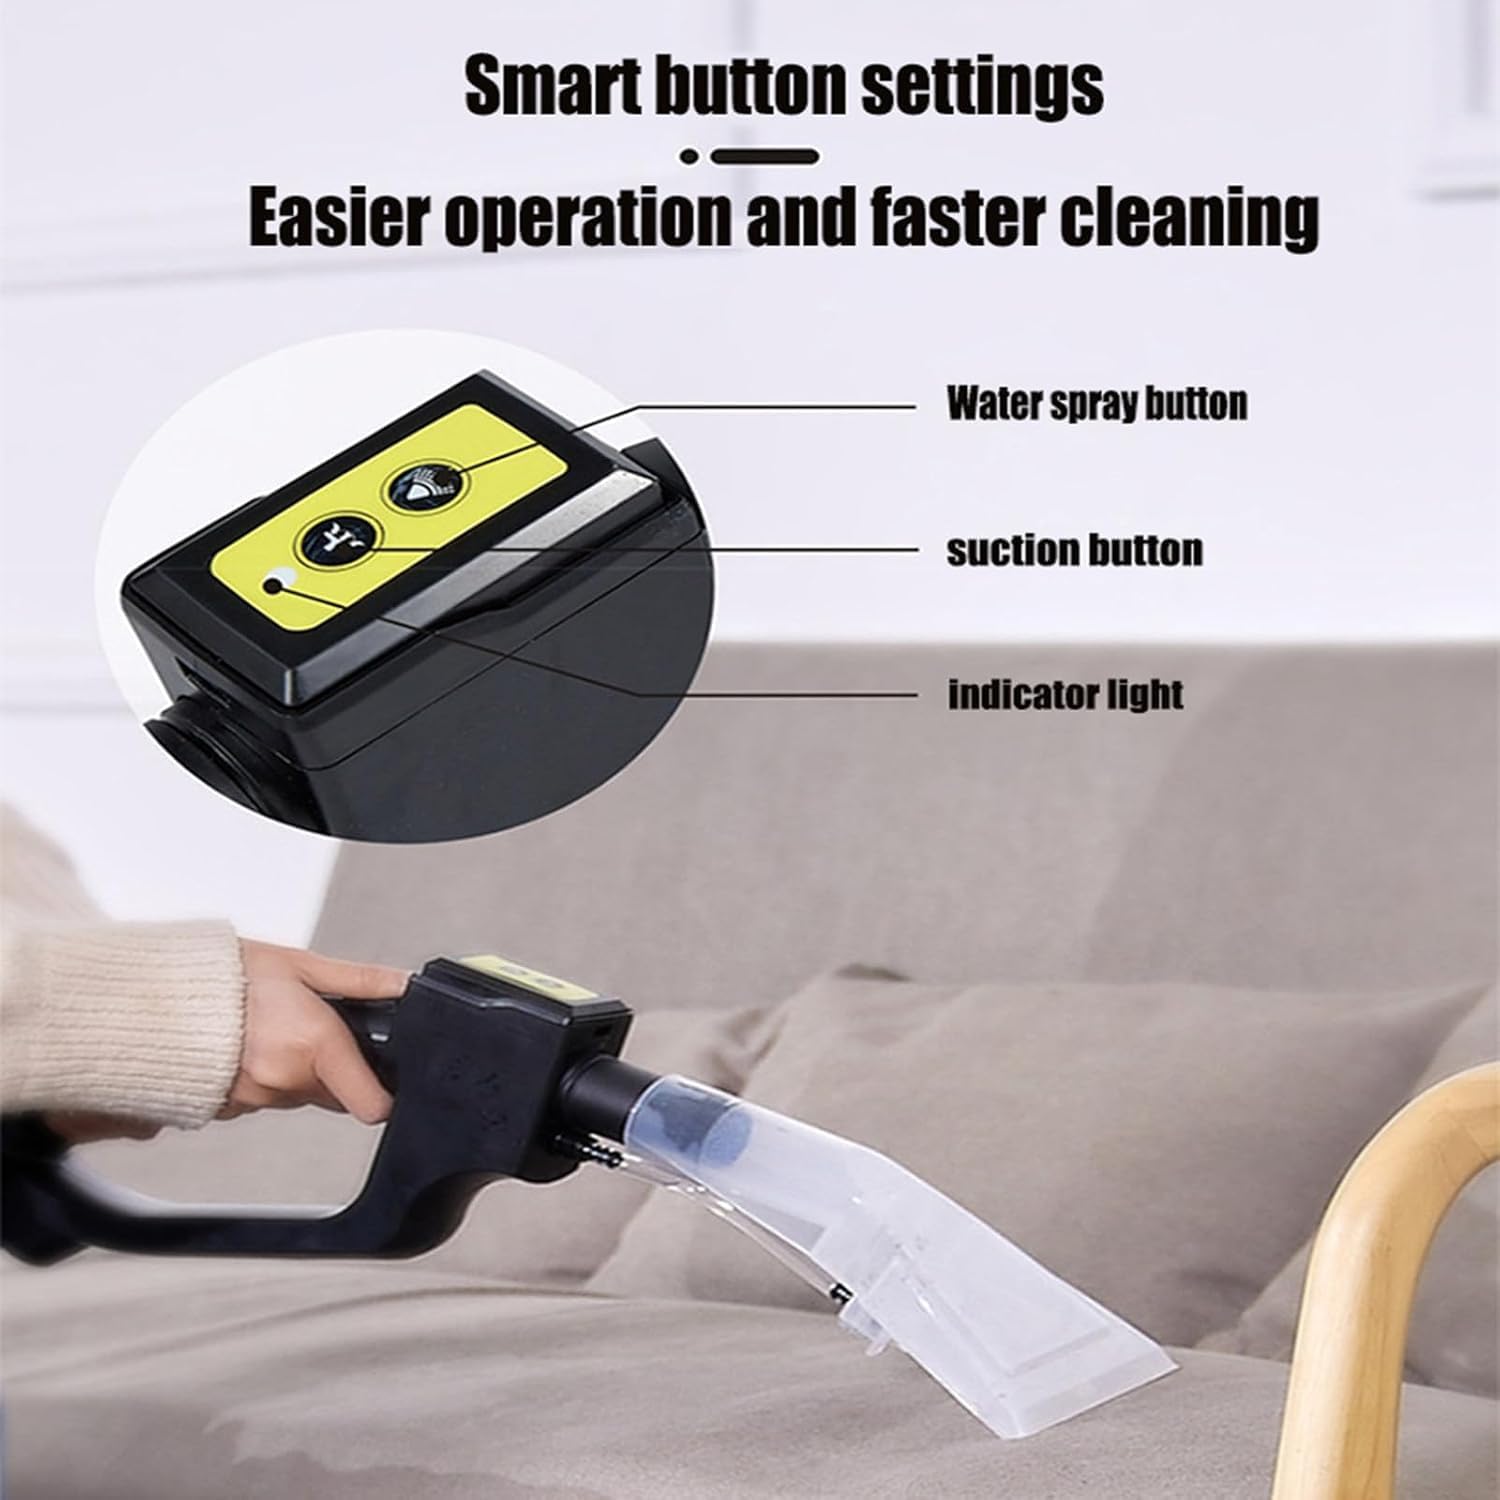
Figure 6.1: Smart button settings on the remote control handle, showing water spray button, suction button, and indicator light.

Figure 6.2: Demonstration of brush, spray, and suck functions for effective cleaning.
- Ensure the Absorbent Sponge (foam filter) is installed.
- Fill the 4L clean water tank with clean water and a suitable carpet/upholstery cleaning solution (follow solution manufacturer's instructions).
- Attach the Sofa Suction Head with Water Spray or the Carpet Brush with Water Spray to the hose assembly.
- Plug the power cord into a suitable 220V electrical outlet.
- Turn on the vacuum cleaner using the power switch.
- Press the Water Spray button on the remote control handle to apply cleaning solution to the surface.
- Allow the solution to penetrate for a short period (refer to cleaning solution instructions).
- Press the Suction button on the remote control handle while moving the cleaning head over the treated area to extract the dirty solution.
- Repeat spraying and sucking as necessary until the area is clean.
- The machine will automatically stop when the 25L sewage tank is full.
- After use, turn off the power, unplug, and empty the sewage tank. Rinse the clean water tank and cleaning heads thoroughly.
7. Maintenance
Regular maintenance ensures optimal performance and extends the life of your appliance.
7.1. Emptying and Cleaning Tanks
- Always unplug the appliance before emptying tanks.
- Unlatch the fixed buckles and remove the motor head from the 25L sewage tank.
- Carefully pour out the dirty water from the sewage tank. Rinse the tank with clean water.
- Empty any remaining clean water from the 4L clean water tank and rinse it.
- Allow both tanks to air dry before reassembling.
7.2. Filter Maintenance
The appliance uses different filters for wet and dry operation. Ensure they are cleaned or replaced as needed.

Figure 7.1: Washable PTFE filter, waterproof and resistant to weak acid and alkali, for efficient fine dust filtration.
- Filter Element (Dry Use): For dry vacuuming, the paper filter element should be regularly cleaned by tapping out dust or gently brushing. Replace if damaged or if suction power decreases significantly.
- Absorbent Sponge (Wet Use): For wet vacuuming and carpet cleaning, the foam filter should be rinsed thoroughly with clean water after each use. Squeeze out excess water and allow it to air dry completely before storage or next use.
7.3. Cleaning Accessories
Rinse all cleaning heads and the hose assembly with clean water after each wet use to prevent clogging and odor buildup. Allow them to air dry.
7.4. Storage
Store the appliance and its accessories in a dry, cool place, away from direct sunlight and extreme temperatures.
8. Troubleshooting
If you encounter issues with your vacuum cleaner, refer to the following table for common problems and solutions.
| Problem | Possible Cause | Solution |
|---|---|---|
| Appliance does not turn on | No power supply Power switch off | Check power cord connection and wall outlet Ensure power switch is in the 'ON' position |
| Low suction power | Filter clogged Hose or nozzle blocked Sewage tank full Incorrect filter for task | Clean or replace filter Check and clear any blockages Empty sewage tank Ensure correct filter (dry/wet) is installed |
| Water not spraying | Clean water tank empty Water pump interface loose Spray nozzle clogged | Refill clean water tank Check and secure water pump interface Clean spray nozzle |
| Machine stops during wet use | Sewage tank is full | Empty the 25L sewage tank |
If the problem persists after attempting these solutions, please contact customer support.
9. Specifications
| Feature | Specification |
|---|---|
| Product Type | 2-in-1 Wet Dry Vacuum Cleaner & Upholstery/Carpet Cleaner |
| Motor Power | 1600W |
| Suction Power | 18 kPa |
| Sewage Tank Capacity | 25 Liters |
| Clean Water Tank Capacity | 4 Liters |
| Cord Length | 4.5 meters |
| Working Voltage | 220V |
| Water Pump Power | 18W |
| Waterproof Level | IPX4 |
| Noise Level | 68 dB |
| Dimensions (Approx.) | Height: 50 cm Width: 36 cm Depth: 41 cm |
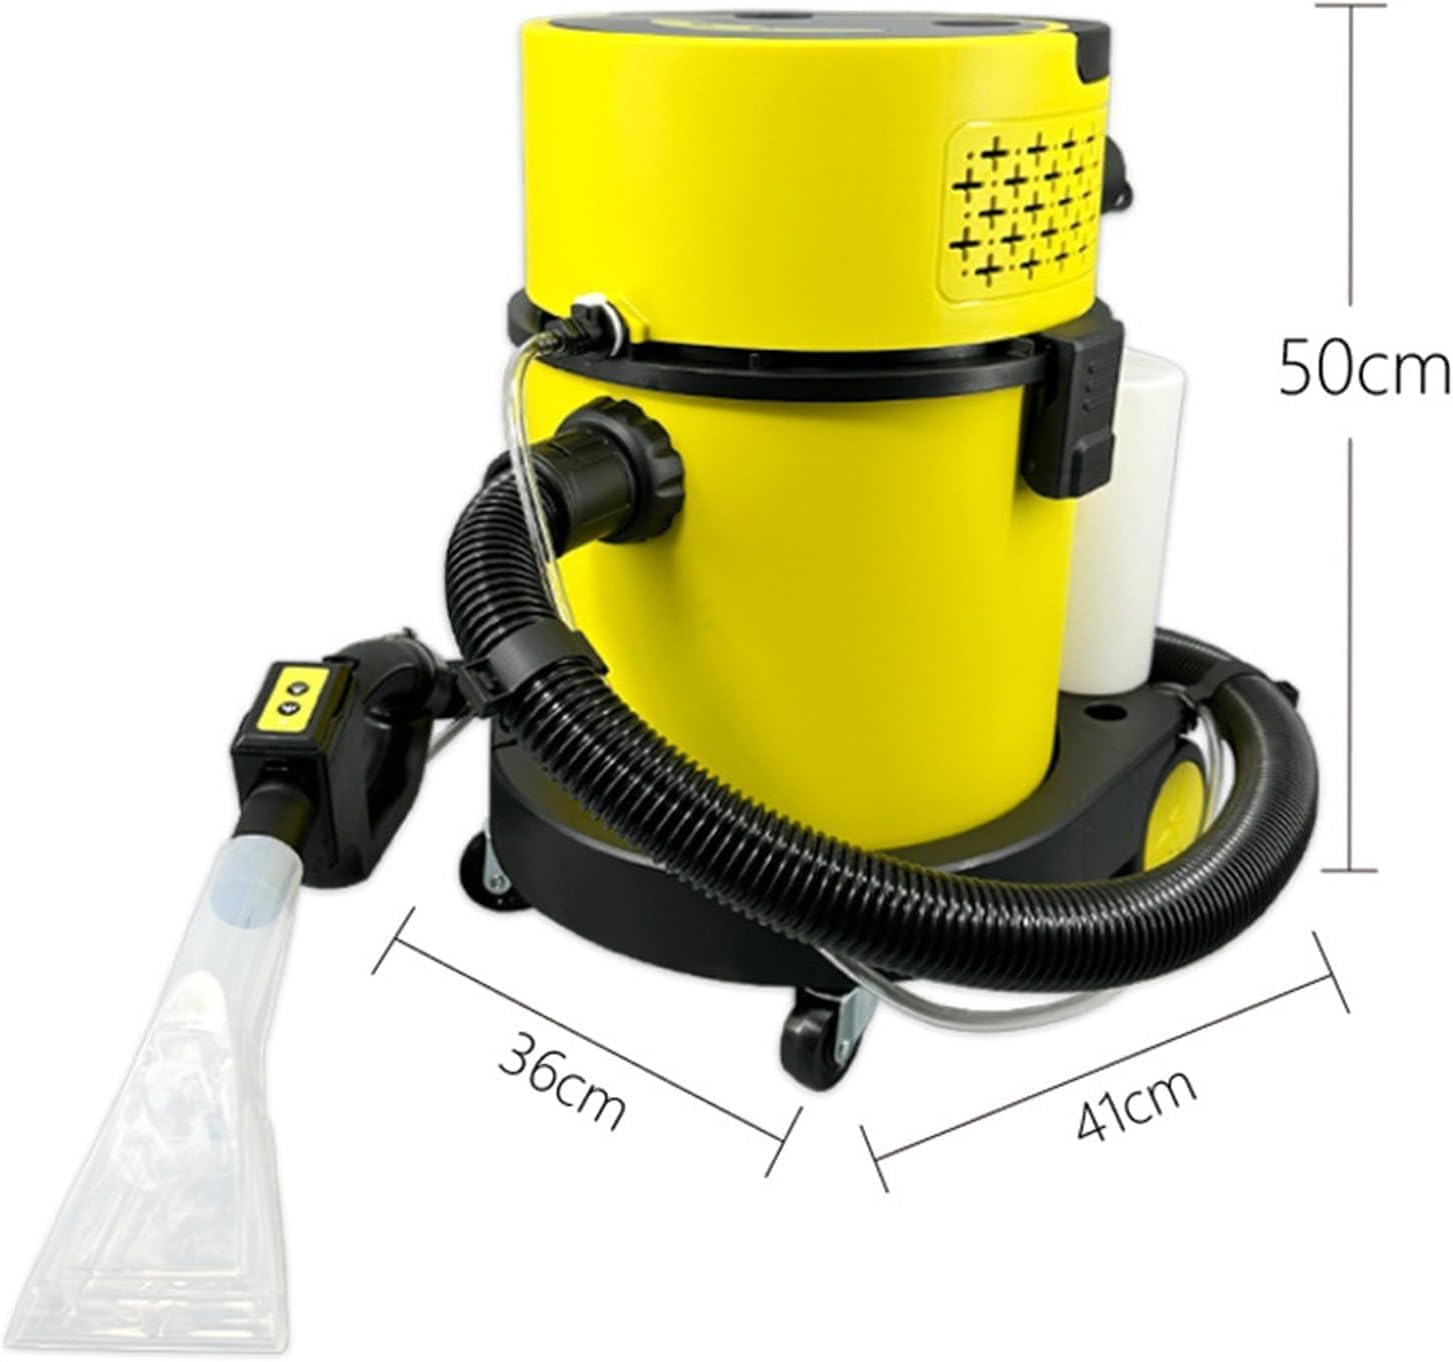
Figure 9.1: Approximate dimensions of the vacuum cleaner.
10. Warranty and Support
This product is covered by a standard manufacturer's warranty. For specific warranty details, please refer to the documentation provided at the time of purchase or contact your retailer. If you have any questions, require technical assistance, or need to report a defect, please contact the seller or manufacturer's customer support. Please have your purchase information readily available when contacting support.


