Introduction
This manual provides detailed instructions for the setup, operation, and maintenance of your ZWP RF502A Replacement Remote Control. This remote is specifically designed to be compatible with Tempur-Pedic Ergo and Ergo Extend Adjustable Bed Bases, model JLDK.33.01.37 RF502A. Please read this manual thoroughly before use to ensure proper functionality and to maximize the lifespan of your device.

Image: Front view of the ZWP RF502A Replacement Remote Control, showcasing its ergonomic design and button layout.
Compatibility Check
Before proceeding with setup, ensure that your original remote control's button layout matches the RF502A. This replacement remote is designed for specific Tempur-Pedic models and may not function correctly with other bed bases if the button configuration differs.

Image: A visual guide illustrating the correct remote control (RF502A) with a green checkmark, alongside several incompatible remote controls marked with red 'X's, highlighting the importance of matching button layouts for compatibility.
Setup and Pairing
Battery Installation
The remote control requires fresh batteries for operation. To install, slide open the battery cover on the back of the remote and insert the required batteries, observing the correct polarity. Close the battery cover securely.
Pairing Instructions
Follow these steps to pair your new RF502A remote control with your adjustable bed base:
- Step 1: Locate the Battery Backup Box on your adjustable bed base. This box typically houses 9-volt batteries and is often found near the power cord or under the bed. Press the button on the Battery Backup Box TWICE. A light on the Battery Backup Box will illuminate, indicating it's ready for pairing.
- Step 2: On the back of the RF502A remote control, remove the battery cover. Locate the PAIR button. Press and hold down the PAIR button. The PAIR button will illuminate blue and begin flashing.
- Step 3: Continue holding the PAIR button. When the PAIR button stops flashing, the illuminated light on the Battery Backup Box will go out. This indicates successful pairing. Release the PAIR button.
- Step 4: Test all remote functions to confirm successful pairing. If the remote buttons do not control the adjustable base movements, please repeat the pairing process.
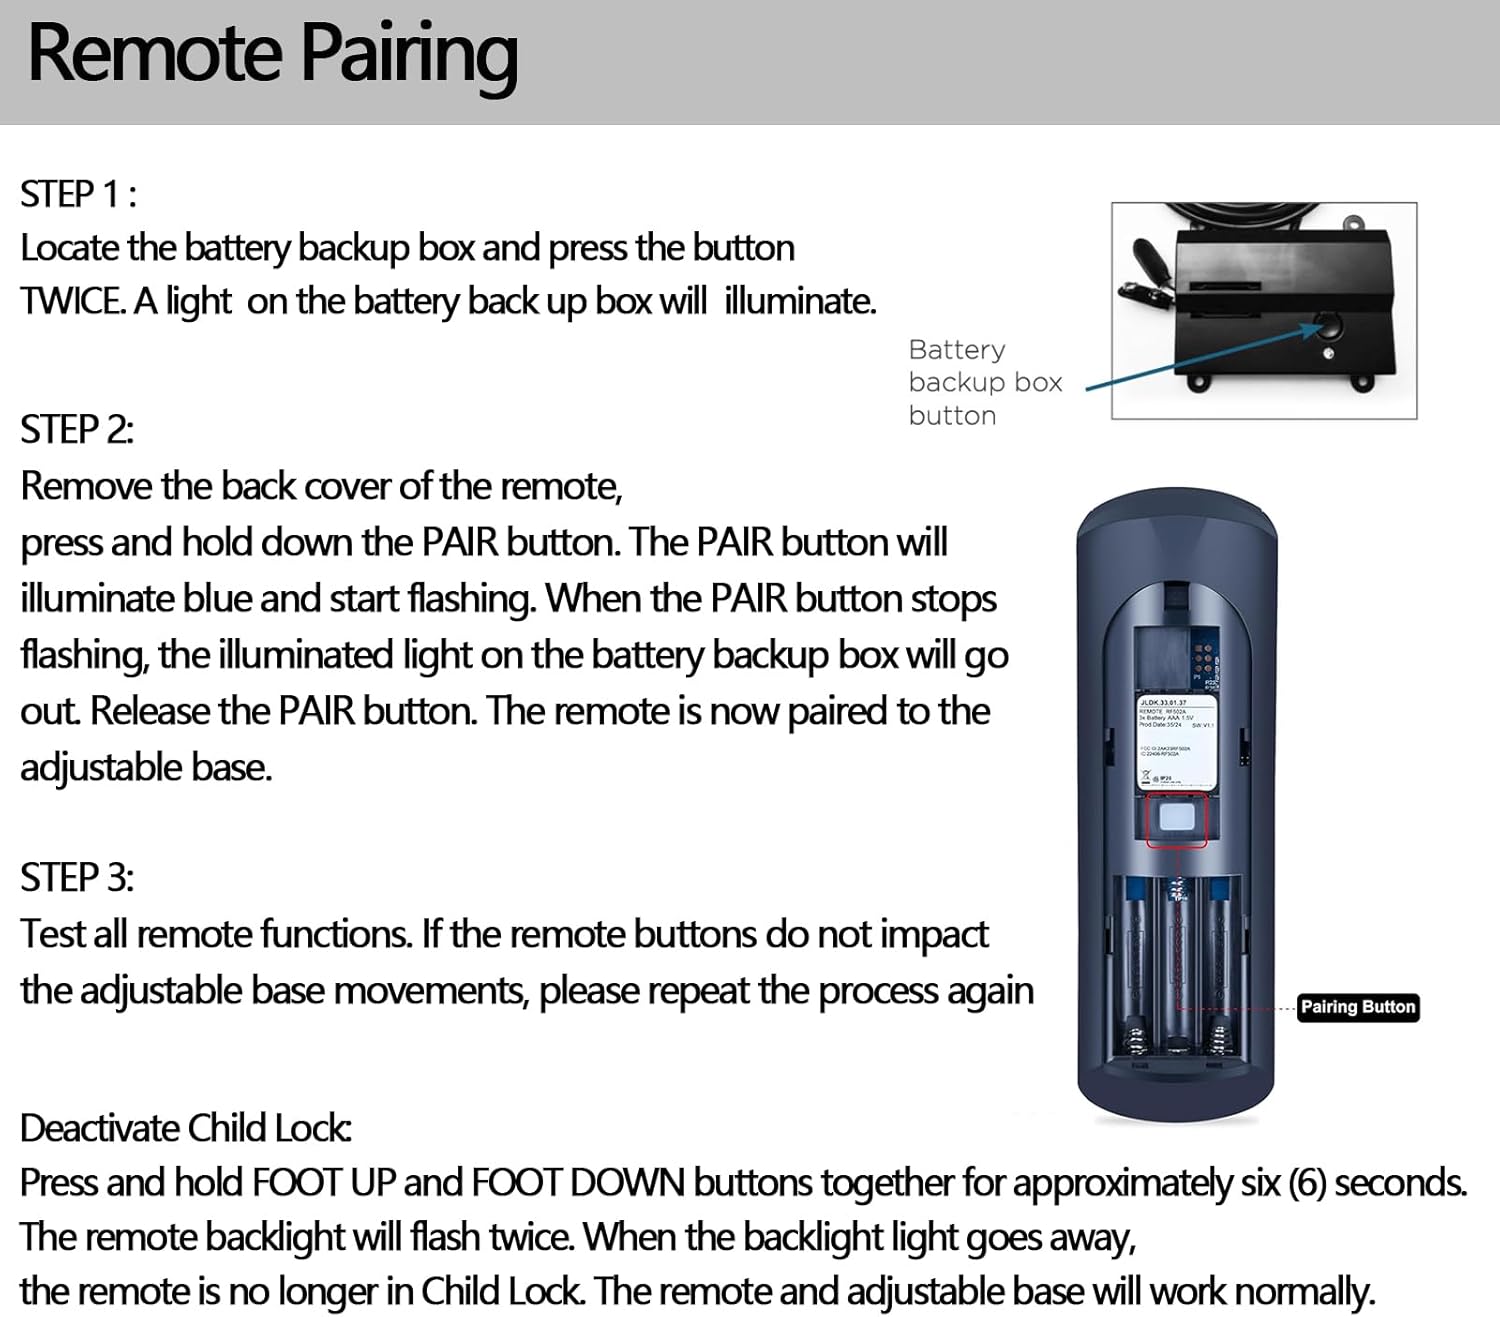
Image: A visual representation of the remote pairing process, showing the location of the battery backup box button and the PAIR button on the remote's battery compartment.
Operating the Remote Control
The RF502A remote control provides intuitive control over your Tempur-Pedic adjustable bed base. Familiarize yourself with the button layout for optimal use.

Image: A close-up view of the RF502A remote control, highlighting specific button clusters for head and foot adjustments, massage, light, and preset positions like Zero G.
- Head Up/Down: Adjusts the head section of the bed.
- Foot Up/Down: Adjusts the foot section of the bed.
- Zero G: Activates the Zero Gravity preset position, designed to relieve pressure.
- Light: Controls any integrated under-bed lighting.
- Massage (if applicable): Activates and adjusts massage functions.
- Memory Presets (1, 2, 3): Allows saving and recalling preferred bed positions.
The remote operates effectively within an operational distance of approximately 8 meters (26 feet) from the bed base, allowing for convenient control from various points in your room.

Image: A person holding the RF502A remote control, with an adjustable bed in the background, illustrating the effective operational distance of 8 meters for long-distance control.
Maintenance
To ensure the longevity and optimal performance of your remote control, follow these maintenance guidelines:
- Cleaning: Wipe the remote with a soft, dry cloth. Avoid using abrasive cleaners or solvents, as these can damage the surface and internal components.
- Battery Replacement: Replace batteries promptly when the remote's performance degrades or it stops responding. Always use new batteries of the specified type.
- Storage: Store the remote in a dry place, away from extreme temperatures and direct sunlight.
- Handling: Avoid dropping the remote or subjecting it to strong impacts, which can cause internal damage.
Troubleshooting
If you encounter issues with your RF502A remote control, refer to the following common troubleshooting steps:
- Remote Not Responding:
- Check if the batteries are correctly installed and have sufficient charge. Replace if necessary.
- Ensure the remote is within the operational distance of 8 meters from the bed base.
- Attempt to re-pair the remote control following the "Pairing Instructions" in this manual.
- Pairing Fails Repeatedly:
- Deactivate Child Lock: If pairing continues to fail, the remote may be in Child Lock mode. To deactivate, press and hold the FOOT UP and FOOT DOWN buttons together for approximately six (6) seconds. The remote backlight will flash twice. When the backlight goes away, the remote is no longer in Child Lock. After deactivating, attempt the pairing process again.
- Ensure no other devices are interfering with the signal during pairing.
- Specific Buttons Not Working:
- Verify that the remote's button layout matches your original remote and bed base functions. Refer to the "Compatibility Check" section.
- If only certain buttons are unresponsive, try re-pairing the remote. If the issue persists, the remote may require replacement.
Specifications
| Model Number | RF502A |
| Brand | ZWP |
| Compatible Devices | Tempur-Pedic Ergo or Ergo Extend Adjustable Bed Base (JLDK.33.01.37 RF502A) |
| Color | Black 1 |
| Item Weight | 2.4 ounces |
| Package Dimensions | 10 x 3 x 1 inches |
| Max Number of Supported Devices | 1 |
| Special Feature | Ergonomic |
| Operational Distance | Approx. 8 meters (26 feet) |
Support
For any questions, concerns, or further assistance regarding your ZWP RF502A Replacement Remote Control, please do not hesitate to contact the manufacturer or seller. We are committed to helping you resolve any issues you may encounter.
Note: Specific contact information may be provided with your purchase documentation or on the seller's platform.


