
XK 806B
Instruction Manual for XK-2.0 Horsepower 806B Tire Changer Machine
Model: 806B | Brand: XK
Product Overview
The XK-2.0 Horsepower 806B Tire Changer Machine is designed for efficient and reliable tire mounting and demounting. It features a robust construction with a high-density aluminum casting piston for extended service life and precision steel cast clamping jaws for durability. The machine incorporates protective sleeves on the clamping jaws to safeguard tires and rims during operation. Its universal bead breaker and vertical inflation tool box enhance usability, while the iron stamping pedal provides durable control. The clamping range is adjustable to accommodate various tire sizes.

Figure 1: XK-806B Tire Changer Machine
Safety Information
Always read and understand all instructions before operating the machine. Failure to follow safety guidelines may result in serious injury or equipment damage.
- Ensure the machine is properly grounded and connected to the correct power supply (110/220/380V, 0.75/1.1kW).
- Wear appropriate personal protective equipment (PPE), including safety glasses and gloves, during operation.
- Keep hands and clothing clear of moving parts, especially the turntable and clamping jaws.
- Do not exceed the maximum wheel diameter (1180mm) or tire width (3-14 inches) specified for this machine.
- Maintain a clean and well-lit work area.
- Never attempt to service or repair the machine while it is powered on. Disconnect from power source before maintenance.
- Ensure proper air pressure (8-10 bar) for pneumatic components.
Components Overview
The XK-806B Tire Changer Machine consists of several key components designed for efficient tire service:
- Turntable: Rotates the wheel during mounting and demounting.
- Clamping Jaws: Securely hold the wheel on the turntable. Equipped with protective sleeves.
- Mount/Demount Head: Positions and manipulates the tire bead.
- Bead Breaker: Separates the tire bead from the rim.
- Inflation Gun: Used for inflating tires after mounting.
- Foot Pedals: Control various functions such as turntable rotation, clamping, and bead breaking.
- Air Filter/Lubricator Unit: Ensures clean and lubricated air supply to pneumatic components.
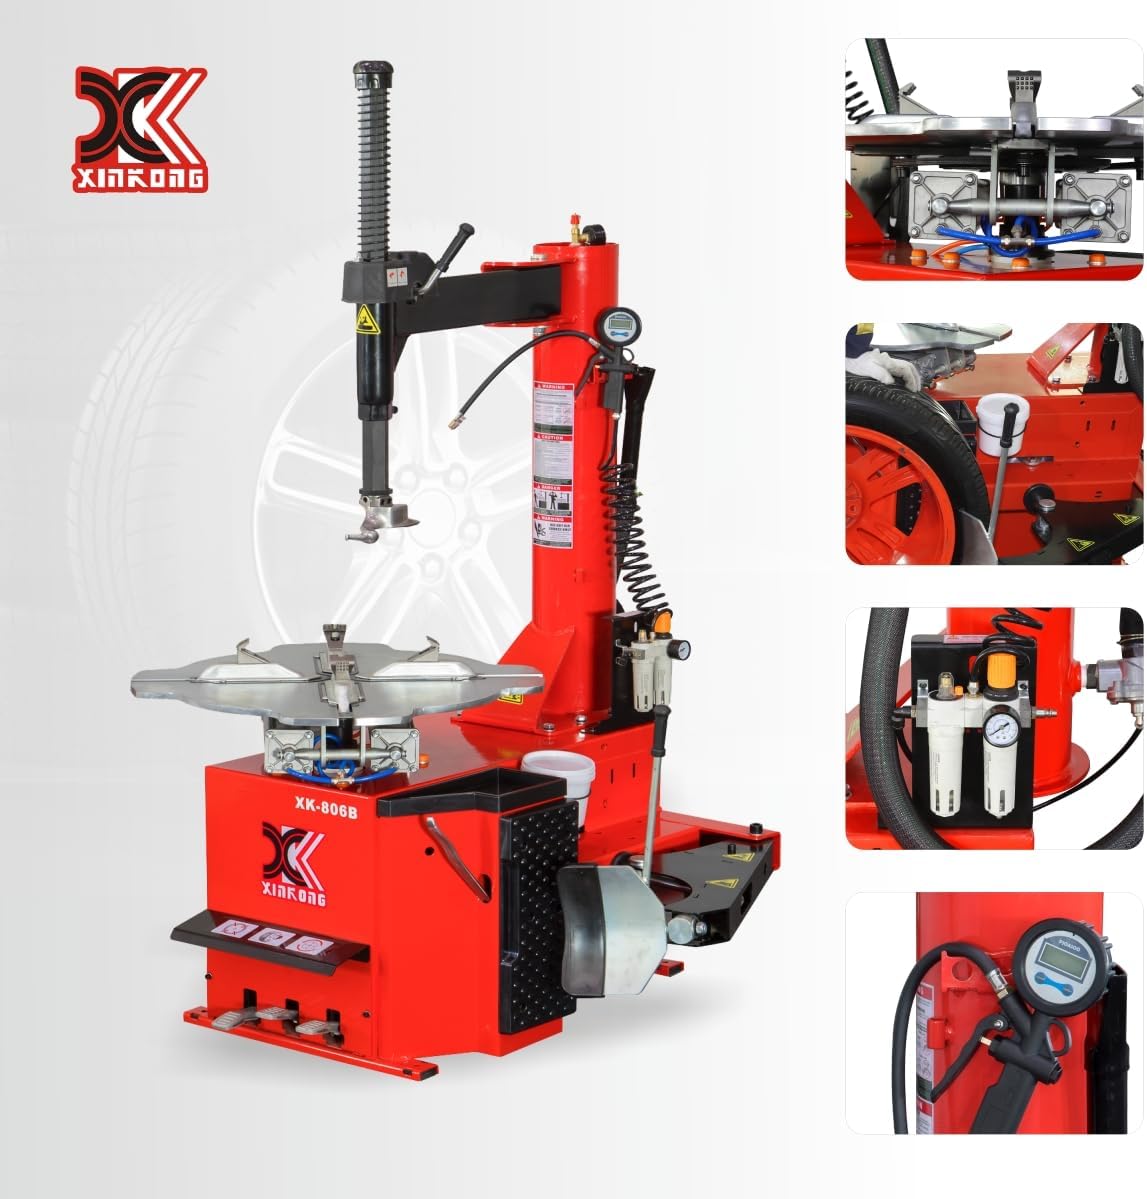
Figure 2: Detailed view of the clamping jaw and mount/demount head.

Figure 3: Underside view of the clamping mechanism.

Figure 4: Air preparation unit, inflation gun, and lubricant container.
Setup
Before operating the XK-806B Tire Changer, ensure proper installation and connection:
- Unpacking and Inspection: Carefully unpack all components. Inspect for any shipping damage. Report any damage to the carrier immediately.
- Placement: Position the machine on a flat, stable, and level surface capable of supporting its weight (approximately 542 pounds). Ensure adequate clearance around the machine for safe operation.
- Power Connection: Connect the machine to a suitable electrical outlet. Verify that the voltage (110/220/380V) and power (0.75/1.1kW) match the machine's requirements and local electrical codes.
- Air Supply Connection: Connect a compressed air line to the machine's air inlet. Ensure the air supply provides the recommended working pressure of 8-10 bar.
- Lubrication: Fill the lubricant container (if applicable) with appropriate tire mounting lubricant.
- Initial Checks: Before first use, check all bolts and fasteners for tightness. Verify that all moving parts operate smoothly without obstruction.
Operating Instructions
Follow these steps for safe and effective tire changing operations:
Video 1: Operational demonstration of the XK-806B Tire Changer Machine.

Figure 5: Visual guide for tire changing steps.
- Preparation: Remove the valve core to fully deflate the tire. Remove any wheel weights.
- Bead Breaking (Step 1): Place the wheel on the bead breaker arm. Use the bead breaker pedal to separate the tire bead from the rim. Repeat for both sides of the tire.
- Mounting on Turntable (Step 2): Position the wheel onto the turntable. Use the clamping pedal to secure the wheel firmly with the clamping jaws. Adjust the slider position if necessary to change the clamping range.
- Lubrication (Step 3): Apply appropriate tire lubricant to both tire beads and the rim edges.
- Demounting Top Bead (Step 4): Position the mount/demount head correctly relative to the rim. Use a tire lever to lift the top bead over the mount/demount head. Activate the turntable rotation pedal to fully demount the top bead.
- Demounting Bottom Bead (Step 5): Reposition the tire. Use the tire lever to lift the bottom bead over the mount/demount head. Activate the turntable rotation pedal to fully demount the bottom bead.
- Mounting New Tire (Step 6): Place the bottom bead of the new tire onto the rim, ensuring it is below the mount/demount head. Activate the turntable rotation pedal to guide the bead onto the rim.
- Mounting Top Bead (Step 7): Push down on the top bead while activating the turntable rotation pedal to guide it onto the rim. Ensure the bead does not pinch.
- Inflation (Step 8): Reinstall the valve core. Connect the inflation gun to the valve stem. Inflate the tire to the recommended pressure, using the foot pedal for controlled inflation. The machine features a vertical inflation tool box for convenience.
- Final Checks: Check for leaks and ensure the tire is properly seated on the rim.
Maintenance
Regular maintenance ensures the longevity and optimal performance of your XK-806B Tire Changer:
- Daily:
- Clean the machine, especially the turntable and clamping jaws, to remove tire debris and lubricant residue.
- Check air pressure and ensure the air filter/lubricator unit is functioning correctly. Drain any accumulated water from the air filter.
- Weekly:
- Inspect all hoses and connections for leaks or damage.
- Lubricate moving parts, such as the mount/demount head pivot points and clamping jaw mechanisms, with appropriate grease or oil.
- Check the tightness of all fasteners and bolts.
- Monthly/Quarterly:
- Inspect the drive belt (if applicable) for wear and tension.
- Check the condition of the clamping jaw protective sleeves and replace if worn.
- Verify the accuracy of the inflation gauge.
- Storage: If storing the machine for an extended period, ensure it is clean, lubricated, and disconnected from power and air supplies.
Troubleshooting
This section provides solutions to common issues you might encounter:
| Problem | Possible Cause | Solution |
|---|---|---|
| Machine does not power on. | No power supply; tripped circuit breaker; faulty power switch. | Check power connection; reset circuit breaker; contact customer support. |
| Turntable does not rotate. | Motor issue; foot pedal malfunction; insufficient air pressure. | Check air supply; inspect foot pedal connections; contact customer support. |
| Clamping jaws do not operate. | Low air pressure; air line blockage; faulty pneumatic cylinder. | Verify air pressure (8-10 bar); check air lines for kinks; contact customer support. |
| Bead breaker is not effective. | Insufficient air pressure; improper positioning of wheel; worn bead breaker pad. | Check air pressure; reposition wheel; inspect and replace bead breaker pad if worn. |
| Tire or rim damage during operation. | Improper technique; worn protective sleeves on clamping jaws; incorrect mount/demount head adjustment. | Review operating instructions; replace worn protective sleeves; adjust mount/demount head properly. |
Specifications
Detailed technical specifications for the XK-806B Tire Changer Machine:

Figure 6: Product details including voltage, power, and dimensions.

Figure 7: Additional specifications such as noise level and net weight.
| Specification | Value |
|---|---|
| Manufacturer | XK |
| Brand | XK |
| Model | 806B |
| Item Weight | 542 pounds |
| Voltage | 110/220/380V |
| Power | 0.75/1.1kW |
| Turntable Rotation Speed | 7 rpm |
| Max. Wheel Diameter | 1180mm |
| Tire Width | 3-14 inches |
| Rim Clamp From Outside | 12-23 inches |
| Rim Clamp From Inside | 15-26 inches |
| Working Pressure | 8-10 bar |
| Noise Level | < 70 dB |
| Date First Available | September 29, 2024 |
Warranty and Support
XK is committed to providing quality products and customer satisfaction.
- Returns: This product is eligible for 30-day easy returns. Please refer to the retailer's return policy for detailed information.
- Customer Support: For any questions, technical assistance, or service inquiries, please contact XK customer support. Contact information can typically be found on the product packaging or the retailer's website.
Ask a question about this manual
Ask about setup, troubleshooting, compatibility, parts, safety, or missing instructions. Manuals+ will review the question and use this page’s manual context to help answer it.