1. Introduction
This user manual provides essential information for the safe and efficient operation of the ZBTK DHCC2000/3000 Double Axis Handheld Laser Cleaning System. This advanced non-contact cleaning system is designed for precise surface treatment of various materials, including metal and wood, utilizing fiber laser technology. Please read this manual thoroughly before operating the device to ensure proper usage, optimal performance, and user safety.
2. Safety Information
Operating laser cleaning equipment requires strict adherence to safety protocols to prevent injury and damage.
- Eye Protection: Always wear appropriate laser safety goggles that are rated for the specific wavelength and power of the laser being used. Never look directly into the laser beam or at reflections.
- Skin Protection: Avoid direct exposure of skin to the laser beam. Wear protective clothing if necessary.
- Ventilation: Ensure adequate ventilation in the work area to dissipate fumes and particles generated during the cleaning process.
- Flammable Materials: Do not operate the laser cleaning system near flammable liquids, gases, or materials.
- Electrical Safety: Ensure the power supply meets the system's requirements. Do not operate with damaged cables or connectors.
- Authorized Personnel: Only trained and authorized personnel should operate the laser cleaning system.
- Emergency Procedures: Familiarize yourself with emergency shutdown procedures and the location of emergency stops.
- Maintenance: Disconnect power before performing any maintenance or cleaning on the device.
3. Product Overview
3.1 Components
The ZBTK DHCC2000/3000 system primarily consists of the handheld laser cleaning head and a control panel unit.

Figure 3.1: The ZBTK DHCC2000/3000 Handheld Laser Cleaning Head connected to its control panel unit. The control panel displays a "Swing Cleaning System" interface with "Cleaning" and "Settings" options.

Figure 3.2: Overview of the ZBTK DHCC2000/3000 Dual Swing Handheld Laser Cleaning System, highlighting key features such as power (<2000W), weight (<0.85KG), and 5 cleaning modes.
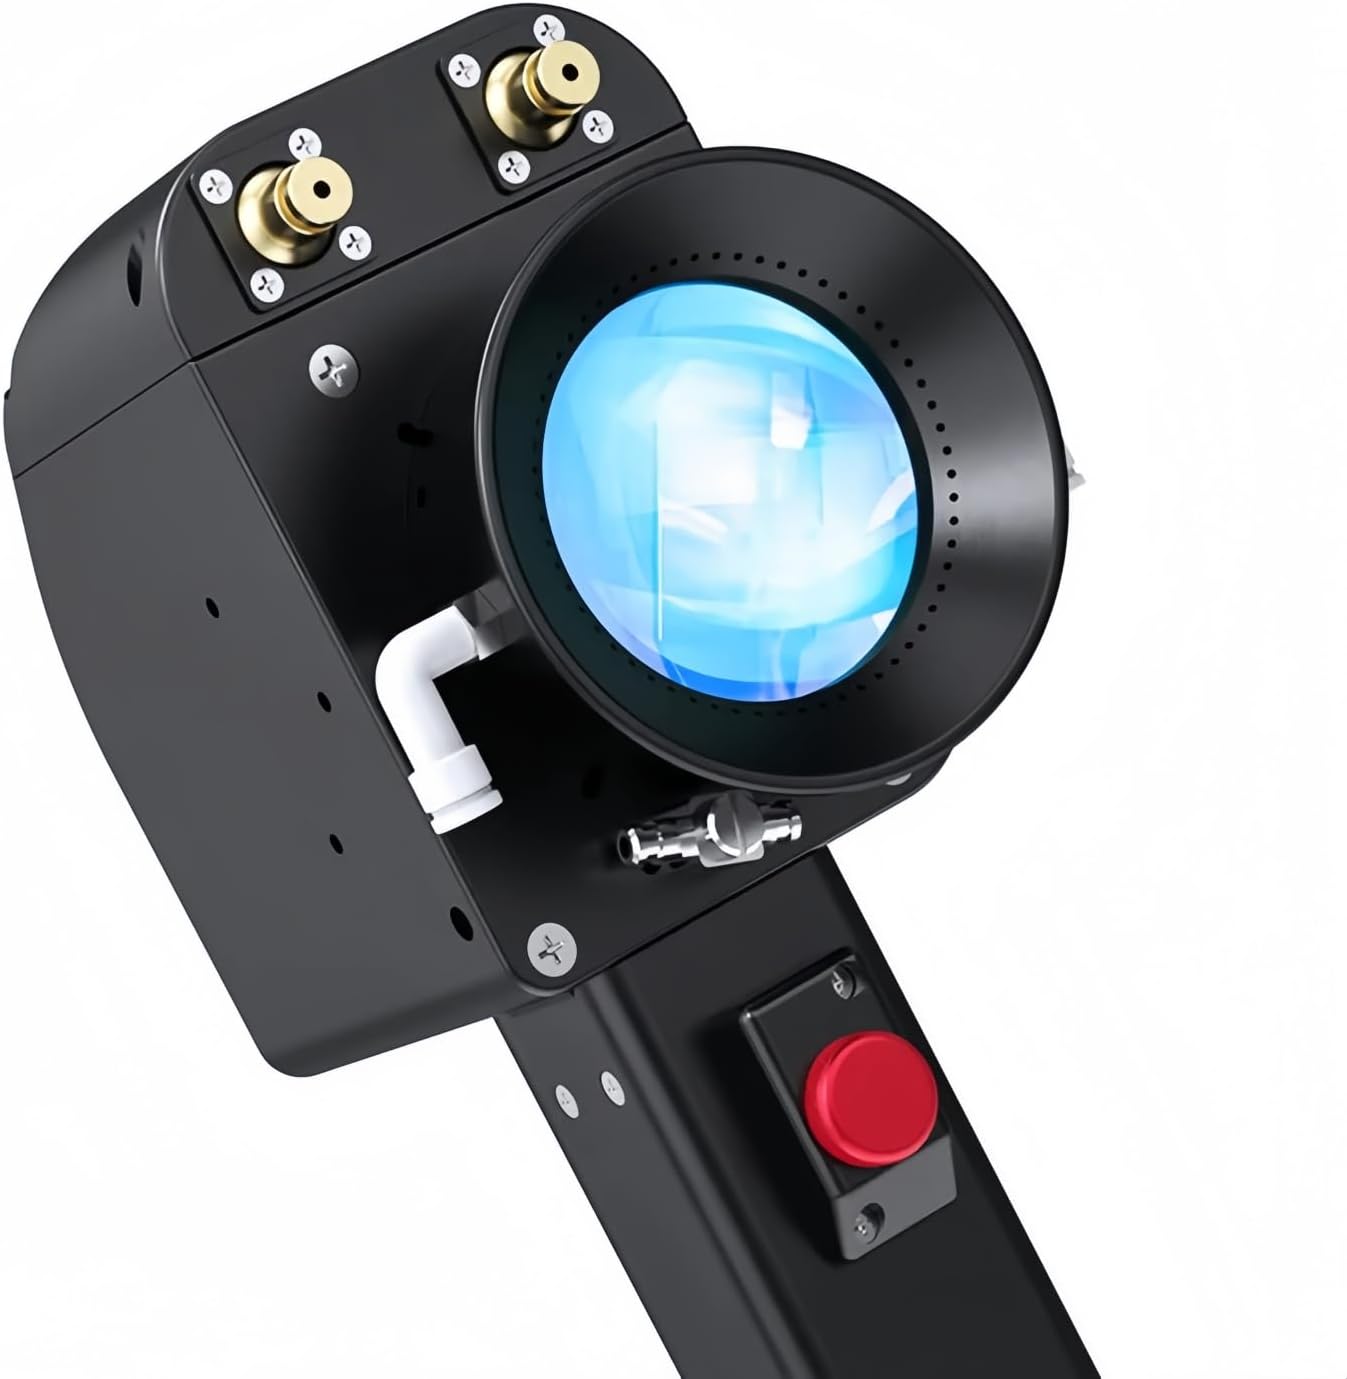
Figure 3.3: A detailed view of the handheld laser cleaning head, showing the laser output lens and control buttons.
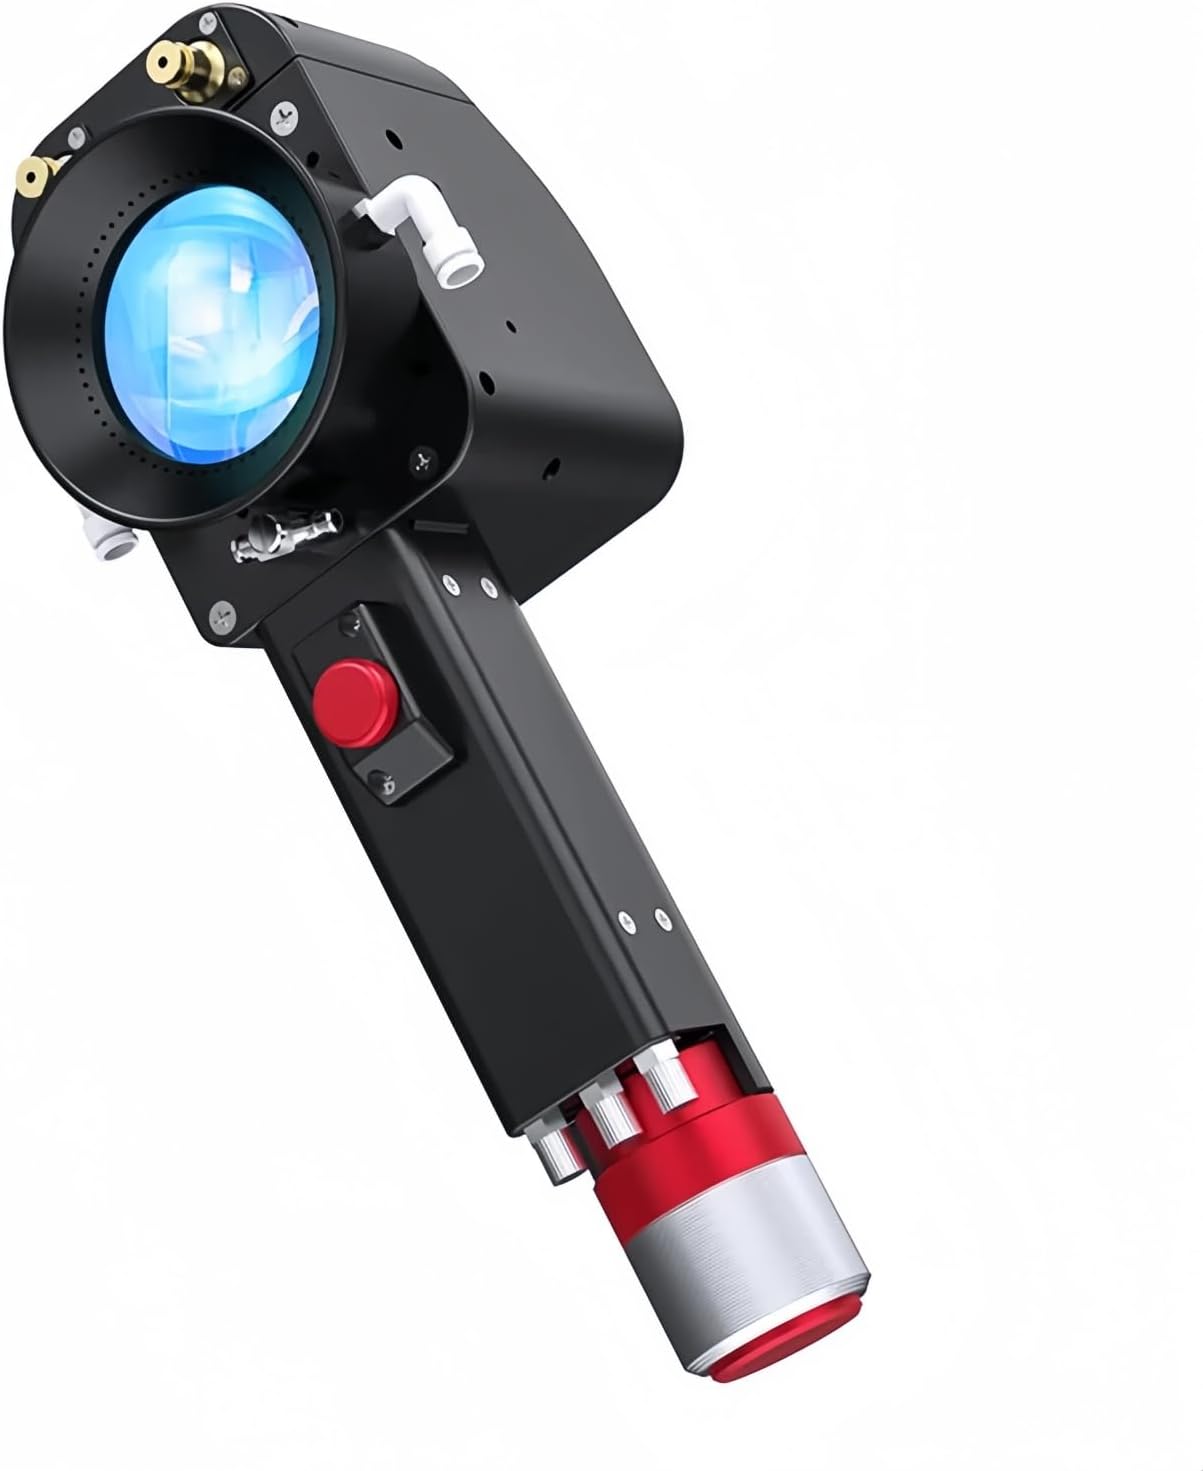
Figure 3.4: Side view of the handheld laser cleaning head, illustrating its ergonomic design and connection points.

Figure 3.5: The control panel's main settings interface, displaying icons for various functions such as calibration, I/O settings, temperature monitoring, user management, other settings, version information, power adjustment, and button light adjustment.

Figure 3.6: The control panel displaying language settings, with the handheld laser cleaning head visible in the foreground, illustrating the complete system setup.

Figure 3.7: A closer view of the control panel's language selection screen, showing a comprehensive list of supported languages.
3.2 Key Features
- Double Axis Precision: Enables highly precise cleaning, ensuring thorough treatment of metal and wood surfaces.
- Double Pendulum Design: Enhances stability and control of the laser cleaning head for efficient and consistent cleaning.
- Versatile Cleaning System: Suitable for a wide range of materials, including various types of metal and wood.
- Efficient Cleaning Performance: Delivers high-performance cleaning, making it suitable for demanding industrial applications.
- Compact and Portable: Features a lightweight design, facilitating easy transport and use in diverse environments.
4. Setup
Before operating the ZBTK DHCC2000/3000 system, ensure all components are properly connected and secured.
- Unpacking: Carefully remove all components from the packaging. Verify that all items listed in the package contents are present.
- Placement: Place the control panel unit on a stable, flat surface in a well-ventilated area. Ensure there is sufficient space around the unit for air circulation.
- Connect Laser Head: Connect the handheld laser cleaning head to the designated port on the control panel unit. Ensure the connection is secure. Refer to Figure 3.1 for visual guidance.
- Power Connection: Connect the power cable to the control panel unit and then to a suitable power outlet. Ensure the power supply matches the system's requirements (voltage, frequency).
- Initial Power On: Turn on the main power switch on the control panel. The display should illuminate, indicating the system is powering up.
5. Operating Instructions
Follow these steps for basic operation of the laser cleaning system.
- System Boot-up: After powering on, allow the system to complete its boot-up sequence.
- Language Selection: If necessary, navigate to the "Settings" menu (refer to Figure 3.5) and select your preferred language (refer to Figure 3.7).
- Access Cleaning Interface: From the main screen, select the "Cleaning" option to enter the cleaning operation interface.
- Adjust Parameters: Within the cleaning interface, adjust parameters such as laser power, pulse frequency, and scanning speed according to the material being cleaned and the desired cleaning effect. Refer to the control panel interface (Figure 3.5) for parameter adjustment options.
- Prepare Workpiece: Ensure the workpiece is stable and positioned correctly. Wear all necessary personal protective equipment (PPE), especially laser safety goggles.
- Initiate Cleaning: Hold the handheld laser cleaning head firmly. Press the activation button on the handle to emit the laser beam.
- Perform Cleaning: Move the laser head smoothly and consistently over the surface to be cleaned. Observe the cleaning process and adjust parameters as needed.
- Stop Cleaning: Release the activation button to stop the laser emission.
- System Shutdown: After use, navigate back to the main menu and perform a proper system shutdown before disconnecting power.
5.1 Cleaning Modes
The system supports multiple cleaning modes (up to 5 modes as indicated in Figure 3.2) to optimize performance for different applications. Specific details on how to select and configure these modes can be found within the cleaning interface of the control panel.
6. Maintenance
Regular maintenance ensures the longevity and optimal performance of your ZBTK laser cleaning system.
- Lens Cleaning: Periodically inspect the laser output lens on the handheld head for dust or debris. Clean gently with a lint-free cloth and a suitable optical cleaning solution. Do not use abrasive materials.
- System Cleaning: Keep the exterior of the control panel and laser head clean. Wipe with a soft, dry cloth. Avoid using harsh chemicals.
- Cable Inspection: Regularly check all cables and connectors for signs of wear, damage, or loose connections. Replace damaged cables immediately.
- Ventilation: Ensure the ventilation openings on the control unit are clear of obstructions to prevent overheating.
- Storage: When not in use, store the system in a clean, dry environment, away from extreme temperatures and direct sunlight.
7. Troubleshooting
This section addresses common issues you might encounter. For problems not listed here, contact customer support.
| Problem | Possible Cause | Solution |
|---|---|---|
| System does not power on. | No power supply; loose power cable; faulty power outlet. | Check power cable connection; try a different outlet; ensure main power switch is ON. |
| Laser not emitting. | Safety interlock engaged; activation button not pressed; system error. | Ensure all safety interlocks are clear; press activation button firmly; check control panel for error messages. |
| Poor cleaning results. | Incorrect parameters; dirty laser lens; material not suitable. | Adjust laser power, frequency, and speed; clean laser output lens; verify material compatibility. |
| System overheating. | Blocked ventilation; prolonged operation at high power. | Ensure ventilation openings are clear; allow system to cool down; operate within recommended duty cycles. |
8. Specifications
| Attribute | Detail |
|---|---|
| Manufacturer | DMK |
| Model Numbers | DHCC2000, DHCC3000 |
| Color | Dhcc3000 (variant specific) |
| Power Source | Laser Cleaning Head (System Powered) |
| Included Components | Laser Cleaning Head |
| ASIN | B0DJ2RJJB8 |
| Date First Available | September 27, 2024 |
| Weight (Laser Head) | <0.85 KG (as per Figure 3.2) |
| Max Power (System) | <2000W (as per Figure 3.2) |
| Cleaning Modes | 5 (as per Figure 3.2) |
9. Warranty and Support
For warranty information and technical support regarding your ZBTK DHCC2000/3000 Laser Cleaning System, please contact the manufacturer, DMK, or the authorized seller.
You can visit the DMK Store on Amazon for more information or to contact their support.


