1. Introduction
The Bisofice S-158 Electronic Time Clock is designed to simplify employee attendance tracking and payroll management for small and medium-sized businesses. This device offers efficient and accurate time recording with its intuitive features and robust design.
Key features include:
- Simplified Time Management: Automatically marks late arrivals and early departures in red, streamlining shift monitoring and payroll processing.
- 100 Time Cards Included: Ready for immediate use without complex biometric setups or ribbon changes. Simply insert the card for quick recording.
- Multiple Installation Options: Can be installed on a wall or placed on a desktop, suitable for various work environments like offices, factories, warehouses, and retail stores.
- Intuitive Setup: A plug-and-play device with an easy-to-follow manual, ideal for small and medium-sized businesses.
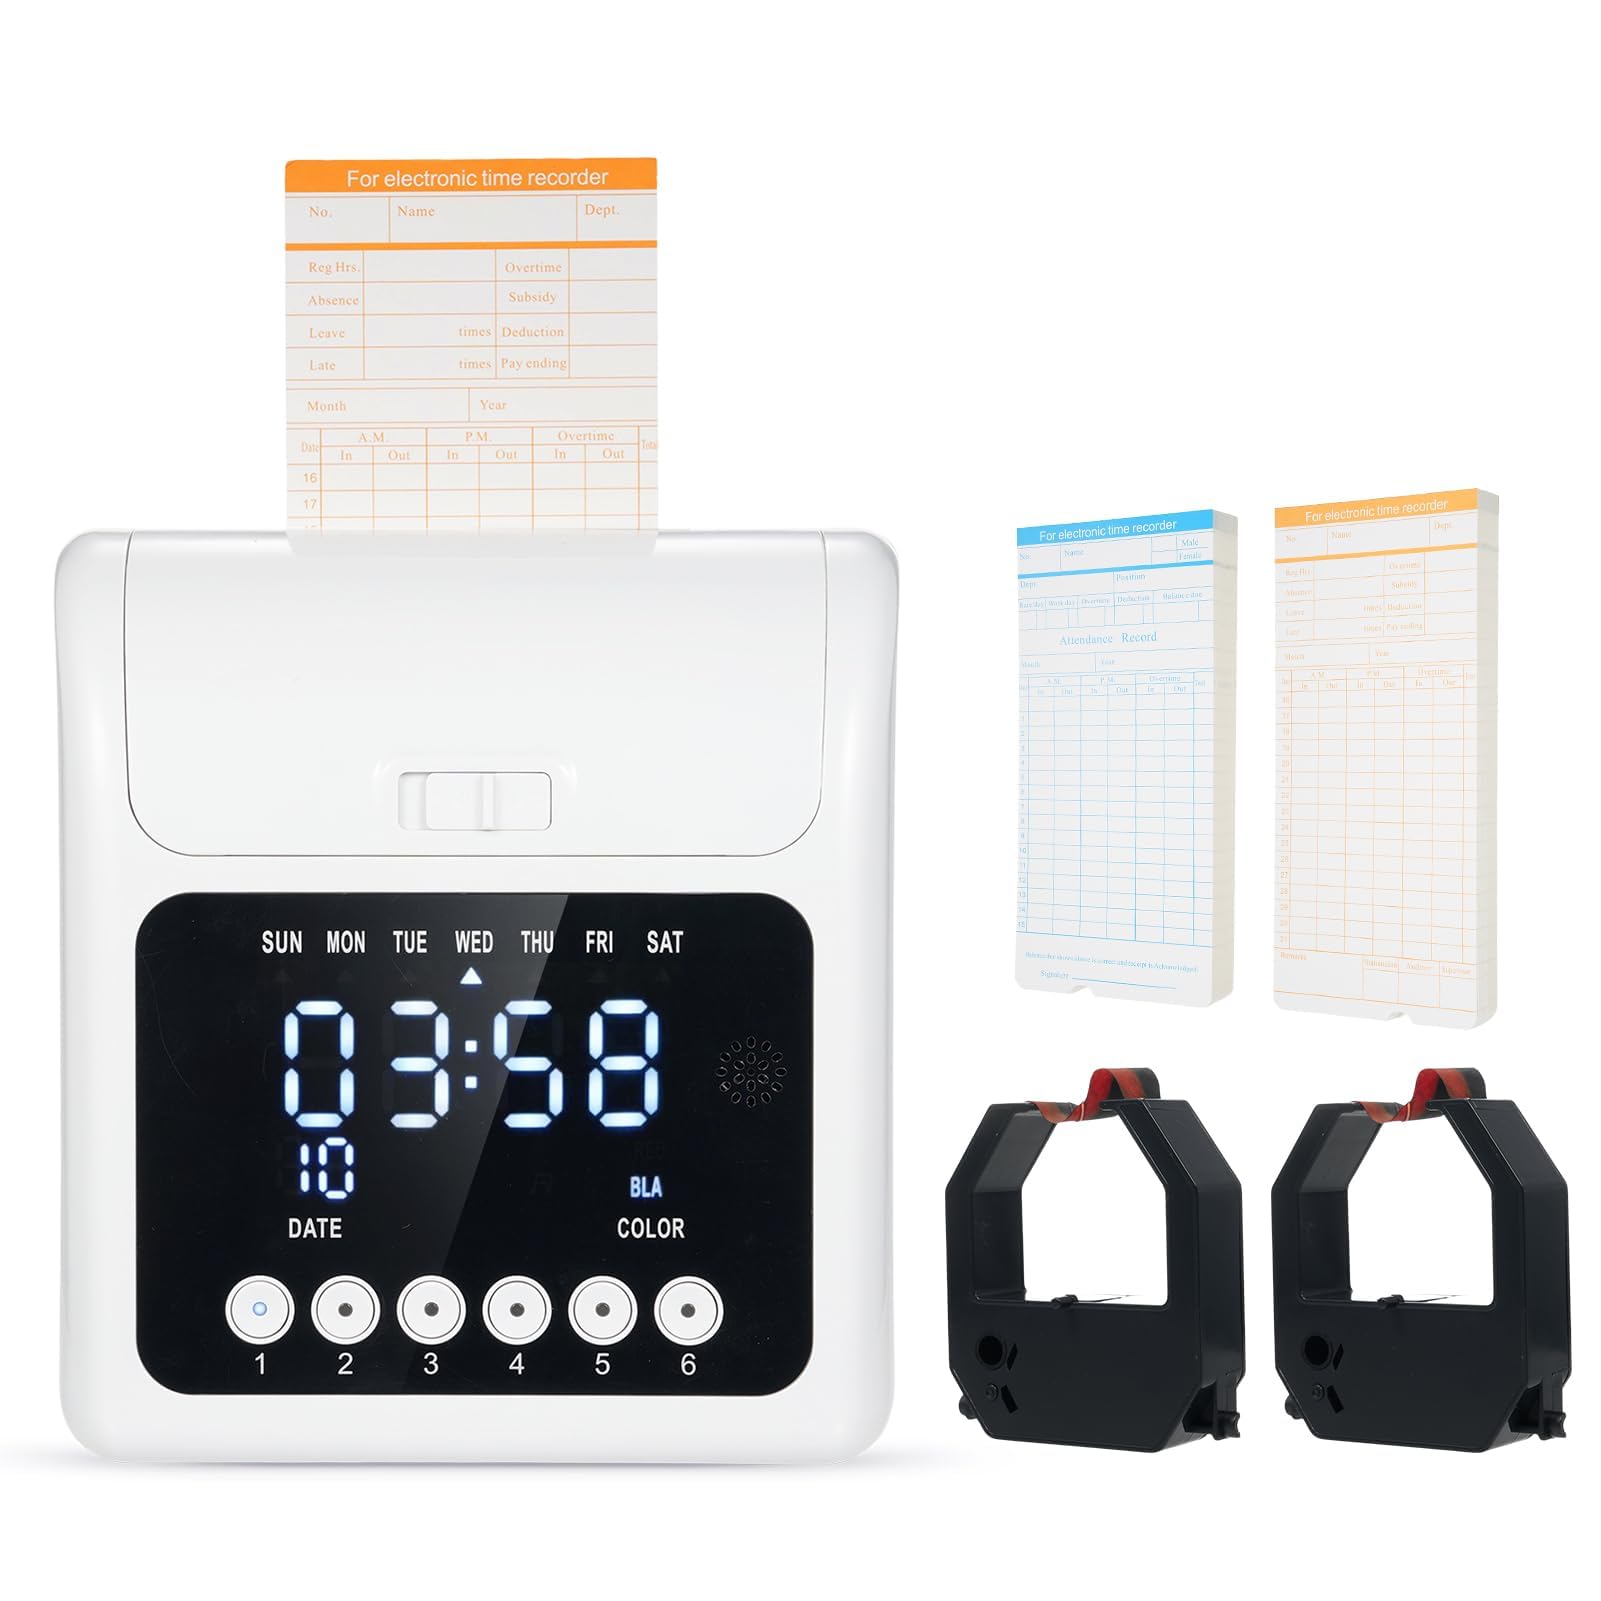
Image 1.1: The Bisofice S-158 Electronic Time Clock, a compact and efficient attendance recorder.
2. Setup
2.1 Package Contents
Before you begin, ensure all components are present in the package:
- 1 x Bisofice S-158 Electronic Time Clock
- 100 x Time Cards
- 2 x Ribbons
- 1 x Power Cable
- 1 x User Manual

Image 2.1: All items included in the Bisofice S-158 Electronic Time Clock package.
2.2 Powering On
Connect the provided power cable to the time clock and plug it into a standard electrical outlet. The device is plug-and-play and will power on automatically. It features a built-in 800mAh rechargeable battery to ensure continuous operation even during sudden power outages.

Image 2.2: The time clock features a built-in 800mAh rechargeable battery for uninterrupted operation.
2.3 Installation Options
The Bisofice S-158 offers flexible installation:
- Desktop Placement: Simply place the time clock on a flat, stable surface such as a desk or counter.
- Wall Mounting: Use appropriate screws and anchors (not included) to secure the device to a wall. Ensure it is mounted at a convenient height for employees to access.

Image 2.3: The time clock can be used on a desktop or mounted on a wall.
3. Operating Instructions
3.1 Display and Button Functions
The time clock features an LED display showing the week, time, and date. Below the display are six buttons (1-6) for various functions.

Image 3.1: Overview of the time clock's display and control buttons.
- Week Display: Shows the current day of the week (SUN, MON, TUE, WED, THU, FRI, SAT).
- Time Display: Shows the current time.
- Date Display: Shows the current date.
- Buttons 1-6: Used for various settings and shift selections. Hold down a key for 3 seconds to enter or exit settings. Buttons 1 and 2 typically function as "+" and "-" for adjustments, while button 3 is for confirmation. Buttons 4-6 may be used to switch between different settings or shifts.
- Color Indicator: Indicates the printing color (black or red).
3.2 Inserting Time Cards
To record attendance, simply insert a time card into the slot at the top of the machine. The machine will automatically detect the card and print the current time and date.
- The front side of the time card (typically blue) is used for the 1st to the 15th of each month.
- The back side of the time card (typically orange) is used for the 16th to the 31st of each month.
3.3 Dual-Color Printing
The S-158 time clock automatically prints in two colors:
- Black: For regular attendance records.
- Red: Automatically used to highlight late arrivals or early departures, making it easy to identify exceptions at a glance.
3.4 Setting Shifts
The device allows you to set up to three shifts per day. Refer to the detailed instructions in the included user manual for specific steps on how to program shift times and rules using the control buttons.
4. Maintenance
4.1 Ribbon Replacement
The time clock uses an ink ribbon for printing. When the print quality deteriorates, it's time to replace the ribbon.
- Turn off the time clock and unplug it from the power source.
- Open the top cover of the time clock. The cover is designed for easy access.
- Carefully remove the old ribbon cartridge.
- Insert the new ribbon cartridge, ensuring it is seated correctly.
- Close the top cover.
- Plug in and power on the device to test the new ribbon.
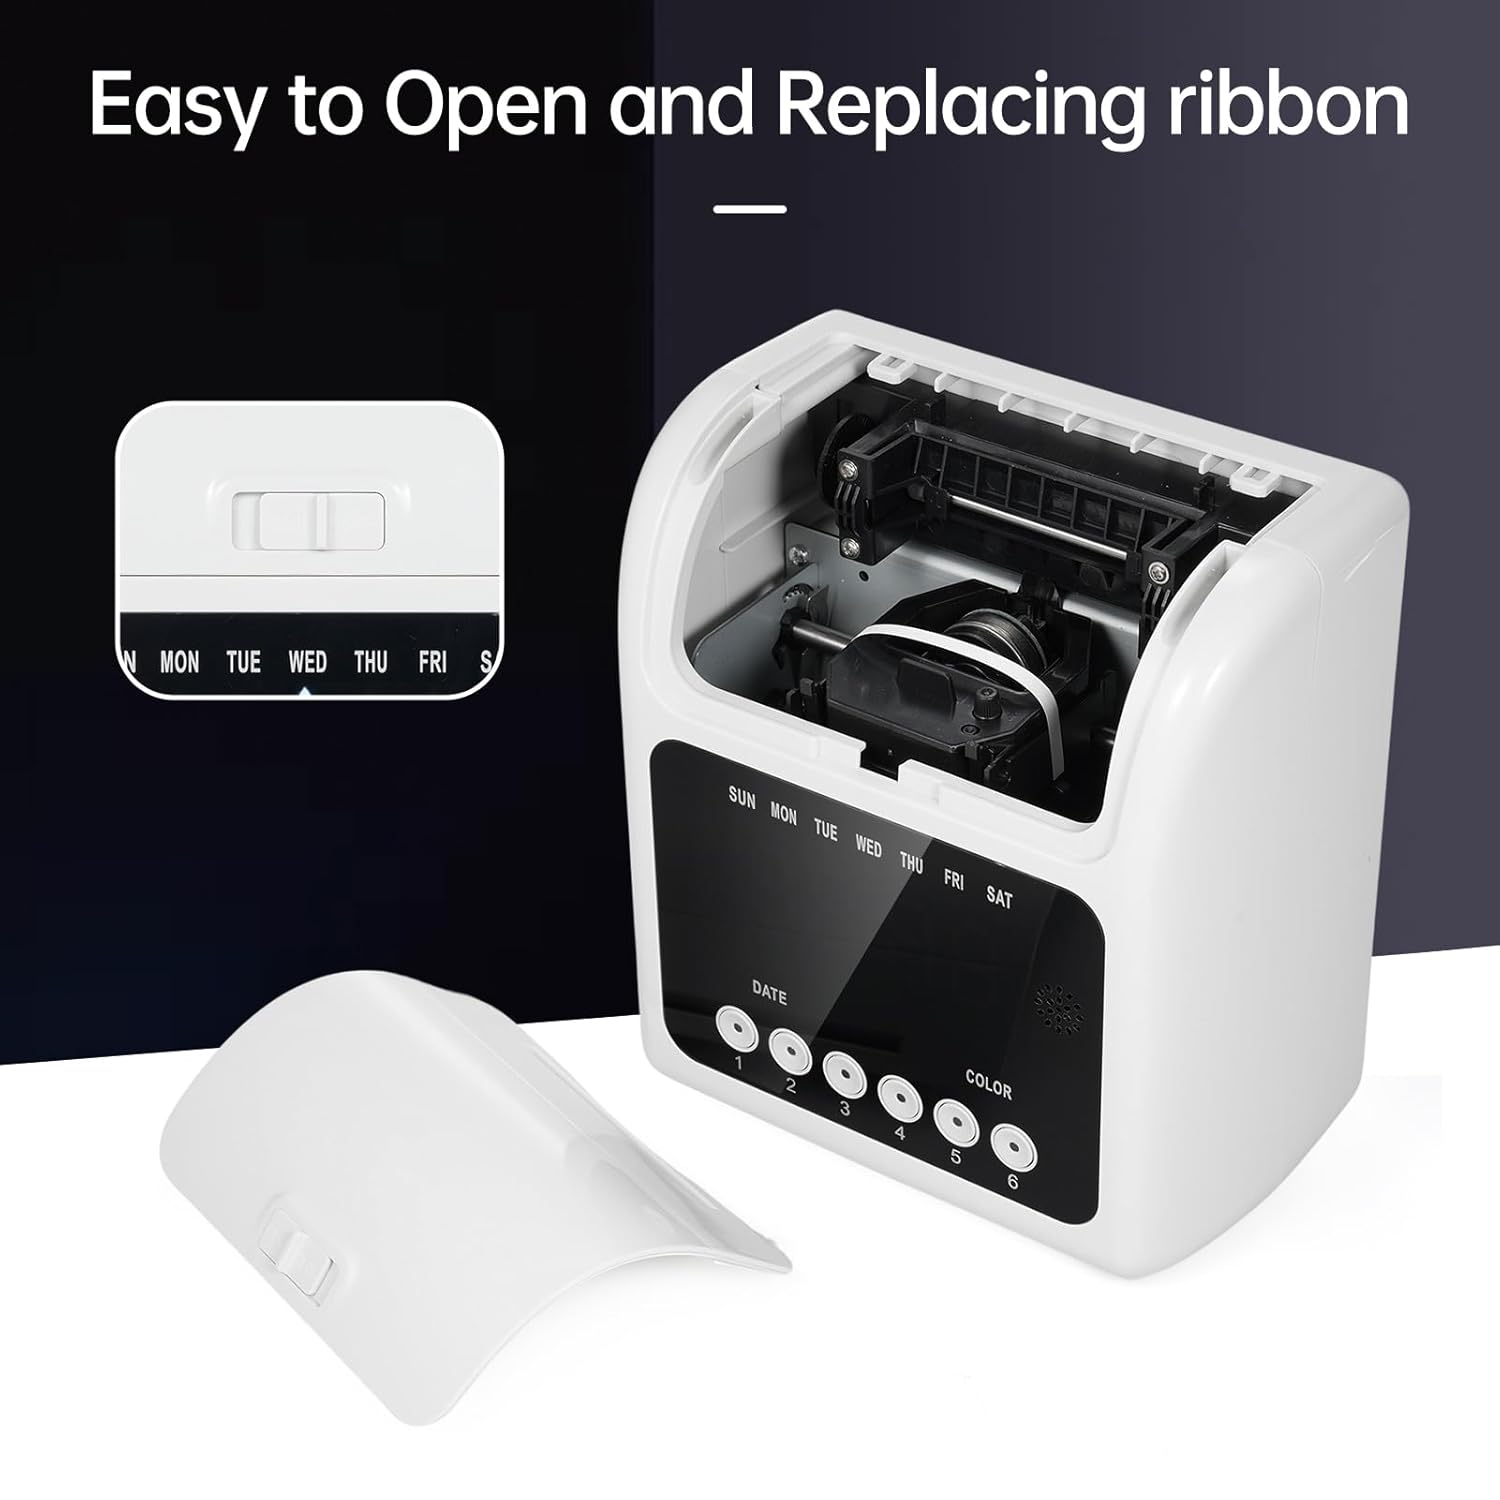
Image 4.1: The top cover can be easily opened for ribbon replacement.
4.2 Cleaning
Regularly clean the exterior of the time clock with a soft, dry cloth. Avoid using abrasive cleaners or solvents. Keep the time card slot free of dust and debris to ensure smooth operation.
5. Troubleshooting
If you encounter issues with your Bisofice S-158 Time Clock, refer to the following common problems and solutions:
- Device does not power on:
- Ensure the power cable is securely connected to both the device and the power outlet.
- Check if the power outlet is functional by plugging in another device.
- If the device has a power switch, ensure it is in the 'ON' position.
- Time card does not print:
- Verify that a ribbon is installed and properly seated.
- Check if the ribbon needs replacement (print may be too faint).
- Ensure the time card is inserted correctly and fully into the slot.
- Incorrect time or date displayed:
- Refer to the detailed instructions in the user manual for setting the correct time and date using the control buttons.
- Hold down a button (e.g., button 1 or 6) for 3 seconds to enter the setting mode.
- Red printing not working:
- Ensure the ribbon is a dual-color type and is installed correctly.
- Verify that the late/early departure settings are configured correctly in the device's menu.
For further assistance, please contact customer support.
6. Specifications
| Feature | Specification |
|---|---|
| Manufacturer | Bisofice |
| Part Number | S-158 |
| Item Weight | 2.39 Kilograms |
| Package Dimensions | 30 x 29 x 22 cm |
| Product Dimensions (Approx.) | 18.8 cm (W) x 10.5 cm (D) x 20 cm (H) |
| Batteries | 1 Lithium Ion battery required (included) |
| Color | White |
| Included Components | Time Clock |
| First Available Date | September 26, 2024 |

Image 6.1: Detailed dimensions of the Bisofice S-158 Time Clock.
7. Warranty and Support
7.1 Warranty Information
Please refer to the warranty card included in your product packaging for specific warranty terms and conditions. Typically, Bisofice products come with a standard manufacturer's warranty covering defects in materials and workmanship from the date of purchase.
7.2 Customer Support
For technical support, troubleshooting assistance, or warranty claims, please contact Bisofice customer service. Contact details can usually be found on the manufacturer's website or in the product documentation.
When contacting support, please have your product model (S-158) and purchase information ready.


