
1. Introduction
This manual provides essential information for the safe and efficient operation of your ASHAPOWER NEON 70 Solar MPPT Charge Controller. Please read these instructions carefully before installation and use. Retain this manual for future reference.
The ASHAPOWER NEON 70 is a high-efficiency Maximum Power Point Tracking (MPPT) solar charge controller designed for various battery bank voltages (12V, 24V, 36V, 48V). It features advanced charging algorithms to optimize battery life and performance.
2. Safety Information
WARNING: Improper installation or operation can lead to serious injury or damage to the equipment. Always follow safety guidelines.
- Ensure all connections are secure and correct before applying power.
- Do not attempt to disassemble or repair the unit yourself. Contact qualified personnel.
- Install the controller in a well-ventilated area, away from flammable materials and direct sunlight.
- Wear appropriate personal protective equipment (PPE) during installation, including insulated gloves and eye protection.
- High voltages can be present at the solar panel input terminals. Exercise extreme caution.
3. Setup and Installation
The ASHAPOWER NEON 70 controller is designed for easy and flexible installation. Follow these steps for proper setup:
- Mounting: Select a suitable location for mounting the controller. It should be indoors, protected from weather, and have adequate ventilation. Ensure the mounting surface is stable.
- Battery Connection: Connect the battery bank to the controller's battery terminals first. Ensure correct polarity (+ to + and - to -). The controller will auto-detect the battery voltage (12V/24V/36V/48V).
- Solar Panel Connection: Connect the solar panel array to the controller's PV input terminals. Observe correct polarity. Ensure the total open-circuit voltage (Voc) of your solar array does not exceed 210V and the total power does not exceed 5100W.
- Load/Inverter Connection (Optional): If connecting a DC load or inverter directly to the controller's load terminals (if available), ensure the load current does not exceed the controller's rating. For AC loads, connect an inverter to the battery bank.
Important: Always connect the battery first, then the solar panels. Disconnect in reverse order: solar panels first, then battery.

Image: Rear view of the ASHAPOWER NEON 70 MPPT Charge Controller showing the battery and solar panel terminal connections.

Image: Overview of key features including input/output current and watts display, 4-stage charging, high tracking efficiency, intelligent current limiting, auto disconnection of PV panel at night, easy installation, factory settings restoration, and auto/forced grid to solar shifting.
Wiring Diagrams:
Refer to the following diagrams for typical off-grid solar power plant configurations:

Image: Wiring diagram illustrating a 2800W/24V off-grid solar power plant setup. It shows 3 series strings of 475W PV panels (total 47 Voc, 2850W), connected to the ASHAPOWER Charge Controller, which then connects to a 24V battery bank (2 x 12V batteries) and an inverter for load and grid power.
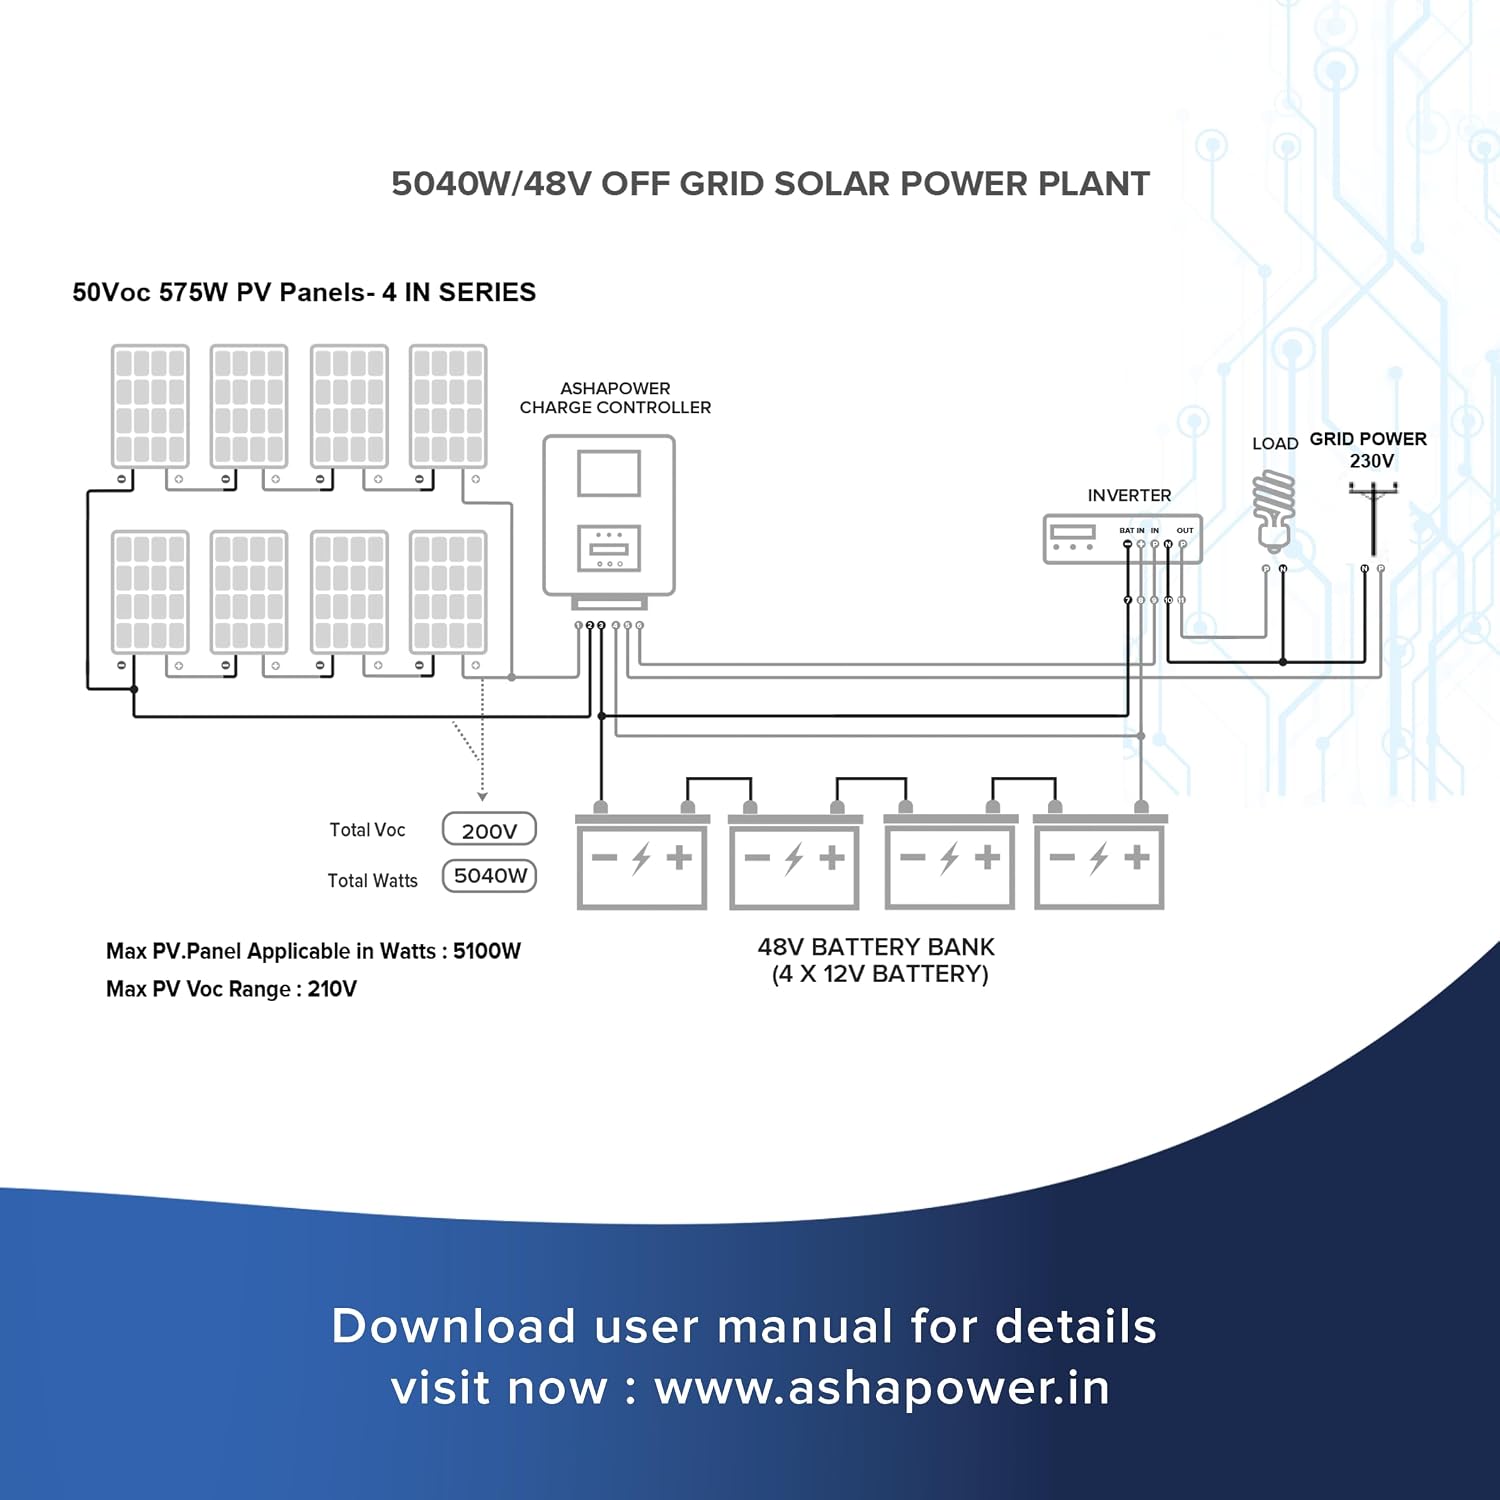
Image: Wiring diagram illustrating a 5040W/48V off-grid solar power plant setup. It shows 4 series strings of 575W PV panels (total 50 Voc, 5040W), connected to the ASHAPOWER Charge Controller, which then connects to a 48V battery bank (4 x 12V batteries) and an inverter for load and grid power.
4. Operating Instructions
Once installed, the ASHAPOWER NEON 70 operates largely automatically. Key operational aspects include:
- Automatic Battery Voltage Detection: The controller automatically detects and sets the battery bank voltage (12V/24V/36V/48V) upon initial connection.
- 4-Stage Smart Charging: The controller employs a 4-stage charging process (Bulk, Absorption, Float, Equalization) to optimize battery health and extend lifespan.
- Programmable Initial Limited Ampere Charging: This feature allows for controlled initial charging, protecting batteries.
- Ultra-fast & Efficient Power Point Tracking: Ensures maximum power harvest from solar panels under varying conditions.
- Auto Disconnection of PV Panel at Night: Prevents reverse current flow from the battery to the solar panels during nighttime.
Display and Button Operations:
The controller features a display (LED or LCD) and buttons for monitoring and adjusting certain settings. The MPPT is in AUTO BYPASS ON mode by default.

Image: Operational guidelines for the display buttons on the ASHAPOWER NEON 70. It details actions like pressing and holding the DOWN button for 2 seconds to turn off solar to grid/grid to solar shifting (INV MODE OFF, AUTO BYPASS OFF), pressing and holding the UP button for 2 seconds to turn on shifting (INV MODE ON, AUTO BYPASS ON), and pressing and holding the ENTER button for 3 seconds to change grid mode to solar forcefully (FORCED SHIFTING).
| Purpose | Action | Display | Function |
|---|---|---|---|
| To turn off (disable) automatic solar to grid/grid to solar shifting function | Press & Hold DOWN Button (2 Seconds) | INV MODE OFF AUTO BYPASS OFF | MPPT reconnects grid power to the connected inverter. |
| To turn on (enable) automatic solar to grid/grid to solar shifting function | Press & Hold UP Button (2 Seconds) | INV MODE ON AUTO BYPASS ON | MPPT disconnects grid power to inverter if the battery terminal voltage is above GRID-SOL set voltage. |
| To change grid mode to solar forcefully (Forced Shifting) | Press & Hold ENTER Button (3 Seconds) | — | MPPT connects grid power to inverter if the battery terminal voltage is above SOL - GRID set voltage. |
Note: To change default function settings, download and refer to user manuals for concerned models & versions from the ASHAPOWER website.
5. Maintenance
Regular maintenance ensures optimal performance and longevity of your ASHAPOWER NEON 70 controller:
- Cleaning: Keep the controller clean and free from dust and debris. Use a dry cloth for cleaning. Do not use liquid cleaners.
- Connections: Periodically check all electrical connections for tightness and corrosion. Loose connections can cause overheating and damage.
- Ventilation: Ensure that the ventilation openings are not blocked. Proper airflow is crucial for heat dissipation.
- Environmental Conditions: Verify that the operating environment remains within the specified temperature and humidity ranges.
6. Troubleshooting
This section provides solutions to common issues. For problems not listed here, contact customer support.
| Problem | Possible Cause | Solution |
|---|---|---|
| No display/No power | Battery not connected or low voltage; reversed polarity; blown fuse. | Check battery connections and voltage. Ensure correct polarity. Check for internal fuse (contact support if suspected). |
| No charging from solar panels | Solar panels not connected; reversed polarity; insufficient sunlight; PV voltage too low/high. | Verify solar panel connections and polarity. Check sunlight conditions. Ensure PV Voc is within 210V range. |
| Battery not fully charged | Insufficient solar input; battery capacity too large for array; battery issues. | Increase solar panel capacity or reduce load. Check battery health. |
| Overheating | Poor ventilation; excessive load; high ambient temperature. | Ensure adequate ventilation. Reduce load if possible. Relocate to a cooler environment. |
7. Specifications
| Feature | Detail |
|---|---|
| Model | NEON70 |
| Brand | ASHAPOWER |
| Battery Voltage Compatibility | 12V / 24V / 36V / 48V (Auto-detection) |
| Maximum Charging Current | 70A |
| Maximum PV Open Circuit Voltage (Voc) | 210V |
| Maximum PV Input Power | 5100W |
| Max PV Input Power by Battery Voltage | 12V: 1500W, 24V: 2800W, 36V: 3900W, 48V: 5100W |
| Max PV Voc by Battery Voltage | 12V: 120V, 24V: 165V, 36V: 180V, 48V: 210V |
| Charging Stages | 4-stage (Bulk, Absorption, Float, Equalization) |
| Display Type | LED or LCD |
| Material | Metal |
| Color | Blue |
| Product Dimensions (L x W x H) | 34.5L x 21.3W x 14.2H Centimeters |
| Item Weight | 4.5 Kilograms |
| Country of Origin | India |

Image: Front view of the ASHAPOWER NEON 70 MPPT Charge Controller, showcasing its compact design and display area.
8. Warranty Information
The ASHAPOWER NEON 70 Solar MPPT Charge Controller comes with a 2 Years Warranty on manufacturing defects. Please retain your purchase receipt as proof of purchase for warranty claims.

Image: ASHAPOWER NEON 70 MPPT Charge Controller with a visible "2 Years Warranty" badge, indicating the product's warranty period.
9. Customer Support
For technical assistance, warranty claims, or any other inquiries, please contact ASHAPOWER customer support:
- Email: contact@ashapower.in
- Phone: +91-7594 82 1007
- Website: For detailed user manuals and further information, visit www.ashapower.in


