Introduction
This user manual provides comprehensive instructions for the safe and effective operation of your ANENG Multimeter and 60W LCD Soldering Iron kit. This versatile tool combination is designed for various electrical and electronic tasks, including measuring voltage, current, resistance, continuity, and diodes, as well as soldering applications for DIY, household repairs, and professional use.
Please read this manual thoroughly before using the product to ensure proper function and to prevent damage or injury.
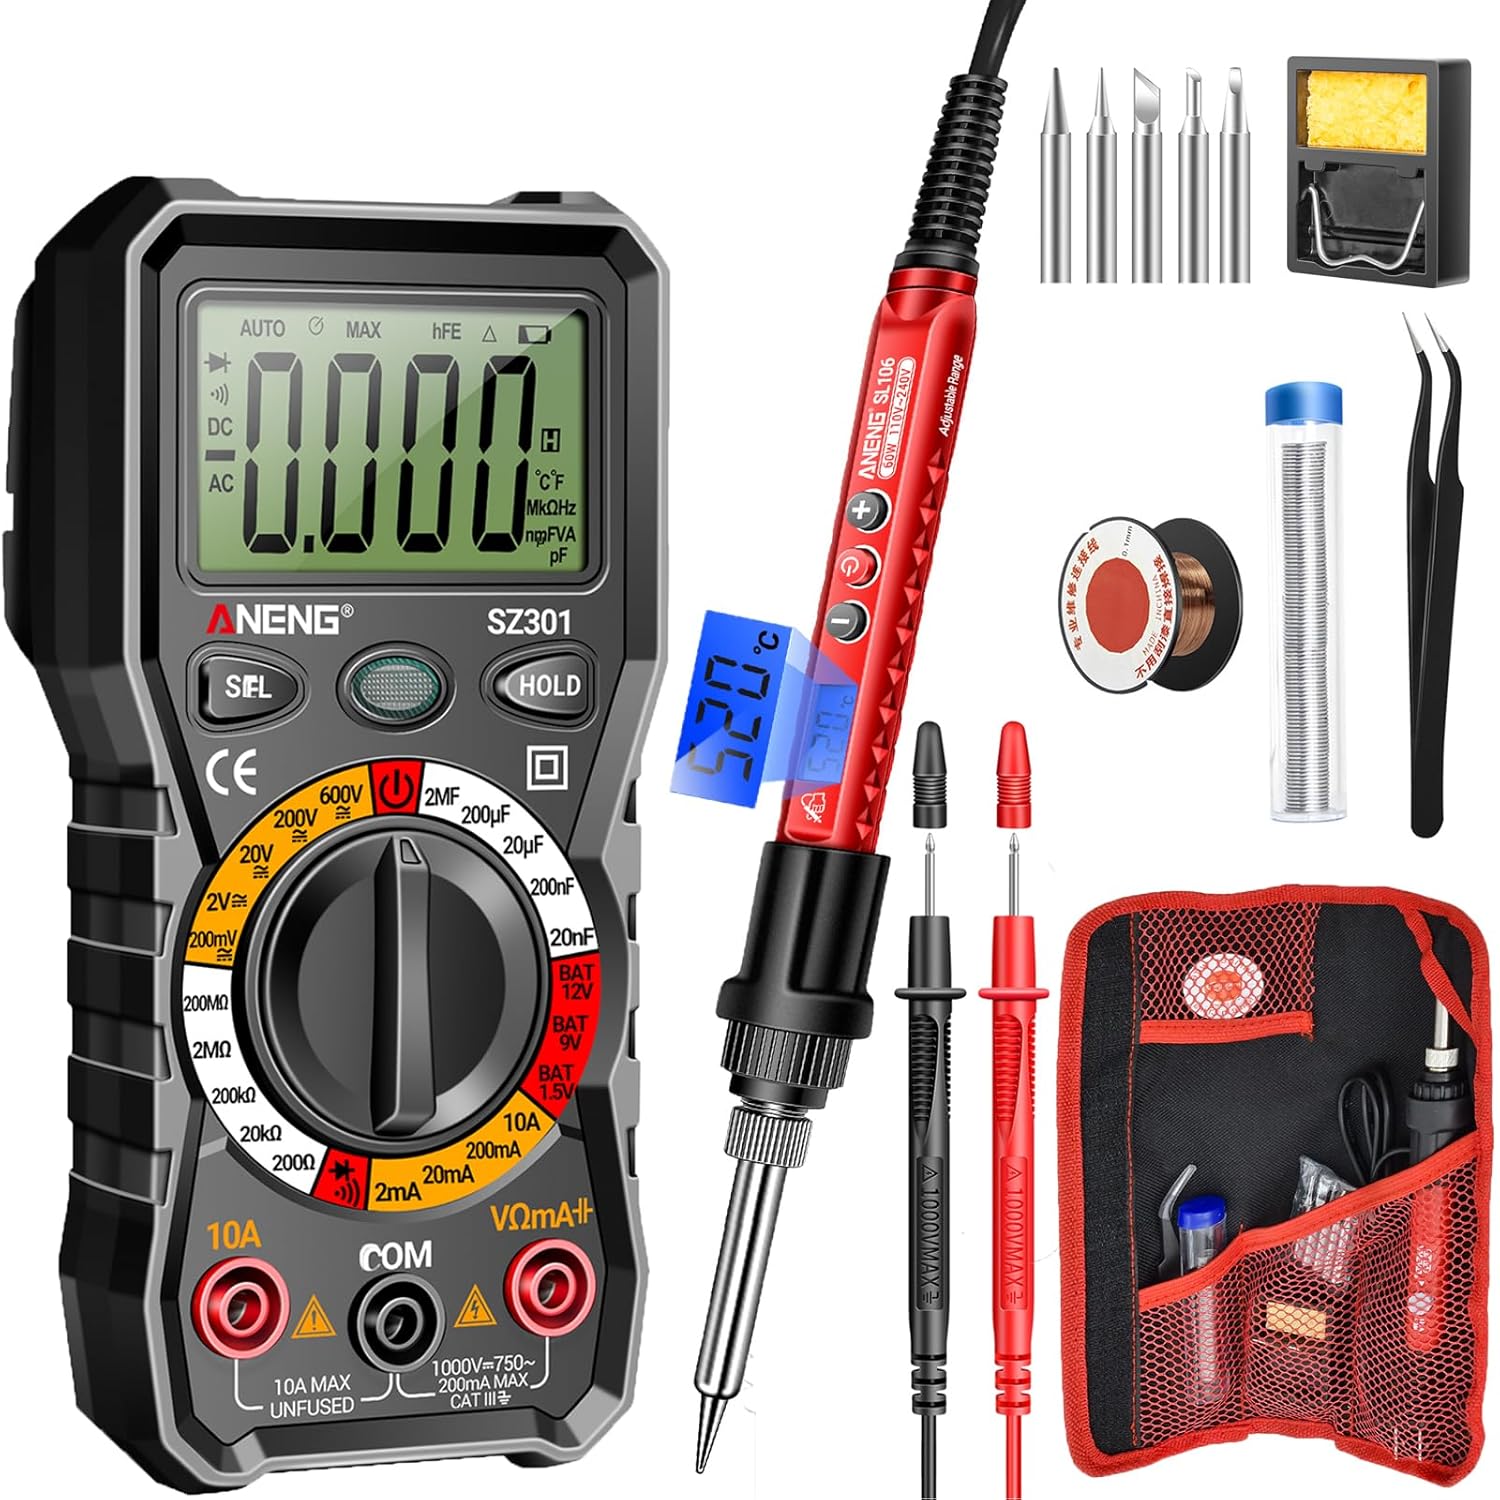
Image: The complete ANENG Multimeter and Soldering Iron kit, showing the multimeter, soldering iron, various tips, stand, sponge, solder wire, and carrying bag.
Safety Information
Always observe the following safety precautions to prevent electric shock, fire, or personal injury:
- Do not use the multimeter or soldering iron if they appear damaged.
- Ensure proper ventilation when soldering to avoid inhaling fumes.
- Always wear appropriate personal protective equipment (PPE), such as safety glasses.
- Do not touch the soldering iron tip when it is hot. Allow it to cool completely before handling.
- Verify the correct function of the multimeter before making measurements on live circuits.
- Use the correct input terminals, function, and range for your measurements.
- Keep the tools away from children.
- Disconnect power to the circuit before soldering or making resistance/continuity measurements.
- The multimeter features anti-burn with double fuses and overload protection for enhanced safety.
Package Contents
Your ANENG Multimeter and Soldering Iron kit includes the following items:
- ANENG SZ301 Digital Multimeter
- ANENG SL106 60W LCD Soldering Iron
- Interchangeable Soldering Tips (various shapes: flat, horseshoe, cutter, spike, conical)
- Simple Soldering Iron Stand
- Cleaning Sponge
- Solder Wire
- Wire Tube
- Tweezers
- Two AA Batteries (for multimeter)
- Two High-Quality Test Leads (for multimeter)
- Storage Bag

Image: The convenient storage roll bag for organizing and transporting the ANENG Multimeter and Soldering Iron kit components.
Product Features
Key features of your ANENG Multimeter and Soldering Iron kit:
- Multimeter Functions: Measures AC/DC voltage, current, resistance, continuity, and diode.
- Soldering Iron Power: 60W, 110V-240V, heats up to operating temperature in approximately 10 seconds.
- Adjustable Temperature: Soldering iron temperature range of 356℉-968℉ (180℃-520℃) with knob wheel adjustment.
- User-Friendly Display: Clear LCD screen on both multimeter and soldering iron for easy reading of values and settings.
- Ergonomic Design: Comfortable handle and high-temperature resistant silicone protective cover on soldering iron.
- Safety Features: Multimeter includes anti-burn with double fuses, overload protection, and insulated probes.
- Portability: Compact and lightweight design with an easy-to-carry storage bag.
- Versatile Applications: Suitable for PCB soldering, equipment repair, circuit boards, jewelry, DIY projects, and various electronic repairs.
Setup
Multimeter Setup (SZ301)
- Battery Installation: Open the battery compartment on the back of the multimeter and insert the two AA batteries, observing polarity. Close the compartment securely.
- Test Lead Connection:
- Insert the black test lead into the "COM" (Common) jack.
- For most measurements (voltage, resistance, continuity, diode), insert the red test lead into the "VΩmA+" jack.
- For high current measurements (up to 10A), insert the red test lead into the "10A MAX" jack.
- Power On: Rotate the rotary switch to the desired measurement function to power on the multimeter.

Image: Close-up view of the ANENG SZ301 Multimeter's rotary switch and display, highlighting its user-friendly design.
Soldering Iron Setup (SL106)
- Tip Installation: Ensure the soldering iron is unplugged and cool. Screw the desired soldering tip firmly into the heating element.
- Stand Placement: Place the simple soldering iron stand on a stable, heat-resistant surface. Ensure the cleaning sponge is moistened and placed in its tray.
- Power Connection: Plug the soldering iron into a standard 110V-240V AC power outlet. The LCD display will illuminate.

Image: The ANENG soldering iron demonstrating its multi-head interchangeable tips, including flat, horseshoe, cutter, spike, and conical shapes.
Operating Instructions
Using the Multimeter (SZ301)
Before any measurement, ensure the test leads are correctly inserted and the rotary switch is set to the appropriate function and range.
- Measuring AC Voltage:
- Set the rotary switch to the "V~" (AC Voltage) range.
- Connect the test leads in parallel to the circuit or component you wish to measure.
- Read the voltage value on the LCD display.

Image: The ANENG SZ301 Multimeter measuring AC voltage from a wall outlet, displaying "0223" for 223V AC.
- Measuring DC Voltage:
- Set the rotary switch to the "V-" (DC Voltage) range.
- Connect the red test lead to the positive (+) side and the black test lead to the negative (-) side of the DC source.
- Read the voltage value on the LCD display.

Image: The ANENG SZ301 Multimeter measuring DC voltage on a car battery, displaying "0023" for 2.3V DC.
- Measuring AC Current:
- Important: Disconnect power to the circuit. Connect the multimeter in series with the circuit.
- Set the rotary switch to the "A~" (AC Current) range. For high currents, use the "10A MAX" jack for the red lead.
- Apply power to the circuit and read the current value.

Image: The ANENG SZ301 Multimeter set up to measure AC current in a circuit with a light bulb, displaying "0.160" for 0.160A AC.
- Measuring Resistance:
- Ensure the circuit is de-energized.
- Set the rotary switch to the "Ω" (Resistance) range.
- Connect the test leads across the component.
- Read the resistance value.
- Continuity Test:
- Ensure the circuit is de-energized.
- Set the rotary switch to the "Continuity" (diode/buzzer) symbol.
- Touch the test leads to the ends of the circuit or component. A beep indicates continuity.
- Diode Test:
- Ensure the circuit is de-energized.
- Set the rotary switch to the "Diode" symbol.
- Connect the red lead to the anode and the black lead to the cathode of the diode. Read the forward voltage drop. Reverse the leads to check for open circuit.
- HOLD Function: Press the "HOLD" button to freeze the current reading on the display. Press again to release.
- SEL Function: Press the "SEL" button to switch between different measurement modes within a single rotary switch position (e.g., AC/DC, Diode/Continuity).
Using the Soldering Iron (SL106)
- Power On and Heating: Plug in the soldering iron. The LCD display will show the current temperature. The iron heats up rapidly, typically within 10 seconds.
- Adjusting Temperature: Use the knob wheel on the handle to adjust the temperature between 356℉-968℉ (180℃-520℃). The LCD will show the set temperature.
- Tinning the Tip: Once the iron reaches the desired temperature, melt a small amount of solder onto the tip. This "tins" the tip, improving heat transfer and preventing oxidation.
- Soldering:
- Clean the components to be soldered.
- Place the hot soldering iron tip onto the joint to heat both the component lead and the pad simultaneously.
- Apply solder to the heated joint, not directly to the iron tip. The solder should flow smoothly and evenly.
- Remove the solder wire, then remove the soldering iron. Allow the joint to cool naturally without disturbance.
- Changing Tips: Ensure the soldering iron is unplugged and completely cool. Unscrew the current tip and screw in the desired new tip.

Image: The ANENG soldering iron in use, demonstrating its rapid heating capability for electronic repair.

Image: Close-up of the ANENG soldering iron's backlit digital LCD display, showing the temperature reading.
Maintenance
Multimeter Maintenance
- Cleaning: Wipe the multimeter with a damp cloth. Do not use abrasive cleaners or solvents.
- Battery Replacement: Replace batteries when the low battery indicator appears on the display.
- Fuse Replacement: If the current measurement function fails, the fuse may need replacement. Refer to specifications for fuse type. Ensure the multimeter is off and leads are disconnected before opening the battery/fuse compartment.
- Storage: Store the multimeter in a cool, dry place, away from direct sunlight and extreme temperatures. Remove batteries if storing for extended periods.
Soldering Iron Maintenance
- Tip Cleaning: Regularly wipe the soldering iron tip on the moistened sponge during use to remove excess solder and oxidation.
- Tip Tinning: Always re-tin the tip with a small amount of fresh solder after cleaning and before storing to prevent oxidation.
- Tip Care: Do not file or sand the soldering tip, as this can damage the plating.
- Storage: Store the soldering iron in its stand or the provided carrying bag once completely cooled.
Troubleshooting
| Problem | Possible Cause | Solution |
|---|---|---|
| Multimeter display is blank or dim. | Low or dead batteries; incorrect battery installation. | Replace batteries; ensure correct polarity. |
| Multimeter shows "OL" (Overload). | Measurement exceeds selected range; incorrect function. | Select a higher range; ensure correct function (e.g., AC vs. DC). |
| Current measurement not working. | Blown fuse; incorrect test lead connection. | Check and replace fuse if necessary; ensure red lead is in "10A MAX" jack for current. |
| Soldering iron not heating up. | Not plugged in; faulty power outlet; internal issue. | Check power connection; try a different outlet. If problem persists, contact support. |
| Solder not flowing well. | Tip is dirty or oxidized; temperature too low; incorrect solder type. | Clean and re-tin tip; increase temperature; ensure using appropriate solder. |
Specifications
| Feature | Detail |
|---|---|
| Brand | ANENG |
| Multimeter Model | SZ301 |
| Soldering Iron Model | SL106 |
| Soldering Iron Power | 60W |
| Soldering Iron Voltage | 110V-240V |
| Soldering Iron Temperature Range | 180℃-520℃ (356℉-968℉) |
| Multimeter Power Source | 2 x AA Batteries |
| Multimeter Measurement Types | AC/DC Voltage, AC/DC Current, Resistance, Continuity, Diode |
| Safety Features | Anti-burn with double fuses, Overload protection, Insulated probes |
| Item Model Number (Internal) | 05f77195-ed31-4c08-9ee5-2aff5f408a62 |
Warranty and Support
For warranty information or technical support, please refer to the contact details provided with your purchase or visit the official ANENG website. Keep your purchase receipt as proof of purchase.
For further assistance, you may contact ANENG customer service through their official channels. The ANENG store can be visited at ANENG Store on Amazon.


