1. Introduction
This manual provides comprehensive instructions for the safe and efficient operation of your HTVRONT Auto Heat Press 2. Please read this manual thoroughly before using the device to ensure proper function and to prevent damage or injury. Keep this manual for future reference.
2. Safety Information
WARNING: Failure to follow these safety instructions may result in fire, electric shock, or other injury or damage.
- Always operate the heat press on a stable, heat-resistant surface.
- Keep hands and fingers clear of the heating plate during operation to avoid burns.
- Do not immerse the machine in water or other liquids.
- Ensure the power cord is not damaged and is properly plugged into a grounded outlet.
- Unplug the machine when not in use or before cleaning.
- Do not leave the machine unattended during operation.
- The machine features an automatic shut-off function after 15 minutes of inactivity to prevent overheating.
- Keep out of reach of children.
3. Product Overview
The HTVRONT Auto Heat Press 2 is designed for efficient and precise heat transfer applications. Familiarize yourself with its main components:
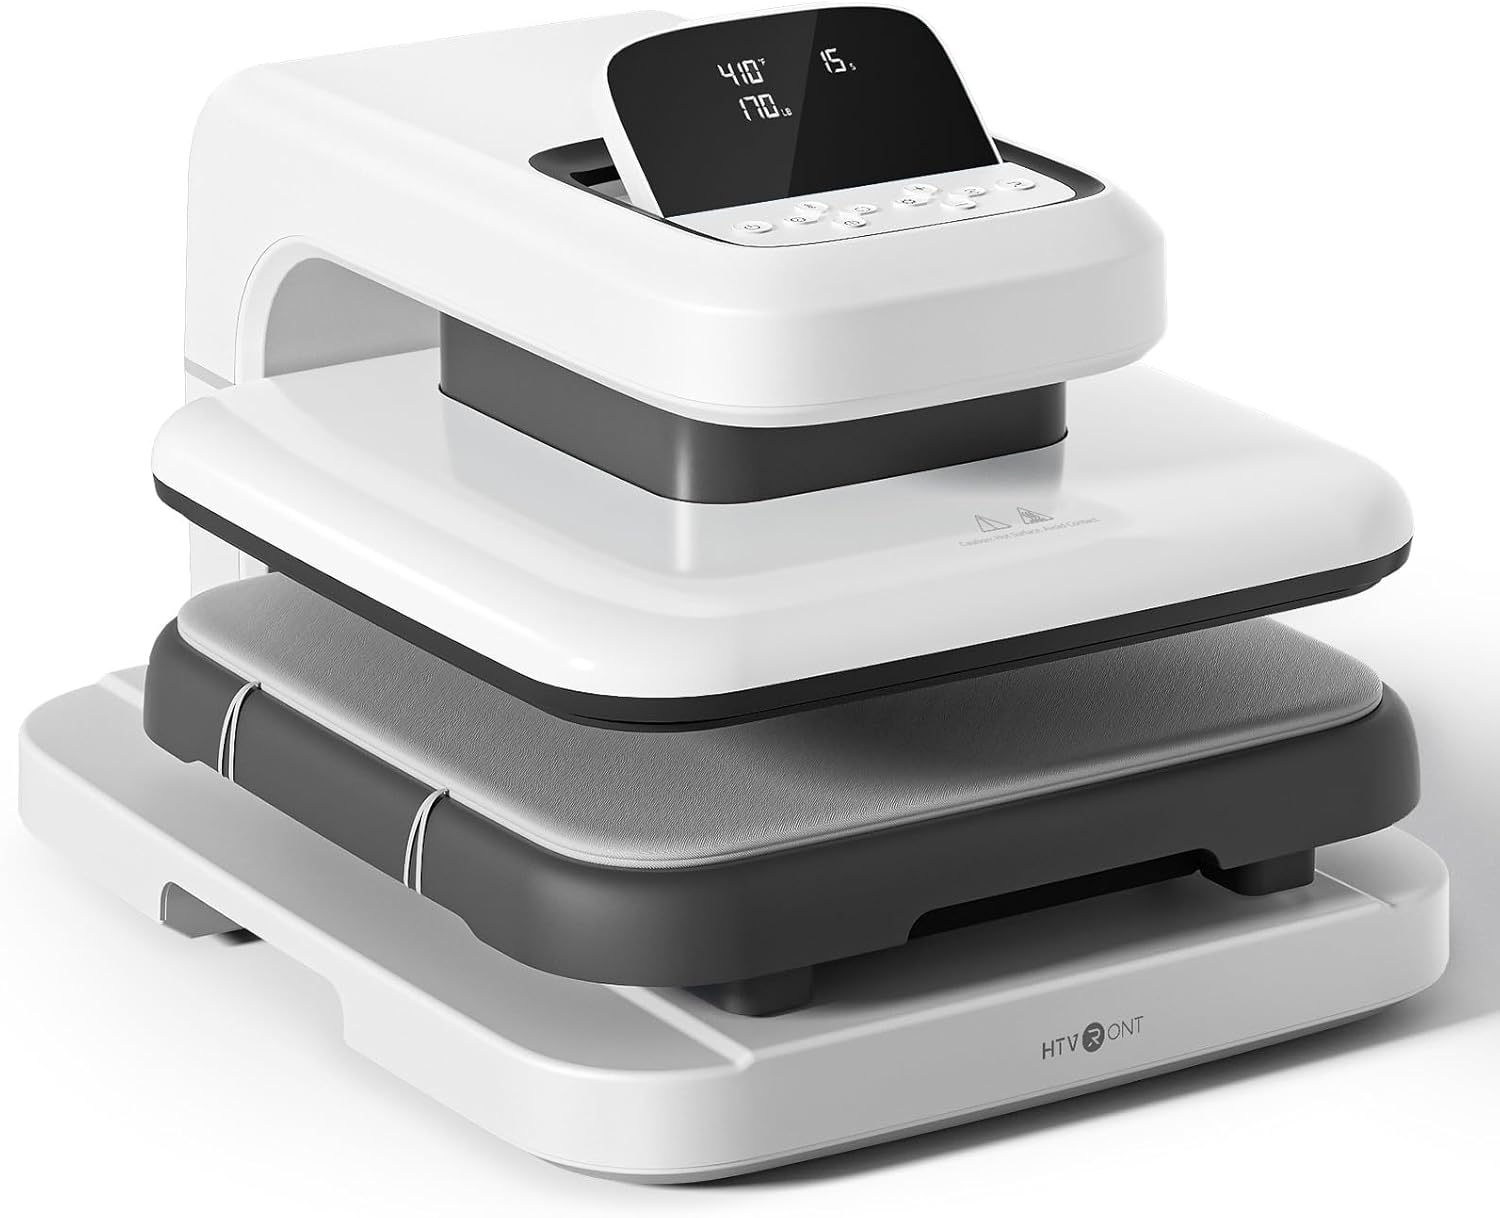

- Heat Plate: The upper heating element that applies heat and pressure.
- Ironing Board (Lower Platen): The surface where materials are placed for pressing. Features a fully pull-out drawer design.
- Base: Provides stability for the machine.
- LED Screen: Displays temperature, time, and pressure settings.
- Control Buttons: Used to adjust settings and initiate operations.
4. Setup
Follow these steps to set up your HTVRONT Auto Heat Press 2 for first use:
- Unpack the Machine: Carefully remove the heat press from its packaging. Retain all packaging materials for potential future transport or storage.
- Placement: Place the machine on a flat, stable, and heat-resistant surface. Ensure there is adequate clearance around the machine for ventilation and safe operation.
- Power Connection: Connect the power cord to the machine and then plug it into a standard 110V (DC) grounded electrical outlet.
- Initial Power On: Press the power button to turn on the machine. The LED screen will illuminate.

5. Operating Instructions
5.1. Powering On/Off
- To power on, press the power button.
- To power off, press and hold the power button until the screen turns off.
5.2. Setting Parameters (Temperature, Time, Pressure)
The HTVRONT Auto Heat Press 2 allows for precise control over temperature, time, and pressure to suit various materials and transfer types.
- Temperature Range: 210°F - 410°F (100°C - 210°C)
- Time Range: 1 - 999 seconds
- Pressure Range: 50 - 170 LB (adjustable)

Use the control buttons on the LED screen to adjust these settings. The machine heats up quickly, reaching 410°F within 5 minutes and 30 seconds.

5.3. Automatic Pressing Cycle
Once parameters are set and the material is in place, the automatic pressing function simplifies operation:
- Place your substrate and transfer material on the ironing board.
- Press the "R" button to initiate the automatic pressing cycle. The heat plate will descend and apply pressure.
- The machine will buzz when the set time is complete and automatically release the heat plate.

5.4. Using the Fully Pull-out Drawer
The ironing board features a fully pull-out drawer, allowing for safe and easy placement of materials without contact with the hot heat plate.
- Pull the drawer completely out before placing or adjusting your items.
- Push the drawer back in before starting the pressing cycle.
5.5. Adjusting Screen Angle
The LED screen can be adjusted to 7 levels within a 0-75° range for improved visibility and ergonomic comfort during operation.

5.6. Material Compatibility and Higher Heating Height
The HTVRONT Auto Heat Press 2 is compatible with various heat transfer materials and features an increased heating height for thicker items.
- Compatible Materials: HTV (Heat Transfer Vinyl), Sublimation Paper, DTF (Direct to Film), Heat Transfer Paper, Puff Heat Transfer Vinyl, Glitter Heat Transfer Vinyl.
- Increased Heating Height: Up to 4.5 cm (1.77 inches), allowing for pressing on thicker items such as hoodies, canvas bags, and pillows, in addition to t-shirts.


6. Maintenance
Proper maintenance ensures the longevity and optimal performance of your heat press.
- Cleaning the Heat Plate: Allow the machine to cool completely. Use a soft, damp cloth to wipe the heat plate. For stubborn residue, a specialized heat press cleaner can be used, following the cleaner's instructions. Avoid abrasive materials.
- Cleaning the Ironing Board: Wipe the ironing board with a damp cloth. Ensure it is dry before next use.
- General Cleaning: Wipe the exterior of the machine with a soft, dry cloth.
- Storage: Store the heat press in a dry, dust-free environment when not in use.
7. Troubleshooting
If you encounter issues with your HTVRONT Auto Heat Press 2, refer to the following common troubleshooting steps:
| Problem | Possible Cause | Solution |
|---|---|---|
| Machine does not power on. | Power cord not properly connected; power outlet issue. | Ensure the power cord is securely plugged into both the machine and a working grounded outlet. Test the outlet with another device. |
| Machine not heating up. | Temperature not set; machine in standby mode. | Verify temperature settings on the LED screen. Allow sufficient time for preheating. If the machine has been idle for 15 minutes, it may have entered auto shut-off mode; power cycle the machine. |
| Uneven heat transfer results. | Incorrect pressure; uneven material placement; faulty transfer material. | Adjust pressure settings as needed (50-170 LB). Ensure material is laid flat and evenly. Test with new transfer material. |
| Automatic press not engaging/releasing. | "R" button not pressed; obstruction. | Ensure the "R" button is pressed firmly. Check for any obstructions preventing the heat plate from moving freely. |
If the problem persists after attempting these solutions, please refer to the support section for further assistance.
8. Specifications
| Feature | Detail |
|---|---|
| Model Number | SG-RYJ-0521-US |
| Heat Plate Size | 15 x 15 inches (38.1 x 38.1 cm) |
| Temperature Range | 210°F - 410°F (100°C - 210°C) |
| Time Range | 1 - 999 seconds |
| Pressure Range | 50 - 170 LB |
| Increased Heating Height | Up to 4.5 cm (1.77 inches) |
| Power | 1500W |
| Input Voltage | 110 Volts (DC) |
| Item Weight | 47.4 pounds (21.54 kg) |
| Product Dimensions | Approximately 20.9"L x 17.1"W x 13"H |
| Auto Shut-off | After 15 minutes of inactivity |
| Screen Angle Adjustment | 0-75 degrees |
9. Warranty and Support
For warranty information, please refer to the documentation included with your purchase or visit the official HTVRONT website. For technical support, product inquiries, or assistance with troubleshooting beyond this manual, please contact HTVRONT customer service through their official channels. Details can typically be found on the manufacturer's website or your purchase platform.
Note: The manufacturer is committed to providing support; however, specific contact methods may vary. Always check the latest information on the official HTVRONT website.


