1. Introduction
This manual provides detailed instructions for the XikeStor 16-Port 2.5G L3 Managed Ethernet Switch, designed for small to medium businesses, home labs, creative studios, and educational institutions. This device offers a balance of performance and flexibility, providing seamless, high-speed connectivity and efficient network management through advanced features such as VLAN, QoS, and routing capabilities. It is ideal for upgrading to a 2.5G or 10G network infrastructure.
2. Product Overview
The XikeStor SKS8300-12E2T2X is a 16-port Layer 3 managed switch featuring a versatile port configuration for high-speed data transfer. It includes 12 x 2.5G Ethernet ports, 2 x 10G RJ45 ports, and 2 x 10G SFP+ ports. The switch supports auto-negotiation across various speeds (100M/1G/2.5G/10G), ensuring compatibility with a wide range of network devices and preventing congestion.

Image 2.1: Front view of the XikeStor 16-Port 2.5G L3 Managed Ethernet Switch, showing all ports and indicators.
Key Features:
- High-Speed Connectivity: 12x 2.5G RJ45 ports, 2x 10G RJ45 ports, and 2x 10G SFP+ ports.
- Layer 3 Management: Supports DHCP, OSPF, BGP, RIP, VLAN, ACL, LACP, IGMP, and QoS.
- Durable Construction: Sturdy metal chassis with an intelligent temperature-controlled fan for optimal heat dissipation.
- Flexible Management: Accessible via Web-based GUI and Command Line Interface (CLI).
- Versatile Installation: Designed for both desktop and wall-mount deployment.

Image 2.2: Overview of the switch's key features, including L3 management, 2.5G/10G RJ45 ports, 10G SFP+ ports, and routing capabilities.

Image 2.3: Diagram illustrating the switch's 140Gbps switching capacity, 104Mpps packet forwarding rate, 16K MAC address table, and 512MB system memory.
3. Specifications
| Attribute | Value |
|---|---|
| Model Number | SKS8300-12E2T2X |
| Number of Ports | 16 (12x 2.5G RJ45, 2x 10G RJ45, 2x 10G SFP+) |
| Data Transfer Rate | 2.5 Gigabits Per Second (per 2.5G port) |
| Interface Type | RJ45, SFP+ |
| Product Dimensions | 9.84 x 8.26 x 1.73 inches (25 x 21 x 4.4 cm) |
| Item Weight | 5.37 pounds (2.44 kg) |
| Case Material | Metal |
| Color | Grey |
| Voltage | 110 Volts |
| Upper Temperature Rating | 40 Degrees Celsius |
| Compatible Devices | Camera, Desktop, Gaming Console, NAS, Router |
| Manufacturer | Anhui Seeker Electronic Technology Co., LTD |
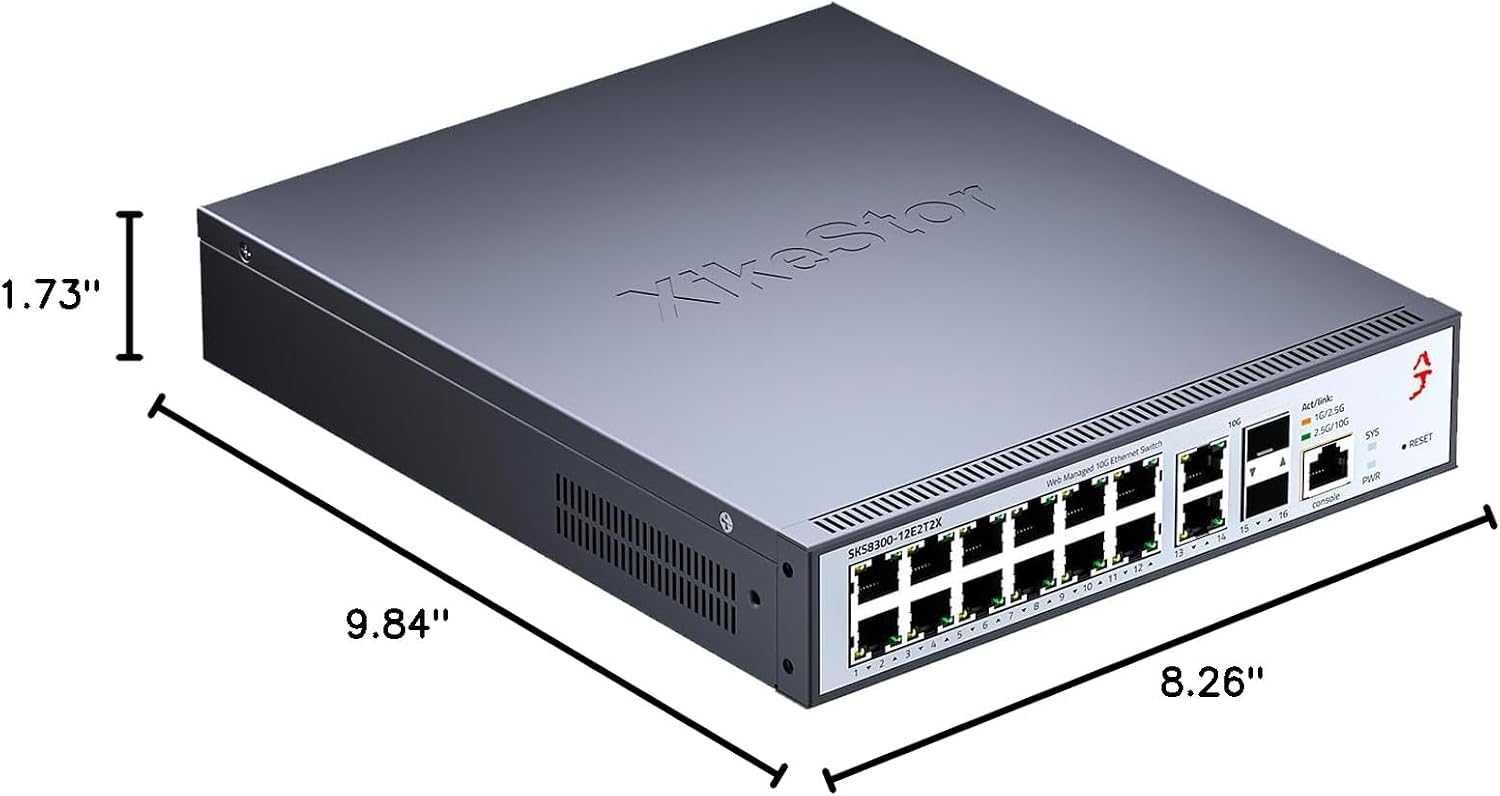
Image 3.1: Diagram showing the physical dimensions of the switch: 9.84 inches length, 8.26 inches width, and 1.73 inches height.
4. Setup and Installation
4.1 Package Contents
Before installation, verify that all components are present in the package:
- XikeStor 16-Port 2.5G L3 Managed Ethernet Switch
- Power Adapter
- Mounting Brackets (for wall or rack mounting)
- Screws (for mounting)
4.2 Physical Installation
The switch can be installed on a desktop, mounted on a wall, or integrated into a rack. Ensure adequate ventilation around the device to prevent overheating.
- Desktop Placement: Place the switch on a flat, stable surface. Ensure sufficient space for cable connections and airflow.
- Wall Mounting: Use the provided mounting brackets and screws to secure the switch to a wall. Refer to the diagram for bracket placement.
- Rack Mounting: The switch is compatible with standard rack units. Attach the provided brackets to the sides of the switch and then secure it into a rack.
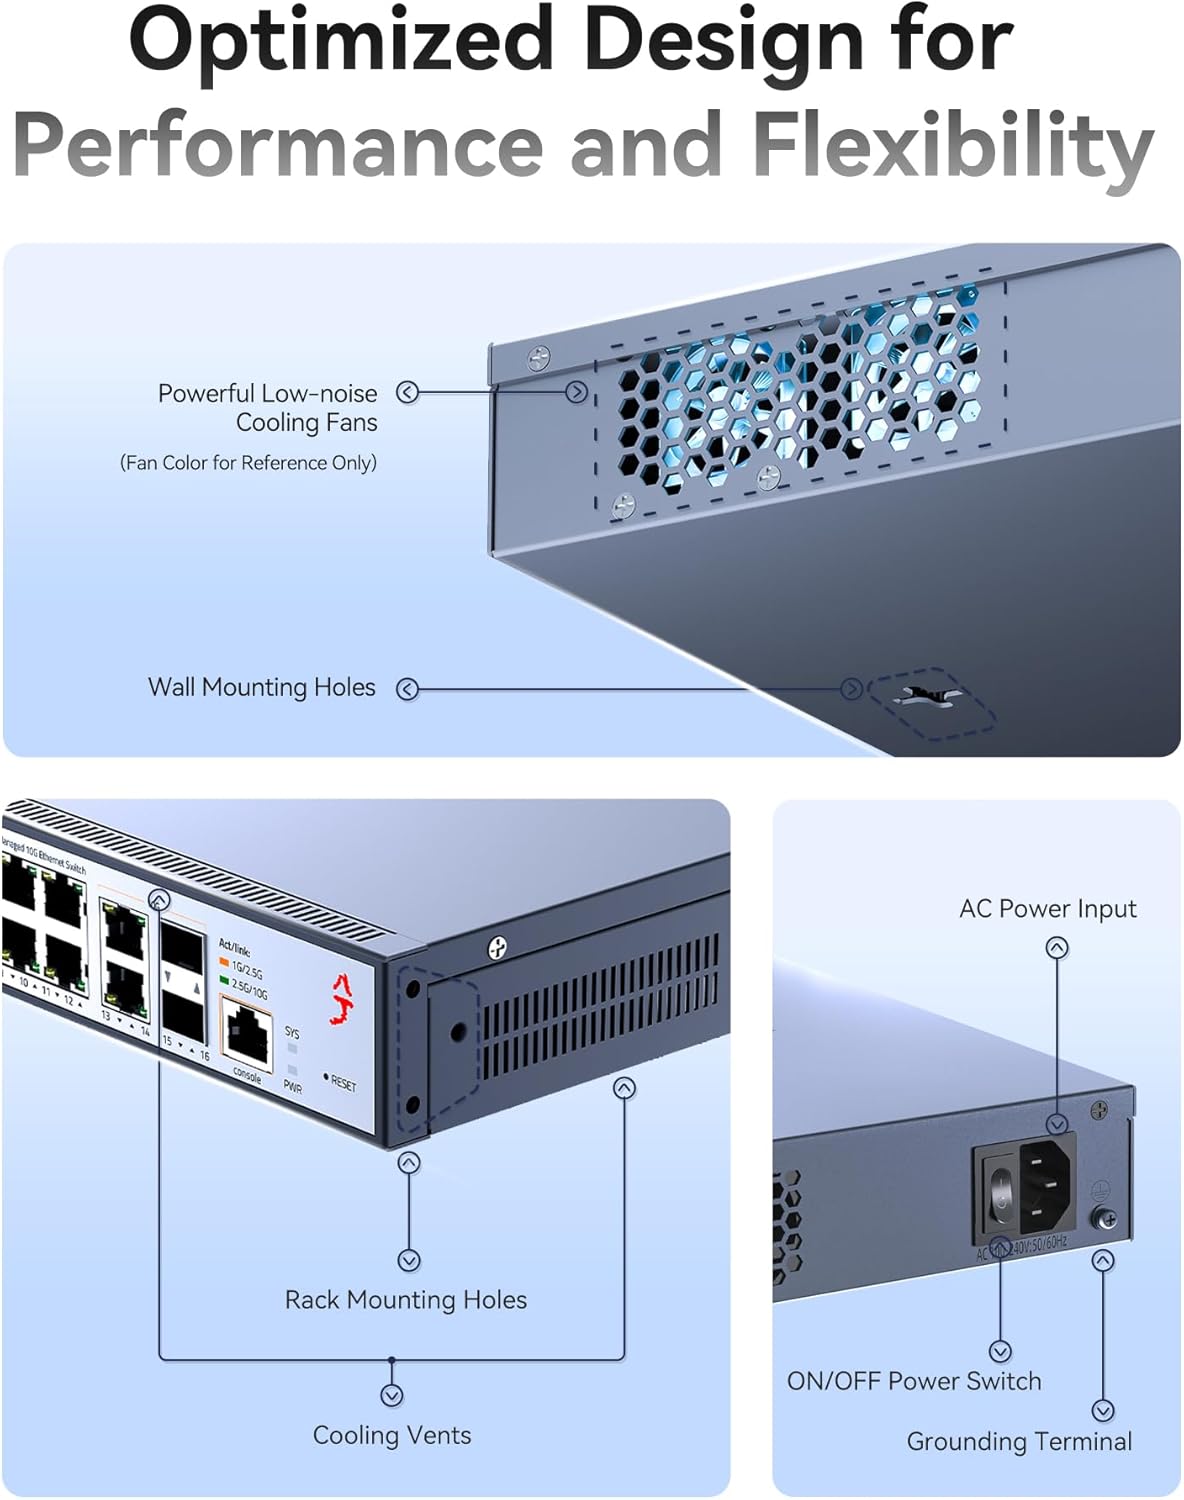
Image 4.1: Detailed view of the switch's design, highlighting powerful low-noise cooling fans, wall mounting holes, rack mounting holes, cooling vents, AC power input, ON/OFF power switch, and grounding terminal.
4.3 Power Connection
- Connect the power adapter to the AC power input port on the rear panel of the switch.
- Plug the power adapter into a standard electrical outlet.
- Press the ON/OFF power switch to power on the device. The SYS indicator light will illuminate upon successful power-up.
5. Management Interface Access
The XikeStor switch offers both Web-based Graphical User Interface (GUI) and Command Line Interface (CLI) for configuration and monitoring.
5.1 Web Interface Access
- Connect Your Device: Connect a computer directly to any RJ45 port on the switch using an Ethernet cable.
- Configure IP Address: Change your computer's network adapter IP address to be within the same subnet as the switch's default IP. For example, set your computer's IP to
192.168.10.X(where X is any number between 2-254, excluding 12) and the subnet mask to255.255.255.0. - Access Web Browser: Open a web browser (e.g., Chrome, Firefox, Edge) and enter the default IP address of the switch:
192.168.10.12. - Login: Enter the default credentials:
Username:admin
Password:admin - Save Settings: After making any configuration changes, navigate to the "Maintain" section and click the "Save" button to ensure settings are permanently stored. Failure to save will result in the switch reverting to factory settings upon power cycle or firmware update.

Image 5.1: Screenshot illustrating the web management interface and the configuration save process, emphasizing the importance of clicking "Save" under the "Maintain" section.
5.2 CLI Access
The switch also supports Command Line Interface (CLI) access, typically via a console port or SSH/Telnet after initial configuration. Refer to the advanced user guide for detailed CLI commands and procedures.
6. Operating Instructions
Once logged into the management interface, you can configure various network settings. This section covers basic operational aspects.
6.1 Basic Network Configuration
- IP Address Configuration: It is recommended to change the default IP address of the switch to one that fits your network's IP scheme to avoid conflicts and improve accessibility.
- Password Change: For security, change the default 'admin' password immediately after initial login.
- Port Status: Monitor the status of individual ports, including link speed and activity, through the web interface.
6.2 Advanced Features
The XikeStor L3 Managed Switch supports a comprehensive suite of advanced networking features:
- VLAN (Virtual Local Area Network): Segment your network into logical broadcast domains to improve security and performance.
- LACP (Link Aggregation Control Protocol): Combine multiple physical links into a single logical link for increased bandwidth and redundancy.
- DHCP (Dynamic Host Configuration Protocol): Configure the switch to act as a DHCP server or relay for automatic IP address assignment.
- Routing Protocols (OSPF, BGP, RIP): Implement dynamic routing for efficient data forwarding across complex networks.
- ACL (Access Control List): Define rules to filter network traffic based on various criteria, enhancing network security.
- IGMP (Internet Group Management Protocol): Optimize multicast traffic delivery, particularly useful for streaming applications.
- QoS (Quality of Service): Prioritize critical network traffic to ensure consistent performance for sensitive applications.

Image 6.1: Example network diagram illustrating the integration of the XikeStor switch in a small to medium-sized enterprise environment, showcasing VLANs, LACP, and connections to various devices like PCs, NAS, and Wi-Fi APs.
7. Maintenance
7.1 Cleaning
Regularly clean the exterior of the switch with a soft, dry cloth. Do not use liquid or aerosol cleaners, as they may damage the device. Ensure ventilation openings are free from dust and obstructions to maintain proper airflow.
7.2 Firmware Updates
Periodically check the XikeStor official website for available firmware updates. Firmware updates can provide new features, performance improvements, and security enhancements. Follow the instructions provided with the firmware update package carefully. It is recommended to back up your configuration before performing a firmware update.
8. Troubleshooting
8.1 No Power
- Ensure the power adapter is securely connected to both the switch and a working power outlet.
- Verify that the power switch on the rear panel is in the 'ON' position.
- Check if the power outlet is functional by plugging in another device.
8.2 Cannot Access Web Interface
- Confirm your computer's IP address is in the same subnet as the switch (e.g., 192.168.10.X).
- Ensure the Ethernet cable connection between your computer and the switch is secure.
- Verify that you are using the correct default IP address (192.168.10.12) and credentials (admin/admin).
- Clear your browser's cache or try a different browser. Some users have reported issues with browser-stored passwords interfering with login.
- If the switch was previously configured, it might have a different IP address. If you cannot recall the configured IP, a factory reset might be necessary (refer to the reset procedure in the full manual).
8.3 Configuration Not Saving
- Always click the "Save" button in the "Maintain" section of the web interface after making changes. This action writes the configuration to non-volatile memory.
- If settings are still not retained, ensure the firmware is up to date.
8.4 No Link Light on Connected Device
- Check the Ethernet cable for damage and ensure it is properly seated in both the switch port and the connected device.
- Verify that the connected device is powered on and functioning correctly.
- Ensure the port on the switch is not disabled in the configuration.
9. Technical Support
For further assistance, firmware updates, or detailed command-line interface manuals, please visit the official XikeStor support website. You may also find troubleshooting guides and FAQs there.

Image 9.1: Graphic indicating available technical support resources from XikeStor, including user manuals, firmware updates, CLI manuals, and troubleshooting guides.