
1. Introduction
This manual provides detailed instructions for the setup, operation, and maintenance of your FOIFKIN M9 PC Case. Designed for optimal performance and aesthetic appeal, the M9 features a unique wood walnut front panel, 270° panoramic tempered glass, and efficient cooling solutions. Please read this manual thoroughly before installation to ensure proper usage and longevity of your product.

Figure 1: FOIFKIN M9 PC Case - Front View
The FOIFKIN M9 PC Case combines elegant design with high-performance features, making it an ideal choice for gaming and professional workstations. Its spacious interior supports a wide range of components, ensuring compatibility with your build.
2. Product Features
- Green Design of Wood Elements: The M9 PC Case integrates natural wood elements with metal, offering an elegant and modern aesthetic. The 270° double-cabin glass curtain wall design provides an expansive view of your internal components.
- High-Performance Heat Dissipation: Equipped with 7 pre-installed NoLED fans, the M9 ensures efficient cooling. The hinged glass side panel allows for quick, tool-free access for installation and maintenance. The case supports up to 10 x 120mm fans on the sides, top, and PSU shroud for comprehensive airflow.
- Extra Large Capacity: The case is designed to accommodate various PC components, supporting ATX, M-ATX, and ITX motherboards. It can house a 360mm cooler, CPU coolers up to 170mm in height, and GPUs up to 400mm in length. The power supply type ATX is supported up to 220mm. Storage options include 1 x HDD and 2 x SSD mounts or 2 x HDD mounts, with 7 expansion slots.
- Input/Output Ports: The front panel features 1 x Type-C 3.0 port, 1 x USB 3.0 port, 1 x USB 2.0 port, Microphone & Audio jacks, a Power Button, and a Restart Button for convenient connectivity.

Figure 2: Internal View of FOIFKIN M9 PC Case
The M9's dual-chamber design separates the main components from cable routing, storage drives, and the PSU, contributing to a cleaner build and improved airflow.

Figure 3: Dual Chamber Design for optimized component separation.
3. Specifications
| Feature | Specification |
|---|---|
| Brand | FOIFKIN |
| Model Name | M9 (also referred to as M3 in some specifications) |
| Motherboard Compatibility | ATX, Micro ATX, ITX |
| Pre-installed Fans | 7 NoLED Fans |
| Max CPU Cooler Height | 170mm |
| Max GPU Length | 400mm |
| Power Supply Type | ATX (up to 220mm) |
| Expansion Slots | 7 |
| Storage Bays | 1 x HDD & 2 x SSD or 2 x HDD |
| Front I/O Ports | 1 x Type-C 3.0, 1 x USB 3.0, 1 x USB 2.0, Microphone & Audio, Power Button, Restart Button |
| Product Dimensions (LxWxH) | 16.4 x 11.8 x 15.2 inches (41.66 x 29.97 x 38.61 cm) |
| Item Weight | 18.79 pounds (8.52 kg) |
| Material | Acrylonitrile Butadiene Styrene (ABS) |

Figure 4: FOIFKIN M9 PC Case - Dimensions
4. Setup and Installation Guide
Follow these steps for a smooth and efficient build process.
4.1 Unpacking and Initial Inspection
- Carefully remove the PC case from its packaging.
- Inspect the case for any signs of damage during transit.
- Locate the accessory box inside the case, which contains screws, cable ties, and additional mounting brackets.
4.2 Panel Removal
The M9 PC Case features tool-free panel removal for easy access to components.
- Side Glass Panel: The 270° panoramic glass side panel is hinged. Gently open it to access the main compartment. It can be quickly removed without tools.
- Rear Panel: The rear panel can be removed by pulling it away. It does not require screws.
- Bottom Airflow Panel: This panel requires a thumbscrew at the rear to be removed.
- Dust Filters: Magnetic dust filters are located on the top and bottom of the case for easy cleaning. A finer mesh dust filter can be inserted into the front of the main filter for enhanced dust protection.

Figure 5: Hinged Glass Panel for Tool-Free Access
4.3 Fan Configuration
The M9 comes with 7 pre-installed NoLED fans. The front fans can be repositioned to optimize airflow for either the GPU or CPU.
- Front Fans: To reposition, remove the blanking plates, lift the fan, pull it towards the front of the case, and re-slot it into the desired position (higher or lower). The fans are mounted on clips with rubber mounts to reduce noise.
- Bottom Intake Fans: The two bottom intake fans are reverse blade fans, designed to pull air from below and direct it upwards.
- Fan Hub: All pre-installed fans are connected to a fan hub at the back of the case. This hub needs to be connected to your power supply unit and motherboard (5V RGB connection and chassis fan header) for power and control.

Figure 6: Pre-installed 7 NoLED Fans
4.4 Power Supply Installation
The M9 supports ATX power supplies and features a unique rear power supply unit area.
- Mounting: The power supply unit is screwed into the case from the inside, rather than from the rear.
- Power Cable: An extension lead runs from the power supply to a port at the rear of the case where your main power cable plugs in.
- Power Switch: Remember to turn the power supply unit on before closing the case, as the power switch is located on the PSU itself.
4.5 Motherboard and Storage Installation
The case supports ATX, M-ATX, and ITX motherboards, including rear-connect motherboards for a cleaner build.
- Motherboard: Install your motherboard into the designated standoffs.
- Storage: The case includes mounts for 1 x HDD and 2 x SSDs (or 2 x HDDs). Additional SSD/HDD trays are provided in the accessory box for mounting behind the motherboard tray.
- SSD Mount above PSU: There is a removable panel above the PSU shroud where an SSD can be mounted. Be mindful that if the PSU fan faces upwards, mounting an SSD here might block its airflow.
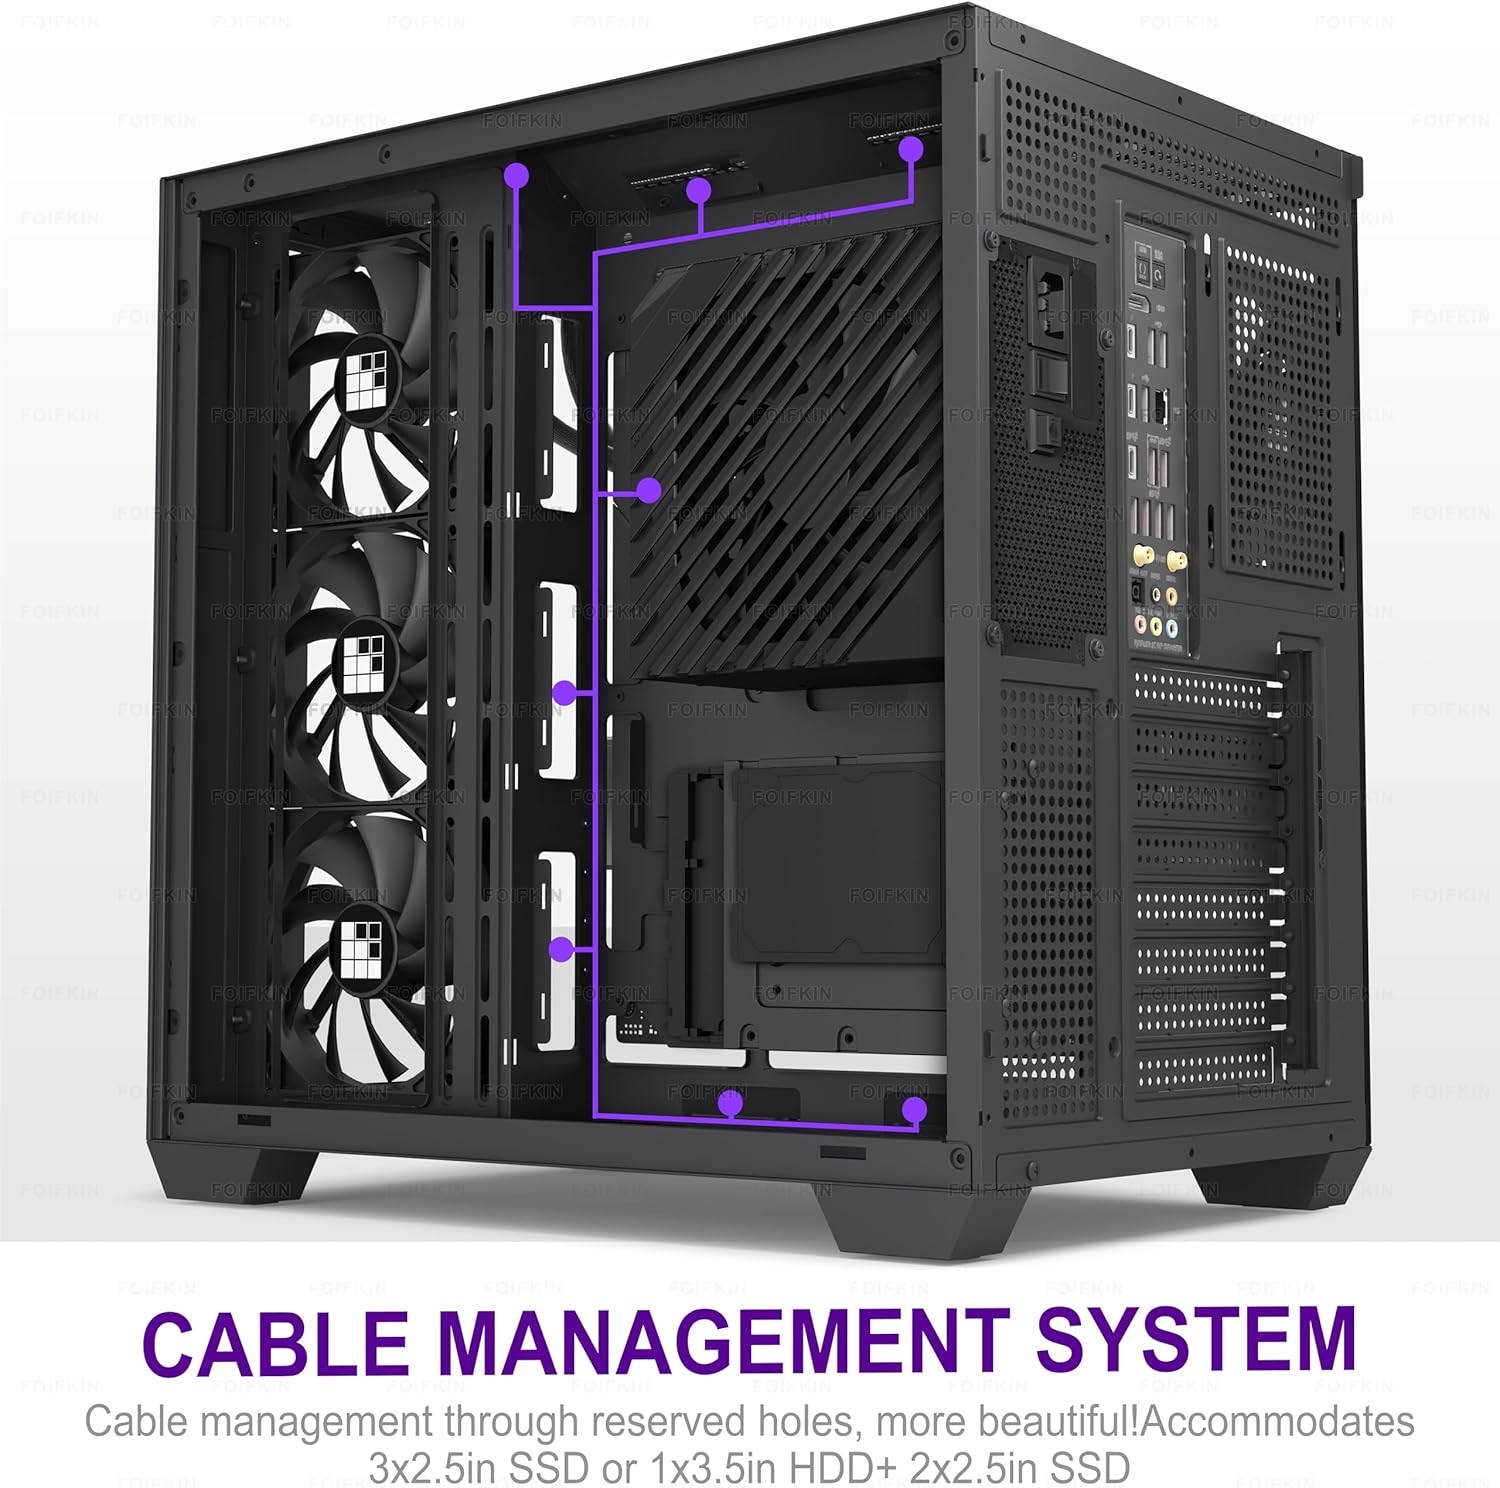
Figure 7: Rear View with Cable Management and Storage Mounts
4.6 GPU Installation
The M9 supports GPUs up to 400mm in length.
- Standard Mount: Install your GPU into the appropriate PCIe slot on the motherboard.
- Anti-Sag Bracket: An adjustable anti-sag bracket is included to support your graphics card and prevent sagging over time. It can be adjusted by loosening a screw at the rear.
4.7 Cable Management
The case offers excellent cable management options to keep your build tidy and improve airflow.
- Rear Channels: Utilize the numerous channels and Velcro ties at the back of the motherboard tray to route and secure cables.
- Plastic Clips: Plastic clips on the right-hand side allow for easy routing of power cables.
Note: The following video demonstrates the hinged panel and RGB lighting of a similar FOIFKIN F600 case. While the model differs, the hinged panel mechanism is similar.
Video 1: FOIFKIN F600 ATX PC Case (Note: Model F600 shown, hinged panel feature is similar)
5. Operating Instructions
Once all components are installed and cables are connected, your FOIFKIN M9 PC Case is ready for operation.
- Power On: Ensure the power supply unit's switch is in the 'ON' position. Press the Power Button located on the front I/O panel to start your PC.
- Restart: Press the Reset Button on the front I/O panel to restart your PC.
- Front Ports: Utilize the conveniently located USB and audio ports for connecting peripherals and accessories.
6. Maintenance
Regular maintenance helps ensure optimal performance and longevity of your PC case.
- Dust Filter Cleaning: Periodically remove and clean the magnetic dust filters located on the top and bottom of the case. Use compressed air or a soft brush to remove accumulated dust.
- Case Cleaning: Use a soft, damp cloth to wipe down the exterior surfaces of the case, including the glass panels. Avoid abrasive cleaners that could scratch the surfaces.
- Internal Cleaning: With the PC powered off and unplugged, carefully open the side panel and use compressed air to remove dust from internal components and fans.
7. Troubleshooting
If you encounter any issues, refer to the following common troubleshooting tips:
- PC Not Powering On:
- Ensure the power cable is securely connected to both the case's rear port and the wall outlet.
- Verify that the power supply unit's switch (located on the PSU itself, accessible via the rear extension cable) is in the 'ON' position.
- Check all internal power connections, especially the 24-pin motherboard power and CPU power cables.
- Fans Not Spinning/No RGB:
- Confirm that the fan hub at the back of the case is correctly connected to the power supply (SATA power) and the motherboard (5V RGB and system fan headers).
- Ensure all individual fan cables are securely plugged into the fan hub.
- GPU Sagging:
- Utilize the included adjustable anti-sag bracket to support the GPU. Loosen the rear screw, adjust the bracket to the desired height, and tighten the screw.
- Excessive Dust Buildup:
- Regularly clean the magnetic dust filters. Consider installing the finer mesh filter at the front for additional protection.
8. Warranty and Support
FOIFKIN is committed to providing high-quality products and excellent customer service.
Risk-Free Purchase: The product quality is guaranteed. If you encounter any problems with your FOIFKIN M9 PC Case, please feel free to contact us. We will endeavor to provide the best possible support and assistance to resolve any issues you may experience.