1. Introduction
This manual provides essential information for the safe and efficient use of your LIVOO DOC325 4-Burner Gas Plancha. Please read these instructions carefully before assembly, operation, or maintenance. Keep this manual for future reference.

Image 1.1: Front view of the LIVOO DOC325 4-Burner Gas Plancha. This image shows the main unit with its four control knobs and the cooking plate installed.
2. Safety Information
WARNING: Failure to follow these safety instructions could result in serious injury or death.
- For outdoor use only. Do not operate indoors or in enclosed spaces.
- Read all instructions before using the appliance.
- Keep children and pets away from the plancha during operation.
- Ensure the appliance is placed on a stable, level, non-combustible surface.
- Do not store or use gasoline or other flammable liquids and vapors in the vicinity of this or any other appliance.
- Always check for gas leaks before each use. Use a soapy water solution; never use an open flame.
- Use only the gas type specified (butane or propane) and ensure the regulator and hose are compatible and in good condition.
- Do not obstruct the flow of combustion and ventilation air.
- Wear protective gloves when handling hot surfaces.
- Disconnect the gas supply when the plancha is not in use.
3. Package Contents
Verify that all components are present and undamaged before assembly.
- LIVOO DOC325 Gas Plancha Unit (main body with burners and control knobs)
- Enameled Steel Cooking Plate
- Removable Grease Collection Tray
- Instruction Manual
- (Gas regulator and hose are typically sold separately, ensure compatibility)
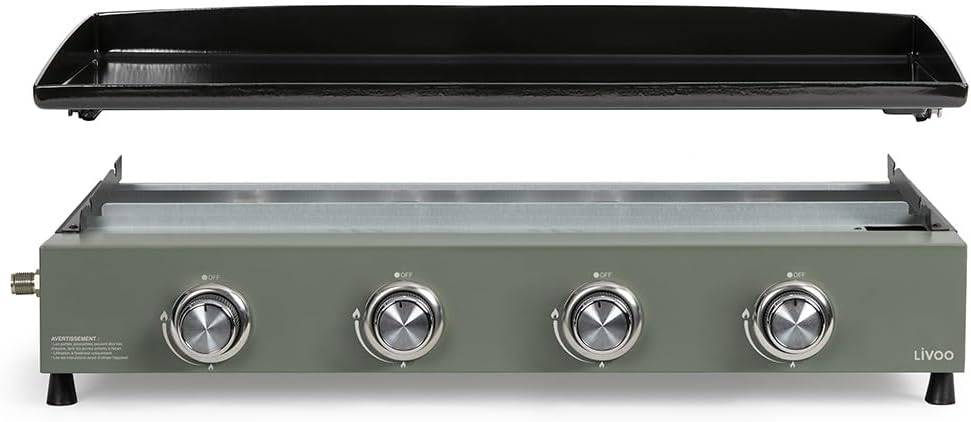
Image 3.1: Exploded view of the plancha showing the main body and the removable cooking plate. This illustrates the primary components.
4. Setup
- Unpacking: Carefully remove all components from the packaging. Retain packaging for storage if desired.
- Placement: Position the plancha on a flat, stable, heat-resistant surface, away from flammable materials. Ensure adequate ventilation.
- Install Cooking Plate: Place the enameled steel cooking plate onto the main unit, ensuring it sits securely.
- Install Grease Tray: Insert the removable grease collection tray into its designated slot at the front or rear of the unit.
- Gas Connection:
- Ensure all control knobs are in the "OFF" position.
- Connect the gas regulator to your butane or propane gas cylinder.
- Connect the gas hose from the regulator to the gas inlet on the side of the plancha. Ensure all connections are tight.
- Leak Test: Before first use and after every gas cylinder change, perform a leak test. Apply a soapy water solution to all gas connections. If bubbles appear, there is a leak. Tighten connections or replace faulty parts. Do not use the plancha if a leak is detected.

Image 4.1: Side view of the plancha, highlighting the gas inlet connection point. Ensure the gas hose is securely attached here.
5. Operating Instructions
- Pre-heating:
- Ensure the gas cylinder valve is open.
- Push and turn a control knob counter-clockwise to the high flame position (large flame symbol).
- The integrated automatic ignition will ignite the burner. If it doesn't ignite within 5 seconds, turn the knob to "OFF", wait 5 minutes, and try again.
- Repeat for desired burners.
- Allow the plancha to pre-heat for 5-10 minutes on high heat for optimal cooking.
- Temperature Control: Adjust the control knobs between the high flame (large flame symbol) and low flame (small flame symbol) settings to achieve the desired cooking temperature. Each of the four burners can be controlled independently.
- Cooking: Place food directly onto the hot enameled steel cooking plate. The 78.5 x 34.5 cm cooking surface is suitable for cooking for 10 to 12 people.
- Shutting Down:
- Turn all control knobs to the "OFF" position.
- Close the valve on the gas cylinder.
- Allow the plancha to cool completely before cleaning or moving.

Image 5.1: Detail of a control knob, showing the "OFF" position, automatic ignition, and flame intensity symbols for precise temperature control.
6. Maintenance
Regular cleaning and maintenance will extend the life of your plancha.
- Cleaning the Cooking Plate:
- After each use, once the plate has cooled sufficiently but is still warm, scrape off any food residue with a suitable scraper.
- The enameled steel cooking plate is removable for easier cleaning. Wash with warm soapy water and a non-abrasive sponge. Rinse thoroughly and dry completely to prevent rust.
- Cleaning the Grease Tray: The removable grease collection tray should be emptied and cleaned after each use. Wash with warm soapy water, rinse, and dry.
- Cleaning the Body: Wipe the lacquered steel casing with a damp cloth and mild detergent. Do not use abrasive cleaners or pads.
- Burner Maintenance: Periodically inspect the burners for blockages (e.g., insect nests). Clean with a soft brush if necessary.
- Storage: Store the plancha in a dry, protected area when not in use, especially during prolonged periods. Disconnect the gas cylinder.

Image 6.1: Underside view of the plancha, revealing the four stainless steel burners and the slot for the removable grease collection tray. Regular inspection of these components is recommended.
7. Troubleshooting
| Problem | Possible Cause | Solution |
|---|---|---|
| Burner does not ignite. |
|
|
| Uneven heating. |
|
|
| Gas smell. |
|
|
8. Specifications
| Brand | LIVOO |
| Model Number | DOC325 |
| Color | Green |
| Product Dimensions | 83.5 x 47 x 24 cm (Length x Depth x Height) |
| Weight | 17.86 kg |
| Total Power | 10 kW |
| Number of Burners | 4 (Stainless Steel) |
| Cooking Plate Material | Enameled Steel (3.5 mm thick) |
| Cooking Surface Dimensions | 78.5 x 34.5 cm |
| Body Material | Lacquered Steel |
| Ignition Type | Integrated Automatic Ignition |
| Gas Type Compatibility | Butane and Propane |
| Special Features | Removable Grease Management System |
9. Warranty and Support
Your LIVOO DOC325 Gas Plancha comes with a limited warranty. Please refer to the warranty card included with your product for specific terms and conditions, including coverage duration and claim procedures.
For technical support, spare parts, or warranty claims, please contact Livoo customer service. Contact information can typically be found on the Livoo official website or on your purchase documentation.
Manufacturer: Livoo


