Introduction
Thank you for choosing the Plkm 3-in-1 Wireless Dog Training System. This intelligent system combines three essential functions for pet owners: a short-range wireless dog leash, a wireless fence for establishing a safe boundary, and a dog training function to assist with behavior correction. This manual provides detailed instructions for the proper setup, operation, and maintenance of your device to ensure a safe and effective experience for both you and your pet.
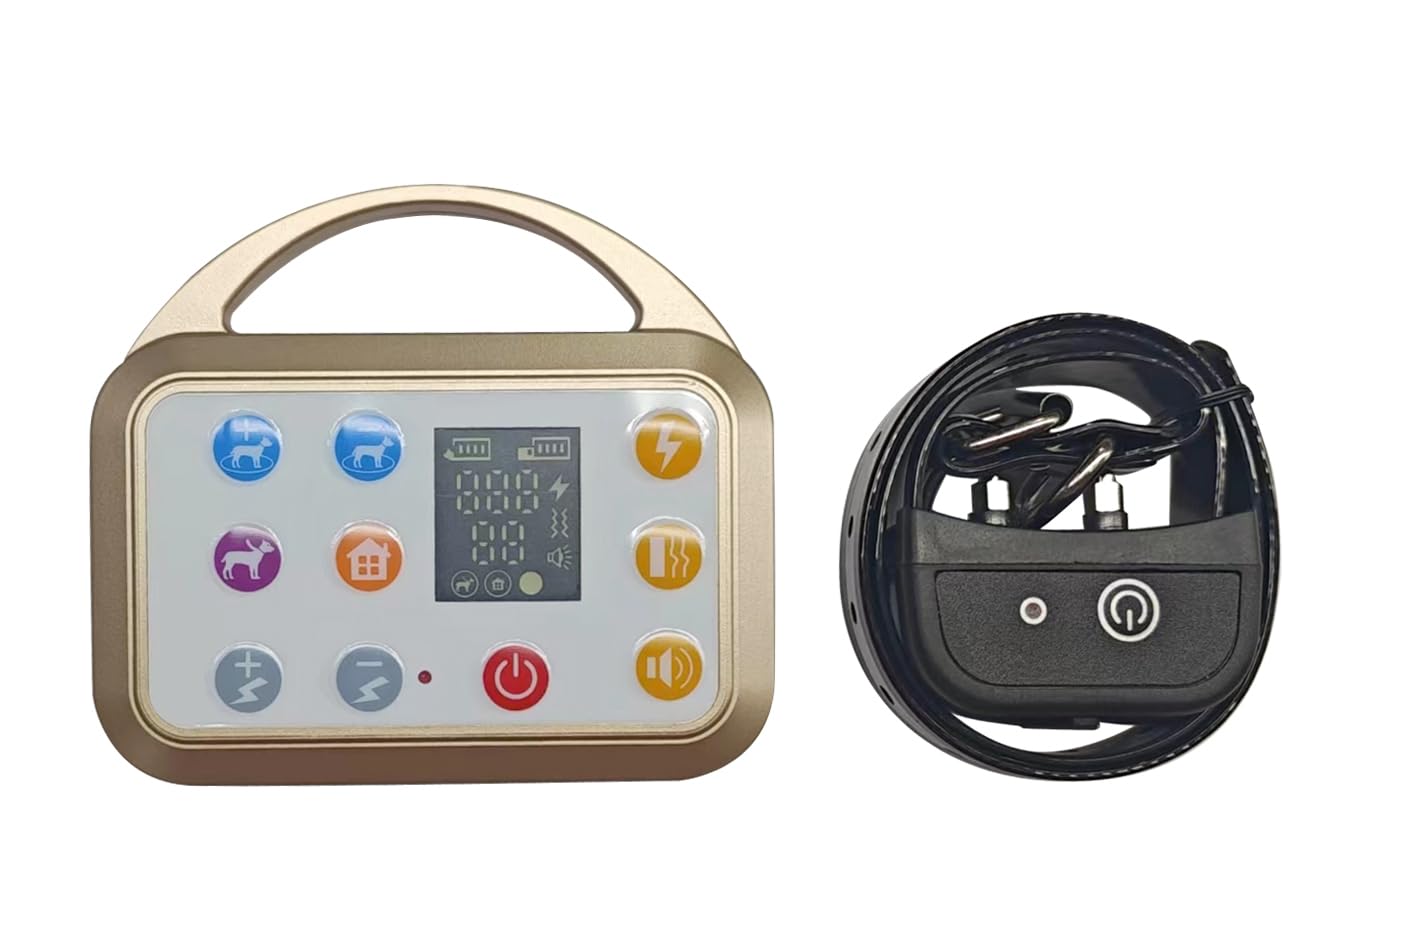
An image showing the main components of the Plkm 3-in-1 Wireless Dog Training System, including the transmitter and receiver collar.
Safety Information
Please read all safety instructions before using the product. Failure to follow these instructions could result in injury to your pet or damage to the device.
- This device is intended for use with dogs only. Do not use on humans or other animals.
- The training collar is not a toy. Keep out of reach of children.
- Do not leave the collar on your dog for more than 12 consecutive hours. Prolonged wear can cause skin irritation.
- Regularly check your dog's neck for signs of irritation or sores. If irritation occurs, discontinue use until the skin heals.
- Ensure the collar fits snugly but not too tightly. You should be able to fit two fingers comfortably between the collar and your dog's neck.
- The electric shock function should be used responsibly and only for training purposes, not punishment. Start with the lowest effective level.
- Do not use this system on aggressive dogs or dogs with health problems. Consult a veterinarian or professional trainer if you have concerns.
- Keep the transmitter and receiver away from extreme temperatures, water (beyond the waterproof rating), and direct sunlight.
Package Contents
Please check the package contents to ensure all items are present:
- 1 x Transmitter Unit
- 1 x Receiver Collar
- 1 x Adjustable Nylon Collar Strap
- 1 x USB Charging Cable
- 2 x Sets of Contact Points (short and long)
- 1 x Test Light Tool
- 1 x User Manual (this document)
Setup
1. Charging the Devices
Before first use, fully charge both the transmitter and the receiver collar.
- Connect the USB charging cable to the charging port on both the transmitter and the receiver.
- Plug the other end of the USB cable into a standard USB power adapter (not included) or a computer's USB port.
- The charging indicator light will illuminate during charging and turn off or change color when fully charged.
- Charging typically takes 2-3 hours.
2. Pairing Transmitter and Receiver
The transmitter and receiver are usually pre-paired from the factory. If they are not communicating, follow these steps:
- Ensure both devices are fully charged and turned off.
- Turn on the transmitter.
- Press and hold the power button on the receiver collar until the indicator light flashes rapidly, indicating pairing mode.
- Within 10 seconds, press any function button on the transmitter (e.g., Sound, Vibration, or Shock button).
- The receiver's indicator light will stop flashing and remain solid, confirming successful pairing.
3. Fitting the Collar
Proper collar fit is crucial for effective operation and your dog's comfort.
- Attach the receiver to the adjustable nylon collar strap.
- Select the appropriate length contact points (short for short-haired dogs, long for long-haired dogs) and screw them securely into the receiver.
- Place the collar on your dog's neck so that the contact points are positioned underneath, making direct contact with the skin.
- Adjust the strap to ensure a snug fit. You should be able to fit two fingers comfortably between the collar and your dog's neck. The collar should not be loose enough to rotate around the neck.
Operating Instructions
Wireless Dog Leash Function
This function allows you to set a short-range boundary for your dog, acting as a virtual leash.
- Setting Signal Range: The signal range of the wireless dog leash is adjustable in 10 levels. Use the "Signal Range Setting Button" on the transmitter to select the desired range.
- Out-of-Range Reminder: If your dog walks out of the set signal range, the transmitter will receive feedback from the receiver and emit a voice prompt to alert you. Simultaneously, the receiver collar will issue a warning to your dog.
- Warning Sequence: The receiver will successively sound for 3 seconds, vibrate for 3 seconds, and apply an electric shock for 4 seconds. This warning sequence will continue until your dog returns within the set signal range. The transmitter's out-of-range indicator will flash during this time.
Wireless Fence Function
Create a circular safety zone for your dog, centered around the transmitter.
- Setting Safety Zone Radius: The wireless dog fence offers 5 levels of adjustable radius, ranging from 231 to 495 feet. Use the "Signal Range Setting Button" on the transmitter to adjust the desired radius.
- Out-of-Range Warning: If your dog exits the established safety zone, the receiver collar will activate a warning sequence.
- Warning Sequence: The receiver will successively sound for 3 seconds, vibrate for 3 seconds, and apply an electric shock for 4 seconds to remind your dog. Concurrently, the transmitter's out-of-range indicator will flash, and a voice prompt will alert you that your dog is outside the signal range.
Dog Training Function
This mode allows you to correct undesired behaviors using sound, vibration, or electric shock.
- Activating Training Mode: The transmitter automatically enters Dog Training mode when turned on. The screen will display the furthest dog training range, up to 999 feet.
- Training Functions: There are three available functions:
- Sound: Emits an audible tone.
- Vibration: Causes the collar to vibrate.
- Electric Shock: Delivers a static correction.
- Using Training Buttons: Press the corresponding "Dog Training Button" on the transmitter for the desired correction (Sound, Vibration, or Electric Shock) to address specific behaviors. Always start with the lowest effective level for electric shock.
Maintenance
Proper maintenance ensures the longevity and performance of your Plkm training system.
- Cleaning: Wipe the transmitter and receiver with a soft, damp cloth. Do not use harsh chemicals or abrasive cleaners.
- Contact Points: Periodically clean the contact points on the receiver collar to ensure good skin contact.
- Battery Care: Recharge the devices regularly, even if not in frequent use, to maintain battery health. Avoid fully depleting the battery for extended periods.
- Storage: Store the system in a cool, dry place when not in use.
Troubleshooting
| Problem | Possible Cause | Solution |
|---|---|---|
| Receiver not responding to transmitter. | Low battery; Not paired; Out of range. | Charge both devices; Re-pair the devices (refer to Setup section); Ensure devices are within operational range. |
| Collar not delivering correction. | Poor contact with dog's skin; Incorrect contact points; Low battery. | Adjust collar fit; Use longer contact points for long-haired dogs; Recharge receiver. |
| Out-of-range warning activates too close or too far. | Signal range setting is incorrect. | Adjust the "Signal Range Setting Button" on the transmitter to the desired level. |
| Transmitter display is blank. | Low battery; Device is off. | Recharge transmitter; Press the power button to turn on. |
Specifications
- Model Number: 01-AE-S38-G-1C
- Manufacturer: Plkm
- Wireless Leash Range: 10 adjustable levels
- Wireless Fence Radius: 231-495 feet (5 adjustable levels)
- Dog Training Range: Up to 999 feet
- Functions: Sound, Vibration, Electric Shock
- Waterproof Rating: Receiver collar is waterproof (specific IP rating not provided, assume splash-proof for general use)
- Battery Type: Rechargeable Lithium-ion (for both transmitter and receiver)
Warranty and Support
Plkm products are designed for reliability and performance. For warranty information or technical support, please refer to the contact details provided with your purchase documentation or visit the official Plkm website. Please retain your proof of purchase for warranty claims.