Introduction
Thank you for purchasing the DreamSky Wooden Digital Alarm Clock. This manual provides detailed instructions for setting up, operating, and maintaining your clock. Please read it carefully to ensure optimal performance and longevity of your device.
Product Features
- Large Digital Display: 1.8-inch numbers for easy readability.
- RGB Dynamic Display: Features 8 color changing patterns with an option to fix a preferred color.
- Adjustable Alarm Volume: 5 levels of alarm volume, including an extra loud setting for heavy sleepers.
- Dimmable Brightness: 5 levels of display brightness plus an 'OFF' option for comfortable viewing day and night.
- Time Format Options: Switchable between 12-hour and 24-hour formats.
- USB Charging Port: Conveniently charge smart devices.
- Battery Backup: Maintains alarm function during power outages (requires 2 AAA batteries, not included). Note: Display does not light up on battery power alone.
- Sleek Wooden Design: Modern aesthetic suitable for various home décors.
Setup
1. Power Connection
Connect the provided AC adapter to the DC 5V port on the back of the clock and plug it into a standard wall outlet. The clock will power on and the display will illuminate.

Image: DreamSky Digital Alarm Clock connected to power adapter and charging a phone via USB port.
2. Battery Installation (Backup)
For alarm backup during power outages, install 2 AAA alkaline batteries (not included) into the battery compartment on the back of the clock. Ensure correct polarity. The display will not light up when operating on battery power alone; only the alarm function is maintained.

Image: DreamSky Digital Alarm Clock showing battery compartment for AAA batteries, indicating battery backup for alarm only.
Operating Instructions
1. Setting the Time
- Press and hold the TIME SET button on the back of the clock until the hour digits begin to flash.
- Use the VOL+ or VOL- buttons to adjust the hour.
- Press the TIME SET button again to move to the minute digits.
- Use the VOL+ or VOL- buttons to adjust the minutes.
- Press the TIME SET button one more time to confirm and exit time setting mode.
Video: Demonstration of how to set the time on the DreamSky Digital Alarm Clock.
2. Setting the Alarm
- Press and hold the ALARM SET button until the alarm hour digits begin to flash.
- Use the VOL+ or VOL- buttons to adjust the alarm hour.
- Press the ALARM SET button again to move to the alarm minute digits.
- Use the VOL+ or VOL- buttons to adjust the alarm minutes.
- Press the ALARM SET button one more time to confirm and exit alarm setting mode.
3. Alarm On/Off
Press the ON/OFF button to toggle the alarm function on or off. An alarm icon will appear on the display when the alarm is active.
4. Snooze Function
When the alarm sounds, press the large SNOOZE button on the top of the clock to temporarily silence the alarm for 9 minutes. To turn off the alarm for the day, press any button on the back of the clock.

Image: DreamSky Digital Alarm Clock showing the snooze button on top and indicating 5 levels of volume control.
5. Volume Control
Press the VOL+ or VOL- buttons to adjust the alarm volume. There are 5 levels of volume to choose from.
6. Brightness Dimmer
Press the DIMMER button repeatedly to cycle through 5 levels of display brightness, including an 'OFF' option. This allows you to customize the display intensity for day or night use.

Image: DreamSky Digital Alarm Clock displaying different brightness levels (L1-L5 and OFF) and 12/24 hour time formats.
7. RGB Dynamic Display
The clock features 8 dynamic RGB color changing patterns. You can also choose to fix the display to a single color you prefer. Refer to the specific instructions in the included quick start guide for cycling through and fixing RGB colors.
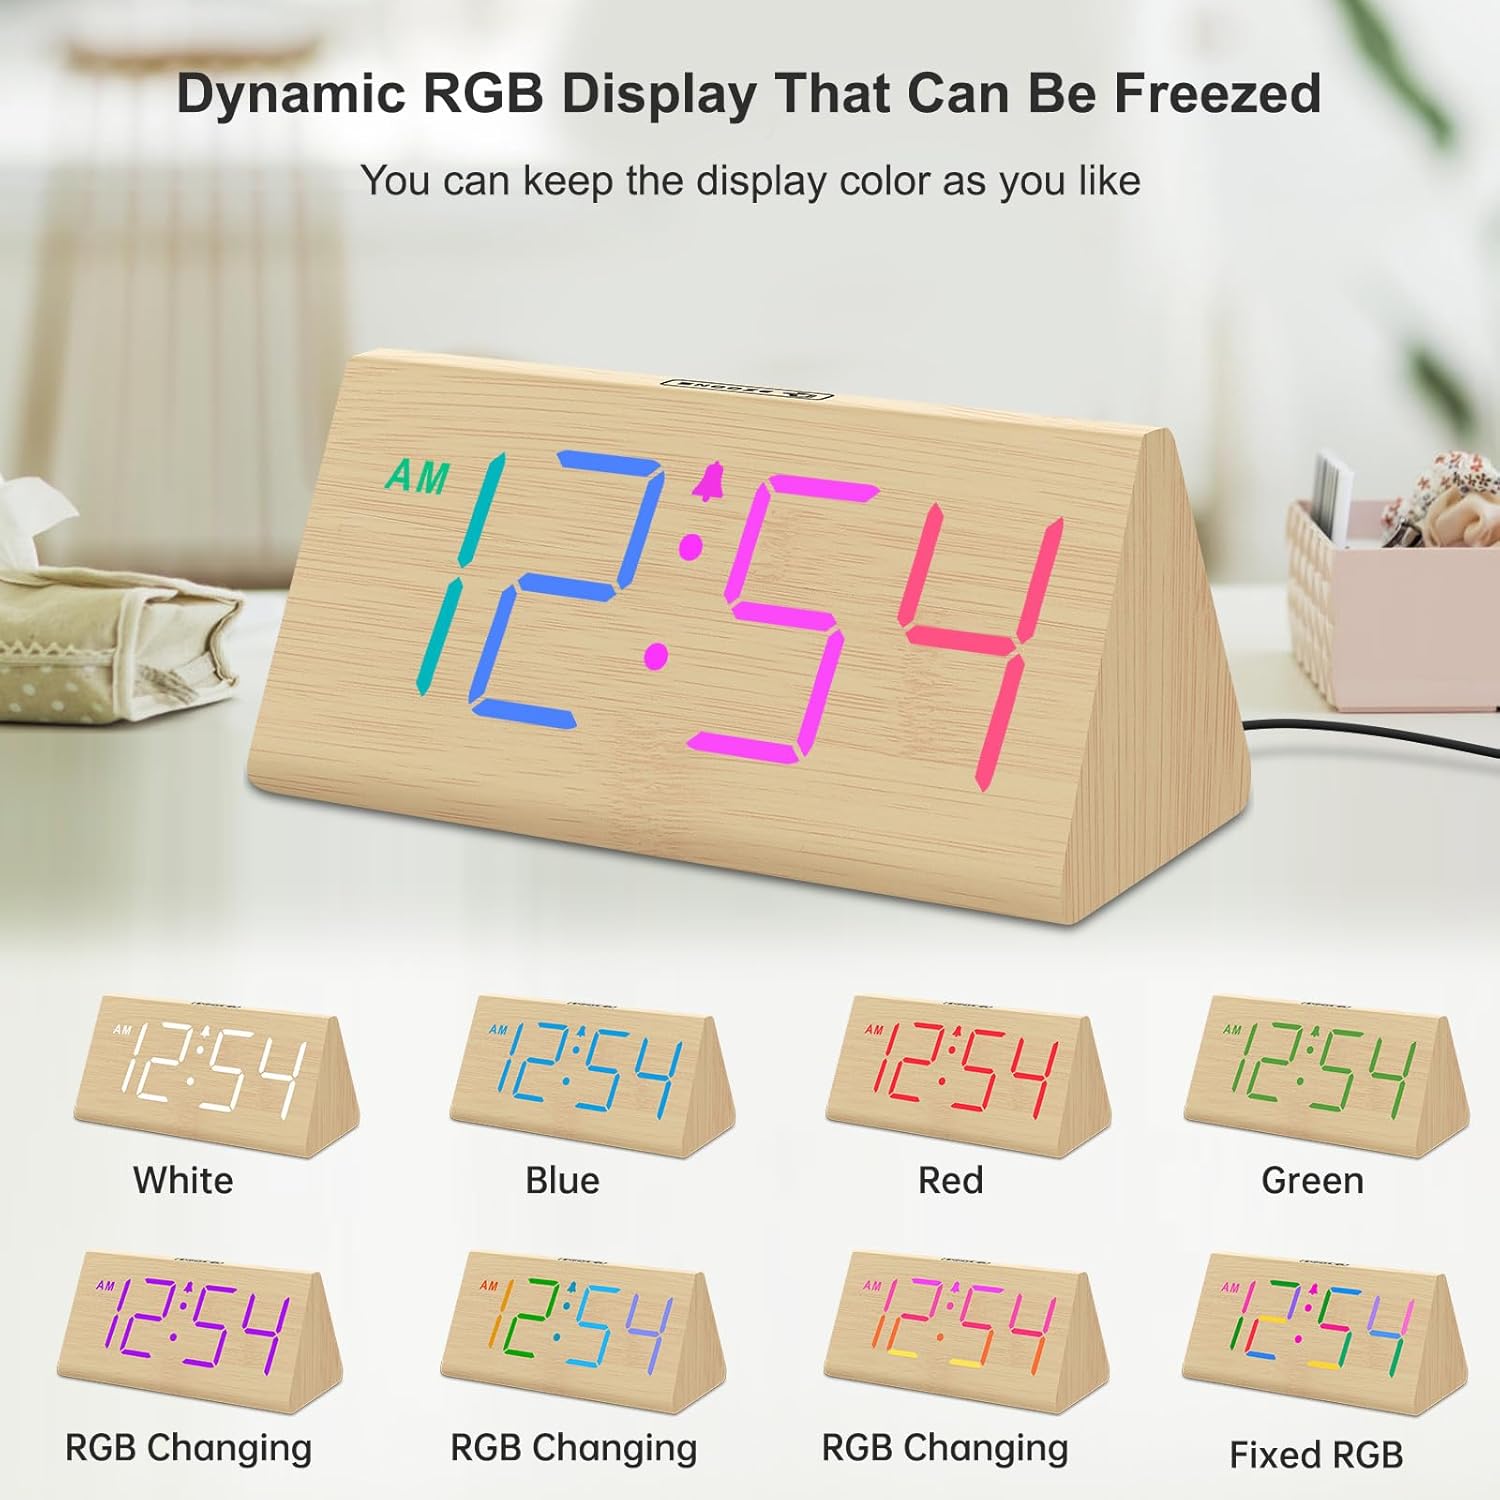
Image: DreamSky Digital Alarm Clock showcasing various RGB color display options, including static colors and color-changing modes.
8. 12/24 Hour Format
Press the 12/24HR button to switch between 12-hour (with AM/PM indicator) and 24-hour time formats.
9. Daylight Saving Time (DST)
Press the DST ON/OFF button to activate or deactivate Daylight Saving Time. This will automatically adjust the time by one hour.
Maintenance
To ensure the longevity and proper functioning of your DreamSky Digital Alarm Clock, follow these maintenance guidelines:
- Cleaning: Wipe the clock with a soft, dry cloth. Avoid using abrasive cleaners, solvents, or harsh chemicals, as these can damage the finish and electronic components.
- Placement: Place the clock on a stable, flat surface away from direct sunlight, excessive heat, moisture, or strong magnetic fields.
- Battery Replacement: Replace AAA backup batteries annually or when the alarm function becomes unreliable during power outages.
Troubleshooting
| Problem | Solution |
|---|---|
| Display is blank. | Ensure the AC adapter is securely plugged into both the clock and a working power outlet. The display does not light up when running on backup batteries only. |
| Alarm does not sound. | Check if the alarm is set and activated (alarm icon visible). Ensure the alarm volume is not set to the lowest level. If using battery backup, ensure batteries are fresh and correctly installed. |
| Time is incorrect. | Re-set the time following the "Setting the Time" instructions. Check if DST is correctly set for your region. |
| USB charging port not working. | Ensure the clock is powered by the AC adapter. The USB port requires main power to function. |
Specifications
| Feature | Detail |
|---|---|
| Model Number | DS2201 |
| Dimensions (W x H) | 5.96" x 2.7" |
| Material | Wood |
| Power Source | Corded Electric (AC Adapter Included) |
| Battery Backup | 2 x AAA batteries (not included) for alarm function during power outage. |
| Display Type | Digital LED with RGB options |
| Item Weight | 10.6 ounces |

Image: DreamSky Digital Alarm Clock with dimensions and packaging contents including user manual and power adapter.
Warranty and Support
This DreamSky product comes with a 1-year replacement warranty. For any questions, technical support, or warranty claims, please contact DreamSky customer support:
Email: info@dreamsky4u.com
Please have your model number (DS2201) and purchase information ready when contacting support.