
LOVPOI Dodge Ram Radio Upgrade
LOVPOI 9-inch Android 13 Car Radio Upgrade Instruction Manual
Model: Dodge Ram Radio Upgrade (for Manual AC)
Applicable for Dodge Ram 1500/2500/3500 (2013-2018) with Manual AC
1. Introduction and Overview
This manual provides detailed instructions for the installation, operation, and maintenance of your LOVPOI 9-inch Android 13 Car Radio Upgrade. This unit is specifically designed for Dodge Ram 1500, 2500, and 3500 models manufactured between 2013 and 2018, equipped with manual air conditioning systems. Please read this manual thoroughly before installation and use to ensure proper functionality and to avoid damage.

Image 1.1: Front view of the LOVPOI 9-inch Android 13 Car Radio unit, showing the display and integrated control panel for Dodge Ram vehicles.
2. Product Features
- Operating System: Android 13
- Display: 9-inch 1920*1080 High-Resolution Touch Screen
- Memory: 2GB RAM, 64GB ROM
- Connectivity: Wireless CarPlay, Android Auto, Bluetooth, Wi-Fi, USB
- Navigation: Built-in GPS module supporting online/offline navigation apps
- Audio: FM Radio, Built-in DSP (Digital Signal Processor) for enhanced sound quality
- Control: Supports original car steering wheel controls
- Compatibility: Specifically for Dodge Ram 1500/2500/3500 (2013-2018) with Manual AC.

Image 2.1: The car radio display showing both Wireless CarPlay and Android Auto interfaces, demonstrating smartphone integration for navigation, music, and calls.

Image 2.2: Visual guide indicating compatibility with Dodge Ram models featuring manual AC controls (green checkmark) and incompatibility with automatic AC controls (red X).
3. Package Contents
Verify that all components listed below are present in your package:

Image 3.1: An organized display of all included accessories: the main touch screen radio unit, dash kit, installation harness, speaker, GPS module, microphone, USB cables, screws, screwdriver, crowbar, antenna adapter cable, USB adaptor, reversing line, RCA cable, and power cable.
- Touch Screen Radio Unit
- Dash Kit
- Installation Harness
- Speaker
- GPS Module
- Microphone
- USB Cable (x2)
- Screws
- Screwdriver
- Crowbar (Pry Tool)
- Antenna Adapter Cable
- USB Adaptor
- Reversing Line
- RCA Cable
- Power Cable
- Can Bus Decoder
4. Installation Guide
Professional installation is recommended. Disconnect the vehicle's battery before beginning any electrical work.
4.1 General Installation Steps
- Preparation: Use the provided crowbar to carefully remove the original radio and trim panels from your vehicle's dashboard.
- Wiring: Connect the new radio's power cable, RCA cables, USB cables, and other necessary wiring to the vehicle's harness. Ensure all connections are secure. Refer to the wiring diagram for specific connections.
- Component Placement: Install the GPS module in a location with a clear view of the sky (e.g., on the dashboard near the windshield). Mount the external microphone for optimal voice pickup.
- Mounting: Secure the new LOVPOI radio unit into the dashboard using the provided dash kit and screws.
- Testing: Reconnect the vehicle's battery. Turn on the ignition and test the radio's basic functions (power, audio, touch screen responsiveness).
- Final Assembly: Reinstall all trim panels.

Image 4.1: A comprehensive diagram illustrating the connection points for the speaker, microphone, USB ports, Can Bus, RCA cables, reversing line, antenna adapter, power cables, and GPS module.
4.2 AC Control Settings
For models with manual AC, you may need to configure the AC controls through the radio interface after installation:
- Access the Settings menu on the radio.
- Navigate to Factory Settings and enter the PIN 000000.
- Locate CAN related settings and ensure Display air info is set to Open.
- Open the Carinfo app on the radio.
- Select Air Set to access and customize AC settings, including fan speed, temperature, and vent direction.
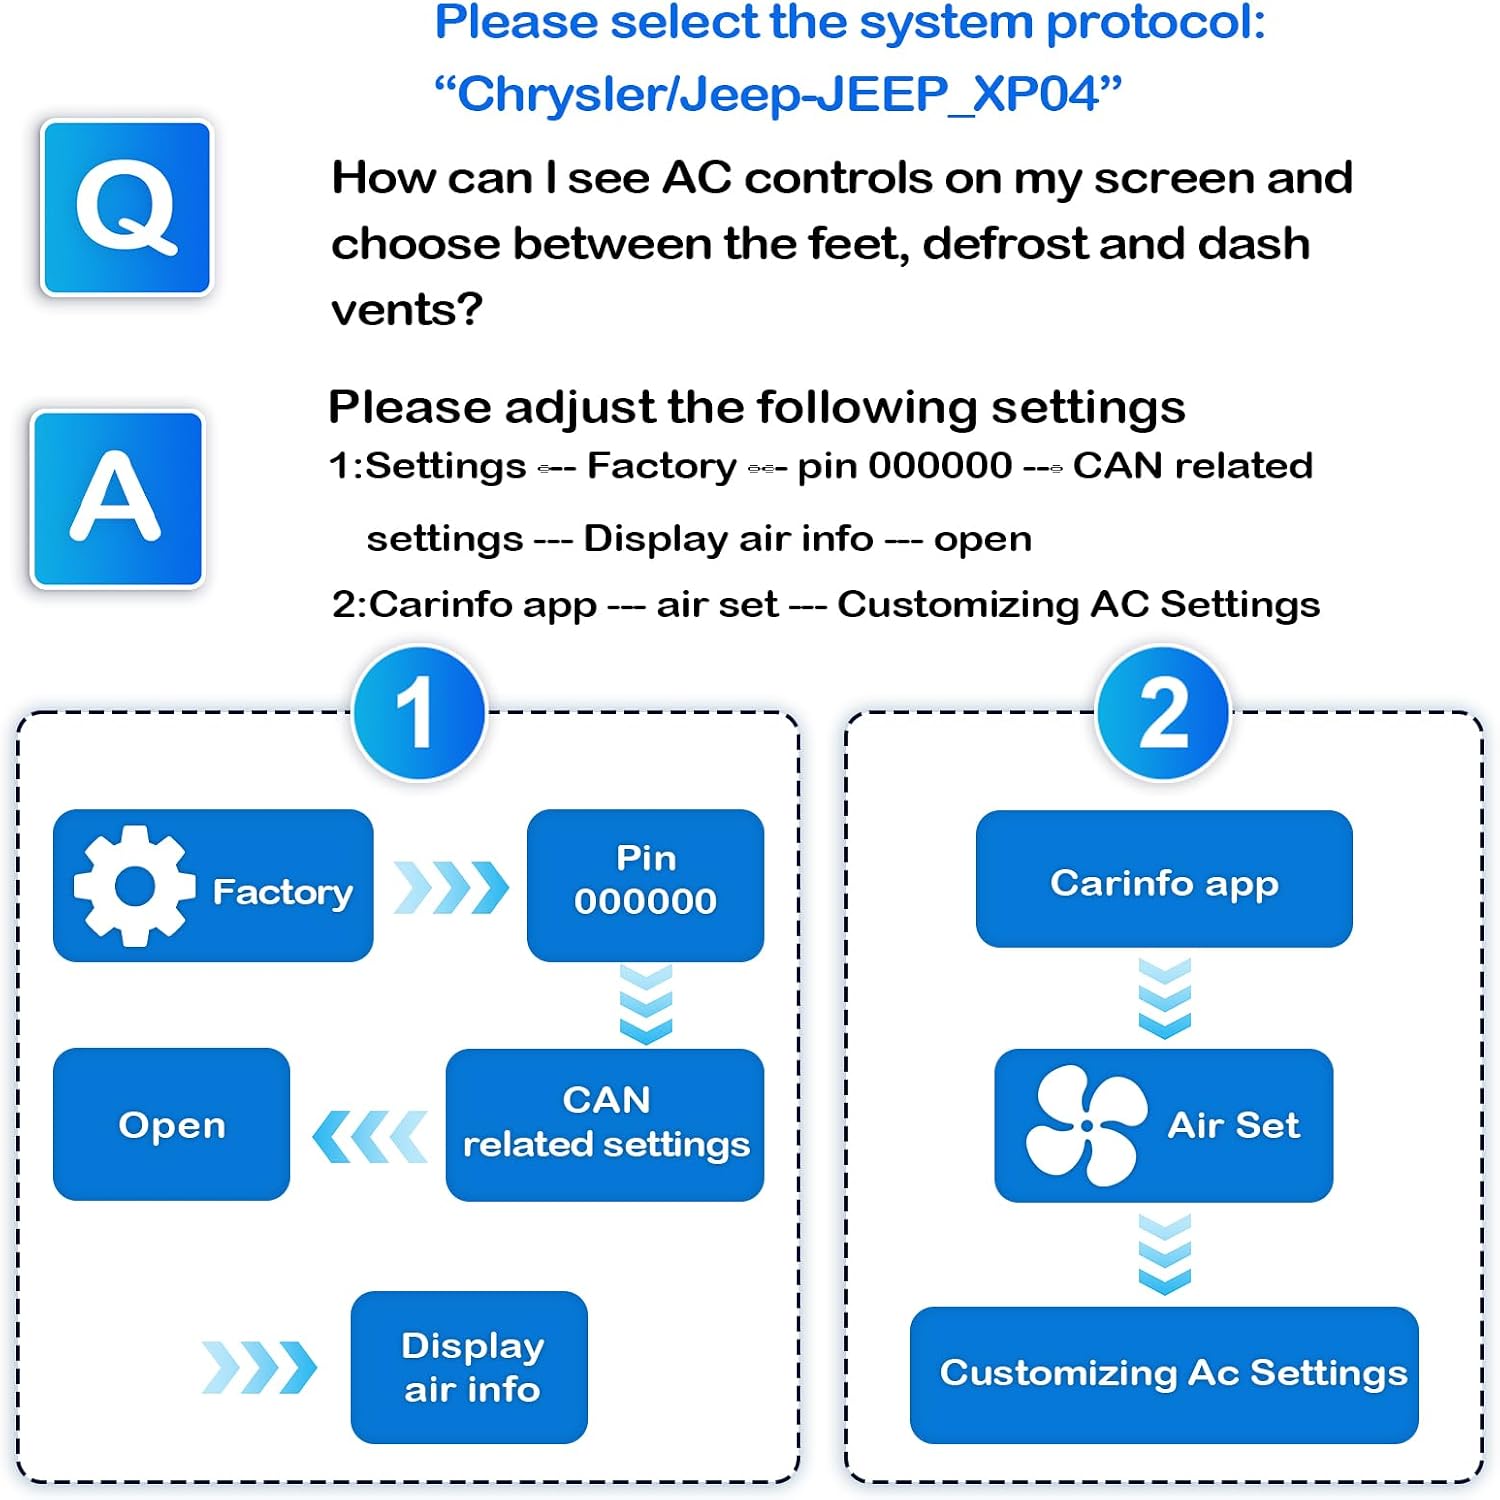
Image 4.2: Flowchart detailing the steps to access and customize AC controls through the radio's settings and Carinfo application.
5. Operating Instructions
5.1 Wireless CarPlay & Android Auto
Connect your iPhone or Android phone wirelessly via Bluetooth to access navigation, make calls, play music, and use other compatible apps. Voice commands (Siri/Google Assistant) are supported for hands-free operation.
5.2 GPS Navigation
The built-in GPS module supports various online and offline navigation applications available on the Google Play Store. Connect to Wi-Fi to download maps and receive real-time traffic updates.

Image 5.1: The radio display showing a GPS navigation map and an icon representing Wi-Fi connectivity, indicating support for online maps and app downloads.
5.3 Bluetooth Connectivity
Pair your smartphone via Bluetooth for hands-free calling and wireless audio streaming. This feature enhances driving safety by minimizing distractions.

Image 5.2: The radio displaying FM radio frequencies and a Bluetooth call interface, showing an incoming call and options to answer or decline.
5.4 FM Radio
Tune into your favorite FM radio stations. The unit provides clear audio reception for broadcast radio.
5.5 Wi-Fi Connection and Multimedia
Connect the radio to a Wi-Fi hotspot to browse the internet, stream videos, and download applications from the Google Play Store, similar to a smartphone.

Image 5.3: The radio screen showing various app icons like YouTube, Netflix, and social media, illustrating the multimedia capabilities when connected to Wi-Fi.
5.6 Split Screen Functionality
Utilize the split-screen feature to run two applications simultaneously, such as navigation and music playback, for enhanced multitasking.
5.7 Steering Wheel Control
The unit is compatible with your vehicle's existing steering wheel controls, allowing you to manage audio, calls, and other functions without taking your hands off the wheel.
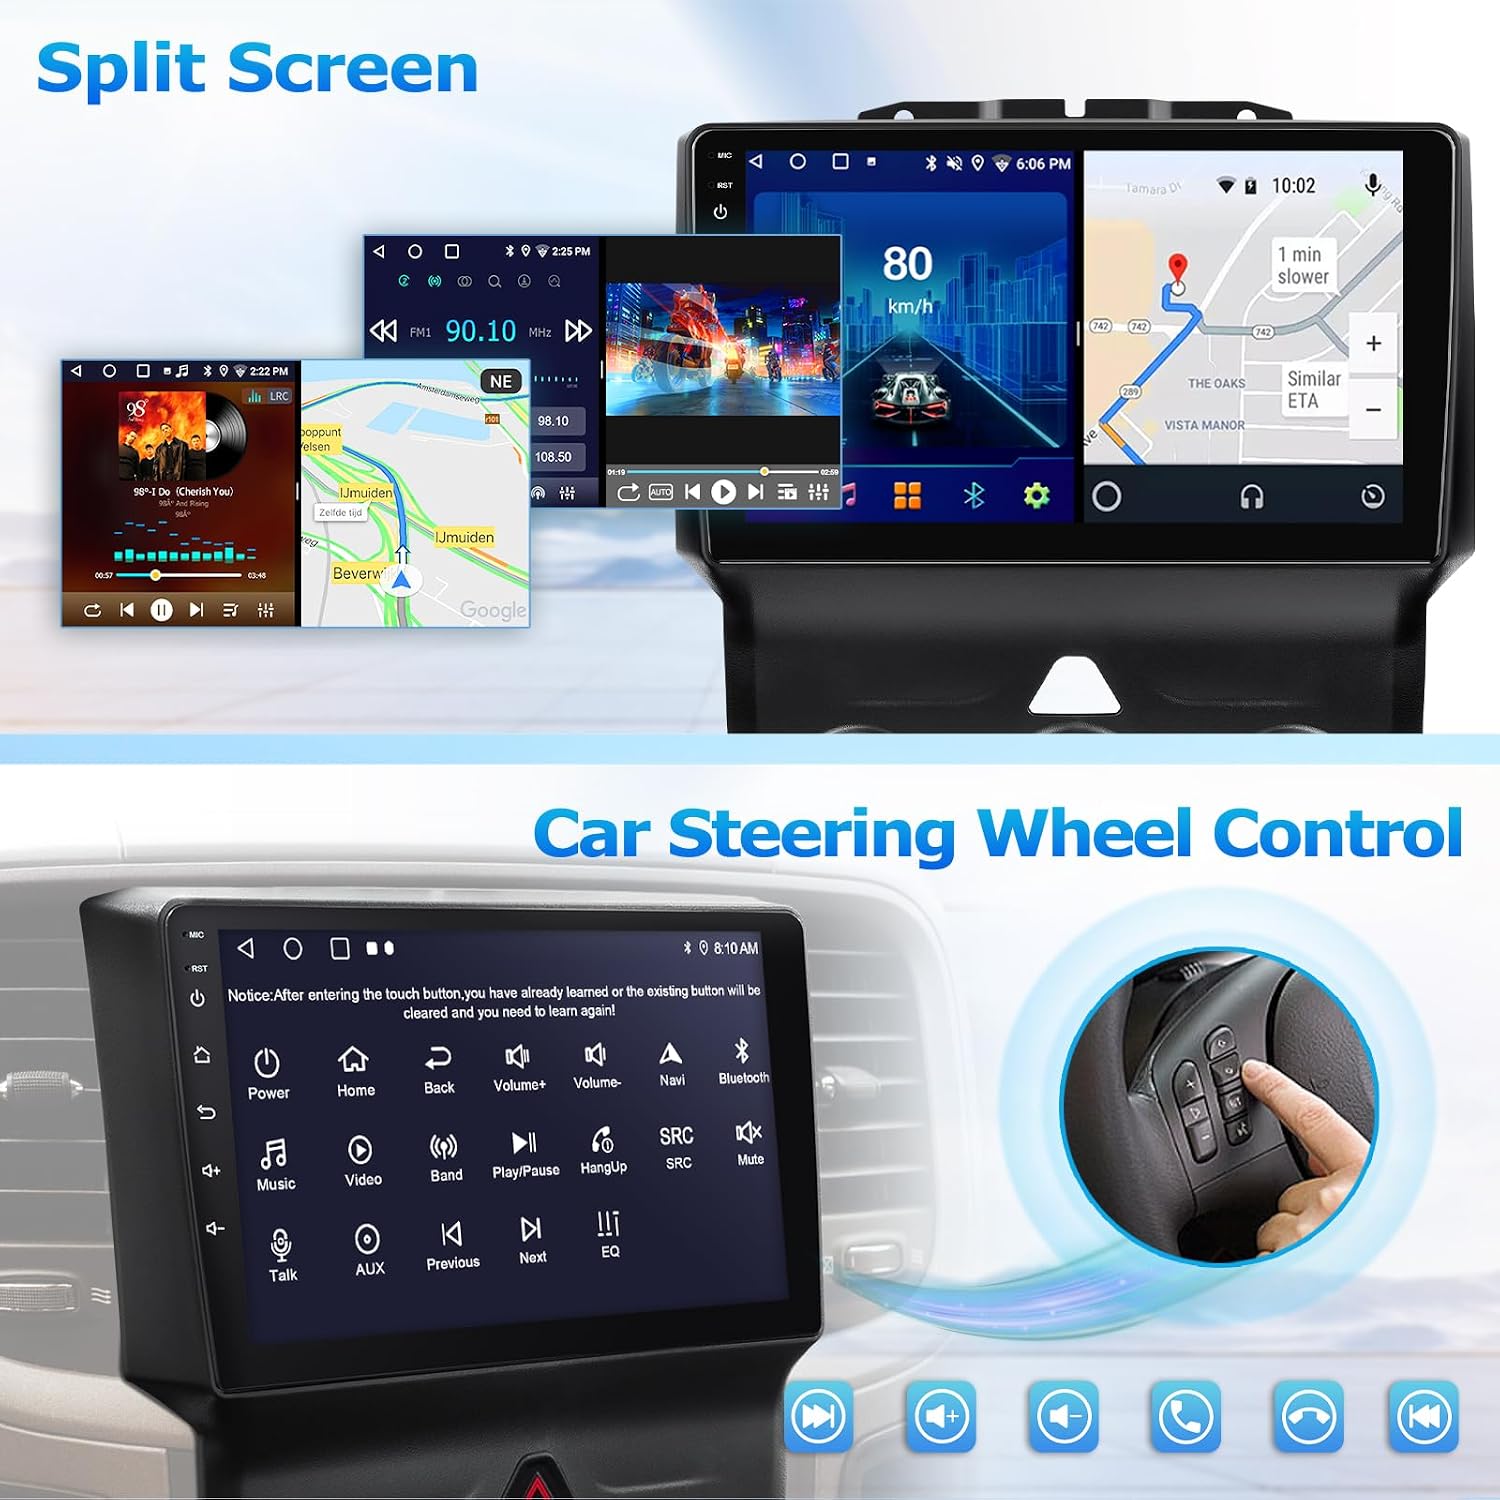
Image 5.4: The radio displaying a split screen with navigation on one side and music on the other, alongside an illustration of how steering wheel buttons control the unit.
5.8 Digital Sound Processor (DSP)
The built-in DSP allows for advanced audio customization, enabling you to adjust equalizer settings, balance, and other sound parameters to achieve optimal sound quality.

Image 5.5: The radio screen showing the Digital Sound Processor (DSP) interface with equalizer settings, balance controls, and subwoofer adjustments for personalized audio output.
6. Maintenance
- Screen Cleaning: Use a soft, lint-free cloth to gently wipe the touch screen. Avoid abrasive cleaners or solvents.
- Software Updates: Periodically check for software updates via the system settings or the manufacturer's website to ensure optimal performance and access to new features.
- Environmental Conditions: Avoid exposing the unit to extreme temperatures, direct sunlight for prolonged periods, or excessive moisture.
7. Troubleshooting
- No Power:
- Check all power connections and fuses.
- Ensure the vehicle's battery is properly connected and charged.
- No Sound:
- Verify speaker connections.
- Check volume levels and mute settings.
- Ensure the correct audio source is selected.
- GPS Signal Issues:
- Ensure the GPS module is installed in a location with a clear view of the sky.
- Check GPS antenna connection.
- CarPlay/Android Auto Not Connecting:
- Ensure Bluetooth is enabled on both the radio and your smartphone.
- Restart both the radio and your smartphone.
- Check for any software updates for the radio or your phone's operating system.
- Touch Screen Unresponsive:
- Perform a soft reset of the unit (refer to the device's specific reset procedure if available).
- Ensure the screen is clean and free of debris.
If issues persist, please refer to the Warranty and Support section for assistance.
8. Specifications
| Item Weight | 3.58 pounds |
| Product Dimensions | 11.8 x 11 x 4.7 inches |
| Display Size | 9 Inches |
| Operating System | Android 13 |
| RAM | 2GB |
| ROM | 64GB |
| Connectivity Technology | Bluetooth, USB, Wi-Fi |
| Special Features | Android Auto, Bluetooth, CarPlay, Touchscreen, GPS, DSP |
| Mounting Type | Dashboard Mount |
| Audio Output Mode | Hi-Fi Stereo |
| Vehicle Service Type | Car (Dodge Ram 1500/2500/3500 2013-2018 with Manual AC) |
9. Warranty and Support
9.1 Product Warranty
This LOVPOI car radio unit comes with a 1-Year Warranty from the date of purchase. This warranty covers manufacturing defects and malfunctions under normal use. It does not cover damage caused by improper installation, misuse, accidents, or unauthorized modifications.
9.2 Technical Support
For any installation or usage concerns, please contact LOVPOI technical support via Amazon. Our support team is available to assist you with troubleshooting and ensure a smooth experience with your new radio replacement.
To contact support, visit the product page on Amazon and use the "Contact Seller" option.
Ask a question about this manual
Ask about setup, troubleshooting, compatibility, parts, safety, or missing instructions. Manuals+ will review the question and use this page’s manual context to help answer it.