1. Introduction
The SYNCO XTALK XPro5 is a 2.4 GHz wireless intercom headset system designed for clear, full-duplex communication among up to 5 individuals. This system features a 500-meter (1640 feet) transmission range, advanced noise cancellation, and flexible master selection, making it suitable for live shows, stage performances, movie shoots, and other professional communication needs. This manual provides detailed instructions for setting up, operating, and maintaining your XTALK XPro5 system.

Image 1.1: The SYNCO XTALK XPro5 Wireless Intercom Headset System.
2. What's in the Box
Verify that all components are present in your package:
- Headsets (5 units for XPro5 system)
- Rechargeable batteries (5 units)
- Charging cable
- Charging station
- One-ear foam cushions
- Microphone windshields
3. Key Features
- Expanded Team Communication to 500M Distance: Two high-gain external antennas enhance the transmission signal, providing a 500m reliable connection range. Instant response backlink ensures continuous communication without delays.
- Experience Enhancing 2.0 AEC Spanning from 150HZ to 7KHZ: Advanced Acoustic Echo Cancellation (AEC) technology eliminates echoes, reverberation, and ambient noise, ensuring clear voice recognition even in noisy environments. Activate noise reduction with one click.
- Supercharge the Signal with Boost Mode: This feature allows intelligent spectrum switching with a single button click, multiplying signals to enhance communication quality and overcome weak signals or through-wall interference.
- Selectable Master For Communication Flexibility: SYNCO's MasterFree Algorithm allows any headset to be designated as the master device, ensuring uninterrupted sessions. Supports groups of 2 to 13 people.
- SmartFlow Sync with Unique 3.5mm Real-time Monitoring: Seamlessly communicate while monitoring audio from external devices like cameras and recorders via a 3.5mm jack, eliminating the need for an additional headset.
- Unique One-Button Remotes Muting Function: The master headset can instantly mute all remote headsets with a single button press, useful for maintaining focus during critical conversations.
- Connect All Day With Rechargeable And Replaceable Batteries: Low-power design and rechargeable, replaceable batteries provide over 24 hours of operation. A 2-slot charging station is included for efficient charging.
- Optimized Portability And Durability For On-The-Go: Crafted from lightweight ABS materials and smooth leather, each headset weighs just 188g (6oz) with the battery, ensuring comfort and durability for extended use in demanding environments.

Image 3.1: Visual representation of the 500m communication range.

Image 3.2: AEC AI Technology for clear audio from 150Hz to 7KHz.
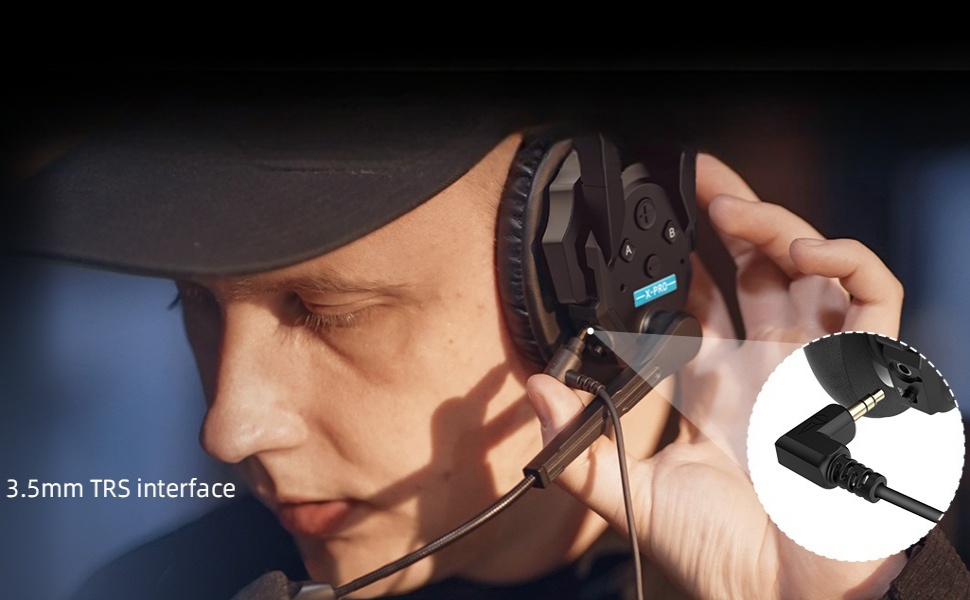
Image 3.3: Boost Mode for enhanced signal quality.

Image 3.4: MasterFree Algorithm for flexible master assignment.
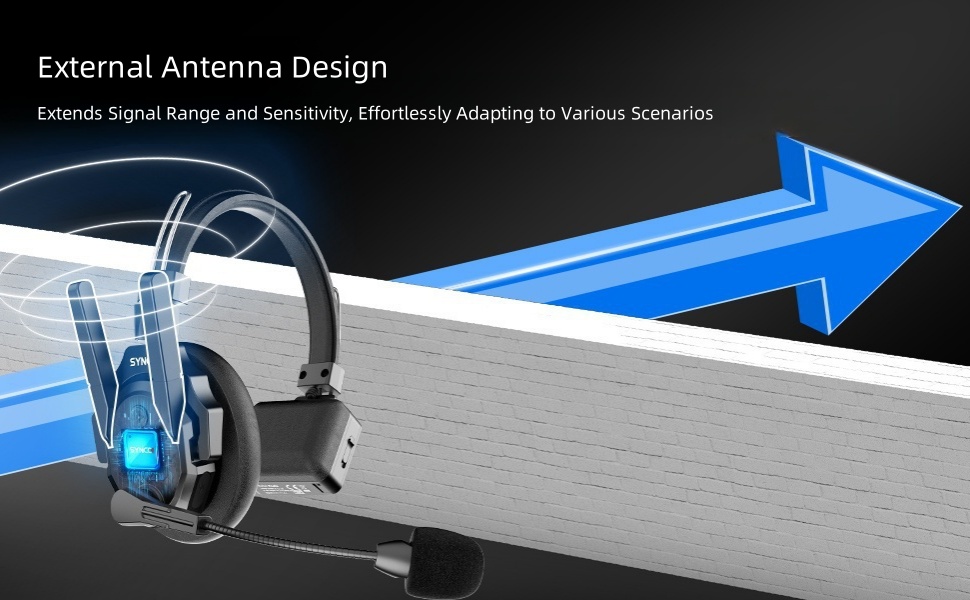
Image 3.5: 3.5mm real-time monitoring feature.

Image 3.6: One-button remote muting function.

Image 3.7: Rechargeable and replaceable batteries for extended use.

Image 3.8: Lightweight and durable design for portability.
4. Setup Instructions
Follow these steps to set up and pair your XTALK XPro5 headsets for multi-person communication.
4.1. Button Functions
Familiarize yourself with the main control buttons on the headset:
- Button A (Red Button): Used for Pairing/Unpairing, setting as Master, Connection Level One, or Connection Level Two.
- Volume + Button: Short press to increase volume. Long press for 3 seconds to hear voice prompts (Master Mode/Level One Pairing/Level Two Pairing).
- Volume - Button: Short press to decrease volume. Long press for 3 seconds to switch Boost Mode between 1/2/3.
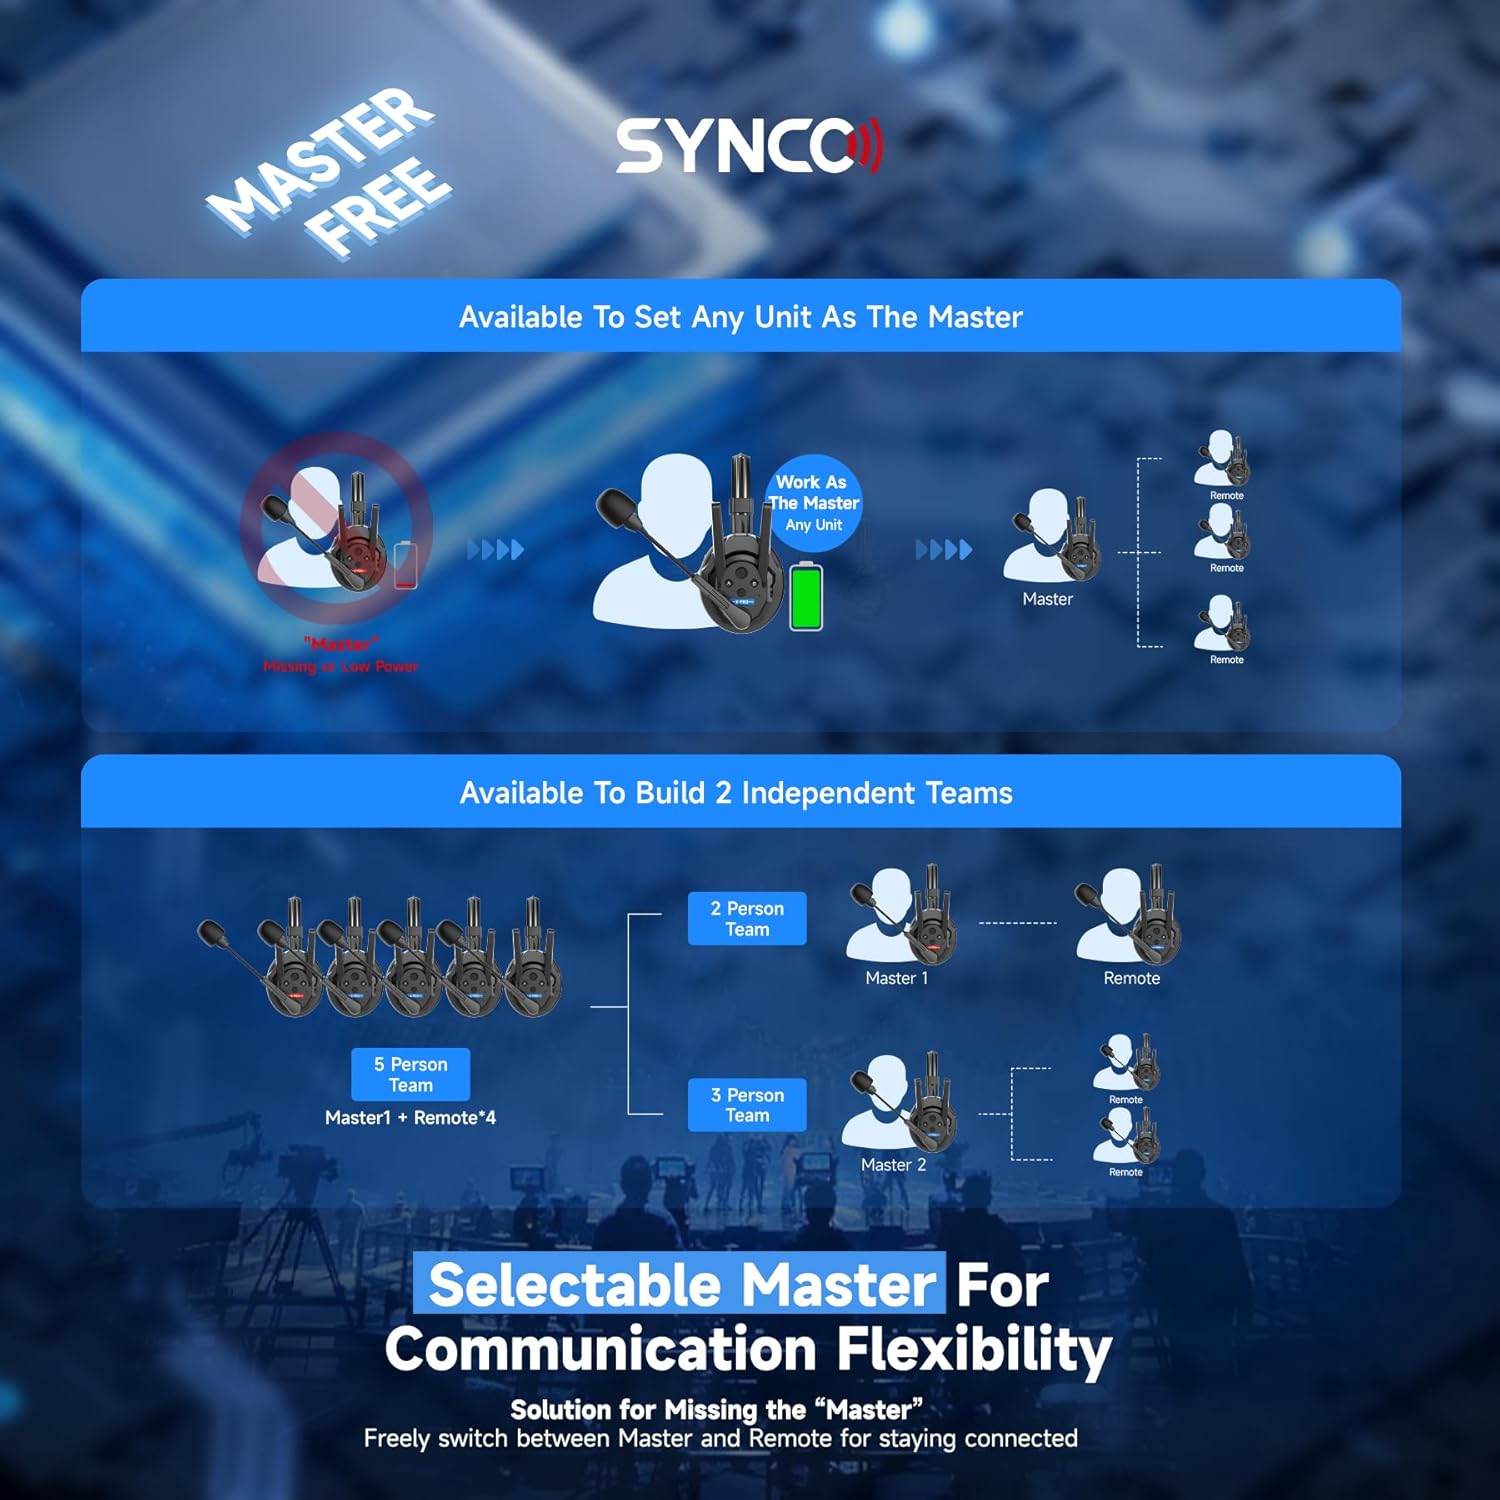
Image 4.1: Headset control buttons, including Button A and Volume controls.
4.2. Pairing Guide
The XTALK XPro5 system allows for flexible pairing configurations. All headsets must first be set to their respective roles (Master, Connection Level One, or Connection Level Two) before pairing.
- Set Headset Roles:
- Pairing-Unpairing: Long-press Button A for 3 seconds until you hear the first 'Beep' sound, then release.
- Set as Master: Long-press Button A for 5 seconds until you hear the second 'Beep' sound, then release.
- Set as Connection Level One: Long-press Button A for 8 seconds until you hear the third 'Beep' sound, then release.
- Set as Connection Level Two: Long-press Button A for 11 seconds until you hear the fourth 'Beep' sound, then release.

Image 4.2: Long-pressing Button A to set headset roles.
- Power On: Once roles are set, power on all headsets. Start by powering on the Master headset, then Connection Level One headsets, and finally Connection Level Two headsets.
- Initiate Pairing (Master): Long-press Button A on the Master headset for 3 seconds until you hear the first 'Beep' sound, then release to enter pairing mode.
- Initiate Pairing (Connection Level One): Long-press Button A on each Connection Level One headset for 3 seconds until you hear the first 'Beep' sound, then release to enter pairing mode.
- Confirm Connection (Master to Level One): Once the green light on a Connection Level One headset is steady, the connection with the Master is complete.
- Initiate Pairing (Connection Level Two): Take the Connection Level One headsets and the Connection Level Two headsets. Long-press Button A on each of these headsets for 3 seconds until you hear the first 'Beep' sound, then release to enter pairing mode.
- Confirm Connection (Level One to Level Two): Once the green light on a Connection Level Two headset is steady (or the green light on a Connection Level One headset is flashing), the connection is complete.
- Restart for Use: Restart all headsets to finalize the pairing operation. Ensure you power the Master on first, then Connection Level One, then Connection Level Two. Failure to do so may prevent transmission.

Image 4.3: Powering on headsets in sequence for pairing.

Image 4.4: Steady green light indicates successful connection.
5. Operating Instructions
5.1. General Operation
- Power On/Off: Use the dedicated ON/OFF switch located on the headset.
- Volume Adjustment: Use the Volume + and Volume - buttons for adjusting listening volume.
- Microphone Mute: Flip the microphone boom up to mute the microphone. Flip it down to unmute.
5.2. Advanced Functions
- Boost Mode: Long-press the Volume - button for 3 seconds to cycle through Boost Mode levels (1, 2, 3) to optimize signal strength in challenging environments.
- MasterFree Algorithm: Any headset can be configured as the Master unit, providing flexibility in team communication setup. Refer to Section 4.2 for setting roles.
- Remote Muting: The Master headset can long-press a designated button (refer to Button A functions) to mute all connected remote headsets instantly.
- Real-time Monitoring: Connect an external audio source (e.g., camera, recorder) to the 3.5mm jack on the headset for simultaneous communication and audio monitoring.
6. Maintenance
Proper maintenance ensures the longevity and optimal performance of your XTALK XPro5 system.
- Battery Charging: Use the provided charging station and cable to charge the rechargeable batteries. Ensure batteries are fully charged before extended use.
- Battery Replacement: The batteries are replaceable. Always use genuine SYNCO replacement batteries to ensure compatibility and safety.
- Cleaning: Wipe the headsets with a soft, dry cloth. Do not use harsh chemicals or abrasive materials. Clean microphone windshields regularly.
- Storage: Store the headsets in a cool, dry place away from direct sunlight and extreme temperatures. Use the provided carrying case for protection during transport.
- Water Resistance: The XTALK XPro5 is not water-resistant. Avoid exposure to rain, splashes, or high humidity.
7. Troubleshooting
If you encounter issues with your XTALK XPro5 system, refer to the following common solutions.
- No Audio/Intermittent Connection:
- Ensure all headsets are powered on and correctly paired according to Section 4.2.
- Check battery levels and recharge if necessary.
- Verify that the Master headset is powered on first, followed by Connection Level One and then Connection Level Two.
- Ensure headsets are within the specified 500m operating range. Obstacles like thick walls can reduce range.
- Try activating Boost Mode (long-press Volume - for 3 seconds) to improve signal strength.
- Poor Audio Quality/Echoes:
- Ensure microphone windshields are properly installed and clean.
- Verify that the AEC (Acoustic Echo Cancellation) feature is active.
- Adjust microphone position to optimize voice pickup and minimize background noise.
- High Latency (Audio Delay):
The XTALK XPro5 system is designed for low latency communication. If you experience significant audio delay, consider updating the firmware.
Video 7.1: Demonstrating latency reduction through firmware updates. After updating the firmware via EasyGo, latency can be reduced to 80ms (min).
- Update to the latest Low Latency firmware version via the SYNCO EasyGo application. This can significantly reduce latency to as low as 80ms.
- Headsets Not Powering On:
- Ensure batteries are inserted correctly and fully charged.
- Check the ON/OFF switch position.
8. Specifications
| Feature | Description |
|---|---|
| Model Name | XTALK XPro5 |
| Connectivity Technology | Wireless (2.4 GHz) |
| Headphones Jack | 3.5 mm Jack |
| Noise Control | Active Noise Cancellation |
| Battery Life | 1050 Hours (Standby, actual usage varies) |
| Charging Time | 2.5 Hours |
| Material | ABS Plastic, Leather |
| Item Weight | 2.54 Kilograms (Total package weight) |
| Ear Placement | Over Ear |
| Water Resistance Level | Not Water Resistant |
| Number of Items | 5 (for XPro5 system) |
9. Warranty and Support
SYNCO products are designed and manufactured to the highest quality standards. In the unlikely event that you experience any issues with your XTALK XPro5 system, please refer to the following information.
9.1. Warranty Information
This product comes with a standard manufacturer's warranty. Please retain your proof of purchase for warranty claims. The warranty covers defects in materials and workmanship under normal use. It does not cover damage caused by misuse, accidents, unauthorized modifications, or normal wear and tear.
9.2. Customer Support
For technical support, troubleshooting assistance, or service inquiries, please contact SYNCO customer support through the official SYNCO website or your retailer. You may also find additional resources, FAQs, and firmware updates on the SYNCO support page.
Online Resources: Visit the SYNCO Store on Amazon for product information and support links.


