
1. Introduction
This manual provides detailed instructions for the safe and effective use of your FADAKWALT QB-12117 Tire Repair Kit and 12V DC Tire Inflator. Please read this manual thoroughly before operation and retain it for future reference.
2. Safety Information
- Always wear appropriate eye protection when performing tire repairs.
- Ensure the vehicle is parked on a level surface with the parking brake engaged.
- Keep children and pets away from the work area.
- Do not overinflate tires. Refer to your vehicle's recommended tire pressure.
- The tire inflator is designed for 12V DC power sources only.
- Do not operate the inflator continuously for more than 10-15 minutes to prevent overheating. Allow it to cool down between uses.
- Tire repairs using this kit are intended as temporary solutions. Have the tire professionally inspected and repaired or replaced as soon as possible.
3. Package Contents
Verify that all items are present in your package:
- 12V DC Tire Inflator
- T-handle Probe Spiral Tool
- T-handle Insertion Tool
- Self-Vulcanization Repair Plugs (3 pieces)
- Tire Repair Glue (Rubber Solution)
- Fuses (2 pieces)
- Extension Nozzles (2 pieces)
- Needle Valve
- Schrader-Presta Valve (2 pieces)

Image 1: Contents of the FADAKWALT Tire Repair Kit and 12V DC Tire Inflator. This image displays the tire inflator unit, T-handle probe and insertion tools, tire repair plugs, rubber solution, fuses, extension nozzles, needle valve, and Schrader-Presta valves.
4. Setup
4.1 Preparing for Tire Repair
- Park your vehicle safely on a flat, stable surface.
- Engage the parking brake and turn off the engine.
- Locate the punctured tire.
- Gather the tire repair kit components: T-handle probe, T-handle insertion tool, repair plugs, and rubber solution.
4.2 Preparing the Tire Inflator
- Ensure the inflator's power switch is in the OFF position.
- Connect the 12V DC power plug to your vehicle's cigarette lighter socket.
- Attach the air hose to the tire valve stem by screwing it on securely.
5. Operating Instructions
5.1 Tire Repair Process
- Locate and Clean Puncture: Carefully pull out any foreign objects (nails, screws) from the tire. Use the T-handle probe spiral tool to ream the puncture hole, rotating it back and forth to clean and enlarge the hole for the plug.
- Prepare Repair Plug: Take one self-vulcanization repair plug. Apply a generous amount of tire repair glue (rubber solution) to the plug.
- Insert Plug: Thread the prepared repair plug through the eye of the T-handle insertion tool. Firmly insert the insertion tool with the plug into the reamed puncture hole until about half an inch of the plug remains visible outside the tire.
- Remove Tool: With a swift, firm motion, pull the insertion tool straight out, leaving the plug securely in place within the tire.
- Trim Excess: Carefully trim any excess plug material protruding from the tire surface using a sharp knife or razor blade (not included).
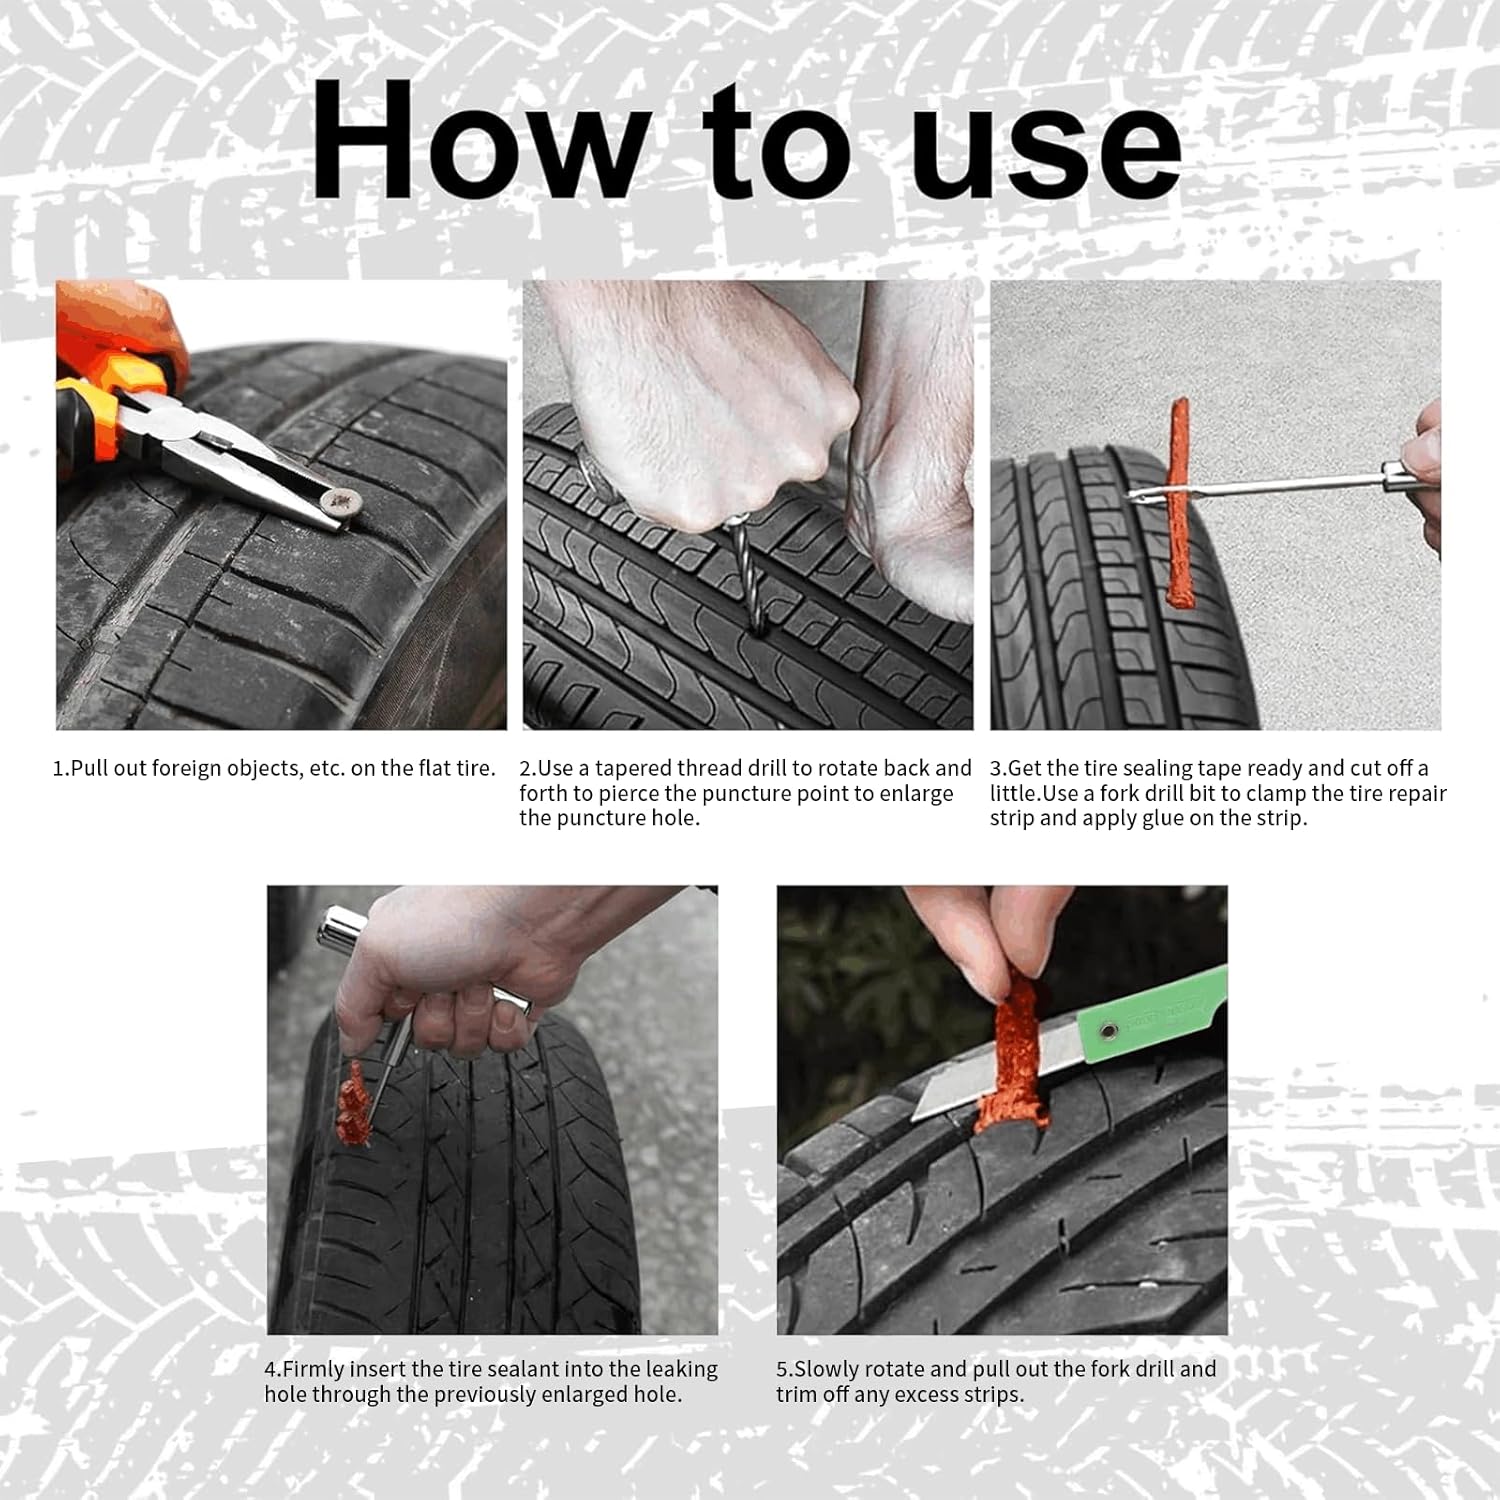
Image 2: Visual guide for the tire repair process. This image illustrates removing foreign objects, reaming the puncture, preparing the plug with glue, inserting the plug, and trimming excess material.
5.2 Tire Inflation Process
- Connect Inflator: Ensure the air hose is securely attached to the tire valve stem.
- Set Desired Pressure: Turn on the inflator. Use the digital display and control buttons to set the desired tire pressure (PSI). Refer to your vehicle's owner's manual or the sticker on the driver's side door jamb for recommended pressure.
- Start Inflation: Press the ON button to start the inflator. The inflator will automatically stop once the preset pressure is reached.
- Monitor Pressure: The built-in pressure gauge will display the current tire pressure during inflation.
- Disconnect: Once inflation is complete and the inflator has stopped, turn off the power switch and carefully disconnect the air hose from the tire valve stem. Replace the valve cap.
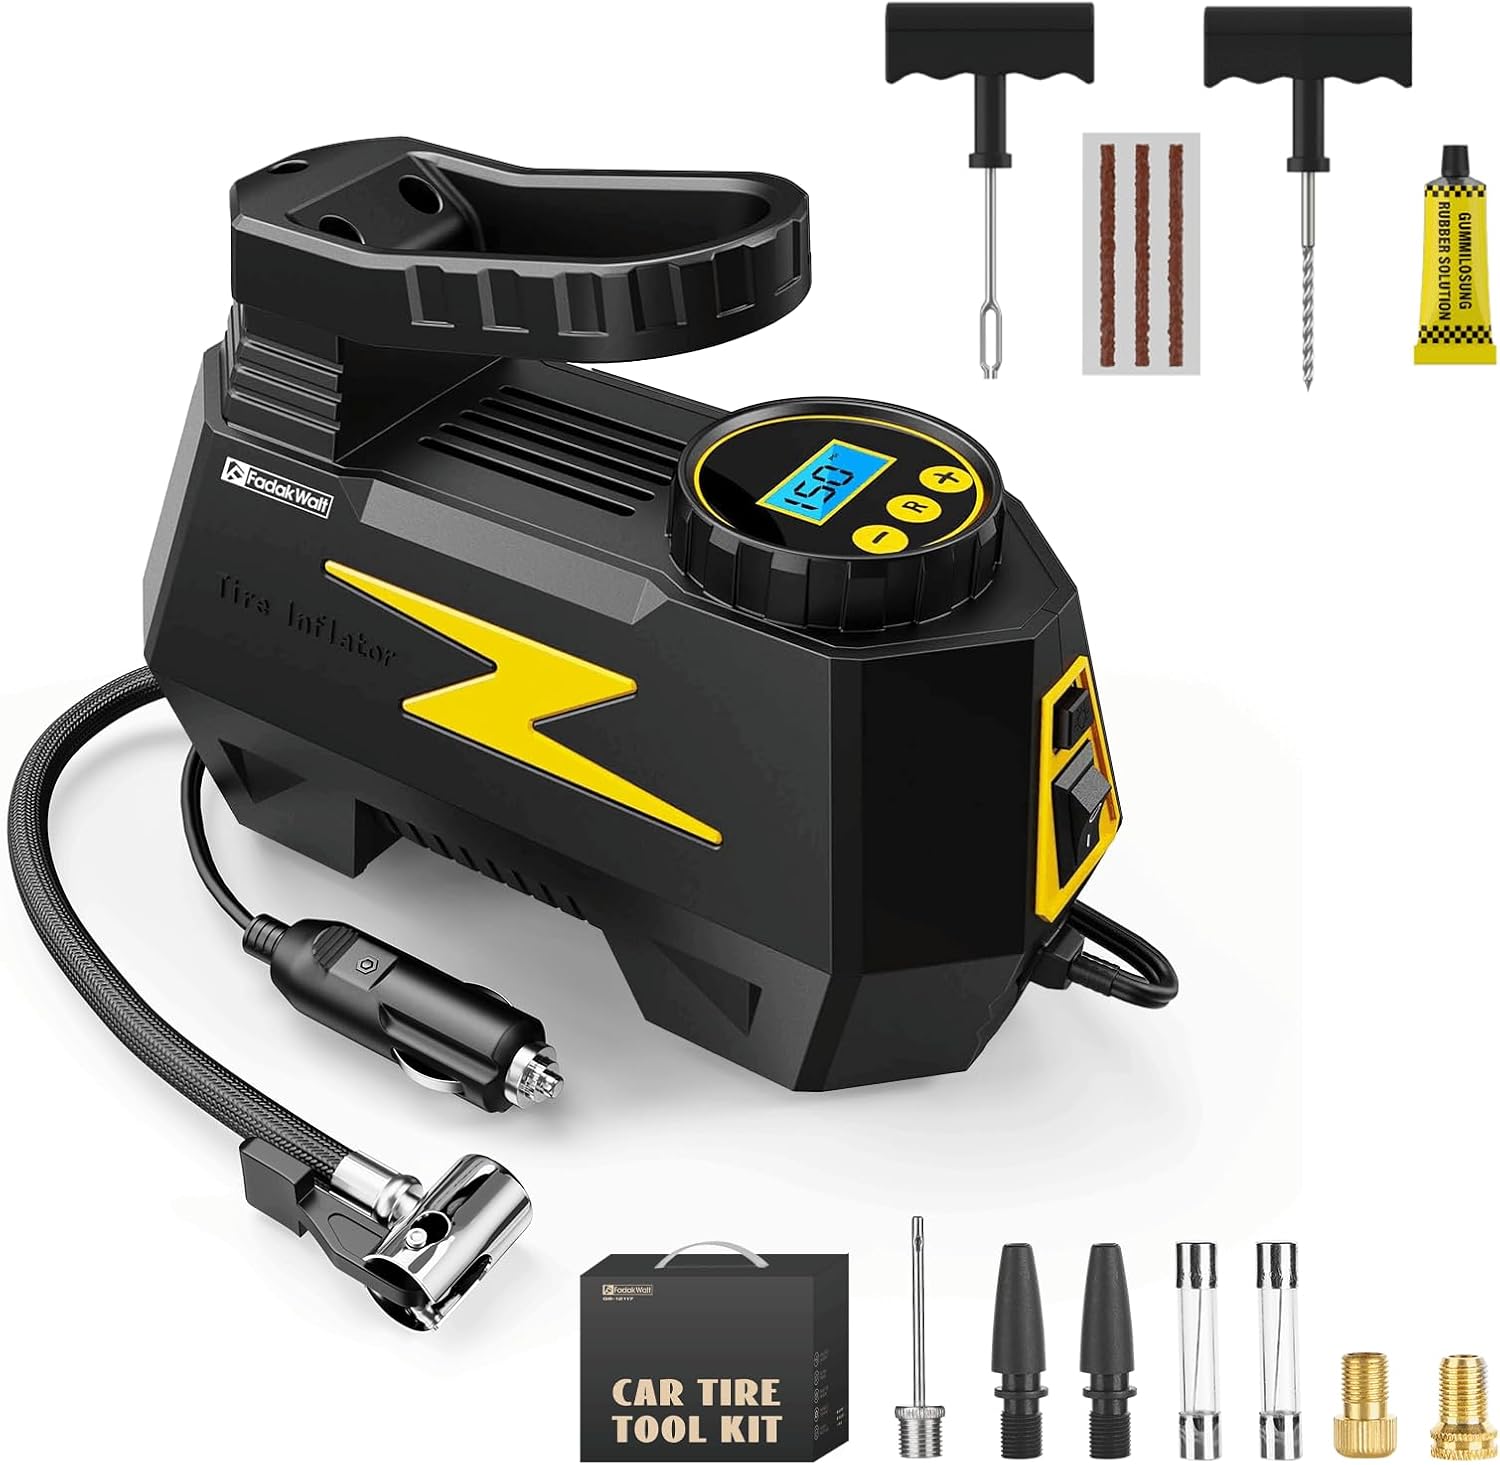
Image 3: The FADAKWALT 12V DC Tire Inflator connected to a tire. This image shows the compact inflator unit with its digital display and hose connected to a tire valve, ready for inflation.
6. Maintenance
- Cleaning: Wipe the inflator and tools with a dry or slightly damp cloth after each use. Do not use harsh chemicals.
- Storage: Store the kit in a cool, dry place, away from direct sunlight and extreme temperatures. Ensure all components are clean and dry before storage.
- Fuses: If the inflator stops working, check the 12V DC power source fuse and the inflator's internal fuse. Replace with the same type and rating if necessary.
- Repair Plugs: Keep repair plugs sealed to prevent them from drying out.
7. Troubleshooting
| Problem | Possible Cause | Solution |
|---|---|---|
| Inflator does not turn on. | No power from 12V DC socket; Blown fuse in vehicle or inflator. | Check vehicle's cigarette lighter fuse. Check and replace inflator's internal fuse if necessary. Ensure secure connection. |
| Tire is not inflating. | Air hose not securely attached; Leak in tire or hose; Inflator hose blocked. | Ensure air hose is tightly screwed onto valve stem. Check for visible leaks. Clear any obstructions in the hose. |
| Inflator overheats and shuts off. | Continuous operation for too long. | Allow the inflator to cool down for at least 15-20 minutes before resuming operation. Avoid continuous use exceeding 10-15 minutes. |
| Tire repair plug does not seal. | Puncture too large; Plug not inserted correctly; Insufficient glue. | This kit is for small punctures only. Ensure the hole is properly reamed and the plug is fully coated with glue and inserted firmly. Seek professional repair if the puncture is too large. |
| Inaccurate pressure reading. | Gauge malfunction; Loose connection. | Ensure the connection to the tire valve is tight. Compare reading with another reliable gauge if possible. |
8. Specifications
- Brand: FADAKWALT
- Model Name: QB-12117
- Voltage: 12 Volts (DC)
- Power Source: Battery Powered (via 12V DC vehicle socket)
- Special Features: Quick Inflation, Portable
- Material: ABS Plastic
- Item Weight: 2.22 pounds
- Product Dimensions: 7 x 3 x 4 inches
9. Warranty and Support
This FADAKWALT product comes with a 1-Year Warranty from the date of purchase. This warranty covers manufacturing defects and workmanship under normal use.
For warranty claims, technical support, or inquiries, please contact FADAKWALT customer service through the retailer where the product was purchased or visit the official FADAKWALT store page on Amazon: FADAKWALT Store.