
1. Introduction
This manual provides essential instructions for the safe and efficient operation of your Callsun 20A 12/24V PWM Solar Charge Controller. This device is designed to manage the power flow from your solar panel to your battery, ensuring optimal charging and protecting your battery from overcharge and over-discharge. It is compatible with various battery types, including AGM, Gel, Flooded, and Lithium batteries, and features an LCD display for easy monitoring and adjustable parameters.
2. Product Features
- Versatile Battery Compatibility: Supports AGM, GEL, flooded, and lithium battery types with adjustable voltage settings.
- Smart Voltage Recognition: Automatically detects 12V or 24V battery systems for AGM, GEL, and flooded batteries. Lithium battery settings are manually adjustable.
- Advanced PWM Charging: Utilizes a three-phase charging process (equalize, boost, float) to extend lead-acid battery lifespan and efficiency.
- User-Friendly Interface: Features an LCD screen for system status and parameter display, with intuitive key operations.
- Robust Protection: Includes comprehensive electrical protections against PV and battery connection errors, short circuits, and over-discharge.
3. Package Contents
The package includes the following items:
- 1 x Callsun P2420 PWM Solar Charge Controller
- 1 x User Manual

Figure 3.1: Package contents including the solar charge controller and user manual.
4. Product Overview
4.1 Component Identification

Figure 4.1: Key components of the solar charge controller.
- LCD Display Screen: Shows system status and parameters.
- Function Key: Used for navigating menus and adjusting settings.
- Load Key: Controls the DC load output.
- Solar Terminals: Connect to solar panels.
- Battery Terminals: Connect to the battery.
- 12V/24V DC Load Output: Provides power for DC loads.
- 5V 1A USB Ports: For charging mobile devices.
4.2 LCD Display Information

Figure 4.2: LCD screen display details.
- Active Functions: Icons indicating current active modes (e.g., solar charging, load output).
- Status Parameters: Numerical values for voltage, current, temperature, etc.
- Charge and Load Status: Visual indicators for charging and load activity.
5. Installation Instructions
5.1 Safety Precautions
- Ensure all connections are correct before powering on. Incorrect wiring can damage the controller and other components.
- Connect the battery first, then the solar panel, and finally the load. Disconnect in the reverse order.
- Install the controller in a well-ventilated area, away from direct sunlight and moisture.
- Use appropriate wire gauges for all connections to prevent overheating.
5.2 Wiring Order
Follow the wiring sequence below to ensure proper and safe installation:
- Connect the Battery: Connect the battery to the controller's battery terminals. Ensure correct polarity (+ to + and - to -).
- Connect the Solar Panel: Connect the solar panel to the controller's solar terminals. Ensure correct polarity.
- Connect the Load: Connect your DC load (e.g., lights, fan) to the controller's load terminals. Ensure correct polarity.

Figure 5.1: Step-by-step installation guide.
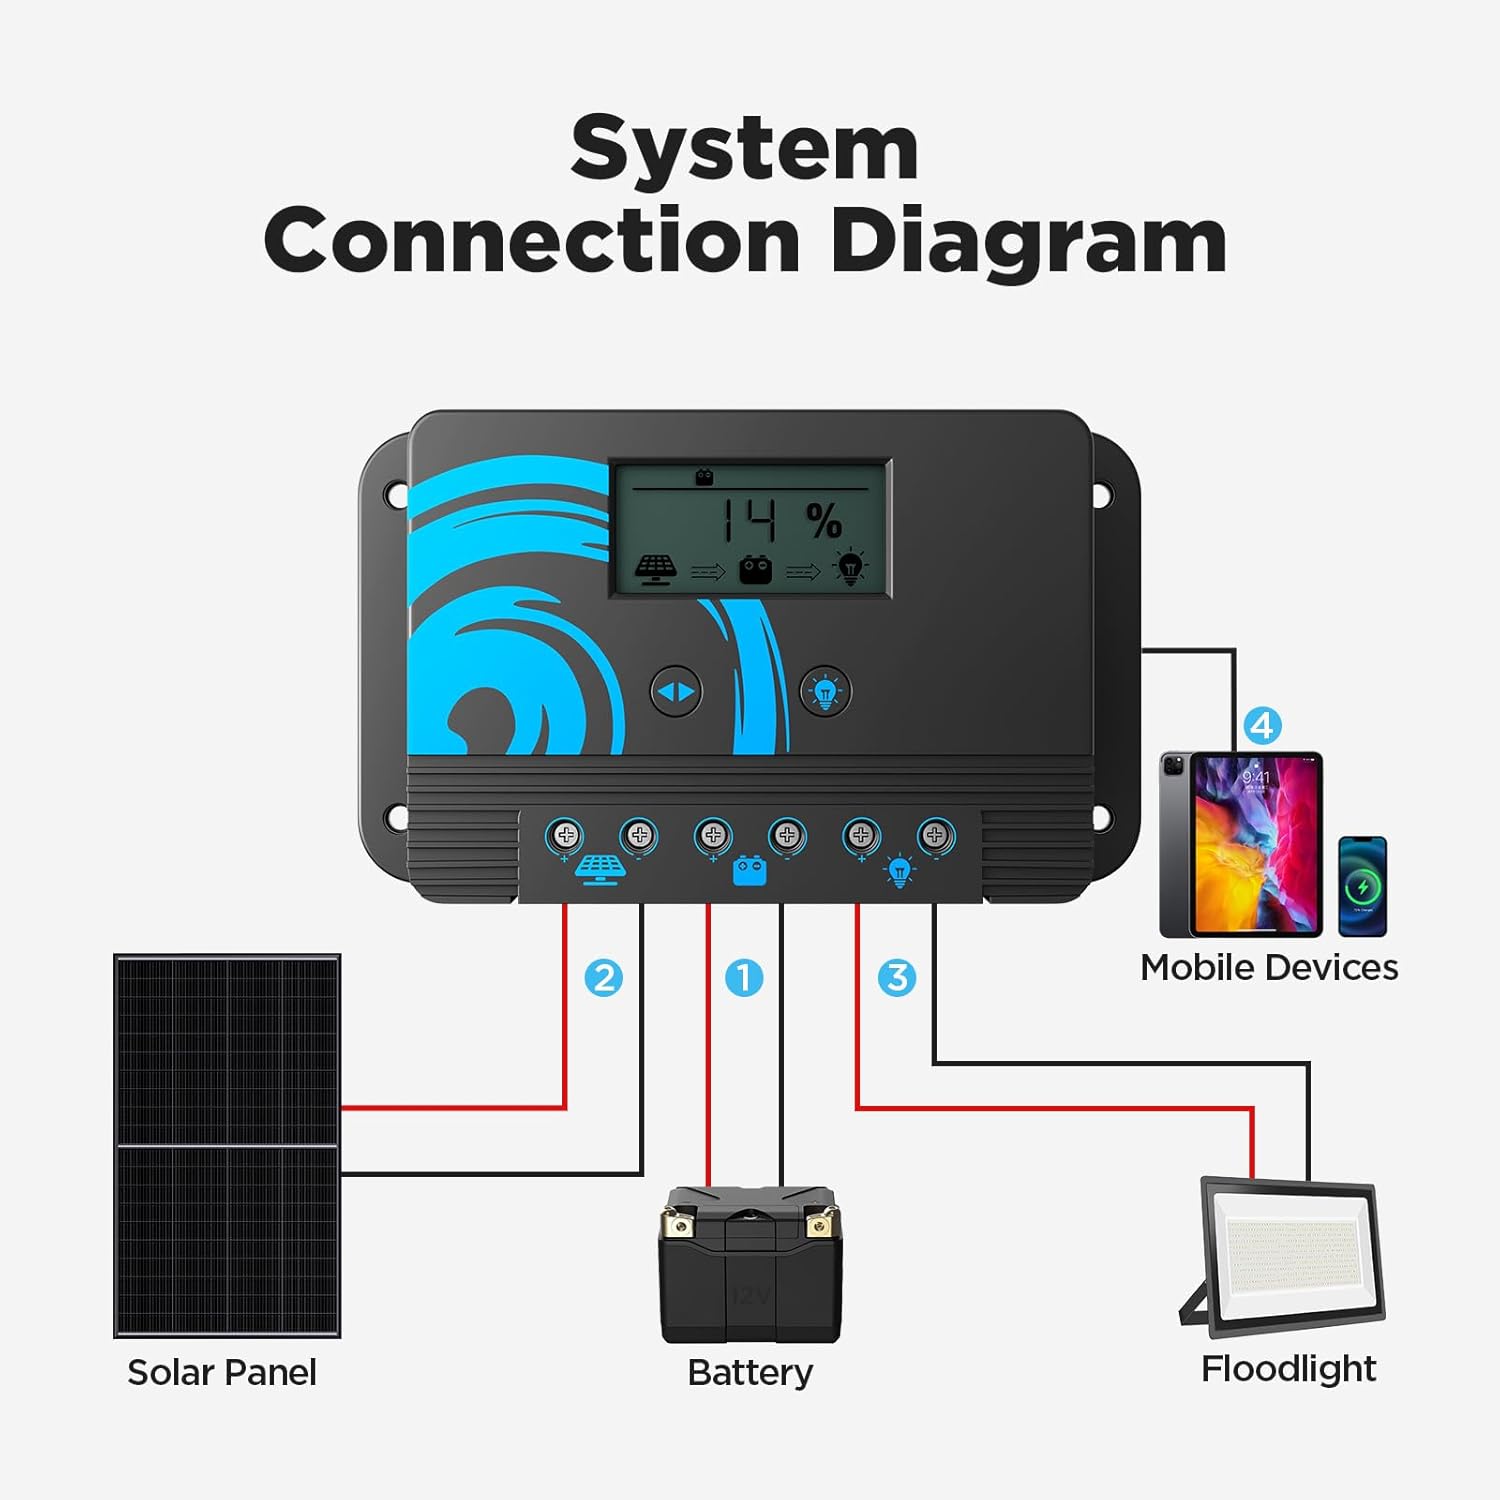
Figure 5.2: System connection diagram.
6. Operating Instructions
6.1 Power On/Off
The controller will automatically power on once the battery is connected. There is no manual power button.
6.2 Battery Type Selection
The controller automatically recognizes 12V or 24V systems for AGM, GEL, and Flooded batteries. For Lithium batteries, manual adjustment is required.

Figure 6.1: Battery type compatibility and setting methods.
To adjust battery parameters for Lithium batteries or fine-tune other types:
- Press the Function Key to cycle through display screens.
- When on the battery type setting screen, press and hold the Function Key to enter edit mode.
- Use the Function Key to change the value or select the battery type.
- Press and hold the Function Key again to save and exit.
6.3 Load Control Settings
The controller features a DC load output that can be controlled via the Load Key.

Figure 6.2: Multiple output control mode.
- Press the Load Key to toggle the DC load output on or off.
- The LCD display will indicate the load status.
6.4 USB Charging
The controller includes USB ports for charging mobile devices.

Figure 6.3: USB charging port.
- Connect your device to the USB port using a compatible cable.
- The USB output provides a maximum of 5V/1A.
7. Safety Features
The Callsun P2420 controller is equipped with multiple protection mechanisms to ensure safe operation of your solar system:

Figure 7.1: Electrical protection features.
- Reverse Connection Protection: Prevents damage from incorrect battery or solar panel polarity.
- Short Circuit Protection: Safeguards against short circuits in the solar panel, battery, or load circuits.
- Open Circuit Protection: Protects the system if a circuit becomes open.
- Over Temperature Protection: Shuts down or reduces charging if the controller overheats.
- Over Load Protection: Prevents damage from excessive current draw by the load.
- Over Current Protection: Limits current to safe levels.
8. Specifications
| Feature | Description |
|---|---|
| Brand | Callsun |
| Model | P2420 |
| Current Rating | 20A |
| System Voltage | 12V/24V Automatic Recognition |
| Max Solar Input Power (12V) | 340W |
| Max Solar Input Power (24V) | 680W |
| Display Type | LCD |
| USB Output | 5V/1A (Max) |
| Battery Compatibility | AGM, Gel, Flooded, Lithium |
| Color | Black |

Figure 8.1: 12V/24V mode and maximum solar input power.
9. Maintenance
Regular maintenance ensures the longevity and optimal performance of your solar charge controller:
- Inspect Connections: Periodically check all wiring connections for tightness and corrosion. Loose connections can cause voltage drops and overheating.
- Clean the Controller: Keep the controller clean and free from dust and debris. Use a dry cloth to wipe the surface. Ensure ventilation openings are not blocked.
- Monitor Performance: Regularly check the LCD display for normal operation and parameter readings. Note any unusual readings or error codes.
- Battery Health: Ensure your battery is well-maintained according to its manufacturer's guidelines.
10. Troubleshooting
If you encounter issues with your solar charge controller, refer to the following common problems and solutions:
| Problem | Possible Cause | Solution |
|---|---|---|
| Controller not powering on / No display | Battery not connected or low voltage; reverse polarity. | Check battery connections and polarity. Ensure battery voltage is above minimum operating threshold. |
| Battery not charging | Solar panel not connected; insufficient sunlight; solar panel reverse polarity; faulty solar panel. | Check solar panel connections and polarity. Ensure adequate sunlight. Test solar panel output. |
| Load not working | Load output off; load reverse polarity; over-discharge protection active; faulty load. | Press the Load Key to turn on output. Check load connections and polarity. Charge battery. Test load separately. |
| Error code on display | Indicates a specific fault (e.g., over-voltage, short circuit). | Refer to the controller's specific error code definitions (if available in a more detailed manual) or contact support. Check for obvious wiring issues. |
11. Warranty and Support
For warranty information, technical support, or service inquiries, please contact Callsun customer service through the retailer where the product was purchased or visit the official Callsun website. Please have your product model number (P2420) and purchase details ready when contacting support.