
1. Introduction
This manual provides comprehensive instructions for the installation, operation, and maintenance of your Technicolor CGA4234VGW DOCSIS 3.1 WiFi Gigabit Modem. This device is designed to provide high-speed internet access, supporting DOCSIS 3.1 technology for ultra-fast speeds and advanced WiFi capabilities for seamless connectivity across multiple devices.
Please read this manual thoroughly before setting up your modem to ensure proper installation and optimal performance.
2. Safety Information
- Use only the power adapter supplied with the modem.
- Do not expose the modem to water or moisture.
- Do not block ventilation openings. Ensure adequate airflow around the device.
- Avoid placing the modem near heat sources or in direct sunlight.
- Do not attempt to open or repair the modem yourself. Refer all servicing to qualified personnel.
- Disconnect the power adapter during lightning storms or when unused for long periods.
3. Package Contents
Verify that all items are present in the package:
- Technicolor CGA4234VGW DOCSIS 3.1 WiFi Gigabit Modem
- Power Adapter
- Ethernet Cable
- Quick Start Guide (if applicable)
4. Product Overview and Features
The Technicolor CGA4234VGW is a high-performance DOCSIS 3.1 modem with integrated Wi-Fi capabilities, designed for robust internet connectivity. Key features include:
- DOCSIS 3.1 Technology: Supports multi-gigabit downstream and upstream rates for ultra-fast internet speeds.
- Dual-Band Wi-Fi: Simultaneous 2.4GHz and 5GHz bands for optimized wireless performance.
- Gigabit Ethernet Ports: Four (4) Gigabit LAN ports for high-speed wired connections to devices like PCs, gaming consoles, and smart TVs.
- Compatibility: Works with Rogers Ontario TPIA providers such as Netcrawler, Teksavvy, CIK, and Start.ca.
- Sleek Design: Compact and modern design to blend into any home or office environment.
4.1. Front Panel Indicators
The front panel of the modem features LED indicators that provide status information:

Image: Front view of the Technicolor CGA4234VGW modem, displaying the vertical row of status indicator lights. From top to bottom, these typically include Power, Downstream, Upstream, Online, Wi-Fi 2.4GHz, Wi-Fi 5GHz, and Phone (if applicable), followed by a WPS button and a Reset button.
- Power: Indicates the power status of the modem.
- Downstream: Shows the status of the downstream connection.
- Upstream: Shows the status of the upstream connection.
- Online: Indicates successful internet connection.
- Wi-Fi 2.4GHz: Indicates activity on the 2.4GHz wireless network.
- Wi-Fi 5GHz: Indicates activity on the 5GHz wireless network.
- WPS: Indicates the status of Wi-Fi Protected Setup.
4.2. Rear Panel Ports
The rear panel contains all the necessary connection ports:
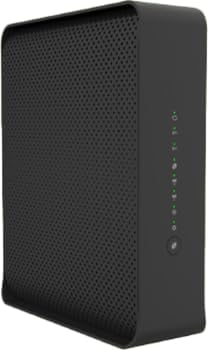
Image: Angled view of the Technicolor CGA4234VGW modem, showcasing its compact black casing and the rear panel where various ports are located. These ports typically include the coaxial cable input, four Gigabit Ethernet LAN ports, and the power input.
- Coaxial Cable Port: Connects to your cable service outlet.
- Ethernet Ports (LAN 1-4): Connects to computers, routers, or other network devices.
- Power Port: Connects to the supplied power adapter.
- Reset Button: Used to restore factory default settings (recessed).
5. Setup and Installation
5.1. Pre-installation Checklist
- Ensure you have an active cable internet service subscription with a compatible TPIA provider (e.g., Rogers TPIA, Netcrawler, Teksavvy, CIK, Start.ca).
- Locate a coaxial cable outlet near a power source.
- Have your account information ready for service activation.
5.2. Connecting the Modem
- Connect Coaxial Cable: Screw one end of the coaxial cable (not included) into the cable wall outlet and the other end into the "Cable" port on the rear of the modem. Ensure connections are finger-tight.
- Connect Power: Plug the supplied power adapter into the "Power" port on the modem and then into an electrical outlet. The Power LED on the front panel should illuminate.
- Wait for Initialization: Allow the modem several minutes to power on and connect to the network. The Downstream, Upstream, and Online LEDs will flash and then turn solid green (or blue for DOCSIS 3.1 channels) once a connection is established. This process can take 5-10 minutes.
- Connect Devices (Optional):
- Wired Connection: Connect one end of the Ethernet cable to any of the LAN ports on the modem and the other end to your computer or router.
- Wireless Connection: Locate the Wi-Fi Network Name (SSID) and Password on the label on the bottom or back of your modem. Connect your wireless devices to this network.
5.3. Service Activation
Once the modem is physically connected and the Online LED is solid, you may need to activate your service with your internet service provider (ISP). This typically involves:
- Visiting your ISP's activation portal (often automatically redirected when opening a web browser).
- Calling your ISP's customer support line and providing the modem's MAC address (found on the modem label).
Follow your ISP's specific instructions for activation.
6. Operating the Modem
6.1. Understanding LED Behavior
| LED Indicator | Status | Description |
|---|---|---|
| Power | Solid Green | Modem is powered on. |
| Downstream | Solid Green/Blue | Connected to downstream channel(s). Blue indicates DOCSIS 3.1. |
| Flashing Green | Scanning for downstream channel(s). | |
| Upstream | Solid Green/Blue | Connected to upstream channel(s). Blue indicates DOCSIS 3.1. |
| Flashing Green | Scanning for upstream channel(s). | |
| Online | Solid Green | Modem is online and connected to the internet. |
| Flashing Green | Obtaining IP address/configuration. | |
| Wi-Fi 2.4GHz/5GHz | Solid Green | Wireless network is active. |
| Flashing Green | Data is being transmitted/received. |
6.2. Accessing Modem Settings
To access the modem's web interface for advanced settings (e.g., Wi-Fi name/password changes, port forwarding), follow these steps:
- Ensure your computer is connected to the modem via Ethernet or Wi-Fi.
- Open a web browser (e.g., Chrome, Firefox, Edge).
- In the address bar, type the modem's default IP address (commonly http://192.168.0.1 or http://192.168.1.1) and press Enter.
- Enter the default username and password. These are usually found on a label on the modem or in the Quick Start Guide. Common defaults are "admin" for username and "password" or "admin" for password.
- Once logged in, you can configure various settings. Refer to the online help within the interface for specific options.
Note: Your ISP may restrict access to certain modem settings or provide their own management portal.
7. Maintenance
- Placement: Place the modem in a central location, away from obstructions, to maximize Wi-Fi coverage. Avoid enclosed spaces.
- Cleaning: Use a soft, dry cloth to clean the exterior of the modem. Do not use liquid cleaners or aerosols.
- Firmware Updates: Firmware updates are typically managed automatically by your internet service provider. Do not attempt manual firmware updates unless instructed by your ISP.
- Rebooting: Periodically rebooting your modem (by unplugging the power for 30 seconds and plugging it back in) can resolve minor connectivity issues and improve performance.
8. Troubleshooting
8.1. Common Issues and Solutions
| Problem | Possible Cause | Solution |
|---|---|---|
| No Internet Connection | Modem not online, cable disconnected, ISP issue. | Check all cable connections. Reboot the modem. Verify LED status (Online LED should be solid green). Contact your ISP if issues persist. |
| Slow Internet Speed | Network congestion, Wi-Fi interference, outdated device drivers. | Reboot modem. Ensure modem is in an open area. Try a wired connection to rule out Wi-Fi issues. Contact ISP if speeds are consistently below expected. |
| Wi-Fi Not Working | Wi-Fi disabled, incorrect password, interference. | Check Wi-Fi LEDs on modem. Ensure Wi-Fi is enabled in modem settings. Verify Wi-Fi password. Try changing Wi-Fi channel in settings. |
| Cannot Access Modem Settings | Incorrect IP address, wrong credentials, network issue. | Ensure correct IP address (192.168.0.1 or 192.168.1.1). Verify username and password. Try connecting via Ethernet. |
8.2. Resetting the Modem to Factory Defaults
If troubleshooting steps do not resolve the issue, you may need to perform a factory reset. This will erase all custom settings and restore the modem to its original configuration.
- With the modem powered on, locate the recessed Reset button on the rear panel.
- Use a paperclip or a similar pointed object to press and hold the Reset button for at least 10-15 seconds.
- Release the button. The modem will reboot, and all LEDs will cycle.
- Allow several minutes for the modem to re-initialize and reconnect to the network. You will need to reconfigure any custom settings or reactivate with your ISP if required.
9. Specifications
| Feature | Detail |
|---|---|
| Model | Technicolor CGA4234VGW |
| DOCSIS Standard | DOCSIS 3.1 |
| Wi-Fi Standard | Dual-Band (2.4GHz & 5GHz) |
| Ethernet Ports | 4 x Gigabit LAN Ports |
| Maximum Downstream Data Rate | 1000 Megabits Per Second (Mbps) |
| Maximum Upstream Data Rate | 1000 Megabits Per Second (Mbps) |
| Dimensions (L x W x H) | 19.1 x 5.6 x 22.9 cm (approx.) |
| Weight | 1.36 kg (approx.) |
| Color | Black |
| Compatible Devices | Laptop, Personal Computer, Tablet, Smart Television, Smartphone |
| Internet Service Provider Compatibility | Rogers TPIA (Netcrawler, Teksavvy, CIK, Start.ca) |
10. Warranty and Support
For warranty information and technical support, please refer to the documentation provided by your internet service provider or contact Technicolor customer support directly. Keep your purchase receipt and modem's serial number handy when seeking support.
Online resources and FAQs may also be available on the Technicolor support website or your ISP's support portal.


