1. Product Overview
The Anmite 18.5 Inch 120Hz Portable Monitor is designed to extend your visual workspace, offering a high-definition display for laptops, gaming consoles, and mobile devices. Its lightweight and slim design ensures portability, while the IPS panel provides wide viewing angles and vibrant colors.

Image 1.1: Front view of the Anmite 18.5 Inch Portable Monitor, highlighting its key features like 1920x1080 resolution, 120Hz refresh rate, 100% sRGB, 3ms response time, and IPS panel.
2. Package Contents
Please verify that all items are present in your package:
- Anmite Portable Monitor x 1
- Mini-HDMI to HDMI cable x 1
- Type-C to Type-C cable x 1
- Type-C to USB-A cable x 1
- User Guide x 1
3. Monitor Features and Ports
Familiarize yourself with the monitor's physical features and connection ports.
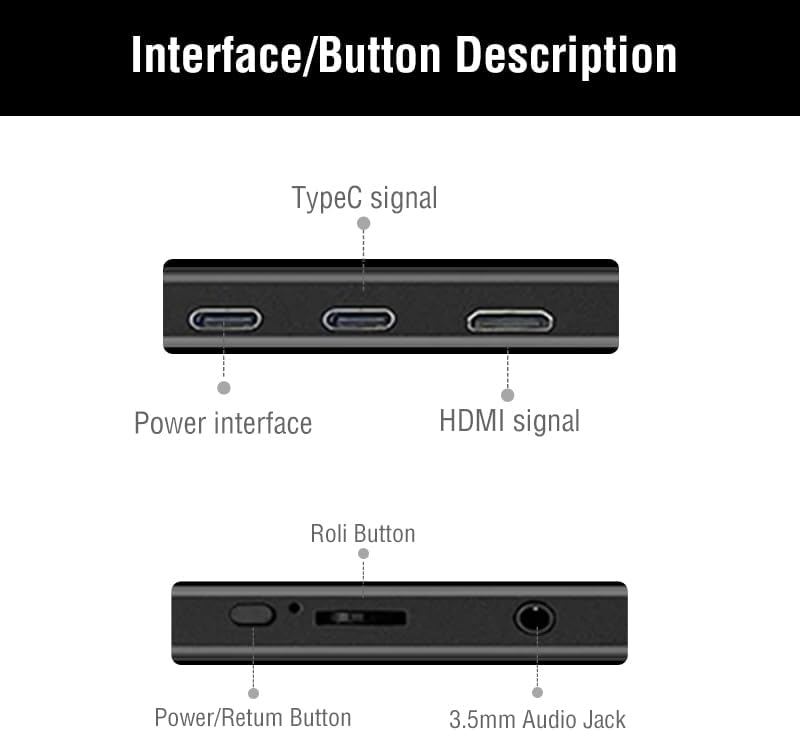
Image 3.1: Detailed diagram showing the monitor's ports and control buttons. This includes Type-C signal input, Power interface, HDMI signal input, a 'Roli Button' for menu navigation, and a 3.5mm Audio Jack.
3.1. Ports and Buttons
- Type-C (Full Function): For video, audio, and power transmission from compatible devices.
- Type-C (Power): For power input to the monitor.
- Mini-HDMI: For video and audio input from devices.
- 3.5mm Audio Jack: For connecting external headphones or speakers.
- Roli Button: Used for navigating the On-Screen Display (OSD) menu and adjusting settings.
- Power/Return Button: Used to power the monitor on/off and as a return function in the OSD menu.

Image 3.2: Rear view of the monitor, showcasing the integrated metal support stand and VESA mounting points.
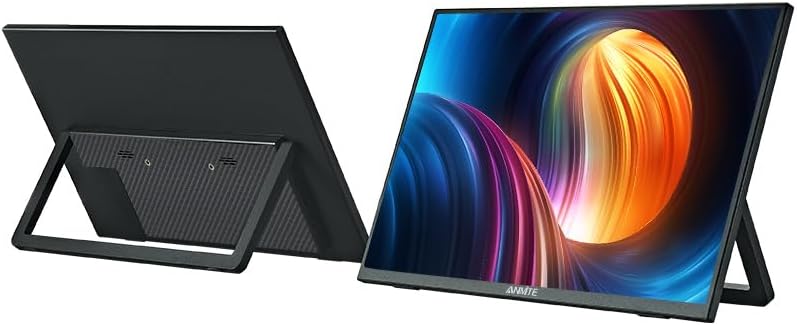
Image 3.3: Front and back perspective views of the monitor, illustrating its slim profile and the adjustable stand.
4. Setup Instructions
4.1. Powering the Monitor
The monitor requires power to operate. Connect the provided Type-C to USB-A cable to the monitor's dedicated power Type-C port and a compatible USB power adapter (not included) or a powered USB port on your device.
4.2. Connecting to Devices
The Anmite portable monitor supports various devices via Type-C (full function) and HDMI connections.
4.2.1. Connecting to a Laptop/PC (Type-C)
- Ensure your laptop/PC has a full-featured Type-C (USB-C) port that supports video output (DisplayPort Alternate Mode) and power delivery.
- Connect one end of the Type-C to Type-C cable to the monitor's full-function Type-C port.
- Connect the other end of the Type-C to Type-C cable to your laptop/PC's full-featured Type-C port.
- The monitor should automatically detect the signal and display your laptop/PC screen. If not, you may need to adjust display settings on your laptop/PC.
4.2.2. Connecting to a Laptop/PC (HDMI)
- Connect one end of the Mini-HDMI to HDMI cable to the monitor's Mini-HDMI port.
- Connect the other end of the Mini-HDMI to HDMI cable to your laptop/PC's HDMI port.
- Connect the monitor to a power source using the Type-C to USB-A cable and a power adapter.
- The monitor should automatically detect the signal. If not, adjust display settings on your laptop/PC.
4.2.3. Connecting to a Smartphone (Type-C)
- Ensure your smartphone has a full-featured Type-C (USB-C) port that supports video output (DisplayPort Alternate Mode) and power delivery.
- Connect one end of the Type-C to Type-C cable to the monitor's full-function Type-C port.
- Connect the other end of the Type-C to Type-C cable to your smartphone's full-featured Type-C port.
- The monitor should mirror or extend your phone's display.

Image 4.1: The portable monitor connected to a smartphone via a Type-C cable, demonstrating its use as an external display for mobile devices.
4.2.4. Connecting to Gaming Consoles (HDMI)
- Connect one end of the Mini-HDMI to HDMI cable to the monitor's Mini-HDMI port.
- Connect the other end of the Mini-HDMI to HDMI cable to your gaming console's HDMI port.
- Connect the monitor to a power source using the Type-C to USB-A cable and a power adapter.
- Power on your gaming console and the monitor. The display should appear automatically.
4.3. Using the Integrated Stand
The monitor features an integrated metal stand for easy setup. Simply unfold the stand from the back of the monitor to position it at your desired viewing angle. The stand also allows for both landscape and portrait orientations.
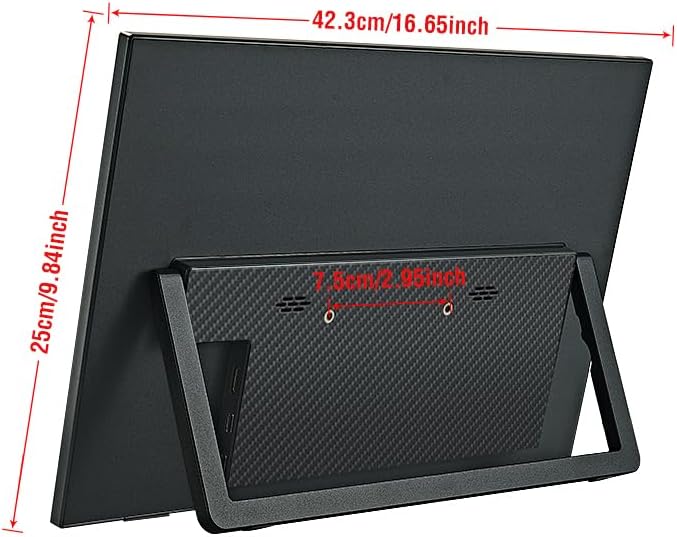
Image 4.2: Rear view of the monitor with its stand extended, showing the overall dimensions and stability.
5. Operating Instructions
5.1. Power On/Off
Press and hold the Power/Return Button for a few seconds to turn the monitor on or off.
5.2. On-Screen Display (OSD) Menu
The OSD menu allows you to adjust various display settings. Use the Roli Button to navigate and select options.
- Press the Roli Button to open the OSD menu.
- Roll the Roli Button up or down to navigate through menu options.
- Press the Roli Button to select an option or enter a submenu.
- Use the Power/Return Button to go back to the previous menu or exit the OSD.
5.3. Common OSD Settings
- Brightness/Contrast: Adjust the display's luminance and contrast levels.
- Color Settings: Modify color temperature, hue, and saturation.
- Input Source: Manually select between Type-C and HDMI inputs if auto-detection fails.
- Aspect Ratio: Change the display aspect ratio (e.g., 16:9, 4:3).
- Volume: Adjust the volume of the built-in speakers or connected headphones.
5.4. Display Orientation
The monitor supports both landscape and portrait orientations. The display will automatically adjust if your connected device supports auto-rotation. Otherwise, you may need to manually change the display orientation in your device's operating system settings.
6. Maintenance
6.1. Cleaning the Monitor
- Always power off and unplug the monitor before cleaning.
- Use a soft, lint-free cloth slightly dampened with water or a non-abrasive screen cleaner.
- Do not spray cleaner directly onto the screen.
- Avoid using alcohol, ammonia, or abrasive cleaners, as they can damage the screen surface.
6.2. Storage
- Store the monitor in a cool, dry place away from direct sunlight and extreme temperatures.
- If storing for an extended period, use the original packaging or a protective sleeve to prevent dust and scratches.
7. Troubleshooting
If you encounter issues with your Anmite portable monitor, refer to the following common solutions:
- No Display/No Signal:
- Ensure the monitor is properly powered and turned on.
- Verify that the video cable (Type-C or HDMI) is securely connected to both the monitor and your device.
- If using Type-C, confirm that your device's Type-C port is full-featured and supports video output. Some Type-C ports are for charging only.
- Try selecting the correct input source manually via the OSD menu.
- Test with a different cable or device if possible.
- Flickering or Unstable Display:
- Check cable connections for looseness.
- Ensure the monitor is receiving sufficient power.
- Adjust the refresh rate or resolution settings on your connected device.
- No Audio:
- Increase the volume on both the monitor (via OSD) and your connected device.
- Ensure the audio output on your device is set to the portable monitor.
- If using external headphones/speakers, ensure they are properly connected to the 3.5mm audio jack.
- Monitor Not Turning On:
- Confirm the power cable is connected and the power source is active.
- Try a different power adapter or USB port.
8. Specifications
Detailed technical specifications for the Anmite 18.5 Inch Portable Monitor (Model A185W03).

Image 8.1: Diagram illustrating the physical dimensions of the 18.5-inch monitor in centimeters and inches.
| Feature | Specification |
|---|---|
| Model Number | A185W03 |
| Screen Size | 18.5 inch |
| Panel Type | IPS |
| Resolution | 1920x1080 (FHD) |
| Screen Refresh Rate | 120Hz |
| Aspect Ratio | 16:9 |
| Display Color | 16.7M |
| Color Temperature | 6800K |
| Visual Angle | H:178° V:178° |
| Visual Area | 410 x 230 mm |
| Contrast Ratio | 1000:1 |
| Brightness | 300cd/m² |
| Supported Colors | 100% sRGB |
| Input Interface | Mini-HDMI, Type-C (Full Function), Type-C (Power) |
| Output Interface | 3.5mm audio interface |
| Speakers | Built-in (1W*2) |
| Net Weight | 1.2 kg |
| Dimensions | 423 x 250 x 6-13 mm (16.65 x 9.84 x 0.24-0.51 inches) |
| Product Dimensions (Packaged) | 8.26 x 14.96 x 19.29 inches |
| Voltage | 5 Volts (DC) |
| Screen Surface Description | Matte |

Image 8.2: Illustration of the monitor's ultra-portable design, highlighting its thinness and lightweight nature with dimensions.

Image 8.3: Visual comparison of the 18.5-inch monitor alongside 17.3-inch and 15.6-inch models, demonstrating its larger screen size.
9. Warranty and Support
9.1. Warranty Information
For detailed warranty information regarding your Anmite portable monitor, please refer to the warranty card included in your product packaging or visit the official Anmite website. Protection plans may also be available for purchase separately.
9.2. Customer Support
If you require further assistance or have questions not covered in this manual, please contact Anmite customer support. You can find contact information and additional resources on the Anmite Official Store.


