
VIKIO HOME VK-RC11-30
Contents
VIKIO HOME Range Hood User Manual
Model: VK-RC11-30
30-inch Under Cabinet Kitchen Hood with 980CFM, 3-Speed Gesture Sensing & Touch Control Panel, Stainless Steel
1. Introduction
Thank you for choosing the VIKIO HOME Under Cabinet Range Hood. This manual provides essential information for the safe and efficient installation, operation, and maintenance of your new appliance. Designed for optimal kitchen air quality, this range hood features powerful 980 CFM suction, quiet operation, and intuitive gesture and touch controls.
For any questions or concerns not covered in this manual, please refer to the "Warranty and Support" section for customer service contact information.

Image: Front view of the VIKIO HOME 30-inch Under Cabinet Range Hood, showcasing its sleek stainless steel design and control panel.
2. Important Safety Information
WARNING:
- Always disconnect power to the range hood before servicing or cleaning.
- Installation must be performed by a qualified installer in accordance with all local codes and regulations.
- To reduce the risk of fire, use only metal ductwork.
- Do not operate any fan with a damaged cord or plug. Discard fan or return to an authorized service facility for examination and/or repair.
- Adequate ventilation is required for proper combustion and exhausting of gases through the flue (chimney) of fuel-burning equipment to prevent back-drafting.
- When cutting or drilling into wall or ceiling, do not damage electrical wiring and other hidden utilities.
- Never leave surface units unattended at high settings. Boil-over causes smoking and greasy spillovers that may ignite.
- Clean ventilating fans frequently. Grease should not be allowed to accumulate on fan or filter.
3. What's in the Box
Your VIKIO HOME Range Hood package includes the following components:
- VIKIO HOME Range Hood Unit
- User Installation Manual
- Stainless Steel Baffle Filters (x2)
- 4500K GU10 LED Bulbs (x2)
- Round Duct Connector (6-inch)
- Rectangle Duct Connector
- Mounting Hardware (screws, expansion screws, anchors)
- Installation Position Paperboard Template

Image: The user installation manual, a key component for proper setup.
4. Product Specifications
| Brand | VIKIO HOME |
| Model Number | VK-RC11-30 |
| Dimensions (D x W x H) | 19.68" x 29.5" x 6" |
| Item Weight | 36.1 Pounds |
| Air Flow Capacity | 980 Cubic Feet Per Minute (CFM) |
| Noise Level | 35 dBA (low speed) to under 65 dBA (high speed) |
| Number of Speeds | 3 |
| Control Method | Touch, Gesture Sensing |
| Mounting Type | Under Cabinet Mount |
| Ventilation Type | Ducted |
| Material | Stainless Steel |
| Light Source Type | LED (4500K GU10) |
| Filter Type | Baffle |
5. Installation Guide
Proper installation is crucial for the performance and safety of your range hood. Refer to the included "Installation Position Paperboard" for precise measurements and drilling points.
5.1 Preparation
- Ensure the cabinet space is at least 30 inches wide.
- Verify electrical supply (110V) is available within the cabinet area.
- Determine your ducting method (top round, top rectangular, or rear rectangular).
- Peel off all blue/white protective film from the stainless steel surfaces before installation. If difficult, a hair dryer can be used to loosen the film.
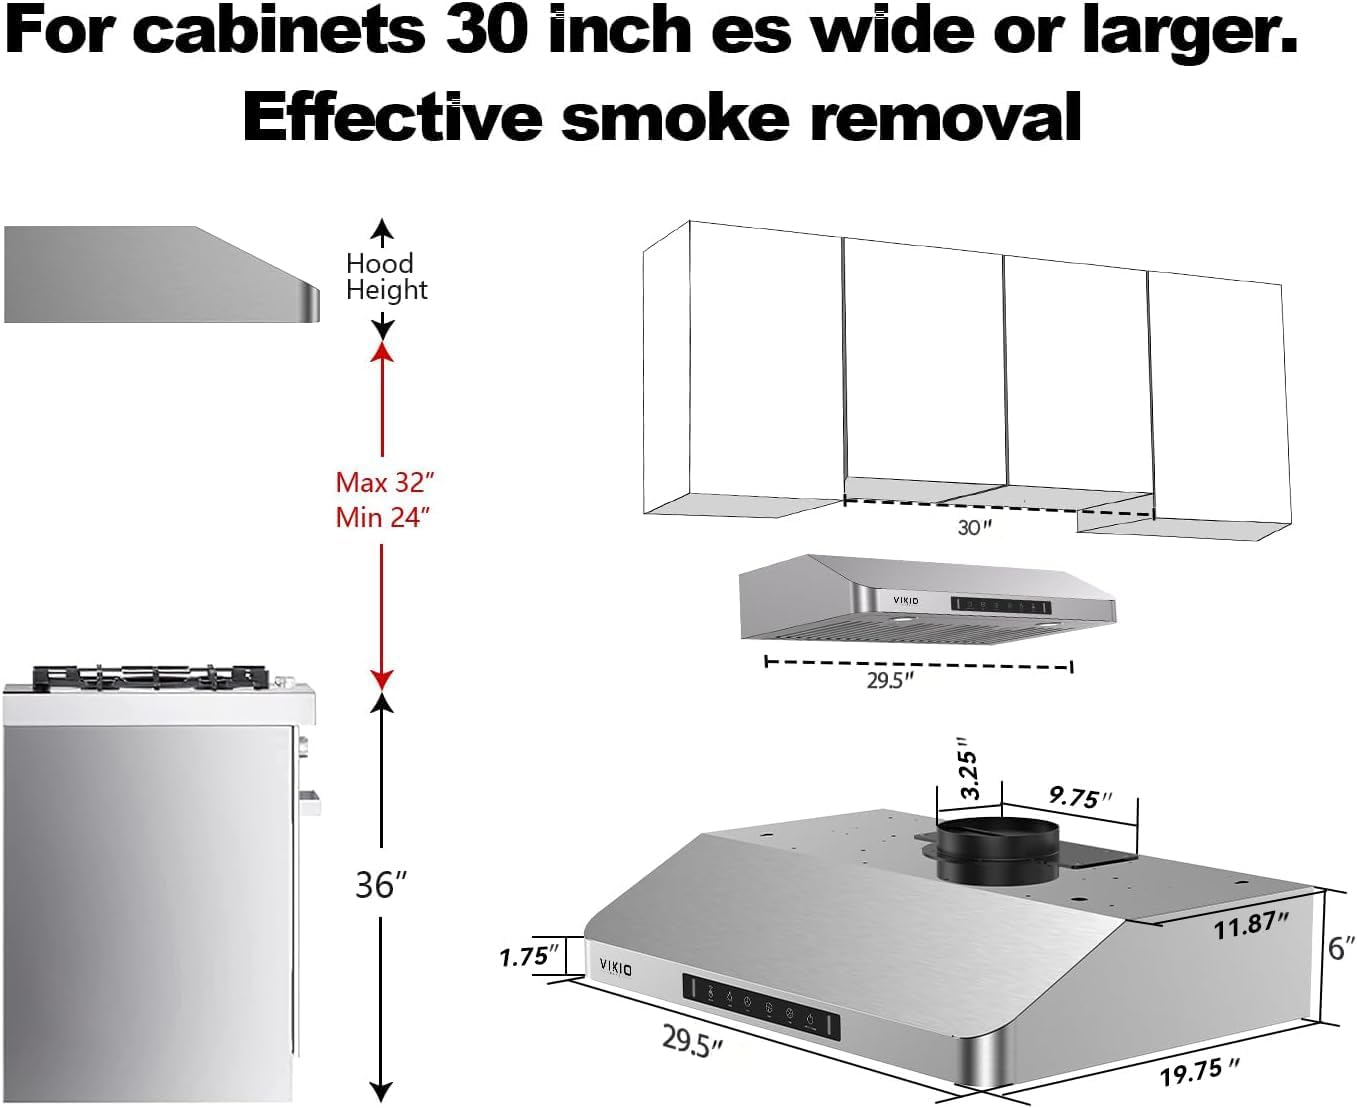
Image: Detailed diagram illustrating the range hood's dimensions and various ducting configurations for installation.
5.2 Mounting the Range Hood
- Using the provided paperboard template, mark the drilling points for the mounting screws and the power cord hole on the underside of your cabinet.
- Drill pilot holes at the marked locations. For rear venting, also mark and cut the appropriate opening on the back wall.
- If using a rectangular duct, attach the rectangular duct connector to the top of the range hood. For round ducting, ensure the 6-inch round transition is securely in place.
- Carefully lift the range hood into position, aligning the mounting holes with the drilled pilot holes. It is recommended to have two people for this step.
- Secure the range hood to the cabinet using the provided mounting screws.
- Connect the ductwork to the range hood's exhaust outlet and route it to your external ventilation system.
- Plug the power cord into a grounded electrical outlet inside the cabinet.
5.3 Installation Videos
RC11 Range Hood Installation Steps Explained
Video: A detailed walkthrough of the installation process for the RC11 range hood model, covering all essential steps.
VIKIO Home Range Hood 30 inch Under Cabinet Overview
Video: An overview of the VIKIO Home 30-inch range hood, including glimpses of its features and potential installation aspects.
6. Operating Instructions
Your VIKIO HOME Range Hood is designed for ease of use with both touch and gesture controls.
6.1 Control Panel Overview
The sleek control panel features illuminated icons for various functions:
- Off/On (Gesture): Activates/deactivates gesture control.
- Light: Toggles the LED lights on/off.
- Low: Sets fan speed to low.
- Med: Sets fan speed to medium.
- High: Sets fan speed to high.
- Off/On/Delay: Powers the unit on/off, or activates the delay shut-off timer.

Image: The intuitive touch and gesture control panel for easy operation.
6.2 Gesture Control
To use gesture control, ensure the "Off/On (Gesture)" icon is illuminated. Wave your hand horizontally over the sensing points (located at the ends of the control panel) to adjust fan speed or turn the unit on/off. Maintain a distance no closer than 5.9 inches from the panel for optimal detection.

Image: A hand waving over the control panel, demonstrating the gesture sensing feature.
6.3 Fan Speed Adjustment
Select from three fan speeds (Low, Med, High) using either the touch buttons or gesture control. The 980 CFM motor efficiently clears smoke and odors, refreshing kitchen air in approximately 90 seconds for a 180 sq. ft. area.

Image: The range hood in operation, effectively removing steam and smoke from the cooking area.
6.4 Lighting
Press the "Light" button to turn the integrated LED lights on or off. These 4500K LED bulbs provide clear, natural illumination for your cooking surface.
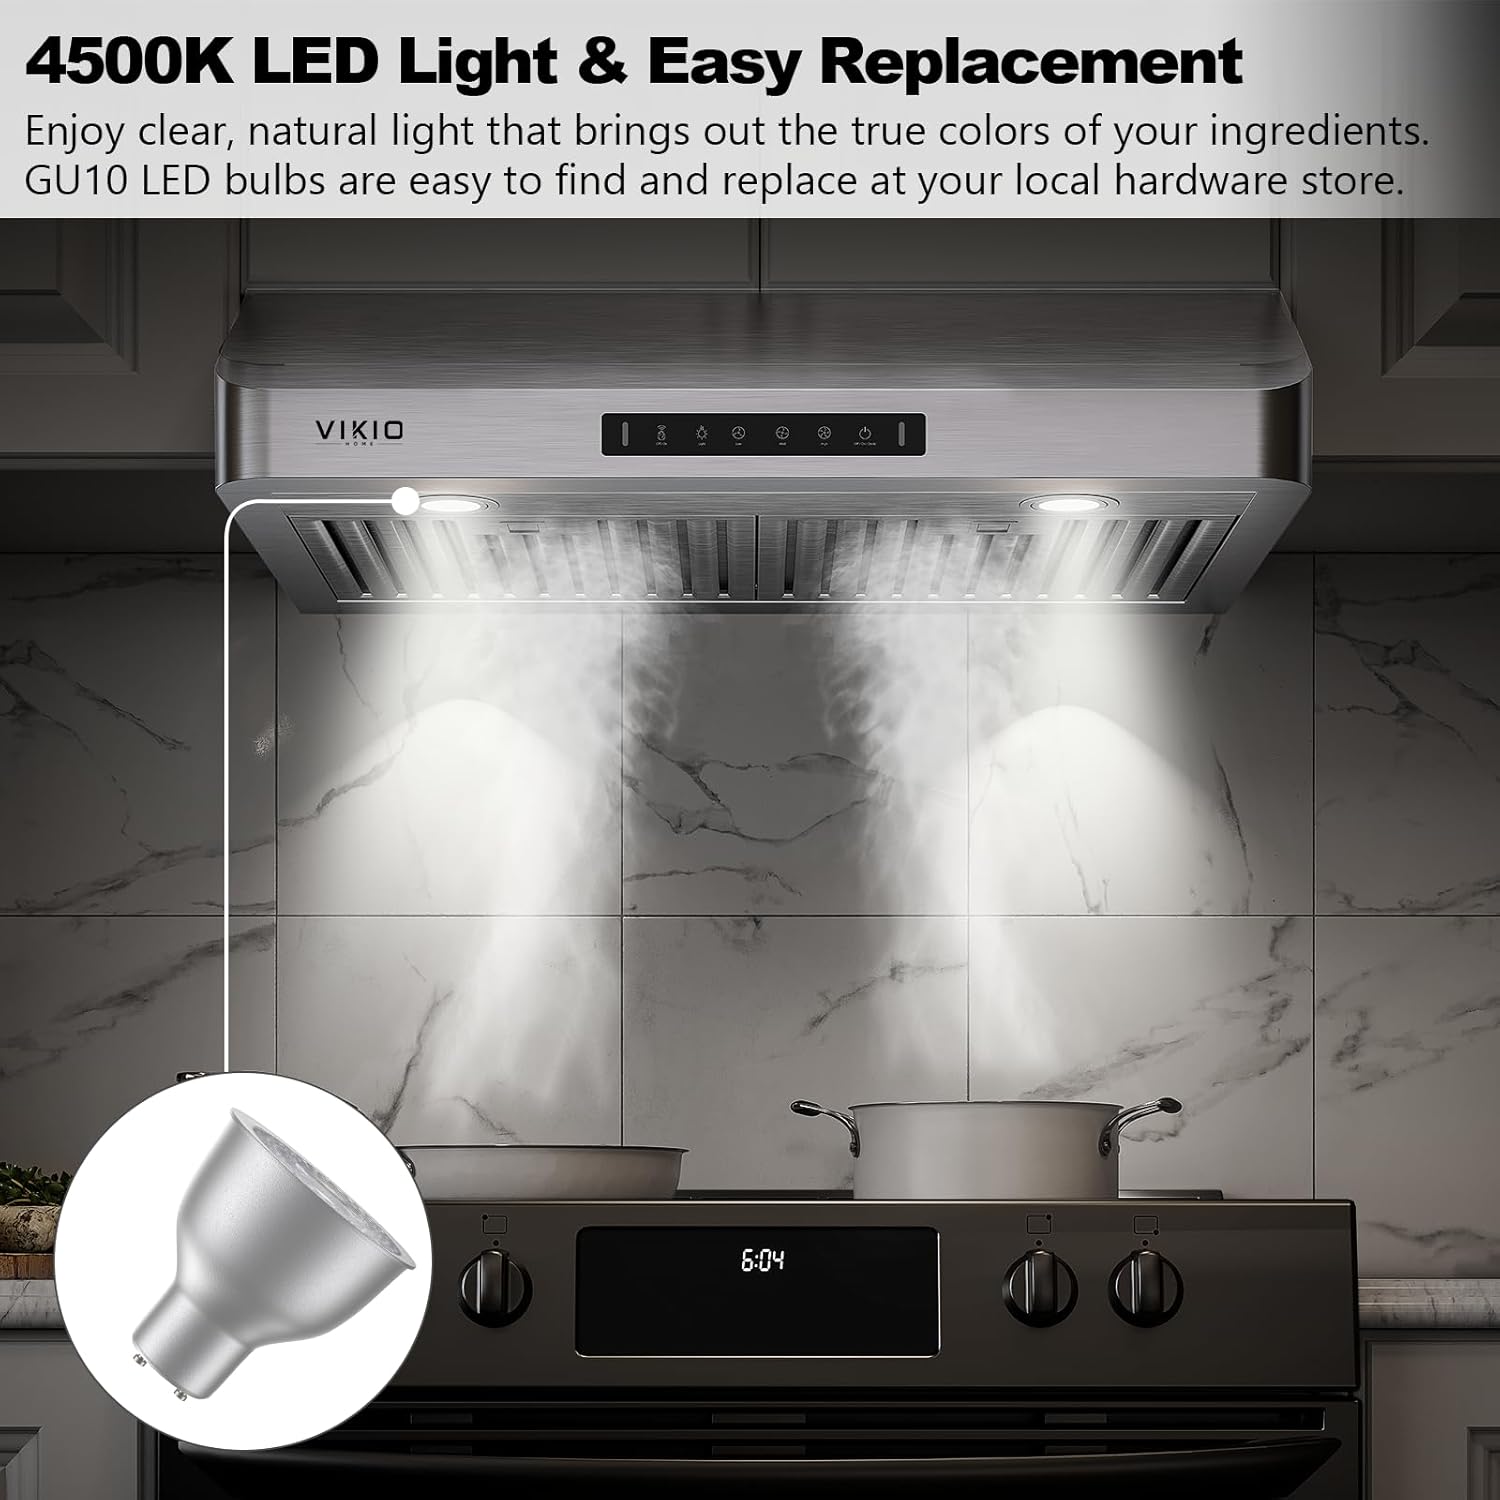
Image: The range hood's LED lights brightly illuminating the cooking surface below.
6.5 Delay Shut-Off Timer
Activate the delay shut-off timer by pressing the "Off/On/Delay" button. The fan will continue to operate for a short period after cooking to ensure all remaining fumes and odors are cleared before automatically turning off.

Image: A close-up of the control panel, emphasizing the "Off/On/Delay" button for timed shut-off.
7. Maintenance
Regular maintenance ensures optimal performance and longevity of your range hood.
7.1 Cleaning Baffle Filters
The stainless steel baffle filters are quick-detachable and dishwasher safe for easy cleaning. Regular cleaning prevents grease buildup and maintains efficient airflow.
- Locate the release clips on each baffle filter.
- Press the clip and gently pull down to remove the filter.
- Wash the filters in a dishwasher or by hand with warm, soapy water.
- Ensure filters are completely dry before re-installing.

Image: A collage showing the ease of removing, washing, and re-installing the dishwasher-safe baffle filters.
7.2 Replacing LED Bulbs
The GU10 LED bulbs are easily replaceable. Free replacements for lights are provided as needed by customer service.
- Ensure the range hood is powered off and the lights are cool to the touch.
- Gently twist the LED bulb counter-clockwise to unlock and remove it.
- Insert the new GU10 LED bulb and twist clockwise to secure it.

Image: A visual guide demonstrating the simple process of replacing the GU10 LED bulbs.
8. Troubleshooting
| Problem | Possible Cause | Solution |
|---|---|---|
| Fan does not turn on. | No power supply; circuit breaker tripped. | Check power cord connection; reset circuit breaker. |
| Low suction power. | Clogged filters; improper ducting; external blockage. | Clean or replace filters; check ductwork for obstructions; ensure proper duct size. |
| Excessive noise. | Loose components; improper installation; ducting issues. | Check for loose screws or parts; ensure secure mounting; inspect ductwork for kinks or blockages. |
| Lights not working. | Bulbs loose or burnt out; electrical connection issue. | Ensure bulbs are securely twisted in; replace burnt out bulbs; check power connection. |
| Gesture control unresponsive. | Hand too close/far; sensor obstruction. | Maintain 5.9-inch distance; ensure no debris on sensor area. |
9. Warranty and Support
VIKIO HOME is committed to providing high-quality products and excellent customer service. Your range hood comes with a manufacturer's warranty covering defects in materials and workmanship. Free replacements for accessories like filters and lights are provided as needed.
For detailed warranty information, technical assistance, or to request replacement parts, please contact our knowledgeable and responsive customer service team:
Email: info@vikiohome.com
(Please refer to your purchase documentation for specific warranty terms and conditions.)
Ask a question about this manual
Ask about setup, troubleshooting, compatibility, parts, safety, or missing instructions. Manuals+ will review the question and use this page’s manual context to help answer it.