1. Introduction
The MOUSETRO Keyless Entry Door Lock Deadbolt with Keypad offers a secure and convenient solution for managing access to your property. This digital smart lock provides multiple entry options, including keypad codes and traditional keys, along with advanced security features like anti-peeking password and auto-locking functionality. This manual will guide you through the installation, setup, and daily operation of your new lock.
2. Safety Information
Please read and understand all instructions before installing and operating this lock. Keep this manual for future reference.
- Ensure the door is open and batteries are not inserted until instructed during installation.
- Do not expose the lock to extreme temperatures or direct water spray. The lock has an IP52 waterproof rating, suitable for general weather conditions, but not submersion.
- Use only specified AA batteries. Do not mix old and new batteries or different types of batteries.
- Keep physical backup keys in a secure location outside of your home.
- Avoid using abrasive cleaners or solvents on the lock's finish.
3. Package Contents
Verify that all components are present before beginning installation:
- Keypad Assembly (Exterior)
- Interior Assembly
- Deadbolt Latch
- Strike Plate
- Mounting Screws
- 2 Backup Keys
- Installation Template
- 4 AA Batteries (included)
Refer to the installation video for a visual overview of the package contents.
4. Specifications
| Feature | Description |
|---|---|
| Brand | MOUSETRO |
| Model Name | S11A |
| Lock Type | Deadbolt, Keypad |
| Material | Metal |
| Color | Satin Nickel |
| Item Dimensions (L x W x H) | 6.4 x 2.8 x 1.1 inches |
| Item Weight | 2.26 Pounds |
| Door Thickness Compatibility | 1.38"-1.97" (35mm-50mm) |
| Door Hole Diameter Compatibility | 2-11/65" (55mm) |
| Backset Distance | 2-3/8" or 2-3/4" (60mm or 70mm) |
| Special Features | Alarm, Anti-Peeking Password, Auto-Lock, Passcode Unlock, Weather Resistant (IP52) |
| Power Source | 4 x AA Batteries (included) |
| Emergency Power | USB-C (5V) |
5. Installation
IMPORTANT: We strongly recommend installing this lock while the door is open/ajar. Do not close your door until the batteries are inserted and the lock is fully tested.
This lock automatically identifies left and right doors, easily adapting to both.
- Determine Door Opening Direction: Before installation, identify if your door is left-handed or right-handed. This will influence the knob orientation on the interior assembly.
- Prepare Door Holes: Use the provided installation template to mark and drill the necessary holes in your door. Ensure the door hole diameter is 2-11/65" (55mm) and door thickness is between 1.38"-1.97" (35mm-50mm). You may choose to punch the optional top hole or not, depending on your preference.
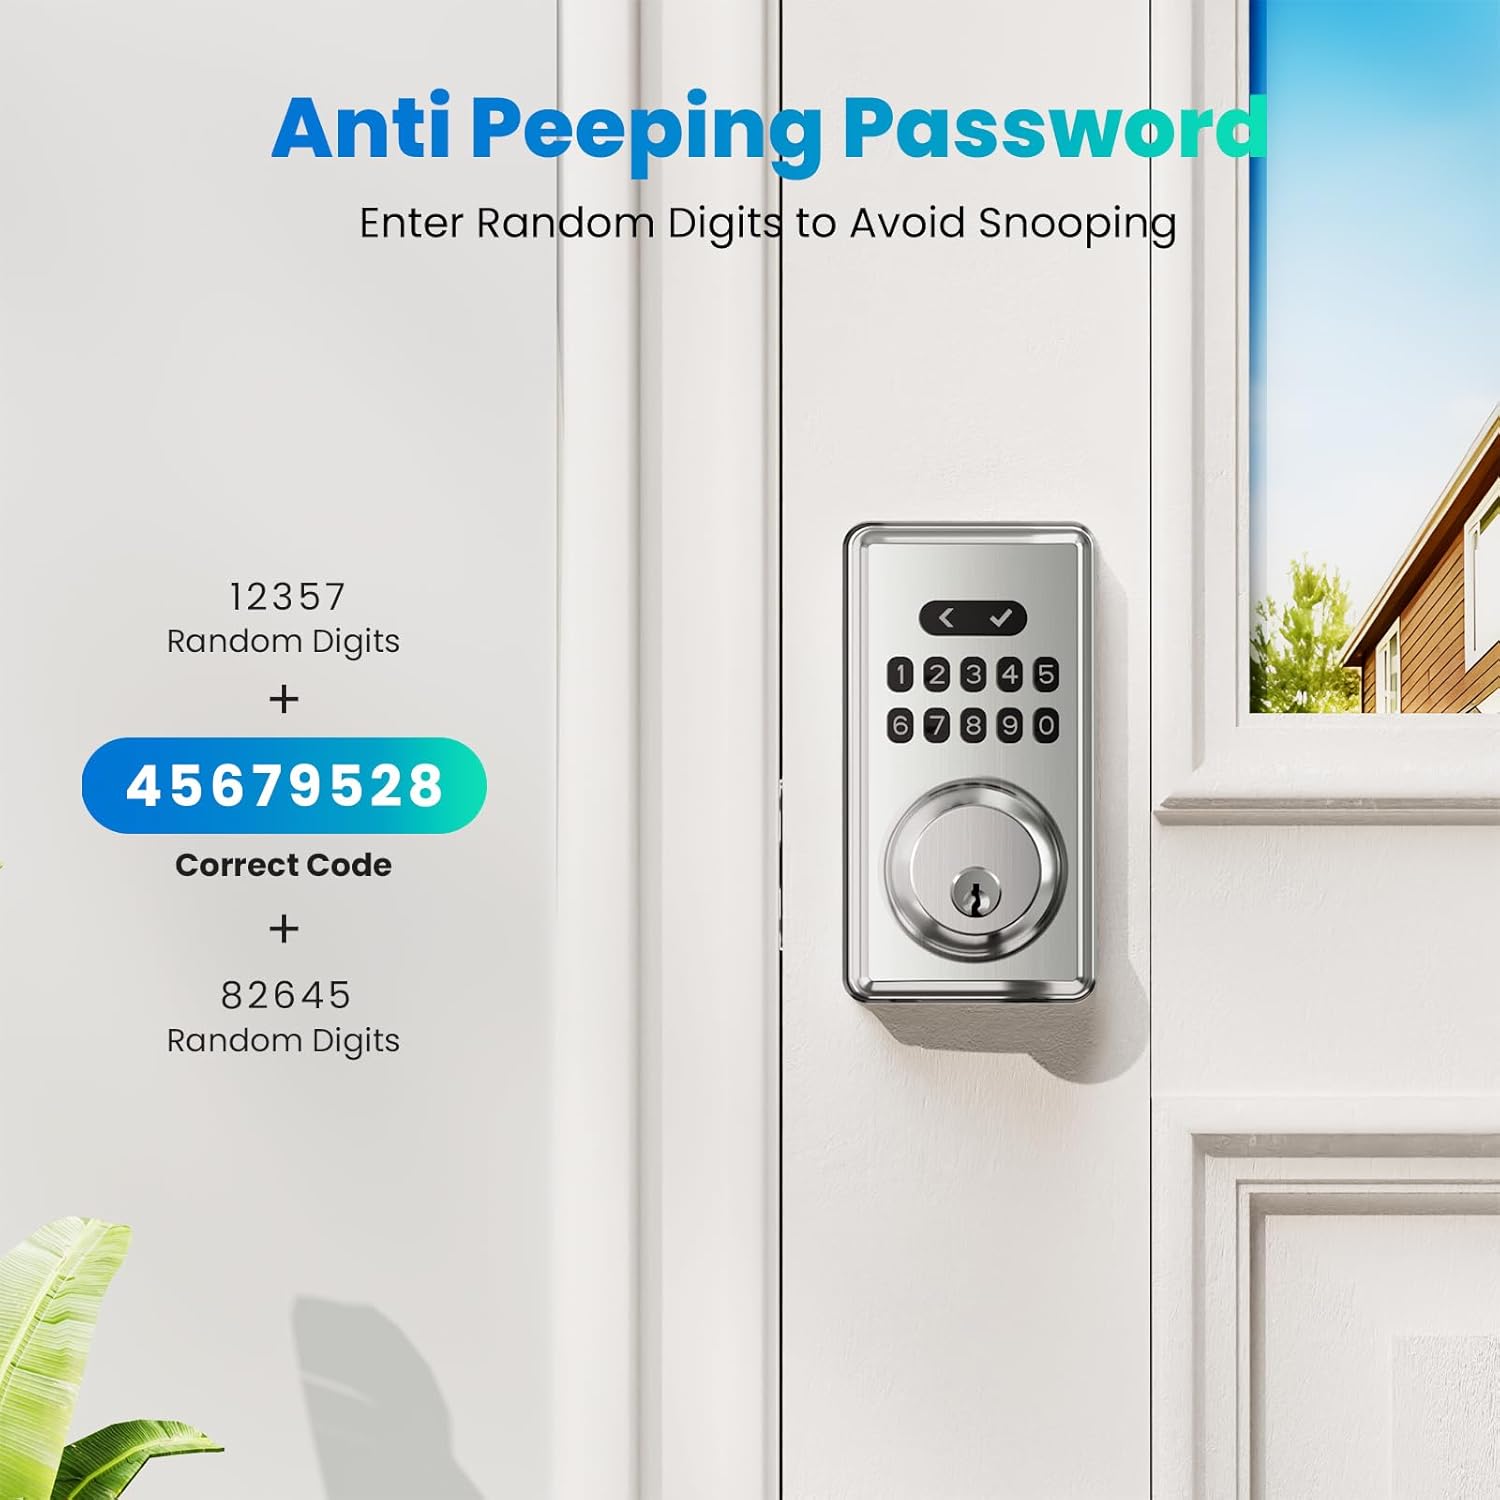
Image: Detailed diagram illustrating door thickness, bore hole diameter, and backset distance for compatibility.
- Install Strike Plate: Secure the strike plate to the door frame using the provided screws. Ensure it is aligned correctly with the deadbolt latch.
- Adjust and Install Lock Body: The lock body length is adjustable between 60mm and 70mm. Pull out the locking tongue to adjust its length. Ensure the 'UP' marking on the lock body is vertical when inserting it into the door. Secure it with the lock body mounting screws.
- Install Front Panel (Exterior): Carefully insert the front panel into the door, ensuring the locking bar is vertical when installing and aligns with the lock body. The main cable should pass through the square hole below.
- Install Back Panel (Interior): Remove the fixing plate from the back panel by unscrewing the assemble screw. Ensure the fixing plate perfectly matches the front panel's alignment. Pass the main cable through the square hole in the fixing plate. Secure the fixing plate to the door using the M6x50 screws, ensuring the panel parts are parallel to the door. Tighten the screws completely.
- Connect Main Cable and Attach Back Panel: Connect the main cable from the front panel to the back panel's circuit board. Carefully tuck the main line in and organize it to avoid pinching. Install the back panel onto the fixed plate.
- Test Knob Direction: After attaching the back panel, test if the knob switch can be turned. If it cannot, or if the direction of the knob is incorrect (e.g., horizontal for a right-handed door), refer to the video segment 02:22-02:37 for adjustment direction.
- Secure Back Panel Cover: Tighten the back panel assemble screw to secure the interior assembly.
- Insert Batteries: Push upwards on the battery cover to open it. Insert 4 AA batteries into the battery compartment, ensuring correct polarity. Close the battery cover and tighten the i2 ST4*20 screw (if applicable, for the top hole).
Installation Video:
Video: A detailed step-by-step guide on installing the MOUSETRO Keyless Entry Door Lock (Model ZN-S11A). This video covers tools needed, door specifications, package contents, and the complete installation process including lock body adjustment, panel installation, and battery insertion.
6. Setup
Your lock comes with default settings. It is recommended to program your master and user codes immediately after installation.
- Master Code: The lock supports up to 9 Master Codes. The Master Code is used to program and manage other settings and user codes.
- User Codes: You can set up to 91 User Codes. These codes are used for daily entry.
- Anti-Peeking Password: To enhance security, you can enter any random digits before and after your correct password (up to a maximum of 20 total digits). This prevents others from easily guessing your code by observing your input.

Image: Illustration of the anti-peeking password feature, showing how random digits can be added before and after the correct code to obscure it.
- Auto-Lock: The lock can be set to automatically lock after a period of 2-9 seconds. This feature provides convenience and peace of mind.
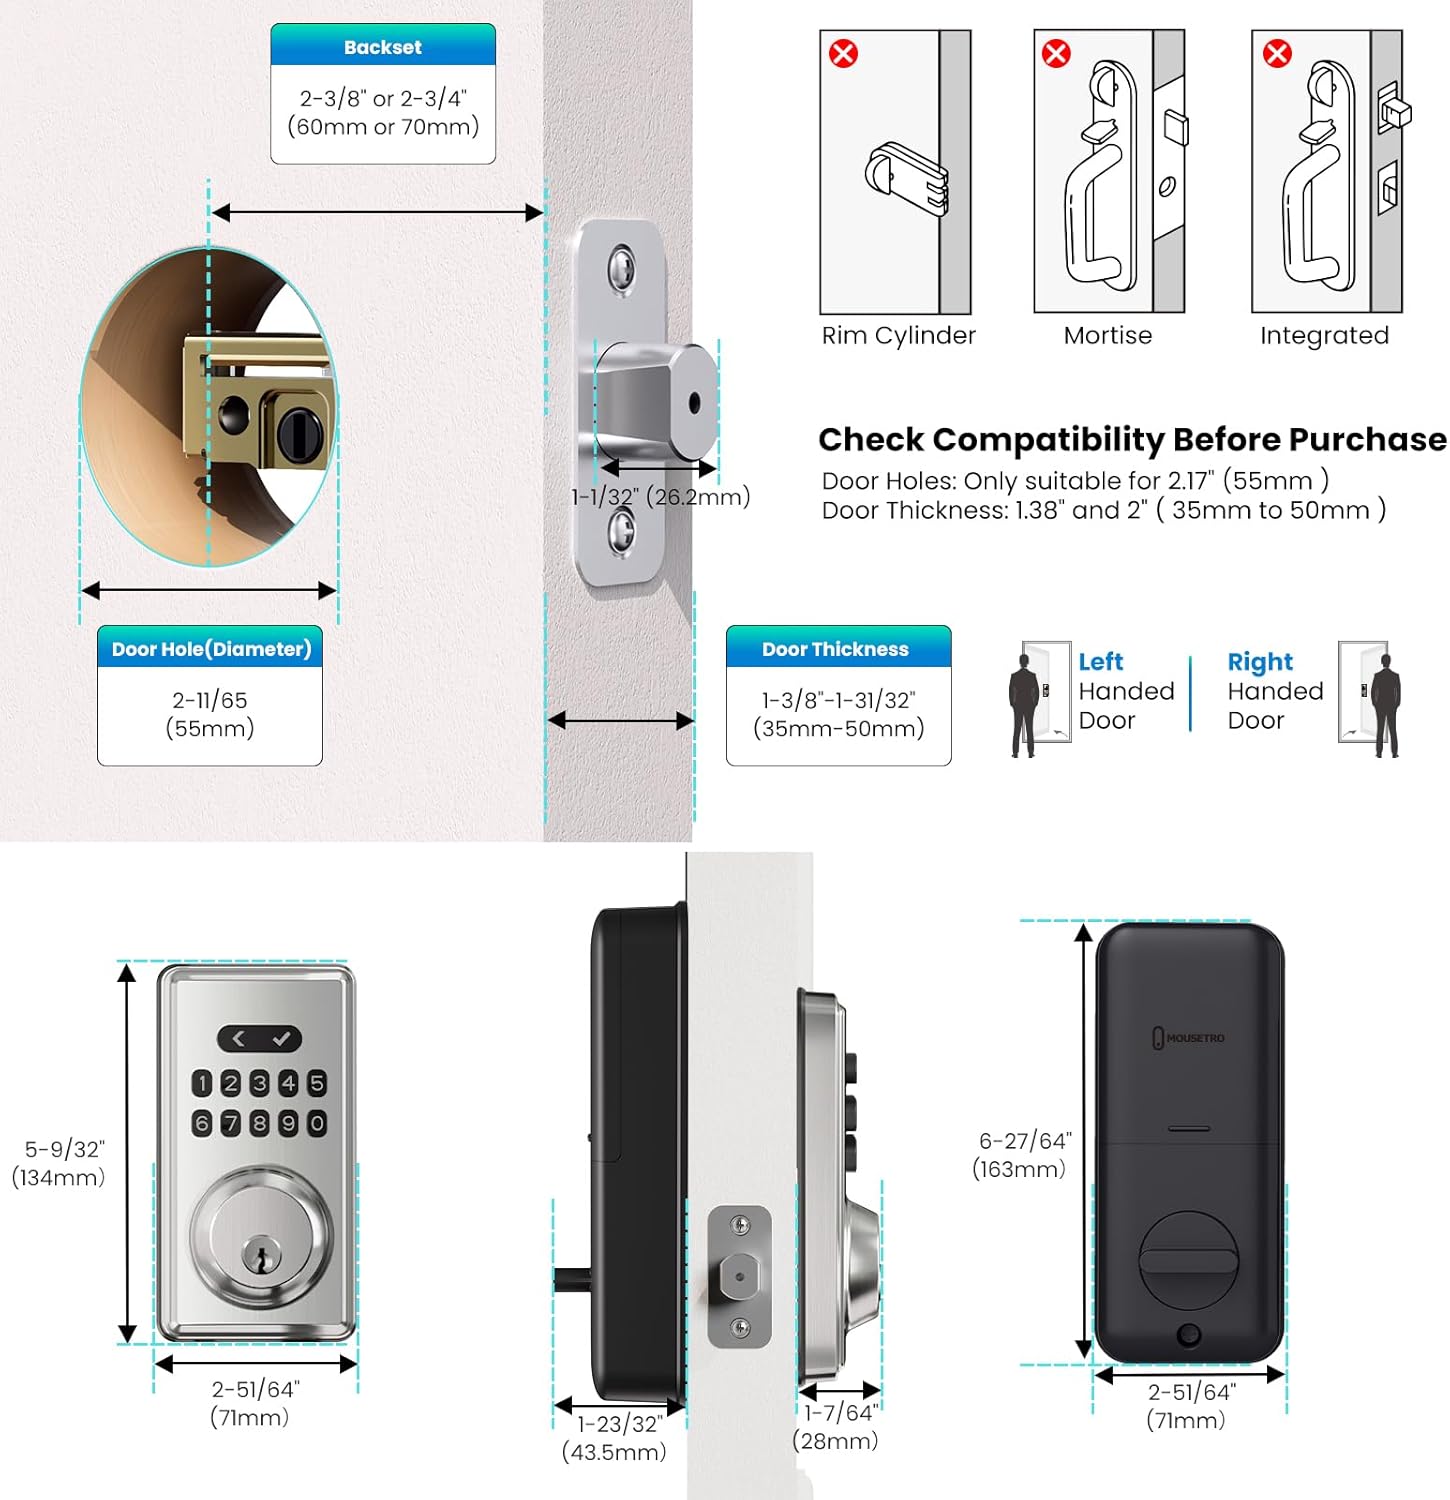
Image: Visual representation of the auto-lock feature, indicating the adjustable time delay, and the one-touch locking function.
- One-Touch Lock: From the outside, you can quickly lock the door by pressing the return button for 2 seconds.
- Silent Mode: The lock features a silent mode to create a quiet environment. Menu settings cannot be muted, but you can press the keypad/unlock button to mute the sound during operation.

Image: Depiction of the silent mode feature, illustrating a quiet home environment.
- Passage Mode: This mode allows the door to remain unlocked at all times, useful for high-traffic periods. To disable this feature, simply enter the master code.

Image: Illustration of the passage mode, showing the door remaining unlocked for continuous access.
7. Operating Instructions
- Unlocking with a Code: Enter your programmed user code or master code on the keypad, followed by the checkmark button. The deadbolt will retract, allowing you to open the door.
- Unlocking with a Key: Insert the physical backup key into the keyhole and turn it to unlock the deadbolt.
- Locking from Outside: If auto-lock is enabled, the lock will engage automatically after the set delay. Alternatively, press the return button for 2 seconds to manually lock the door.
- Locking from Inside: Turn the thumb-turn knob on the interior assembly to engage the deadbolt.
8. Maintenance
- Battery Replacement: The lock will provide a low battery alert when power is running low. To replace batteries, push upwards on the battery cover on the interior assembly, remove the old batteries, and insert four new AA batteries, ensuring correct polarity.
- Cleaning: Clean the lock's surface with a soft, dry cloth. Do not use harsh chemicals or abrasive materials, as they may damage the finish.
9. Troubleshooting
- Lock not responding to keypad: Check battery levels. If batteries are dead, use the emergency charging feature via the USB-C port or the physical backup key.
- Wrong Code Entry Limit: If 5 consecutive incorrect codes are entered within 5 minutes, the keypad will shut down for 90 seconds as a security measure. Wait for the lockout period to end before trying again.
- Knob not turning or deadbolt not retracting: Ensure the lock body is installed correctly and the locking bar is vertical. Refer to the installation section for proper alignment.
- Lock is making unexpected sounds: Check if silent mode is enabled. If not, ensure all components are securely fastened.
10. Warranty & Support
The MOUSETRO Keypad Lock offers a 30-day free return policy and a 1-year free replacement for manufacturing defects. Additionally, lifetime troubleshooting and customer service support are provided. For assistance, please contact MOUSETRO customer service.
Return Policy: 30 days for refund/replacement.


