1. Introduction
This manual provides comprehensive instructions for the safe and proper installation, operation, and maintenance of your Ibergrif MA002 Monitor Stand. Please read this manual thoroughly before installation and retain it for future reference. Correct installation ensures optimal performance and safety.
2. Product Overview
The Ibergrif MA002 is a single monitor arm designed to enhance your workspace ergonomics and free up desk space. It offers versatile adjustments for optimal viewing comfort.

Figure 1: Ibergrif MA002 Monitor Stand showing the main arm, pole, and both C-clamp and grommet mounting options.
Key Features:
- Screen Compatibility: Supports most flat and curved LCD/LED monitors from 13 to 32 inches.
- VESA Standards: Compatible with VESA 75x75mm and 100x100mm mounting patterns.
- Load Capacity: Maximum load of 8 kg (17.6 lbs).
- Ergonomic Adjustments: Features ±90° vertical tilt, ±180° panel rotation, and ±90° left/right swivel.
- Cable Management: Integrated system to keep cables organized.
- Mounting Options: Includes both C-clamp and grommet base for flexible installation.
- Durable Construction: Made from high-quality alloy steel with an anodized surface treatment.

Figure 2: The Ibergrif MA002 monitor stand in use, demonstrating compatibility with various monitor sizes and VESA standards.
3. Safety Information
- Ensure your desk surface is stable and strong enough to support the combined weight of the monitor stand and your monitor.
- Do not exceed the maximum load capacity of 8 kg (17.6 lbs).
- Verify that your monitor's VESA mounting pattern is 75x75mm or 100x100mm before installation.
- Keep all small parts away from children.
- Follow all assembly instructions carefully. Incorrect installation may result in equipment damage or personal injury.
- If you encounter any difficulties or are unsure about any step, contact customer support.
4. Package Contents
Please check that all components are present and undamaged before beginning assembly. If any parts are missing or damaged, please contact customer support.
- Monitor Arm Assembly
- Desk Clamp (C-clamp)
- Grommet Base Components
- VESA Plate
- Hardware Kit (screws, washers, spacers)
- Assembly Tools (e.g., Allen wrenches)
- Cable Management Clips/Covers
5. Setup and Installation
The Ibergrif MA002 monitor stand offers two installation methods: C-clamp and Grommet mount. Choose the method best suited for your desk.

Figure 3: Illustration of the two easy installation methods: C-clamp and grommet mount.
5.1 C-Clamp Installation (Desk Edge)
- Attach the C-clamp: Assemble the C-clamp to the bottom of the main pole. Ensure the rubber pads are in place to protect your desk surface.
- Secure to Desk: Position the C-clamp on the edge of your desk (suitable for desk thickness 10-65mm). Tighten the clamp screw firmly until the stand is stable.
- Attach the Arm: Slide the monitor arm onto the main pole at your desired height. Secure it with the provided screws. It is recommended to loosely attach the arm to the pole first, then slide it down from the top of the pole to the desired height before tightening.
- Attach VESA Plate to Monitor: Secure the VESA plate to the back of your monitor using the appropriate screws and spacers from the hardware kit. Ensure the VESA plate's orientation matches your desired monitor orientation (horizontal or vertical).
- Mount Monitor: Carefully slide the monitor (with VESA plate attached) onto the arm's mounting head. Secure it with the locking mechanism or screws as per instructions.
5.2 Grommet Installation (Through Desk Hole)
This method requires an existing hole in your desk (e.g., a cable grommet hole) or drilling a new one. Suitable for desk thickness 10-55mm.
- Assemble Grommet Base: Attach the grommet base components to the bottom of the main pole.
- Insert into Desk Hole: Pass the pole through the desk hole.
- Secure to Desk: From underneath the desk, attach the bottom plate and tighten the nut firmly to secure the stand.
- Attach the Arm: Slide the monitor arm onto the main pole at your desired height. Secure it with the provided screws.
- Attach VESA Plate to Monitor: Secure the VESA plate to the back of your monitor using the appropriate screws and spacers from the hardware kit.
- Mount Monitor: Carefully slide the monitor (with VESA plate attached) onto the arm's mounting head. Secure it with the locking mechanism or screws as per instructions.
Important Installation Tip: When attaching the VESA plate to your monitor, ensure the small protrusion on one of the four sides of the square VESA support is positioned on the side you intend to be the top of the monitor. This prevents accidental upside-down or sideways mounting if you plan to rotate the monitor.
6. Operating and Adjustments
The Ibergrif MA002 monitor stand offers a range of adjustments to customize your viewing experience.
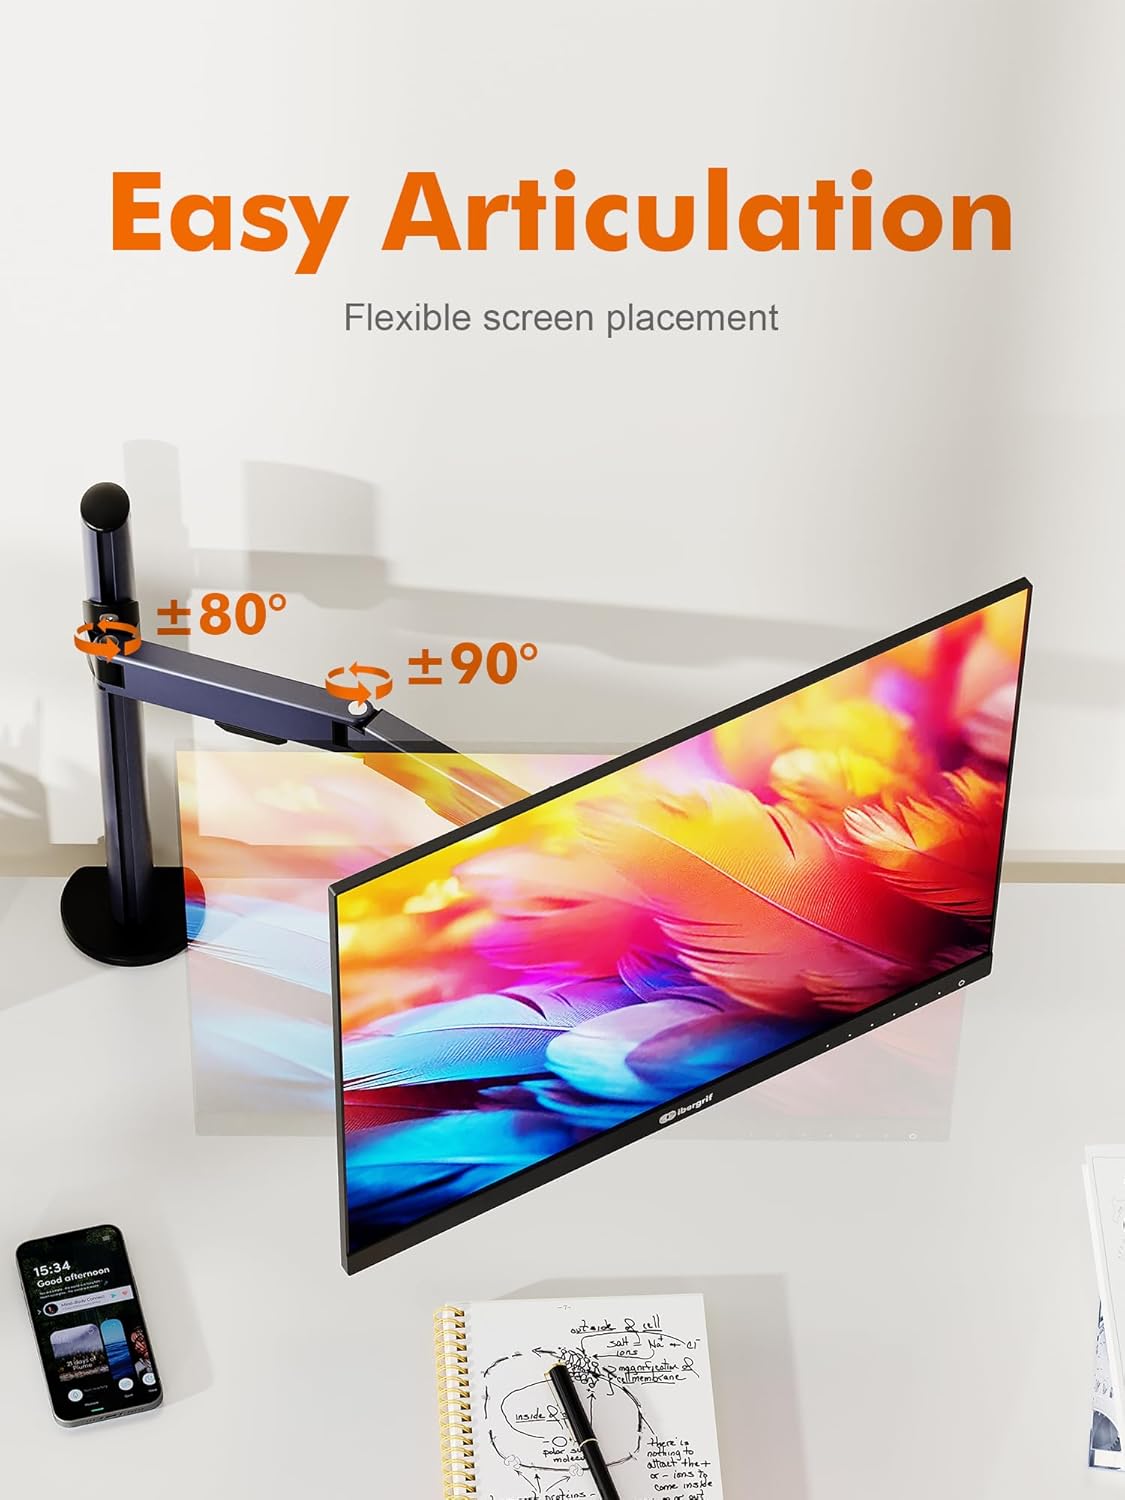
Figure 4: Easy articulation of the monitor arm for flexible screen placement, illustrating tilt and swivel ranges.
- Height Adjustment: Loosen the screws on the arm clamp, slide the arm up or down the main pole to the desired height, and then re-tighten the screws firmly.
- Tilt Adjustment: The monitor can be tilted vertically by ±90°. Adjust the tilt angle by gently pushing or pulling the top or bottom of the monitor. If the monitor sags, tighten the tilt tension screw on the VESA head.
- Swivel Adjustment: The monitor arm can swivel horizontally by ±90° at the pole connection and the VESA head. Rotate the monitor to your preferred angle.
- Rotation Adjustment: The VESA plate allows for a full 360° rotation, enabling you to switch between landscape and portrait orientations.
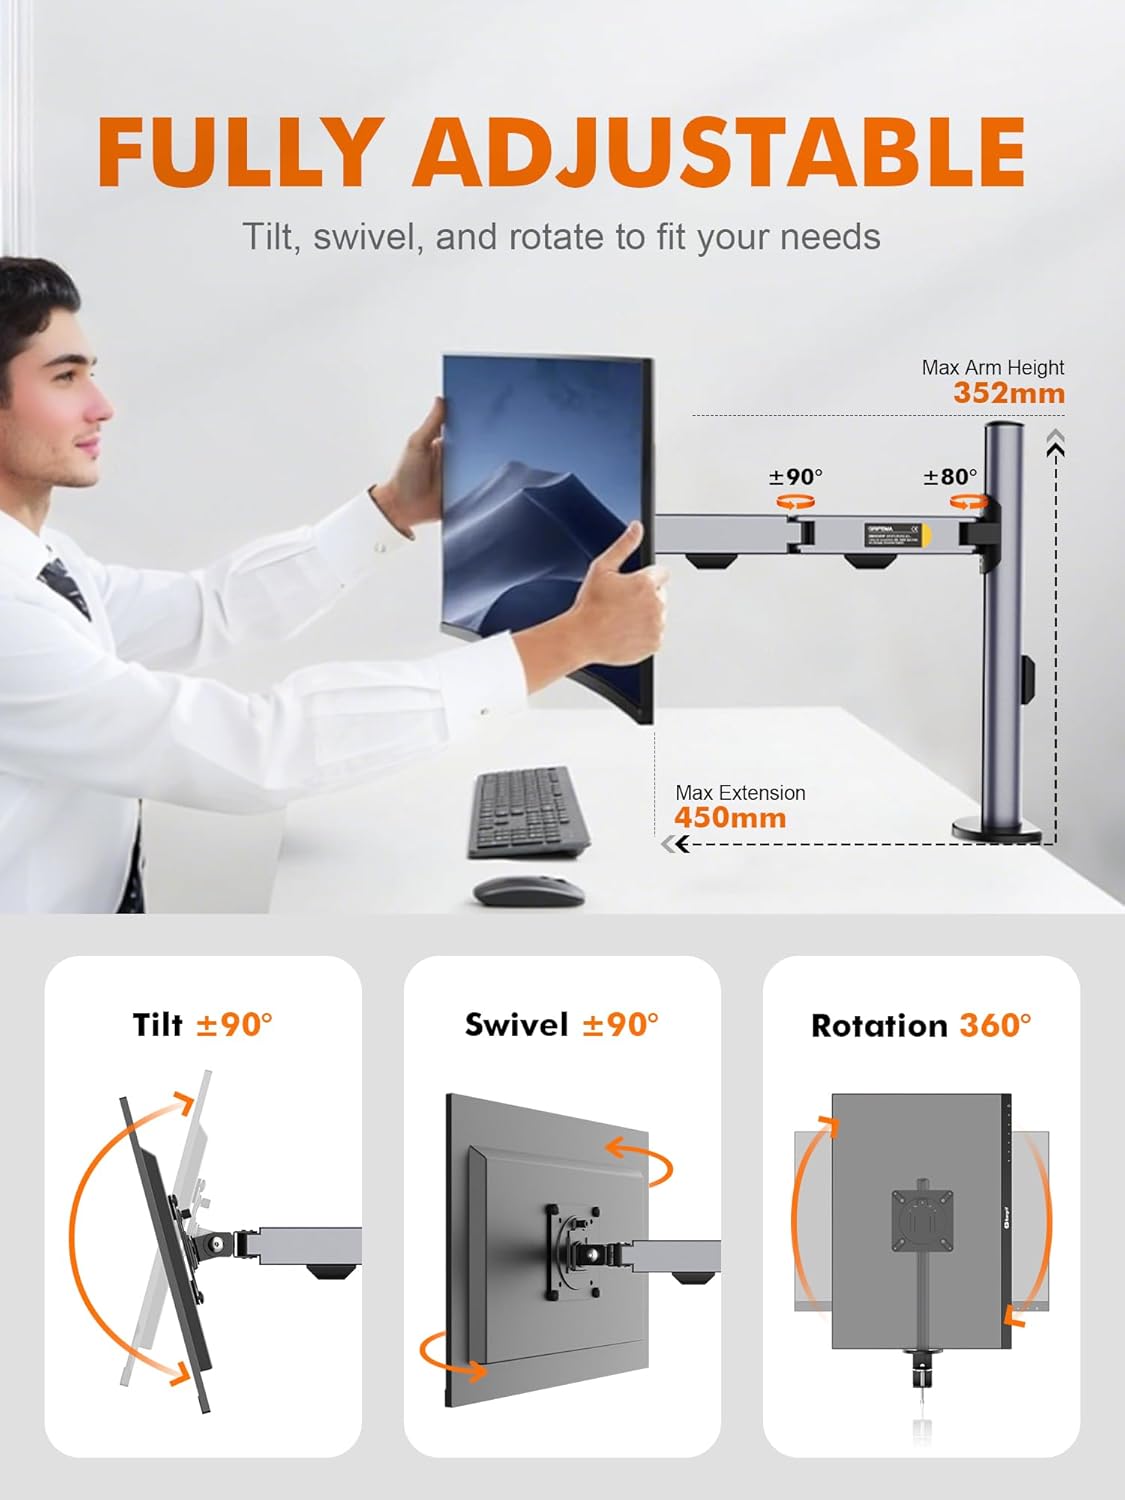
Figure 5: Comprehensive adjustability options for the monitor stand, including tilt, swivel, and rotation.
These adjustments help reduce strain on your neck and back, ensuring a comfortable viewing angle for various tasks.
7. Cable Management
The Ibergrif MA002 monitor stand includes an integrated cable management system to keep your workspace tidy. Route your monitor and power cables through the clips or covers along the arm and pole. This helps prevent clutter and provides a cleaner aesthetic.
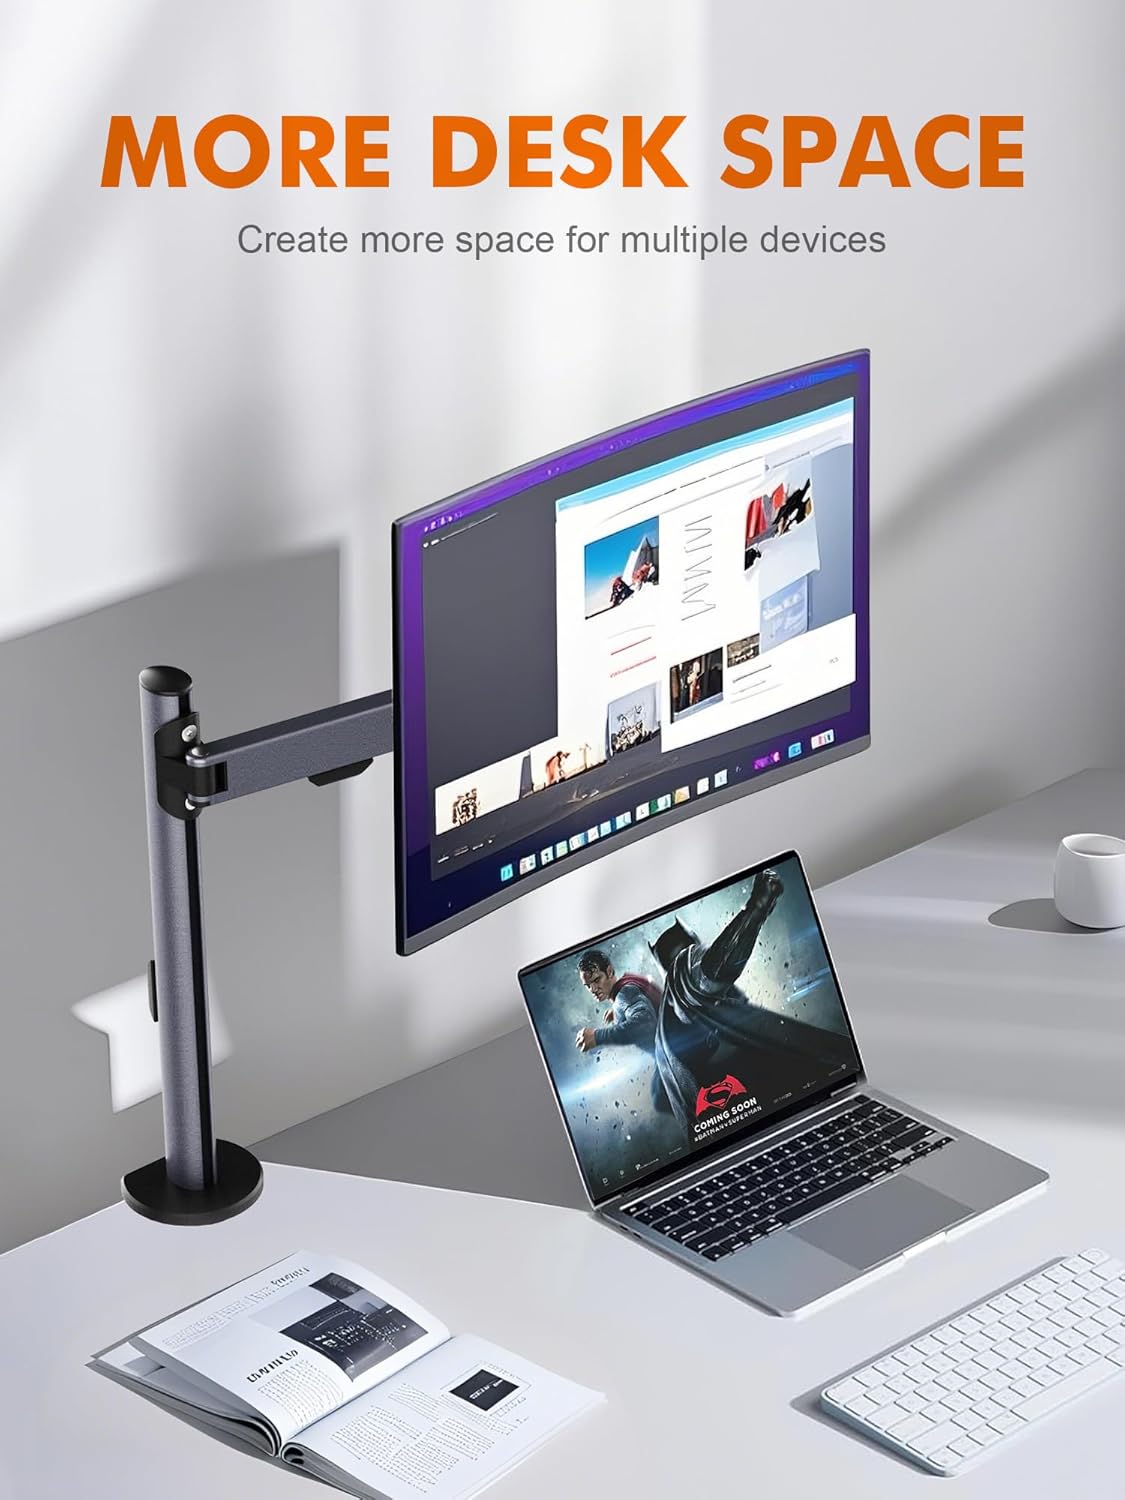
Figure 6: A clean workspace demonstrating the benefits of cable management and increased desk space with the monitor stand.
8. Maintenance
- Cleaning: Wipe the stand with a soft, damp cloth. Avoid abrasive cleaners or solvents.
- Periodic Check: Periodically check all screws and connections to ensure they remain tight and secure. Re-tighten if necessary.
- Lubrication: No lubrication is typically required for the moving parts.
9. Troubleshooting
- Monitor Sags or Tilts Downward: The tilt tension screw on the VESA head may be too loose. Use the provided Allen wrench to tighten this screw until the monitor holds its position.
- Stand is Unstable: Ensure the C-clamp or grommet base is securely tightened to the desk. Check that the desk surface is flat and robust.
- Difficulty Adjusting Height: Loosen the arm clamp screws on the main pole before attempting to adjust the height. Re-tighten firmly after adjustment.
- Monitor Does Not Rotate Smoothly: Check for any obstructions. Ensure all mounting screws are tight but not over-tightened, which could impede movement.
10. Specifications
| Feature | Specification |
|---|---|
| Model Number | MA002 |
| Screen Size Compatibility | 13 to 32 inches |
| VESA Compatibility | 75x75mm, 100x100mm |
| Maximum Load Capacity | 8 kg (17.6 lbs) |
| Tilt Angle | ±90° |
| Swivel Angle | ±90° |
| Rotation | 360° |
| Mounting Options | C-clamp, Grommet |
| C-clamp Desk Thickness | 10-65mm |
| Grommet Desk Thickness | 10-55mm |
| Material | Alloy Steel |
| Item Weight | 4.2 pounds |
| Max Arm Height | 352mm |
| Max Extension | 450mm |

Figure 7: Detailed dimensions of the Ibergrif MA002 monitor stand.
11. Warranty and Support
Ibergrif products are manufactured to high-quality standards. For warranty information or technical support, please refer to the warranty card included with your product or visit the official Ibergrif website. If you have any questions or require assistance, please contact our customer service team.
Manufacturer: Ibergrif Griferias,S.L
Date First Available: March 22, 2025