1. Introduction and Safety Information
Thank you for choosing the Hermitlux 77cm 7000W 4-Zone Built-in Induction Hob. This manual provides essential information for the safe and efficient use of your appliance. Please read it thoroughly before installation and operation, and keep it for future reference.
Important Safety Instructions:
- Read all instructions before using the appliance.
- Ensure the appliance is installed by a qualified technician in accordance with local regulations.
- Do not touch hot surfaces. Use handles or knobs.
- Close supervision is necessary when any appliance is used by or near children.
- Do not operate any appliance with a damaged cord or plug, or after the appliance malfunctions or has been damaged in any manner.
- Only use cookware suitable for induction hobs.
- Do not place metallic objects such as knives, forks, spoons, and lids on the hob surface as they can get hot.
- Always turn off the appliance after use.
2. Product Overview and Features
The Hermitlux HIH4F01 induction hob is designed for modern kitchens, offering efficient and precise cooking with advanced features.
Key Features:
- Built-in Design: Seamless integration into your kitchen countertop.
- 7000W Total Power: High power output for rapid heating.
- 4 Independent Cooking Zones: Allows for simultaneous cooking.
- Flexible Bridging Zone: Combines two zones for larger cookware.
- 9 Power Levels: Precise temperature control for various cooking needs.
- Booster Function: Provides instant maximum power for quick boiling.
- Continuous Low Power Heating: Ideal for simmering and melting delicate ingredients like chocolate.
- Timer Function: Set cooking durations for individual zones.
- Child Lock: Prevents accidental operation.
- Residual Heat Indicator: Alerts when the surface is still hot.
- Pan Sensor: Detects suitable cookware.
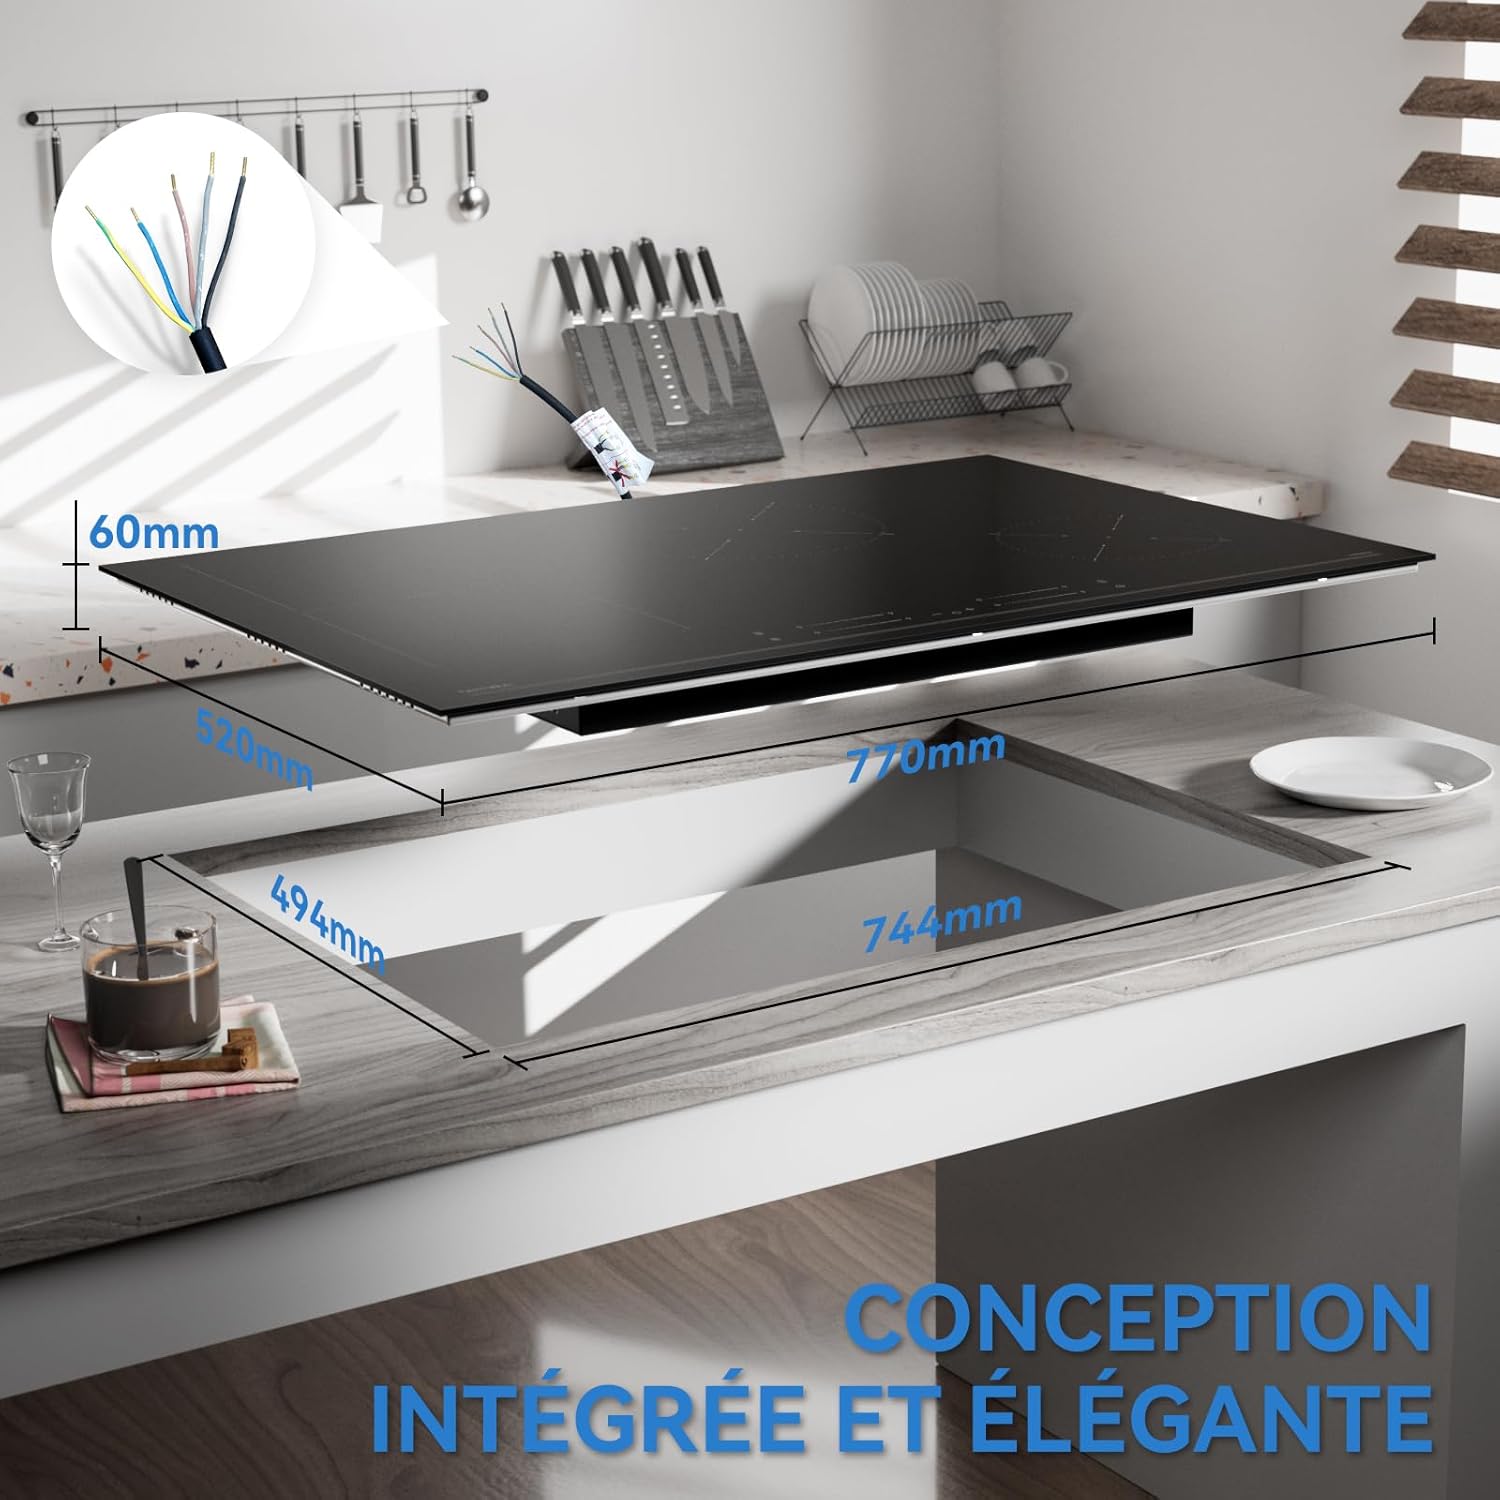
Image 2.1: Overview of the Hermitlux 77cm 4-Zone Induction Hob.
3. Setup and Installation
Proper installation is crucial for the safe and optimal performance of your induction hob. It must be installed by a qualified electrician or technician.
Installation Requirements:
- Cut-out Dimensions: 494mm x 744mm.
- Product Dimensions: 520mm (Depth) x 770mm (Width) x 60mm (Height).
- Power Supply: 220V AC, 7000W. Ensure the electrical supply meets the appliance's requirements and local wiring regulations.
- Ventilation: Ensure adequate ventilation space around and below the hob for proper operation and heat dissipation.
- Clearance: Maintain minimum clearances from adjacent surfaces and overhead cabinets as specified in the installation guide.

Image 3.1: Diagram showing the installation dimensions and cut-out requirements for the induction hob.
Included Components for Installation:
- 1 x Installation Material (clips, screws, sealing tape)
- 1 x 4-Zone Induction Hob
- 1 x Instruction Manual
4. Operating Instructions
This section details how to operate your Hermitlux induction hob.
Control Panel Overview:

Image 4.1: Diagram illustrating the control panel layout and functions.
- Power/Timer Adjustment Controls: Used to increase or decrease power levels and set the timer.
- Timer Control: Activates and adjusts the cooking timer.
- Flex Zone Controls: Activates and manages the flexible cooking zone.
- Boost Function: Provides maximum power for rapid heating.
- Child Lock: Locks the control panel to prevent accidental changes.
- On/Off Control: Powers the hob on or off.
Basic Operation:
- Place suitable cookware on the desired cooking zone.
- Press the On/Off button to power on the hob.
- Select the desired cooking zone by touching its corresponding control.
- Adjust the power level using the '+' or '-' buttons (1-9 levels).
- To turn off a zone, select it and reduce the power level to '0' or press the On/Off button for that zone.
- To turn off the entire hob, press the main On/Off button.
Special Functions:
- Booster Function: Select a cooking zone and press the 'Boost' button (often indicated by 'P'). This provides maximum power for a set period, ideal for boiling water quickly.
- Timer Function: After selecting a cooking zone and setting its power level, press the 'Timer' button. Use '+' or '-' to set the desired cooking duration. The zone will automatically turn off when the timer expires.
- Child Lock: To activate, press and hold the 'Child Lock' button (often indicated by a lock icon) for a few seconds. The controls will be locked. Repeat the process to deactivate.
- Flex Zone: To activate the flexible zone, select one of the two zones that form the flex zone and press the 'Flex Zone' button. This combines the two zones to create a larger heating area for oversized pots or griddle pans.
- Continuous Low Power Heating: This feature ensures stable, uniform heating at low power settings, preventing intermittent heating cycles common in conventional hobs. This is ideal for delicate tasks like melting chocolate or simmering sauces.

Image 4.2: Illustration of continuous low power heating for stable simmering.
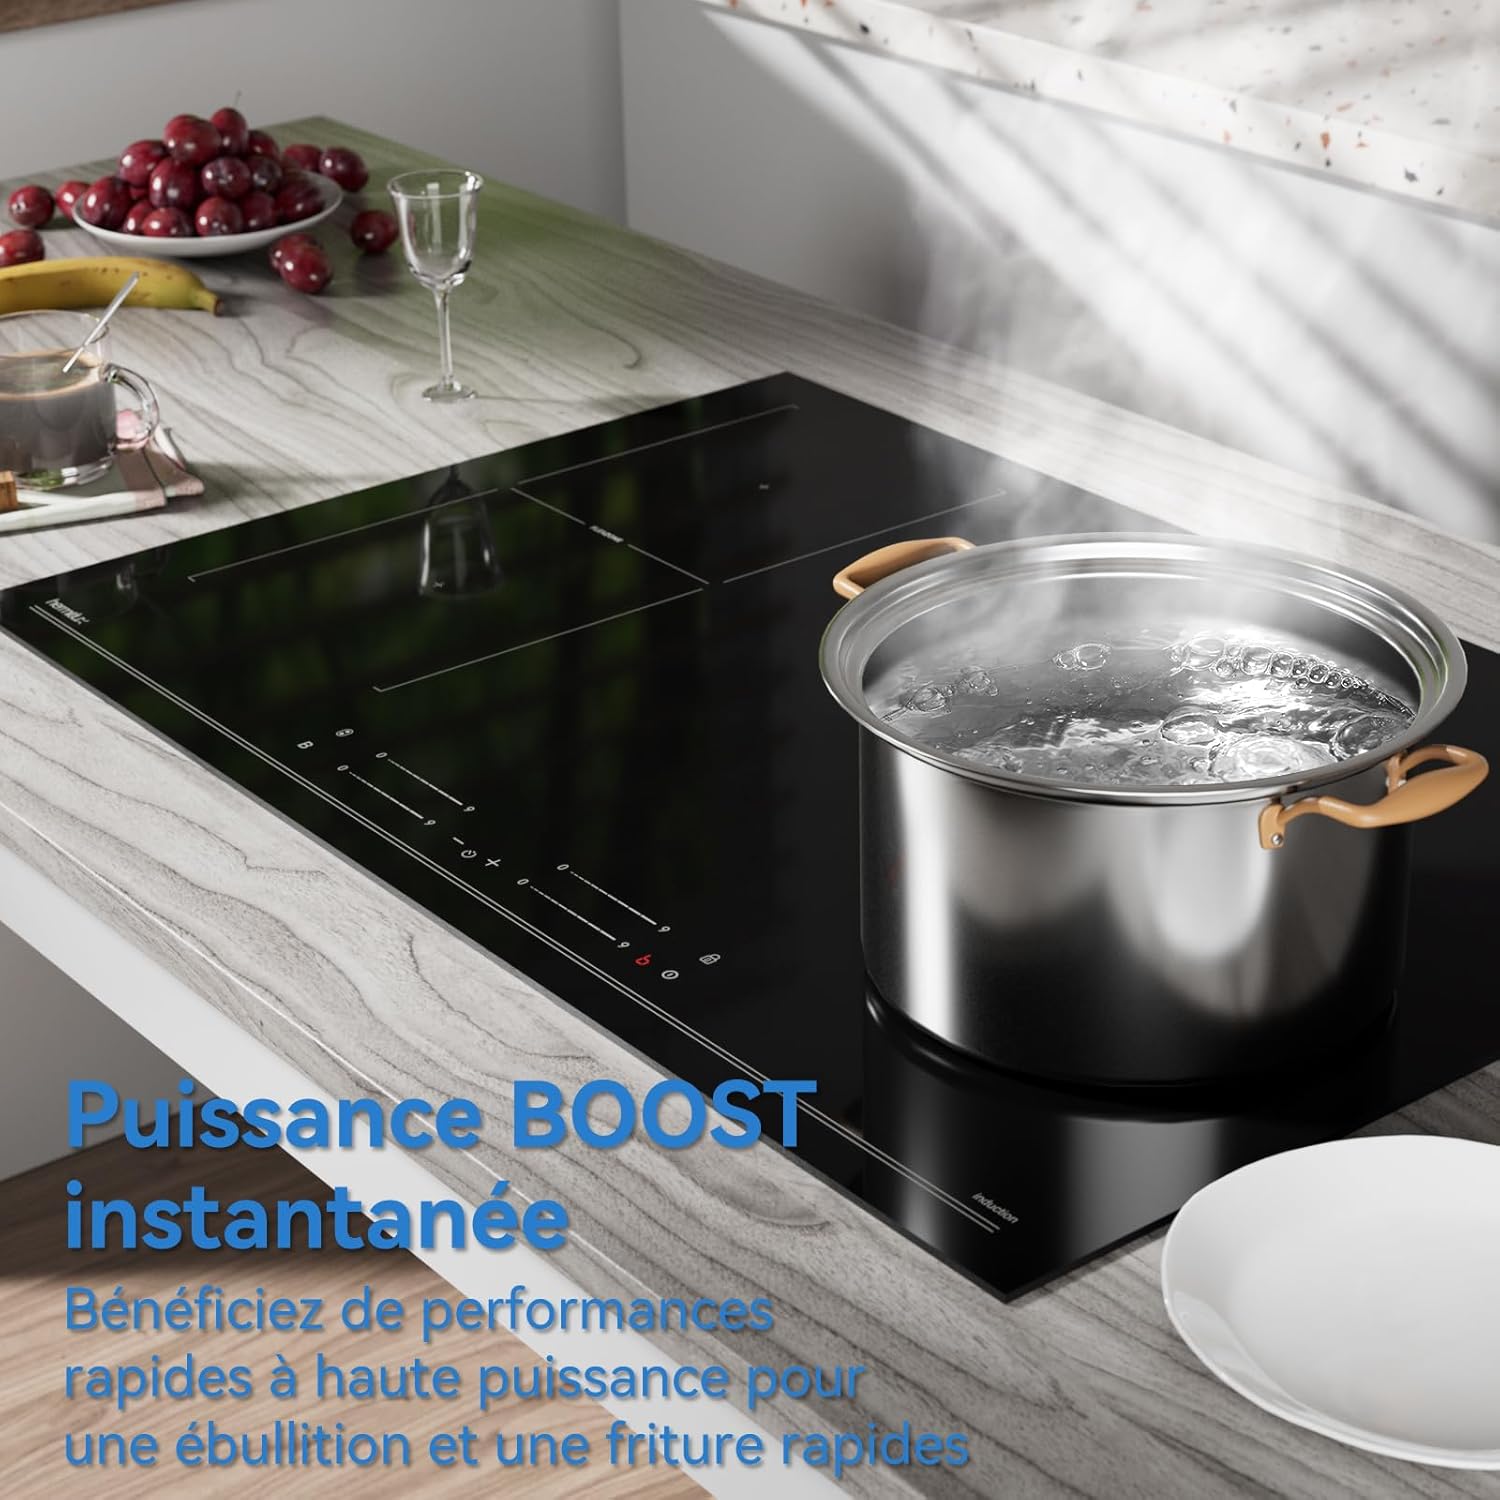
Image 4.3: Visual representation of the 9 adjustable heating levels.
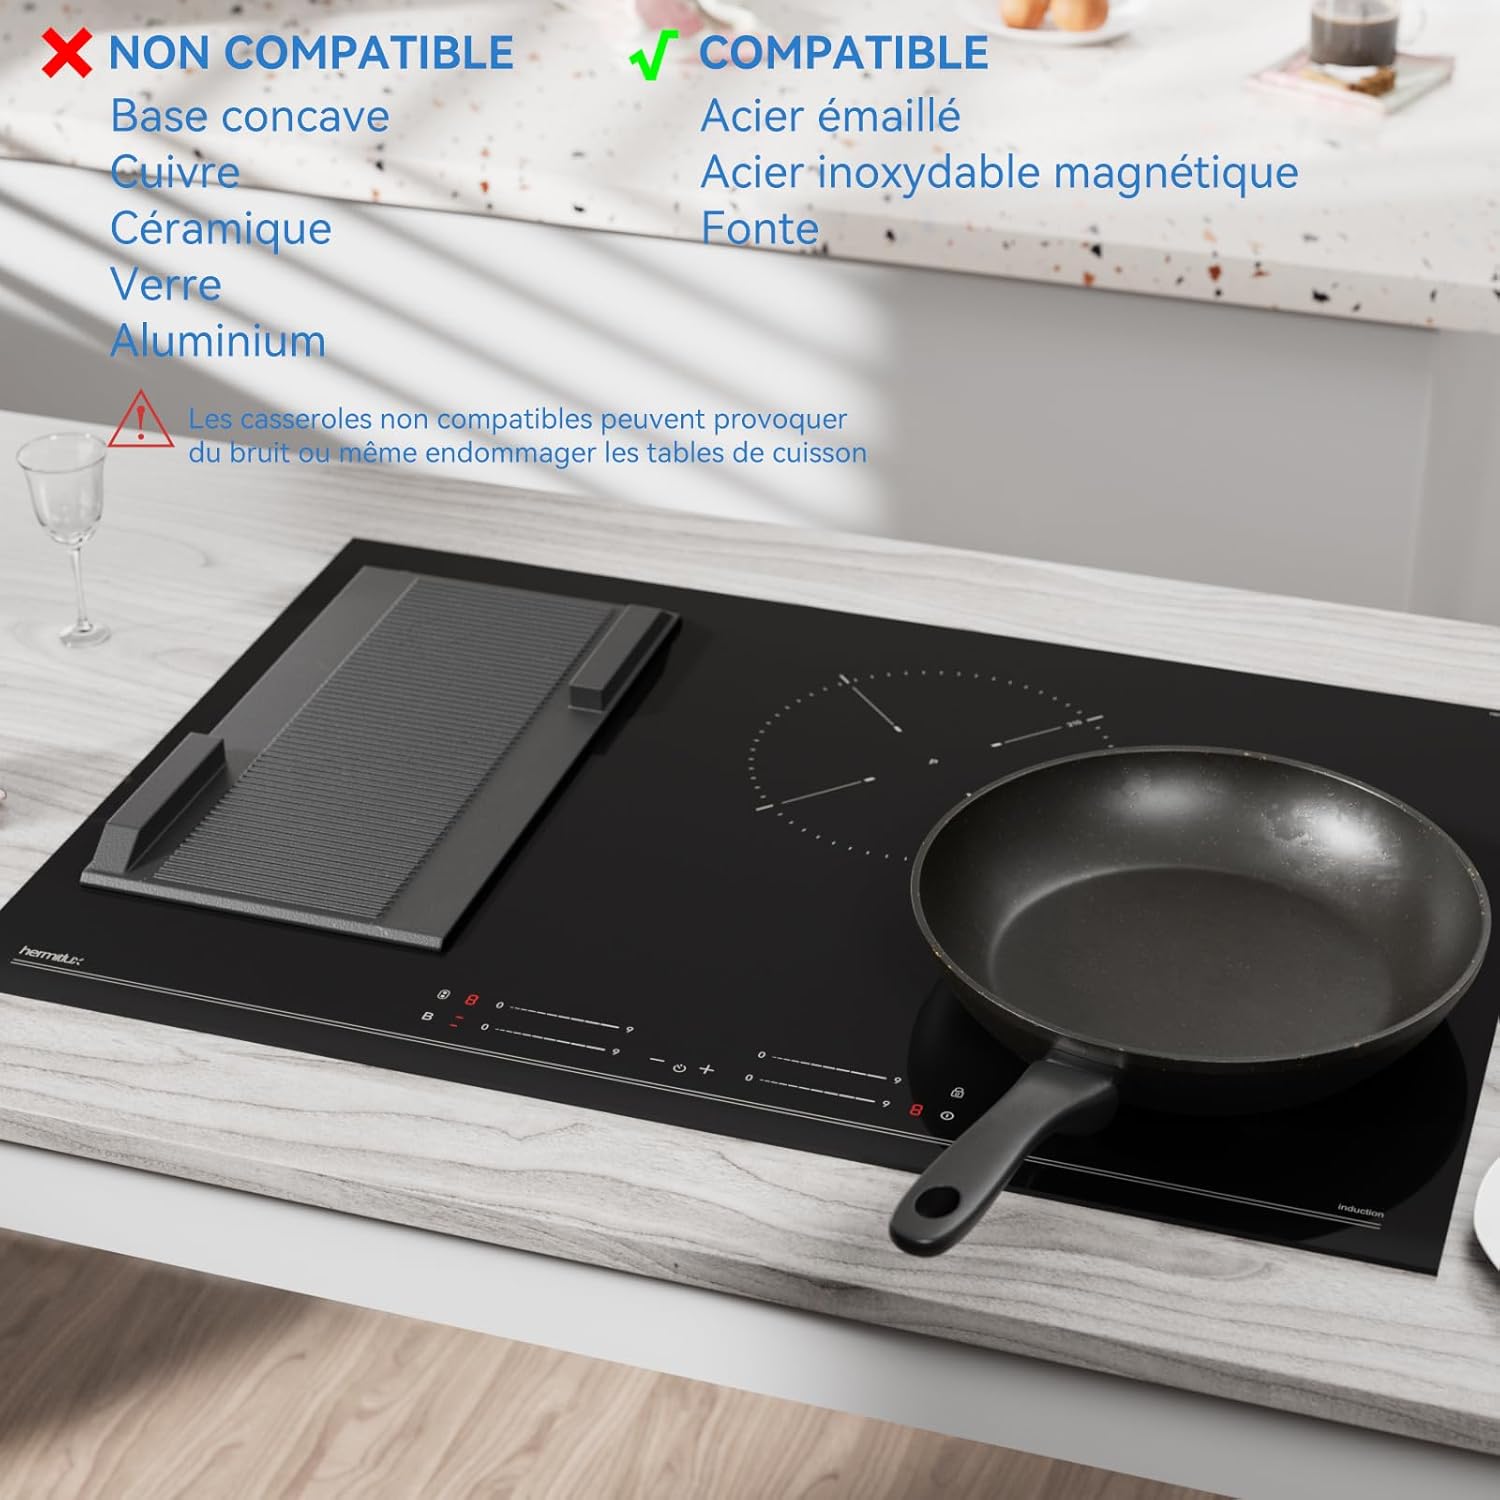
Image 4.4: The Boost function provides instant high power for rapid cooking.
5. Compatible Cookware
For optimal performance, use cookware specifically designed for induction hobs. Induction cooking requires pots and pans with a magnetic base.
Compatible Cookware Materials:
- Enameled steel
- Magnetic stainless steel
- Cast iron
Incompatible Cookware Materials:
- Concave base cookware
- Copper
- Ceramic
- Glass
- Aluminum
Note: Using non-compatible cookware may cause noise or damage the hob. Always check for the induction symbol on your cookware.
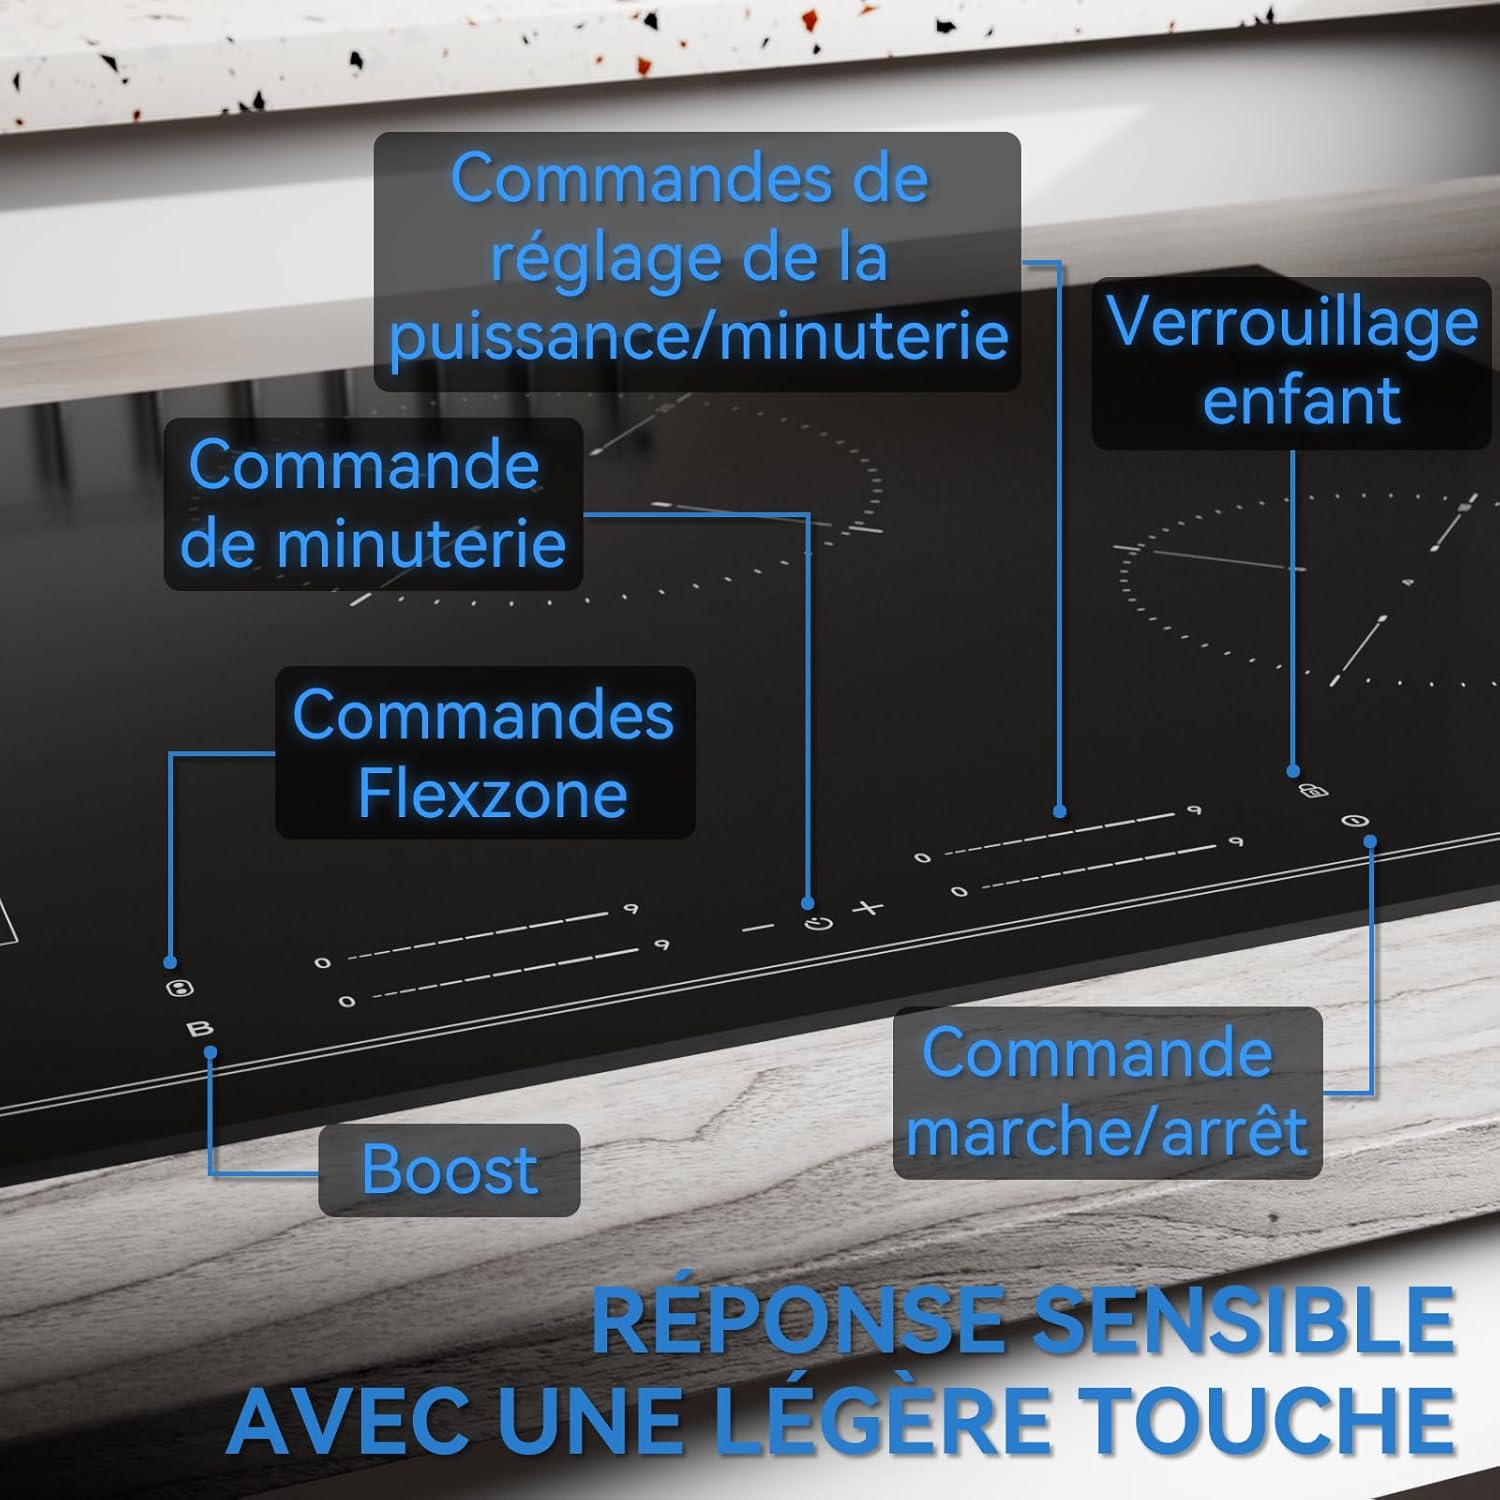
Image 5.1: Guide to compatible and incompatible cookware types.
6. Cleaning and Maintenance
Regular cleaning and proper maintenance will ensure the longevity and optimal performance of your induction hob.
Cleaning Instructions:
- Always disconnect the power supply before cleaning.
- Allow the hob to cool down completely before cleaning.
- Wipe the ceramic glass surface with a soft cloth and a mild detergent.
- For stubborn stains, use a specialized ceramic hob cleaner and a scraper designed for glass surfaces.
- Avoid abrasive cleaners, scouring pads, or harsh chemicals, as they can scratch or damage the surface.
- Clean spills immediately to prevent them from drying and becoming harder to remove.
Maintenance Tips:
- Regularly check the ventilation openings to ensure they are not blocked.
- Avoid dropping heavy or sharp objects on the hob surface to prevent cracks or damage.
- Do not use the hob as a storage surface.
7. Troubleshooting
Before contacting customer support, please refer to the following troubleshooting guide for common issues.
| Problem | Possible Cause | Solution |
|---|---|---|
| Hob does not turn on | No power supply; Child lock activated | Check power connection; Deactivate child lock. |
| Cooking zone not heating | Incompatible cookware; No cookware detected | Use induction-compatible cookware; Ensure cookware is centered on the zone. |
| Display shows an error code (e.g., 'E0', 'E1') | Overheating; Internal fault | Turn off hob, let it cool, then restart; If error persists, contact service. |
| Unusual noise during operation | Normal fan noise; Cookware type | Some noise is normal; Certain cookware may produce slight vibrations. |
| Residual heat indicator ('H') remains on | Surface is still hot | This is a safety feature; Wait for the surface to cool down. |
8. Specifications
Detailed technical specifications for the Hermitlux HIH4F01 Induction Hob.
| Feature | Specification |
|---|---|
| Brand | Hermitlux |
| Model Number | HIH4F01 |
| Product Dimensions (L x W x H) | 52 x 77 x 6 cm |
| Weight | 13.14 kg |
| Installation Type | Built-in (Drop-in) |
| Hob Type | Induction |
| Number of Hobs | 4 |
| Voltage | 220 Volts (AC) |
| Wattage | 7000 Watts |
| Power Source Type | Electric |
| Material | Glass (Vitroceramic heating surface) |
| Special Features | Pan Sensor, Continuous Low Power Heating, Residual Heat Indication, Child Lock, Flexible 4+1 Cooking Zones |
| Heating Elements | 4 |

Image 8.1: Diagram showing the power distribution and dimensions of each cooking zone.
9. Warranty and Support
For warranty information and customer support, please refer to the warranty card included with your product or visit the official Hermitlux website.
Contact Information:
- Online Support: Visit the Hermitlux official website for FAQs and support resources.
- Email: Refer to your warranty documentation for specific contact email.
- Phone: Refer to your warranty documentation for specific contact phone number.
Please have your model number (HIH4F01) and purchase date ready when contacting support.


