Introduction
Thank you for choosing the ASPERX 3000A Jump Starter. This portable device is designed to provide a reliable solution for starting vehicles with dead batteries and serves as a versatile power bank for your electronic devices. It features a high peak current of 3000A, capable of starting up to 10.0L gas or 8.0L diesel engines. Please read this manual thoroughly before use to ensure safe and optimal performance.

Image: The ASPERX 3000A Jump Starter, smart jumper cables, USB-C charging cable, and a protective carrying case.
Safety Information
Your safety is paramount. The ASPERX Jump Starter incorporates an advanced Battery Management System (BMS) with multiple protection features. Adhere to the following safety guidelines:
- Spark Protection: Designed to prevent sparks during connection.
- Reverse Polarity Protection: Prevents damage if cables are connected incorrectly.
- Low/High Temperature Protection: Operates safely within -4°F to 140°F (-20°C to 60°C). Do not use or store outside this range.
- Overload Protection: Shuts down if current draw exceeds safe limits.
- Over-Charge/Over-Current/Short-Circuit/Over-Voltage Protection: Ensures safe charging and operation.
- Keep out of reach of children.
- Do not disassemble the unit.
- Avoid exposing the unit to water or extreme moisture.

Image: An illustration showing the internal components and the intelligent protection systems of the jump starter, emphasizing its safe operating temperature range.
Package Contents
Verify that all items are present in your package:
- ASPERX 3000A Car Jumper Starter Portable (x1)
- Smart Jumper Clip (x1)
- Data Cable (USB-C) (x1)
- Storage Box (x1)
- User Manual (x1)

Image: A visual representation of all items included in the product package.
Product Overview
Familiarize yourself with the components and ports of your ASPERX Jump Starter:
- ON/OFF Switch: Powers the unit on or off.
- EC5 Output: Port for connecting the smart jumper cables.
- USB Output 1 & 2: Standard USB-A ports for charging external devices.
- USB-C Input/Output: Used for charging the jump starter and also for charging external devices.
- POWER/LED Switch: Activates the LED flashlight and cycles through its modes.
- Lights Indicator: Displays battery charge level and operational status.
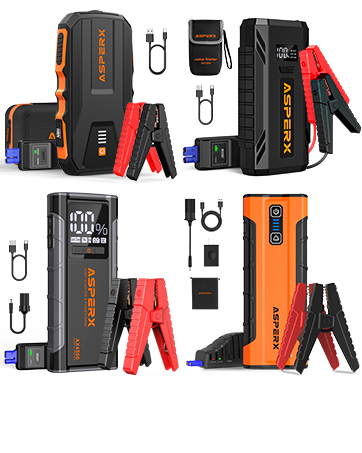
Image: A detailed diagram illustrating the various ports, switches, and indicators on the ASPERX jump starter unit.
Charging the Jump Starter
Before first use, fully charge the jump starter. It is recommended to recharge the unit every 3-6 months to maintain battery health.
- Connect the provided USB-C data cable to the USB-C Input/Output port on the jump starter.
- Connect the other end of the USB-C cable to a compatible USB wall charger (not included) or a car charger.
- The indicator lights will illuminate to show the charging progress. The unit is fully charged when all indicator lights are solid.

Image: The jump starter connected to both a wall charger and a car charger, demonstrating charging methods.
Operating Instructions: Jump Starting a Vehicle
Follow these steps carefully to jump start your vehicle:
- Ensure Sufficient Charge: Confirm the jump starter has at least 50% charge.
- Connect Smart Jumper Cables: Insert the blue plug of the smart jumper cables into the EC5 Output port on the jump starter. Ensure a secure connection.
- Connect to Car Battery: Attach the red clamp (+) to the positive terminal of the vehicle's battery and the black clamp (-) to the negative terminal. The smart cables will indicate a safe connection.
- Start Vehicle: Once connected correctly, start your car's engine. If the vehicle does not start immediately, wait 30 seconds before attempting again. If the battery voltage is extremely low (below 9V), press the "BOOST" button on the smart jumper cable unit to force a start.
- Remove Cables: After the engine starts, immediately remove the smart jumper cables from the car battery, then disconnect them from the jump starter.

Image: A step-by-step visual guide demonstrating the process of connecting the jump starter to a car battery and starting the engine.
Using as a Power Bank
The ASPERX Jump Starter can also charge various electronic devices:
- Connect your device's charging cable to either the USB Output (USB-A) ports or the USB-C Input/Output port on the jump starter.
- The jump starter will automatically begin charging your device.
- The 5V/3A Type-C port offers faster charging for compatible devices.

Image: The jump starter connected to and charging multiple electronic devices, including a smartphone, tablet, and wireless earbuds.
LED Flashlight Modes
The integrated LED flashlight offers three modes for various situations:
- Steady Light: For general illumination.
- Strobe Light: For signaling or attracting attention.
- SOS Signal: For emergency situations.
To activate the flashlight, press and hold the POWER/LED Switch. Press the button repeatedly to cycle through the modes.

Image: A person utilizing the jump starter's LED flashlight to illuminate an engine bay, with icons depicting the steady, strobe, and SOS light modes.
Maintenance and Storage
Proper maintenance ensures the longevity and performance of your jump starter:
- Store the unit in its protective carrying case when not in use.
- Keep the jump starter in a cool, dry place, away from direct sunlight and moisture.
- Avoid storing in temperatures outside the recommended operating range (-4°F to 140°F).
- Recharge the unit at least once every 3-6 months to prevent deep discharge and extend battery life.
- Clean the exterior with a soft, dry cloth. Do not use harsh chemicals or abrasives.
Troubleshooting
| Problem | Possible Cause | Solution |
|---|---|---|
| Vehicle does not start | Jump starter battery low; incorrect cable connection; vehicle battery completely dead. | Ensure jump starter is fully charged. Check cable connections for correct polarity. If vehicle battery is extremely low, use the "BOOST" function on the smart cables. |
| Jump starter not charging | Charging cable faulty; charger not working; unit too hot/cold. | Try a different USB-C cable and charger. Ensure the unit is within the recommended charging temperature range. |
| Smart cables show error | Reverse polarity; short circuit; over-temperature. | Disconnect and re-connect cables correctly. Allow unit to cool if hot. Refer to smart cable indicator lights for specific error codes. |
Specifications
| Feature | Detail |
|---|---|
| Model | AX3000 |
| Peak Output Current | 3000 Amps |
| Engine Compatibility | Up to 10.0L Gas, 8.0L Diesel |
| Product Dimensions | 4.33"D x 5.11"W x 8.85"H |
| Item Weight | 2.27 pounds |
| Battery Type | Lithium Polymer (1 included) |
| USB-C Input/Output | 5V/3A |
| Operating Temperature | -4°F to 140°F (-20°C to 60°C) |
Warranty and Support
ASPERX products are designed for reliability and performance. This product is covered by a manufacturer's warranty. For specific warranty details, please refer to the documentation included with your purchase or contact ASPERX customer support.
If you have any questions, concerns, or require technical assistance, please do not hesitate to contact our customer support team. Contact information can typically be found on our official website or through your purchase platform.