
Introduction
This manual provides essential information for the safe and efficient use of your Varstrom 48V 20Ah Ebike Battery. Please read these instructions carefully before installation and operation to ensure optimal performance and safety. This battery is designed for ebike conversion kits ranging from 250W to 1000W.

Image: Varstrom 48V 20Ah Ebike Battery showing its compact design and key dimensions.
Safety Information
Your Varstrom Ebike Battery is designed with safety in mind and is UL 2271 certified for cell safety and system reliability. Adhere to the following guidelines:
- Charging: Use only compatible ebike chargers with a DC2.1 charging port. Ensure the charging current does not exceed 3A.
- Battery Management System (BMS): The integrated 30A BMS protects against overcharge, over-discharge, short circuits, overvoltage, overcurrent, and temperature fluctuations.
- Storage: Store the battery in a cool, dry place away from direct sunlight and extreme temperatures.
- Handling: Avoid dropping or subjecting the battery to severe impacts. Do not disassemble the battery pack.
- Water Exposure: While equipped with an IP-rated waterproof breather valve, avoid submerging the battery in water.

Image: Diagram illustrating the 30A Battery Management System (BMS) and its protective features including cell balancing, reverse charge, temperature, short circuit, overcharge, over-discharge, overvoltage, and overcurrent protection.
Setup and Installation
Follow these steps to properly install your Varstrom Ebike Battery:
- Detach Battery Base: Unscrew the latch on the battery and slide the base downward to detach it from the main battery unit.
- Align and Mount Plate: Align the detached mounting plate with the frame bosses on your ebike. Use the correct-sized screws to securely fasten the plate to the frame. For frames without standard mounts, utilize the unique dual zip-tie slots for secure attachment.
- Mount Battery: Slide the main battery unit onto the mounted plate until it clicks firmly into place. Ensure the dual-side locking rails engage to maintain cell compression and stability.
- Secure with Key Lock: Use the provided key to lock the battery to the frame, deterring theft.

Image: Visual guide demonstrating the three-step installation process of the battery onto an ebike frame, along with a list of included components.
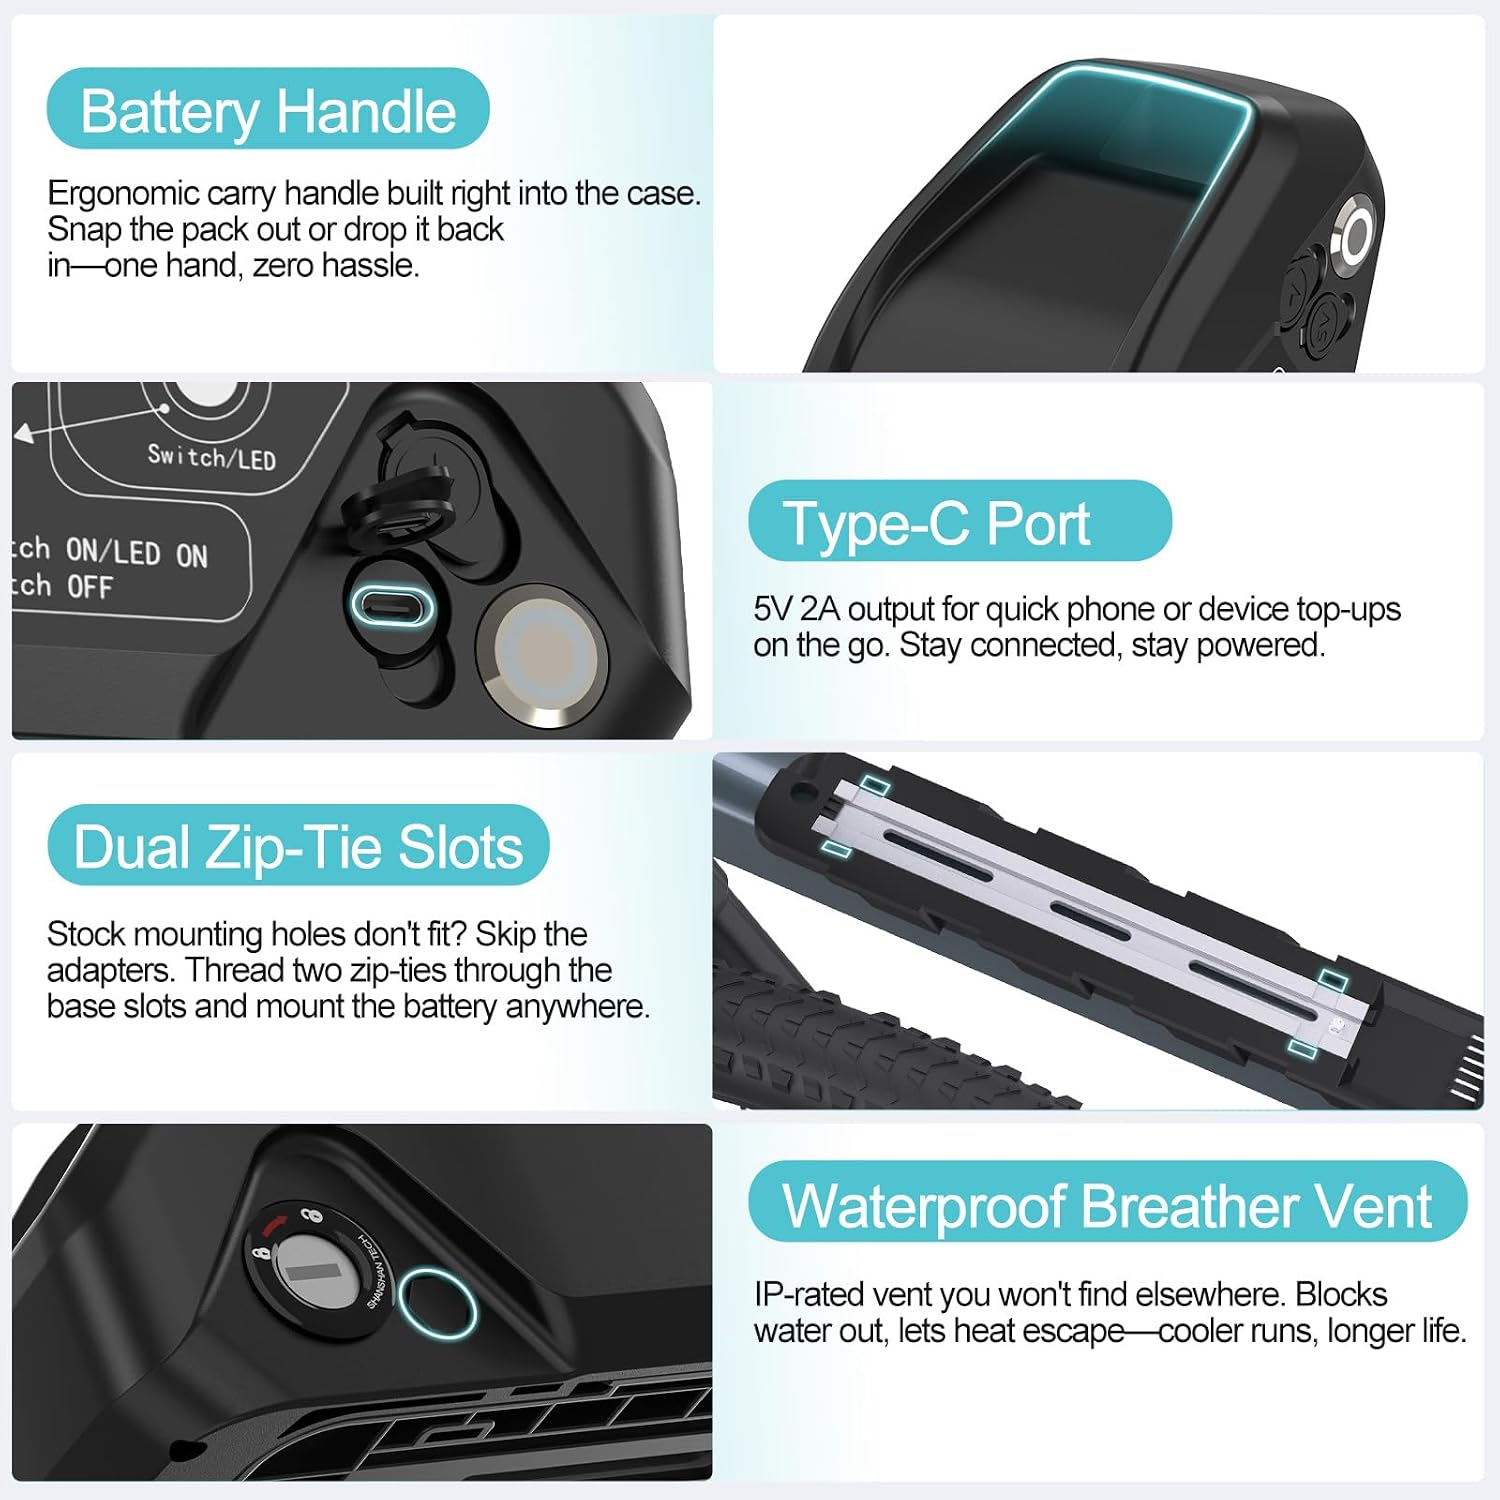
Image: Close-up views of the battery's ergonomic handle, 5V 2A Type-C port, dual zip-tie slots for flexible mounting, and the IP-rated waterproof breather vent.
Operation
- Power On/Off: Use the physical power switch to turn the battery on or off. Turning it off prevents phantom drain when not in use.
- Battery Indicator: Press the power button to check the charge status. A 3-level indicator provides precise charge status at a glance: Red (0-10%), Yellow (11-50%), Green (51-100%).
- Charging: Connect your compatible charger to the DC2.1 charging port. Ensure the charging current does not exceed 3A.
- USB-C Power Hub: The integrated 5V 2A Type-C port allows you to charge phones or other small electronic devices on the go.
- Motor Connection: The XT60 connector provides a secure and efficient connection to your ebike motor controller. The discharge port utilizes a 6-Pin header.

Image: Detailed views of the key-operated safe lock, DC2.1 charging port, 6-Pin discharge port, and the XT60 battery connector.

Image: Illustrations of the easily accessible bottom-mounted fuse, the secure battery bracket, the precision auto spot-weld process for cells, and the 3-level battery indicator lights.
Maintenance
- Charging Habits: For optimal battery life and longevity, recharge the battery before it is completely depleted. Avoid frequently running the battery to 0%.
- Fuse Replacement: The base-mounted fuse simplifies field repairs without requiring full disassembly of the battery pack. If the battery stops functioning, check and replace the fuse if necessary.
- Cleaning: Wipe the battery exterior with a dry or slightly damp cloth. Do not use harsh chemicals or abrasive cleaners.
- Long-Term Storage: If storing the battery for an extended period, charge it to approximately 50-60% capacity and store in a cool, dry place. Recharge every 3 months to maintain cell health.
- Cycle Life: The battery retains 80%+ capacity after 800 deep cycles, projecting 1000+ cycles and approximately 5 years of daily use under proper care.
Troubleshooting
- Battery Not Charging:
- Ensure the charger is properly connected to both the battery and a power outlet.
- Verify the power outlet is functional.
- Check the base-mounted fuse for damage and replace if necessary.
- Confirm the charger is compatible with a 48V battery and has a DC2.1 connector.
- Reduced Range or Power:
- Ensure the battery is fully charged before each ride.
- Check for loose connections between the battery and the motor controller.
- Consider ambient temperature; cold weather can temporarily reduce battery performance.
- Battery capacity naturally degrades over time and cycles.
- Battery Indicator Not Working:
- Ensure the battery is powered on.
- If the issue persists, contact technical support.
If you encounter issues not covered here, please refer to the support section for assistance.
Specifications
| Feature | Specification |
|---|---|
| Voltage/Capacity | 48V 20Ah |
| Energy | 960Wh |
| BMS Continuous Discharge Current | 30A |
| Battery Cell Type | L*-*G 21700 5000mAh |
| Cycle Life | 1000+ cycles (retains 80%+ capacity after 800 cycles) |
| Dimensions (L×W×H) | 365×85×107mm (14.37×3.35×4.21 inches) |
| Weight | 5.69kg (12.54 lbs) |
| Matchable Motor Power | 48V 250W-1200W |
| Charger Connector | DC2.1 |
| Maximum Charge Current | 3A |
| USB-C Output | 5V 2A |
| Discharge Port | 6-Pin Header, XT60 Connector |
| Certifications | UL 2271 |
Official Product Video
Video: An official video from Varstrom demonstrating the features and benefits of the Ebike Battery. This video is 45 seconds long and provides a visual overview of the product.
Warranty and Support
Warranty Information
Your Varstrom Ebike Battery comes with a 30-day return policy and a 365-day repair or replacement warranty from the date of purchase. This warranty covers manufacturing defects and malfunctions under normal use conditions.
Technical Support
Varstrom offers lifetime technical support for this product. If you have any questions, require assistance with installation, operation, or troubleshooting, please contact our support team. For the most current support contact information, please visit the official Varstrom store on Amazon: Varstrom Store.