
LIAMOS 1005005956216502
Contents
Debra 4-Channel Audio Interface DJ Console Mixer User Manual
Model: 1005005956216502 | Brand: LIAMOS
Introduction
The LIAMOS Debra D4M 4-channel audio mixer is a portable mini audio interface designed for various audio applications, including PC recording, live streaming, and small performances. It features a 5V power supply for outdoor use, built-in MP3 playback, standard 48V phantom power, digital reverb effects, and dual headphone jacks. Its USB connectivity allows for professional sound card output, ensuring high-quality recordings.
Key Features
- 4-Channel Audio Interface: Supports multiple audio inputs for versatile use.
- USB Sound Card: Enables direct connection to PC for high-quality recording and playback.
- 48V Phantom Power: Provides power for condenser microphones.
- Digital Reverb Effect: Enhances vocal and instrument sound.
- Dual Headphone Jacks: Includes 3.5mm and 6.3mm outputs for monitoring.
- 3-Segment Equalization: Adjustable EQ for each channel (High, Mid, Low).
- Bluetooth Connectivity: For wireless audio streaming.
- Compact and Portable: Designed for both indoor and outdoor use with 5V power supply.
Product Overview
Familiarize yourself with the various inputs, outputs, and controls on your Debra D4M mixer.

Figure 1: Top view of the Debra D4M mixer, displaying all input/output ports, control knobs, and buttons. This includes XLR/TRS combo jacks, 6.3mm inputs, USB port, headphone outputs, and various channel controls.
Input/Output Ports:
- CH1/CH2 (XLR/TRS Combo Jacks): For connecting microphones (XLR) or instruments/line-level devices (6.3mm TRS).
- CH3/4 (6.3mm TRS/TS Jacks): Stereo input for line-level devices like keyboards or media players.
- REC L/R (RCA Jacks): Stereo output for recording to external devices.
- PHONES (6.3mm & 3.5mm Jacks): Dual headphone outputs for monitoring.
- MAIN L/R (6.3mm TRS Jacks): Main stereo output to connect to speakers or amplifiers.
- USB Audio Port: For connecting to a computer for recording and playback.
Channel Controls (CH1, CH2, CH3/4):
- GAIN Knob: Adjusts the input sensitivity for each channel.
- HI Knob: Adjusts the high-frequency equalization for the channel.
- LOW Knob: Adjusts the low-frequency equalization for the channel.
- EFF Knob: Controls the amount of effect (reverb) applied to the channel.
- LEVEL Knob: Adjusts the output volume of the channel.
- PK (Peak) LED: Illuminates when the input signal is too high, indicating potential clipping.
Master Controls & Features:
- +48V Phantom Power Button: Activates 48V phantom power for condenser microphones on CH1/CH2.
- HI-Z Button: For connecting high-impedance instruments like guitars directly.
- USB Audio/Bluetooth Section:
- Display Screen: Shows current mode (USB, BT) and track information.
- Control Buttons: Play/Pause, Previous, Next, Mode (USB/Bluetooth selection).
- USB Port: For connecting USB drives for MP3 playback.
- HEADSET Section:
- TO CH1/CH2 Switch: Routes headset microphone input to CH1 or CH2.
- DEL Knob: Controls delay effect.
- REP Knob: Controls repeat for delay effect.
- MAIN Knob: Adjusts the overall output volume of the main mix.
- PHONES Knob: Adjusts the volume of the headphone outputs.
- Indicator Lights: CLIP (clipping), SIG (signal present), POW (power on).
Setup Guide
Follow these steps to set up your Debra D4M mixer for optimal performance.
1. Power Connection:
Connect the provided power adapter to the mixer's 5V DC input and then to a power outlet. The POW indicator light will illuminate.
2. Connecting Audio Devices:
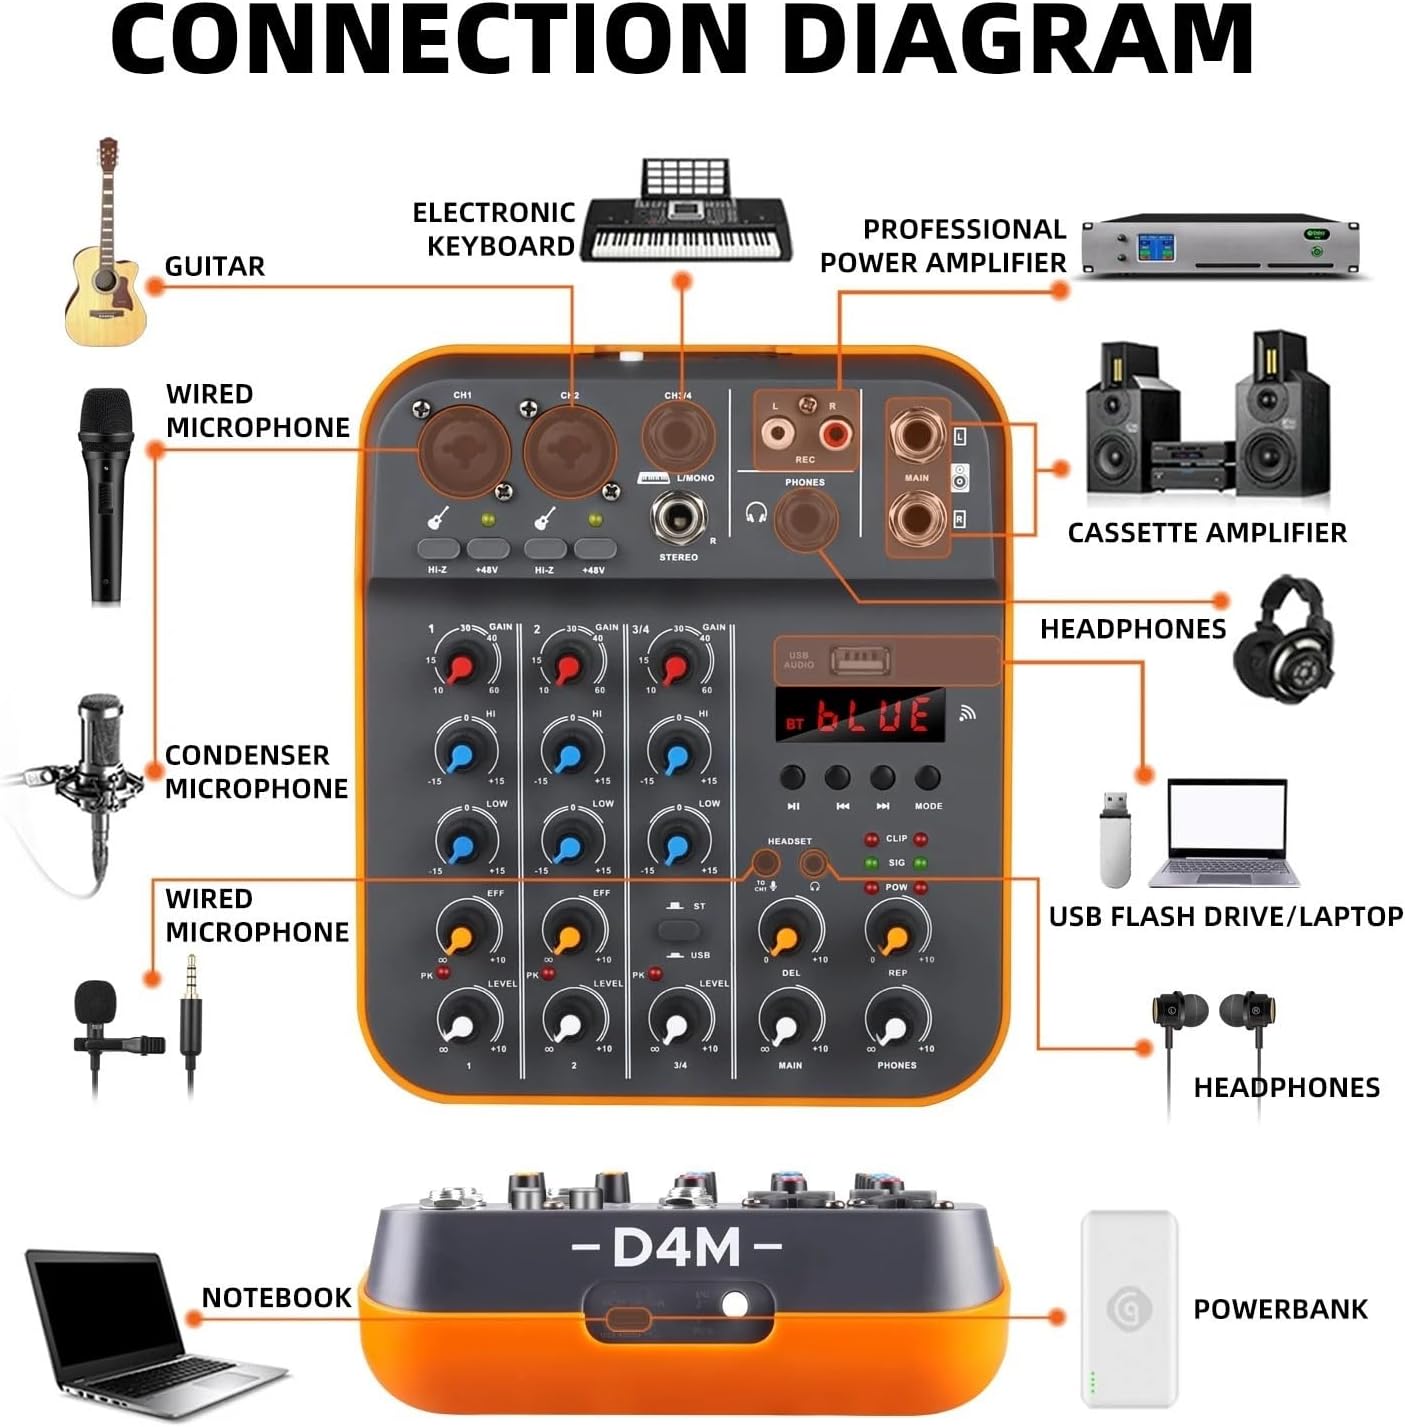
Figure 2: A visual guide demonstrating how to connect various audio sources and output devices to the Debra D4M mixer, such as guitars, keyboards, microphones, amplifiers, and headphones.
- Microphones:
- For dynamic microphones, connect via XLR cable to CH1 or CH2.
- For condenser microphones, connect via XLR cable to CH1 or CH2, then press the +48V button.

Figure 3: Illustration of the +48V phantom power button, essential for powering condenser microphones. Ensure this is activated when using such microphones.
- Instruments (e.g., Guitar, Keyboard):
- Connect guitars or other high-impedance instruments to CH1 or CH2 using a 6.3mm TS cable and press the HI-Z button.
- Connect keyboards or other line-level devices to CH3/4 using 6.3mm TS/TRS cables.
- Speakers/Amplifiers: Connect your main speakers or amplifier to the MAIN L/R outputs using 6.3mm TS/TRS cables.
- Headphones: Connect your headphones to either the 6.3mm or 3.5mm PHONES jack.
3. Computer Connection (USB Audio):

Figure 4: The mixer connected to a laptop via USB, demonstrating its use as an external sound card for recording or live streaming. The USB cable is included for easy setup.
Connect the mixer to your computer using the provided USB cable. The mixer will be recognized as an external sound card. You may need to select it as the input/output device in your computer's sound settings or recording software.
4. Bluetooth Connection:

Figure 5: The mixer's Bluetooth functionality, allowing for wireless audio streaming from a smartphone or other Bluetooth-enabled device. The display shows "BLUE" when in Bluetooth mode.
Press the MODE button in the USB Audio/Bluetooth section until "BLUE" appears on the display. On your smartphone or Bluetooth device, search for "D4M" (or similar) and pair with it. You can now stream audio wirelessly to the mixer.
Operating Instructions
1. Adjusting Input Levels:
- Ensure all LEVEL and MAIN knobs are turned down before starting.
- Connect your audio source to the desired channel (CH1, CH2, or CH3/4).
- Slowly increase the GAIN knob for that channel until the SIG LED illuminates consistently, and the PK LED flashes only occasionally during the loudest parts. If the PK LED stays lit, reduce the GAIN.
- Adjust the channel's LEVEL knob to set its volume within the mix.
2. Using Equalization (EQ):
Each channel (CH1, CH2, CH3/4) has HI and LOW EQ knobs. Adjust these to shape the tone of your audio source:
- HI: Boost or cut high frequencies (e.g., for clarity in vocals or brightness in instruments).
- LOW: Boost or cut low frequencies (e.g., for warmth in vocals or punch in bass instruments).
3. Applying Effects (Reverb/Delay):
- Reverb: Use the EFF knob on each channel to send a portion of that channel's signal to the built-in reverb effect.
- Delay: For the headset input, use the DEL knob to control the delay time and the REP knob to control the number of repeats.
4. Monitoring Audio:
Connect headphones to the PHONES jack and adjust the PHONES knob to set your monitoring volume.
5. Main Output Level:
Once individual channel levels are set, slowly increase the MAIN knob to control the overall volume sent to your speakers or recording device.
Technical Specifications

Figure 6: Detailed technical specifications and physical dimensions of the Debra D4M mixer, providing key performance metrics and size information.
| Parameter | Value |
|---|---|
| Input/Output | 6.3mm socket, balanced |
| Microphone Input Type | XLR, balanced, split input circuit |
| Microphone Gain Range | +10 dB to +60 dB |
| Microphone Signal to Noise Ratio | 110dB / 112dB |
| Noise | -80dBu |
| Channel Crosstalk Attenuation | >-82dB |
| Earphone Output | (200Ω) 300mW |
| Other Outputs | +20dBu |
| Equalizer High | 12KHz, +/-15dB |
| Equalizer Bass | 80Hz, +/-15dB |
| Power Consumption | 10W |
| Power Input | 100-240VAC 0.3A 50/60HZ |
| Power Output | 5V 2A |
| Frequency Response | +/-0.5dB 20Hz-20kHz |
| Total Harmonic Distortion | <0.03% @ 1kHz |
| Maximum Input Level (Microphone) | +16dBu |
| Maximum Input Level (Line) | +30dBu |
| Maximum Input Level (Stereo) | +20dBu |
| Package Dimensions | 1.18 x 0.79 x 0.39 inches |
| Item Weight | 1.76 pounds |
| Item Model Number | 1005005956216502 |
Troubleshooting
If you encounter issues with your mixer, refer to the following common problems and solutions:
- No Sound Output:
- Ensure the mixer is powered on and the POW indicator is lit.
- Check all cable connections (inputs, outputs, speakers, headphones).
- Verify that channel LEVEL knobs and the MAIN knob are turned up.
- If using USB audio, ensure the mixer is selected as the output device in your computer's sound settings.
- Distorted Sound / Clipping:
- Reduce the GAIN knob for the affected channel if the PK LED is constantly lit.
- Lower the channel LEVEL or MAIN knob.
- Check the input source for distortion before it reaches the mixer.
- Microphone Not Working (Condenser Mic):
- Ensure the +48V phantom power button is pressed for condenser microphones.
- Verify the XLR cable connection.
- Bluetooth Connection Issues:
- Ensure the mixer is in Bluetooth mode ("BLUE" on display).
- Make sure Bluetooth is enabled on your device and it's within range.
- Try unpairing and re-pairing the device.
Care and Maintenance
- Cleaning: Use a soft, dry cloth to clean the mixer's surface. Do not use liquid cleaners or solvents.
- Storage: Store the mixer in a cool, dry place away from direct sunlight and extreme temperatures.
- Handling: Avoid dropping or subjecting the mixer to strong impacts.
- Ventilation: Ensure proper ventilation around the unit to prevent overheating.
Warranty and Support
For information regarding warranty coverage, technical support, or service, please refer to the documentation included with your purchase or contact LIAMOS customer service. Keep your proof of purchase for warranty claims.
Documents and downloads
Ask a question about this manual
Ask about setup, troubleshooting, compatibility, parts, safety, or missing instructions. Manuals+ will review the question and use this page’s manual context to help answer it.