1. Introduction
The Gravity MGR3 Marine Stereo Receiver is designed for audio entertainment in various environments, including cars, boats, ATVs, motorcycles, and RVs. This manual provides instructions for installation, operation, and maintenance to ensure optimal performance and longevity of your device.
The MGR3 features multiple playback options, including USB, SD card, AUX input, and FM radio. It also includes Bluetooth connectivity for wireless audio streaming and a remote control for convenient operation. Its weatherproof design ensures durability in challenging outdoor conditions.
2. Safety Information
- Read all instructions carefully before installation and operation.
- Ensure proper wiring and connections to prevent damage to the unit or vehicle. Consult a professional if unsure about installation.
- Do not operate the unit in a manner that distracts from safe driving or operation of your vehicle.
- Protect the unit from extreme temperatures, direct sunlight for prolonged periods, and excessive moisture beyond its IPX5 rating.
- Do not attempt to disassemble or modify the unit. This may void the warranty and cause damage.
- Keep the remote control and small parts out of reach of children.
3. Package Contents
Verify that all items are present in the package:
- Gravity MGR3 Marine Stereo Receiver
- Remote Control
- Wiring Harness
- Mounting Hardware
- User Manual (this document)
4. Product Overview
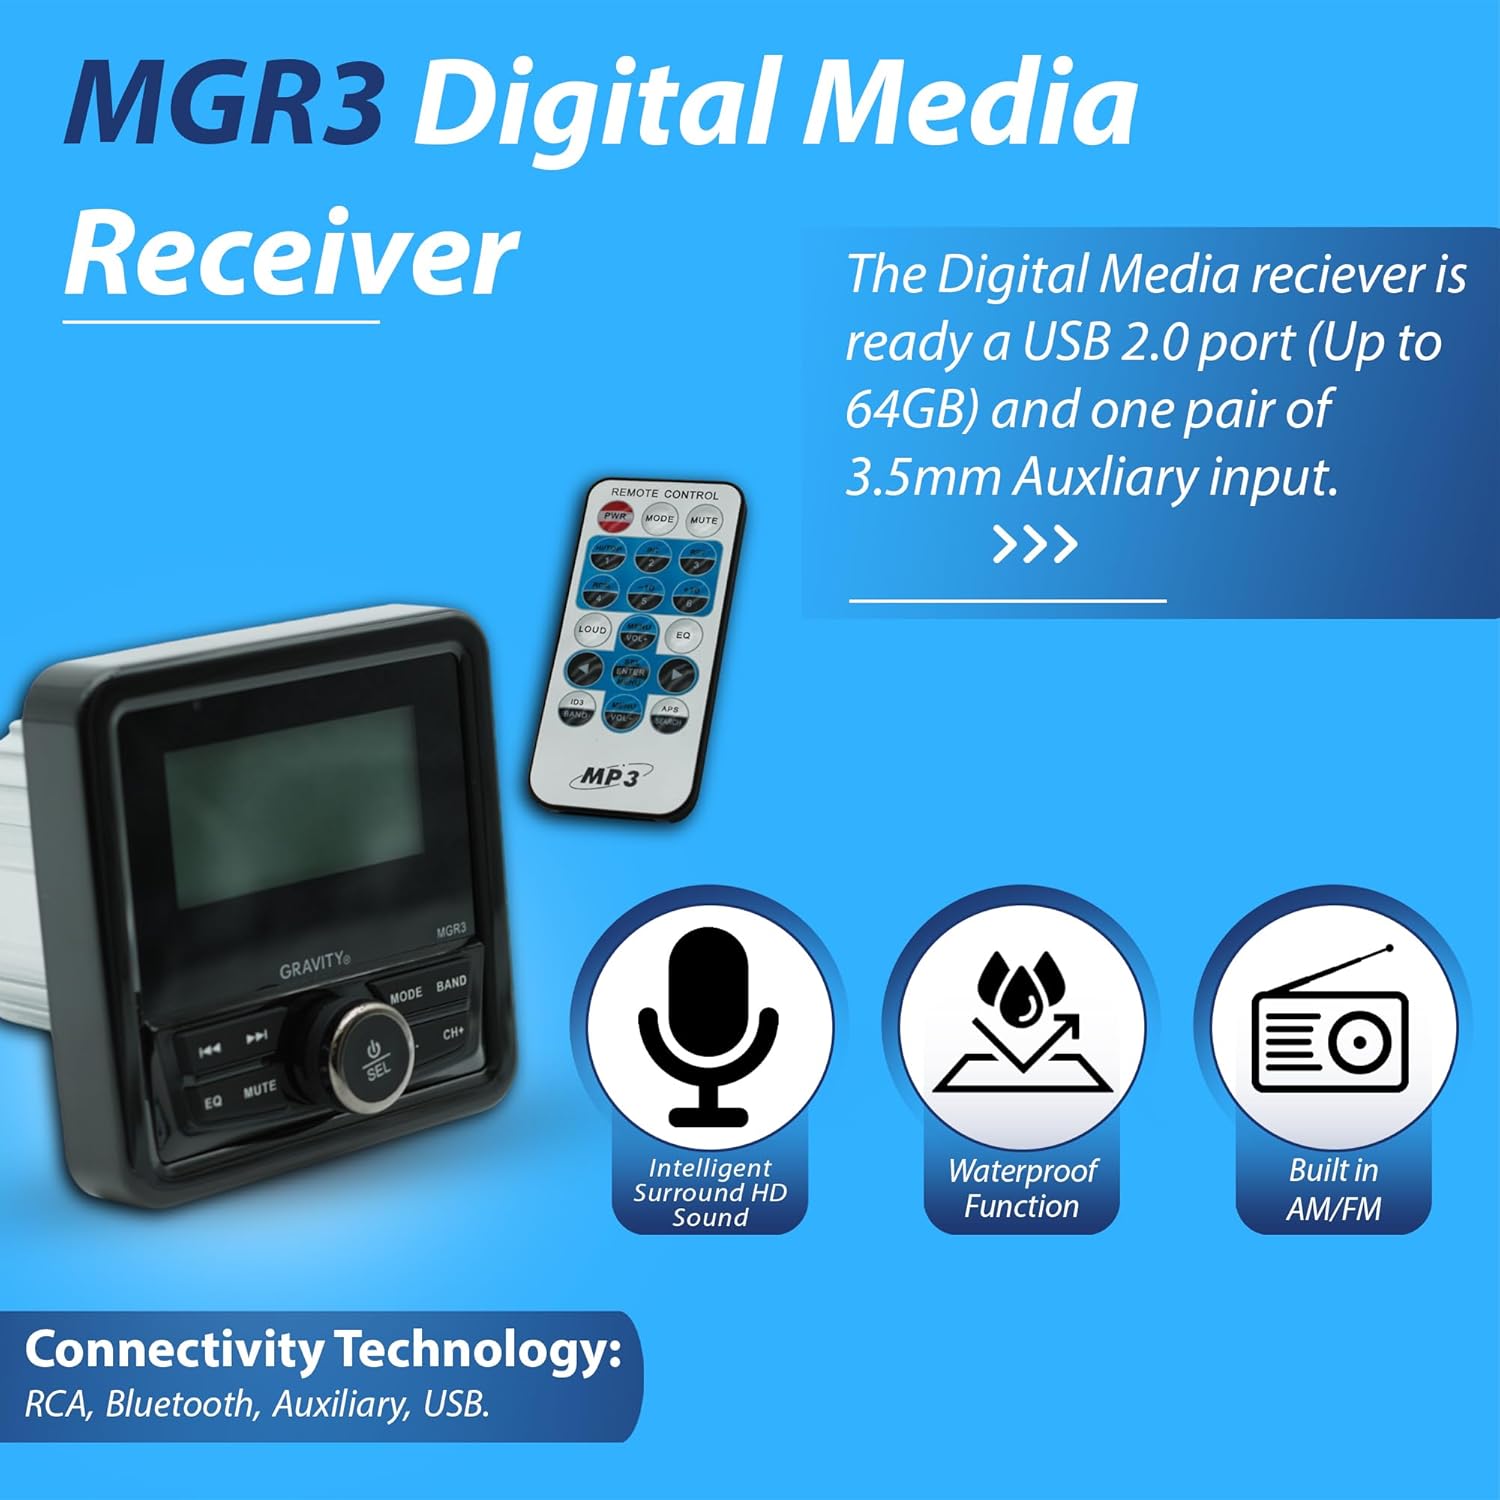
Figure 4.1: Front view of the Gravity MGR3 Digital Media Receiver and its remote control. This image highlights the unit's display, control buttons, and the included remote.
Key Features:
- Multi-Mode Playback: Supports USB, SD card, AUX input, and FM radio for diverse audio sources.
- Bluetooth Connectivity: Allows wireless audio streaming from compatible devices.
- Remote Control: Provides convenient control over audio settings from a distance.
- Weatherproof Design: Built to withstand outdoor conditions, suitable for marine and off-road use. Features IPX5 water resistance and dustproof construction.
- Customizable Sound: Integrated equalizer with preset sound modes (Rock, Pop, Classical).
- Output Power: 50W x 4 Channels (200W total output).
- Anti-Shock Protection: Super electronic anti-shock for consistent playback.
- RCA Audio Signal Output: For connecting external amplifiers or subwoofers.

Figure 4.2: Overview of key features including 200W output, IPX5 water resistance, auxiliary input, anti-shock, and RCA output.

Figure 4.3: Visual representation of the MGR3's dustproof and waterproof capabilities, emphasizing its rugged design.
5. Setup and Installation
5.1 Mounting Dimensions
Before installation, ensure adequate space for the unit. Refer to the dimensions below for proper fitment.

Figure 5.1: Physical dimensions of the MGR3 unit. Front panel width is 4.33 inches, mounting depth is 3.92 inches, and height is 2.89 inches.
5.2 Wiring Connections
The MGR3 comes with a wiring harness for connection to your vehicle's power, ground, and speakers.
- Power (Red/Yellow): Connect to a switched 12V power source (ignition).
- Ground (Black): Connect to a solid chassis ground point.
- Speaker Outputs (Colored Pairs): Connect to your vehicle's speakers. Ensure correct polarity (+/-).
- Antenna: Connect to an external FM antenna.
- RCA Outputs: For connecting to external amplifiers or a subwoofer.
Note: For detailed wiring diagrams, please refer to the separate installation guide or consult a professional installer. Incorrect wiring can cause damage to the unit or vehicle.
6. Operating Instructions
6.1 Front Panel Controls
The MGR3 features intuitive front panel controls for basic functions.
- Power/SEL Button: Press to turn on/off. Rotate to adjust volume. Press to select menu options.
- MODE Button: Cycles through available audio sources (FM, USB, SD, AUX, Bluetooth).
- BAND Button: In FM mode, cycles through radio bands (FM1, FM2, FM3).
- EQ Button: Accesses equalizer settings.
- MUTE Button: Mutes/unmutes audio.
- CH-/CH+ Buttons: Changes radio stations, tracks, or navigates menus.
- Previous/Next Track Buttons: Skips to previous/next track in media playback.
6.2 Remote Control Functions
The included remote control provides full access to all functions.

Figure 6.1: Detailed layout of the remote control buttons and their functions.
- Power on/off control (PWR)
- Mode selector (MOD)
- Mute control (MUTE)
- Pause button (Play/Pause)
- Intro play button (INT)
- Track repeat button (RPT)
- Random play button (ROM)
- Track down button (Previous Track)
- Track up button (Next Track)
- Loud control (LOUD)
- EQ button (EQ)
- Scan control (APS)
- Audio control/function selector (MENU/VOL+/-)
- Volume (VOL+/-)
- Band selector (BAND)
- Auto memory control scan & store (APS SEARCH)
6.3 Bluetooth Operation
- Pairing:
- Turn on the MGR3 and select Bluetooth mode using the MODE button.
- On your Bluetooth-enabled device, search for available devices.
- Select "MGR3" from the list to pair. A confirmation tone will sound upon successful pairing.
- Streaming Audio: Once paired, you can stream audio from your device to the MGR3. Use the MGR3's controls or your device to play, pause, and skip tracks.
6.4 USB/SD Card Playback
- Insert a USB drive or SD card into the designated slot.
- The unit will automatically switch to USB/SD mode and begin playback. If not, press the MODE button to select.
- Use the track buttons to navigate through files.
6.5 AUX Input
- Connect an external audio device (e.g., MP3 player) to the 3.5mm AUX input jack.
- Press the MODE button to select AUX input.
- Control playback from the connected external device.
6.6 FM Radio
- Press the MODE button to select FM radio.
- Use the CH-/CH+ buttons to manually tune to stations.
- Press and hold CH-/CH+ for automatic station seeking.
- Press the BAND button to switch between FM1, FM2, and FM3 bands.
- To save a station, tune to the desired frequency, then press and hold one of the numbered preset buttons on the remote (1-6) until you hear a confirmation beep.
6.7 Equalizer Settings
Press the EQ button on the front panel or remote to cycle through preset equalizer modes such as Rock, Pop, Classical, and Flat.
7. Maintenance
- Cleaning: Use a soft, dry cloth to clean the unit's surface. For stubborn dirt, a slightly damp cloth can be used, followed by a dry cloth. Do not use abrasive cleaners or solvents.
- Water Exposure: While the unit is weatherproof (IPX5), avoid direct high-pressure water jets. Ensure all covers for USB/SD slots are securely closed when not in use, especially in wet conditions.
- Connections: Periodically check all wiring connections for corrosion or looseness, especially in marine environments.
8. Troubleshooting
| Problem | Possible Cause | Solution |
|---|---|---|
| No power | Blown fuse; incorrect wiring; loose power connection. | Check and replace fuse; verify wiring connections; ensure power cable is securely connected. |
| No sound | Volume too low; Mute activated; incorrect input source; speaker wiring issue. | Increase volume; deactivate Mute; select correct input source; check speaker connections. |
| Bluetooth not connecting | Device not in pairing mode; MGR3 not in Bluetooth mode; device too far. | Ensure both devices are in pairing mode; select Bluetooth mode on MGR3; move device closer. |
| USB/SD card not playing | Unsupported file format; corrupted files; card/drive not inserted correctly. | Ensure files are in supported format (e.g., MP3); reformat card/drive; reinsert card/drive firmly. |
| Poor FM reception | Antenna not connected; weak signal; interference. | Check antenna connection; try repositioning antenna; move away from sources of interference. |
9. Specifications
| Model Number | MGR3 |
| Brand | Gravity |
| Output Power | 200 Watts (50W x 4 Channels) |
| Connectivity Technology | Bluetooth, USB, SD, AUX, FM |
| Controller Type | Hand Control (Remote) |
| Special Feature | Built-In Bluetooth, Weatherproof (IPX5), Dustproof, Electronic Anti-Shock |
| Audio Output Mode | Stereo |
| Item Weight | 1.2 Pounds |
| Package Dimensions | 6 x 6 x 6 inches |
10. Warranty and Support
Gravity products are designed and manufactured to the highest quality standards. For warranty information and customer support, please refer to the warranty card included with your product or visit the official Gravity website.
When contacting support, please have your model number (MGR3) and purchase date available.


