1. Introduction
This manual provides essential information for the safe and efficient operation, setup, and maintenance of your CNCZONE RECI 1500W 4-in-1 Laser Machine. This versatile machine is designed for laser welding, cutting, cleaning, and weld seam cleaning applications on various metals including stainless steel, aluminum, and copper.
Please read this manual thoroughly before operating the machine to ensure proper usage and to prevent potential hazards.
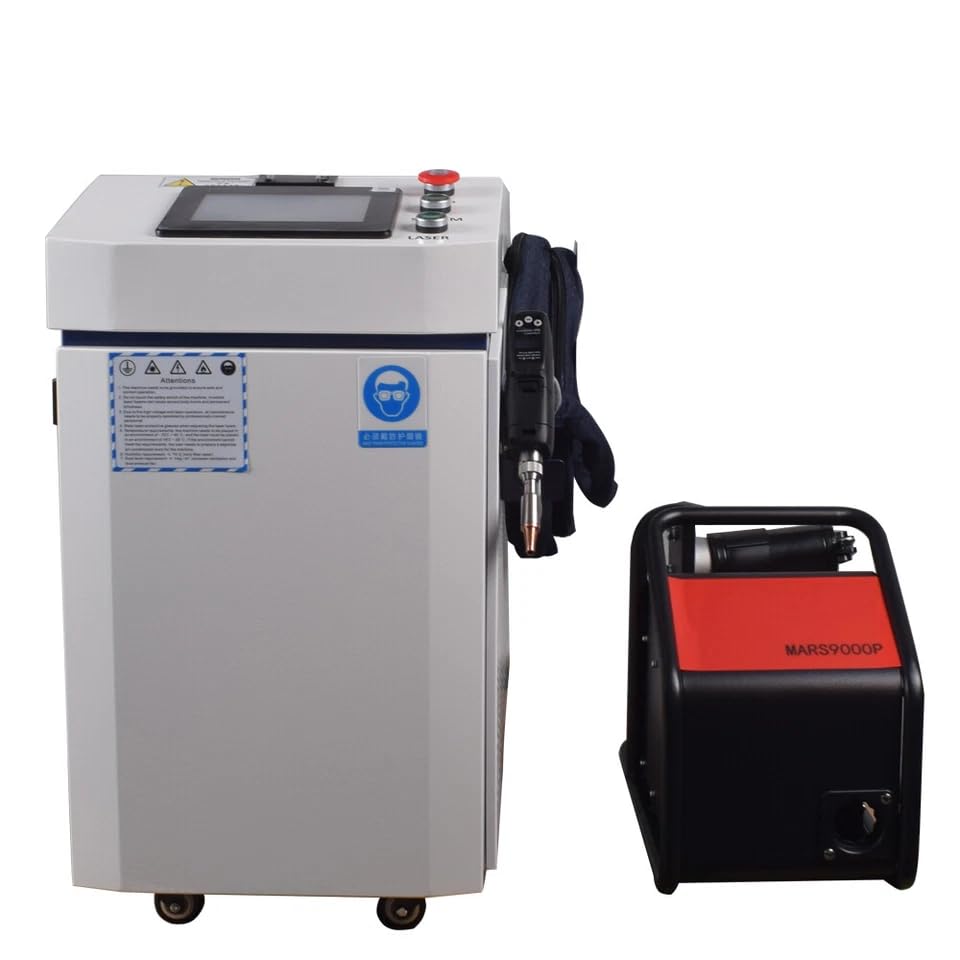
Figure 1.1: Main unit of the CNCZONE RECI 1500W 4-in-1 Laser Machine, showing the integrated design with the handheld laser gun and external wire feeder.
2. Safety Information
Operating a laser machine involves inherent risks. Adhere strictly to all safety guidelines to prevent injury and equipment damage.
2.1 General Safety Precautions
- Always wear appropriate personal protective equipment (PPE), including laser safety glasses (OD7), protective gloves, and a protective mask, during operation.
- Ensure the work area is well-ventilated and free from flammable materials.
- Never look directly into the laser beam or allow it to strike reflective surfaces.
- Ensure proper grounding of the machine using the safe ground wire clamp.
- In case of emergency, immediately press the Emergency Stop switch.
- Do not operate the machine if any components are damaged or malfunctioning.
- Keep unauthorized personnel away from the operating area.
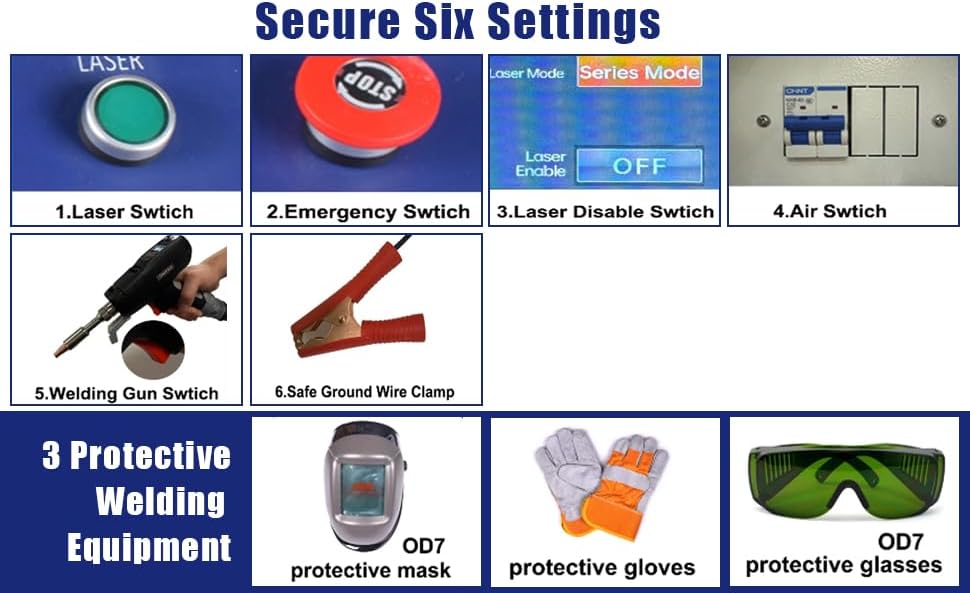
Figure 2.1: Overview of safety controls including Laser Switch, Emergency Stop Switch, Laser Disable Switch, Air Switch, Welding Gun Switch, Safe Ground Wire Clamp, and recommended protective equipment (mask, gloves, glasses).
3. Components Overview
The CNCZONE RECI 1500W Laser Machine consists of several key components:
- Main Unit: Houses the RECI laser source, control panel, and cooling system.
- Handheld Welding Gun (HW980): The primary tool for directing the laser beam, featuring integrated controls and a smart screen.
- Automatic Wire Feeder: Supplies welding wire for welding applications.
- Water Cooler: Essential for maintaining optimal operating temperature of the laser source.
- Control Panel: User interface for machine settings and diagnostics.
- Pressure Reducing Valve: Regulates gas pressure for specific applications.

Figure 3.1: Close-up of the main control panel featuring the Emergency Stop switch, Screen switch, and Laser switch.

Figure 3.2: Internal components showing the Reci Laser Source (FC1500S) and the external pressure reducing valve for gas regulation.

Figure 3.3: The HW980 Handheld Gun, illustrating its components including the welding copper nozzle, protective lens, LED display, parameter adjustment buttons, and various laser welding nozzles for different applications.
4. Setup
Follow these steps for initial setup of your laser machine:
- Unpacking and Inspection: Carefully unpack all components. Inspect for any visible damage during shipping. Report any damage immediately.
- Placement: Position the machine on a stable, level surface in a well-ventilated area, ensuring adequate space for operation and maintenance. The machine is equipped with 360° universal rotation wheels for easy mobility.
- Connect Water Cooler: Connect the water cooler to the main unit according to the provided diagrams (not shown in this manual, refer to specific cooler instructions). Ensure the water tank is filled with appropriate coolant.
- Connect Wire Feeder: Attach the automatic wire feeder to the designated port on the main unit and load the welding wire.
- Connect Handheld Gun: Securely connect the HW980 handheld gun to the main unit.
- Grounding: Connect the safe ground wire clamp to a reliable ground source.
- Power Connection: Connect the machine to a suitable power supply (AC 220V 50/60Hz for FC1500 model). Ensure the power switch is in the OFF position before connecting.
- Initial Checks: Before powering on, double-check all connections and ensure all safety measures are in place.

Figure 4.1: The machine features 360° universal rotation wheels for easy mobility and convenient positioning in the workspace.
5. Operating Instructions
The machine features an intelligent operation system for precise control.
5.1 Powering On and Off
- Power On: Ensure all connections are secure. Turn on the main power switch. The control panel screen will illuminate.
- Laser Activation: Press the 'Laser Switch' button on the control panel to enable the laser.
- Power Off: Press the 'Laser Disable Switch' to turn off the laser. Then, turn off the main power switch. In an emergency, press the 'Emergency Stop Switch'.
5.2 Control Panel and Handheld Gun Functions

Figure 5.1: The Intelligent Operation System's main interface, showing options for setting parameters, controlling the wire feeder, selecting welding modes, and switching between 25 languages.
- Main Interface (HIM): Provides access to all machine settings and operational parameters.
- Parameter Adjustment: Use the control panel or the '+' and '-' buttons on the handheld gun to adjust parameters such as output power, scanning width, wire feed speed, and fixing time.
- Welding Modes: Select between optional spot welding and continuous welding modes as required for your application.
- Wire Feeder Control: The system allows direct control over the wire feeder settings.
- Language Switch: The system supports 25 languages for user convenience.
- Nozzle Selection: Choose the appropriate welding copper nozzle for the specific task. Refer to Figure 3.3 for various nozzle types.
- Switch Button (Handheld Gun): Activates the laser beam during operation.
5.3 Applications
The 4-in-1 functionality allows for:
- Laser Welding: For precise and strong welds on various metals.
- Laser Cutting: Capable of perfect cutting operations.
- Laser Cleaning: Effective for fast rust removal and surface preparation.
- Weld Seam Cleaning: For finishing and cleaning weld seams.

Figure 5.2: The 1500W laser machine performing welding, cutting, and rust removal tasks, highlighting its multi-functional capabilities.
6. Maintenance
Regular maintenance ensures optimal performance and extends the lifespan of your machine.
- Daily Cleaning: Keep the machine exterior, control panel, and handheld gun clean and free from dust and debris.
- Lens Cleaning: Periodically inspect and clean the protective lens and focus lens of the handheld gun. Use only approved cleaning materials to avoid damage.
- Water Cooler Maintenance: Regularly check the coolant level and quality in the water cooler. Replace coolant as recommended by the manufacturer to prevent overheating and ensure efficient cooling.
- Air Filter: Inspect and clean or replace air filters as needed to maintain proper airflow and heat dissipation. The machine features powerful heat dissipation with high rotational speed fans.
- Cable Inspection: Check all cables and connections for wear, damage, or loose fittings.

Figure 6.1: Rear view of the machine, highlighting the powerful heat dissipation system designed for durability and safety.
7. Troubleshooting
This section addresses common issues and their potential solutions. For complex problems, contact customer support.
7.1 Laser Diagnostic Fault Alarm
The intelligent operation system includes a laser diagnostic fault alarm feature. If an alarm message appears on the screen, refer to the specific error code and description for guidance.

Figure 7.1: Example of a laser diagnostic fault alarm message displayed on the control panel, indicating potential issues like communication failure or motor errors.
7.2 Common Issues
- No Laser Output:
- Check if the 'Laser Switch' is ON and 'Laser Disable Switch' is OFF.
- Ensure the Emergency Stop button is not engaged.
- Verify power supply and connections.
- Check for any fault alarms on the control panel.
- Poor Welding/Cutting Quality:
- Adjust laser parameters (power, speed, scanning width).
- Ensure the correct nozzle is used and it is clean.
- Check the focus of the laser.
- Verify material cleanliness and preparation.
- Overheating:
- Check water cooler functionality and coolant levels.
- Ensure adequate ventilation around the machine.
- Clean air filters if clogged.
8. Specifications
Key technical specifications for the RECI Laser Source FC1500 model:

Figure 8.1: Detailed parameters for RECI Laser Source models, including FC1500, FC2000, and FC3000.
| Parameter | FC1500 |
|---|---|
| Output Power | ≥1500W |
| Operating Mode | CW/Modulate |
| Polarization | Random |
| Power Range | 10~100% |
| Central Wavelength | 1080 nm |
| Power Instability | <3% |
| Max. Modulation Frequency | 20 kHz |
| Red Laser Power | >0.5 mW |
| Beam Delivery Optics | QBH |
| Output Fiber Diameter | 30 or 50µm |
| Delivery Fiber Length | 10m |
| Operating Voltage | AC 220V 50/60Hz |
| Power Consumption | <5300W |
| Control Mode | Ext. AD/Loc. AD |
| Dimensions WxHxD(mm) | 483x125x506 |
| Weight | 40kg |
| Ambient Temperature | 5~40°C |
| Ambient Humidity | <70% |
| Cooling Method | Water cooling |
| QBH Cooling Water Temperature | Room temperature (No condensation) |
| Cooling Water Temperature | 25°C (28°C in summer) |
| Current | 22A |
| Cooling Water Flow with load | 15L/MIN |
9. Warranty and Support
Information regarding product warranty and customer support is typically provided with your purchase documentation. Please refer to the warranty card or contact your vendor for details on warranty coverage and technical assistance.


