1. Introduction
The TESmart 8K@60Hz HDMI KVM Switch is designed to allow two computers to share two monitors, a single set of USB keyboard and mouse, and other USB 3.0 peripherals. This device supports high resolutions up to 8K@60Hz and 4K@144Hz, making it ideal for demanding applications such as gaming, graphic design, and video editing. Featuring advanced EDID emulation technology, Gigabit Ethernet, and multiple switching options, it provides a seamless and efficient workspace solution.

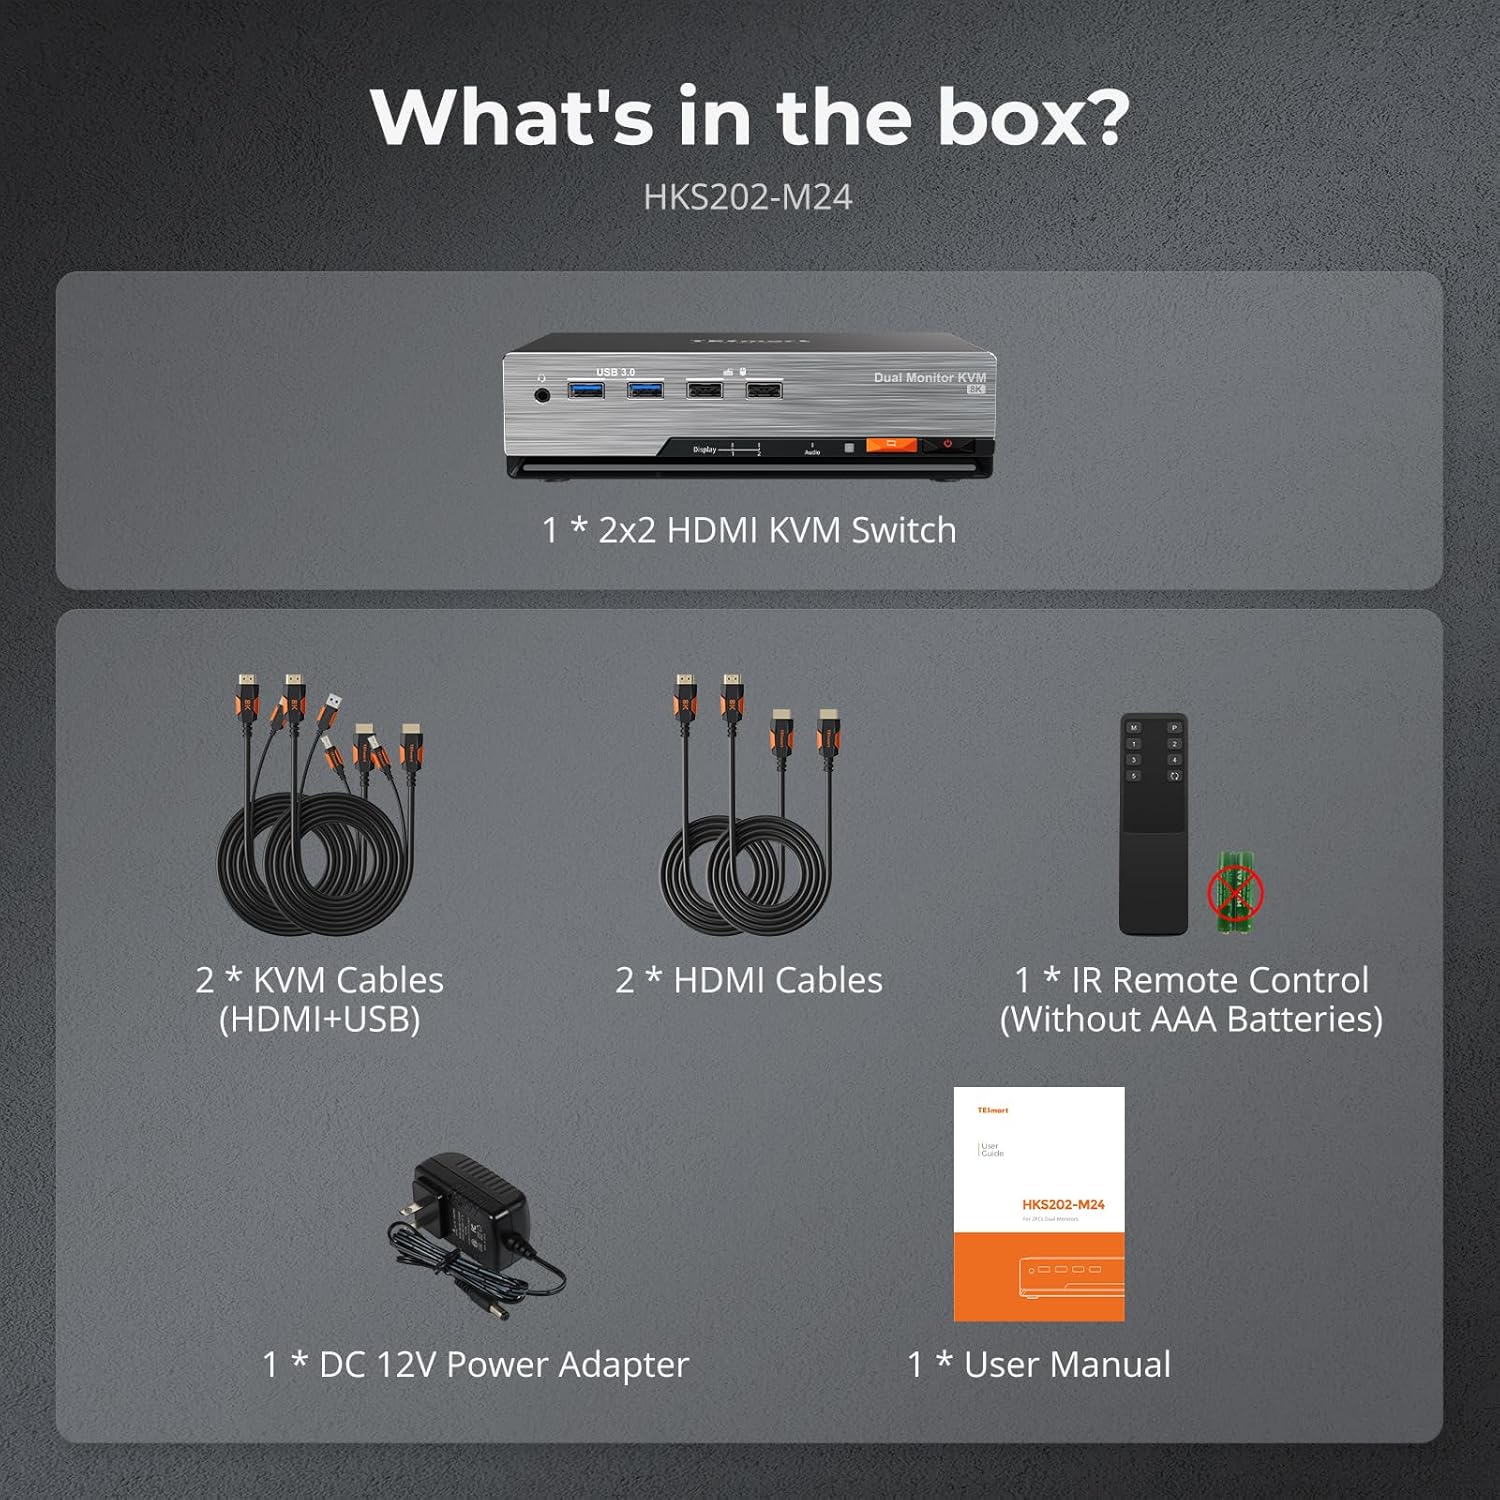
2. What's in the Box
Verify that all items listed below are included in your package:
- 1 x 2x2 HDMI KVM Switch (Model HKS202-M24)
- 2 x KVM Cables (HDMI+USB)
- 2 x HDMI Cables
- 1 x IR Remote Control (AAA batteries not included)
- 1 x DC 12V Power Adapter
- 1 x User Manual
Unboxing Video
This video provides a visual guide to unboxing the TESmart HKS202-M24 KVM Switch and its components.
3. Specifications
| Attribute | Value |
|---|---|
| Product Dimensions | 8 x 5 x 2 inches; 1.9 Pounds |
| Item Model Number | HKS202-M24 |
| Manufacturer | TESmart |
| Operation Mode | ON-OFF |
| Current Rating | 2 Amps |
| Operating Voltage | 12 Volts (DC) |
| Contact Type | Normally Open |
| Connector Type | Plug In |
| Terminal | Solder |
| Item Dimensions L x W x H | 8 x 5 x 2 inches |
| Circuit Type | 2-way |
| Mounting Type | Panel Mount |
4. Setup Guide
Follow these steps to set up your TESmart KVM Switch:
- Power Off Devices: Ensure both computers and monitors are powered off before making any connections.
- Connect Monitors: Connect your two monitors to the KVM Switch's OUTPUT 1 and OUTPUT 2 HDMI ports using the provided HDMI cables.
- Connect Computers (Video): Connect PC 1's two HDMI outputs to the KVM Switch's INPUT 1 and INPUT 2 ports under the 'PC 1' section. Repeat for PC 2, connecting its two HDMI outputs to the KVM Switch's INPUT 1 and INPUT 2 ports under the 'PC 2' section.
- Connect Computers (USB): Connect the USB 3.0 Type-B cables from each computer to the corresponding USB 3.0 Type-B ports on the KVM Switch (labeled 'USB' under PC 1 and PC 2 sections). These connections enable keyboard, mouse, and other USB peripheral sharing.
- Connect USB Peripherals: Plug your USB keyboard, mouse, and any other USB 3.0 devices (e.g., flash drives, printers) into the USB 3.0 ports on the front panel of the KVM Switch.
- Connect Audio: If desired, connect your speakers or headphones to the 3.5mm audio output port and your microphone to the 3.5mm microphone input port on the KVM Switch.
- Connect Network (Optional): For shared Gigabit Ethernet, connect a network cable from your router/modem to the LAN port on the KVM Switch.
- Power On: Connect the DC 12V Power Adapter to the KVM Switch and then plug it into a power outlet. Power on your monitors and then your computers.


5. Operating the KVM Switch
The TESmart KVM Switch offers several convenient methods for switching between connected computers:
- Front Panel Buttons: Press the 'PC1' or 'PC2' button on the front of the KVM Switch to switch to the desired computer.
- Keyboard Hotkeys: Use predefined keyboard hotkey combinations to switch between PCs. Refer to the user manual for specific hotkey sequences.
- IR Remote Control: Use the included IR remote control to switch between computers from a distance.
- Mouse Wheel: Double-click the middle mouse wheel to switch between computers.

EDID Emulation
The KVM Switch features built-in EDID emulators. This technology ensures that your computers always receive correct display information, preventing desktop icon rearrangement, screen flickering, and window clutter issues when switching between sources. Your desktop layout remains consistent.

EDID Emulation Demonstration Video
This video demonstrates how TESmart's EDID emulation technology prevents desktop rearrangement when switching between computers.
6. Key Features
- High Resolution Support: Experience dual 8K@60Hz vision with HDMI 2.1. Backward compatible with 4K@60Hz/120Hz/144Hz. Supports 7680x4320@60Hz 4:4:4 and 3840x2160@144Hz via DSC technology.
- Gaming Optimization: Supports Dynamic HDR (HDR10+, Dolby Vision), Variable Refresh Rate (VRR), Fast Vactive (FVA), and Auto Low Latency Mode (ALLM) for a smoother, more immersive gaming experience with reduced tearing and input lag.
- Gigabit Ethernet: Allows two connected PCs to share a single wired network connection, simplifying cable management.
- USB 3.0 Hub: Expand connectivity with extra USB 3.0 ports for powering phones, tablets, and connecting various peripherals.
- Audio Integration: Integrated microphone and L/R audio output allow independent audio control. Listen to audio from one computer while working on another, with headphones remaining active during switching.
- Pass-Through Mode: Ensures perfect compatibility with various keyboard and mouse types, including mechanical, wireless (with 2.4G receiver), gaming, and multimedia keyboards and mice.


7. Maintenance
To ensure the longevity and optimal performance of your TESmart KVM Switch:
- Cleaning: Use a soft, dry cloth to clean the exterior of the device. Avoid using liquid cleaners or aerosols.
- Ventilation: Ensure the KVM Switch is placed in a well-ventilated area to prevent overheating. Do not block ventilation openings.
- Cable Management: Keep cables organized to prevent strain on ports and accidental disconnections.
- Storage: When not in use for extended periods, store the device in a cool, dry place away from direct sunlight and extreme temperatures.
8. Troubleshooting
If you encounter issues with your KVM Switch, refer to the following common problems and solutions:
- No Display/Incorrect Resolution:
- Ensure all HDMI cables are securely connected to both the KVM Switch and your computers/monitors.
- Verify that the KVM Switch is powered on.
- Check your computer's display settings to ensure the correct resolution and refresh rate are selected.
- The built-in EDID emulation should prevent most display issues. If problems persist, try updating your graphics drivers.
- Keyboard/Mouse Not Responding:
- Ensure the USB 3.0 Type-B cables are securely connected from both computers to the KVM Switch.
- Try connecting the keyboard/mouse to different USB ports on the KVM Switch.
- Some specialized gaming or multimedia keyboards/mice may require direct connection to the computer or specific drivers. The KVM's Pass-Through Mode is designed to maximize compatibility.
- Audio Issues:
- Check audio cable connections.
- Verify audio output settings on your computer.
- Ensure the correct audio source is selected on the KVM Switch (if applicable for independent audio switching).
- Switching Delays:
- While the KVM is designed for fast switching, some monitors may take a moment to re-sync. This is normal behavior.
- Ensure you are using high-quality HDMI 2.1 cables, especially for 8K resolutions.
9. Warranty and Support
TESmart is committed to providing high-quality products and excellent customer service.
- Warranty: Your TESmart KVM Switch comes with a standard 1-year warranty, which can be extended by an additional 2 years for a total of 3 years upon product registration. Please refer to the official TESmart website for details on warranty registration.
- Technical Support: 24/7 technical support is available to assist you with any questions or issues.
For further assistance, please visit the official TESmart website or contact their customer support team through the contact information provided in the included user manual or on their website.


