
1. Introduction
This manual provides comprehensive instructions for the installation, operation, and maintenance of your HUDAMZKY Ebike 40A Sine Wave Controller kit, which includes the 40A sine wave controller, CS866 color display, throttle, and PAS sensor. This system is designed to enhance the performance and control of electric bicycles equipped with 500W, 800W, 1000W, or 1800W brushless DC hub motors.
2. Safety Information
- Always disconnect the battery before performing any installation, maintenance, or wiring adjustments.
- Ensure all connections are secure and properly insulated to prevent short circuits.
- Do not attempt to modify the controller or display. Unauthorized modifications can lead to system failure or injury.
- Operate your e-bike responsibly and in accordance with local regulations.
- Keep the controller and display away from water and extreme temperatures.
3. Package Contents
Verify that all components are present in your package:
- 1x 40A Sine Wave Controller (24V/36V/48V compatible)
- 1x CS866 Color Display
- 1x Adjustable Throttle
- 1x Pedal Assist System (PAS) Sensor

Figure 3.1: Overview of the HUDAMZKY Ebike 40A Sine Wave Controller kit components, including the controller, CS866 color display, throttle, and PAS sensor.
4. Product Overview and Specifications
The 40A sine wave controller features an aluminum housing for efficient heat dissipation and is compatible with both Hall and non-Hall brushless motors. The CS866 color display provides essential riding data and allows for parameter customization.
4.1 Controller Specifications

Figure 4.1: Dimensions of the 40A Sine Wave Controller (212mm x 85mm x 45mm) and key electrical specifications.
- Maximum Current: 40 ± 1A
- Rated Voltage: DC36V-52V
- Rated Power: 2000W
- Rated Current: 20A
- Speed Set: 1-4.2V
- MOSFETs: 15
- Housing: Aluminum for superior heat dissipation
- Compatibility: Hall and non-Hall brushless DC motors
4.2 CS866 Color Display Specifications

Figure 4.2: Dimensions of the CS866 Color Display (80mm x 47.6mm) and its technical specifications.
- Product Type: CS866 Display
- Product Voltage: 24V/36V/48V
- Product Plug: 5Pin+2Pin
- Cable Length: 1650mm (64.96in)
- Holder Diameter: Φ22.2mm (0.87in)
- Characteristic: With light line
- Communication Protocol: UART
4.3 Throttle and PAS Sensor Dimensions
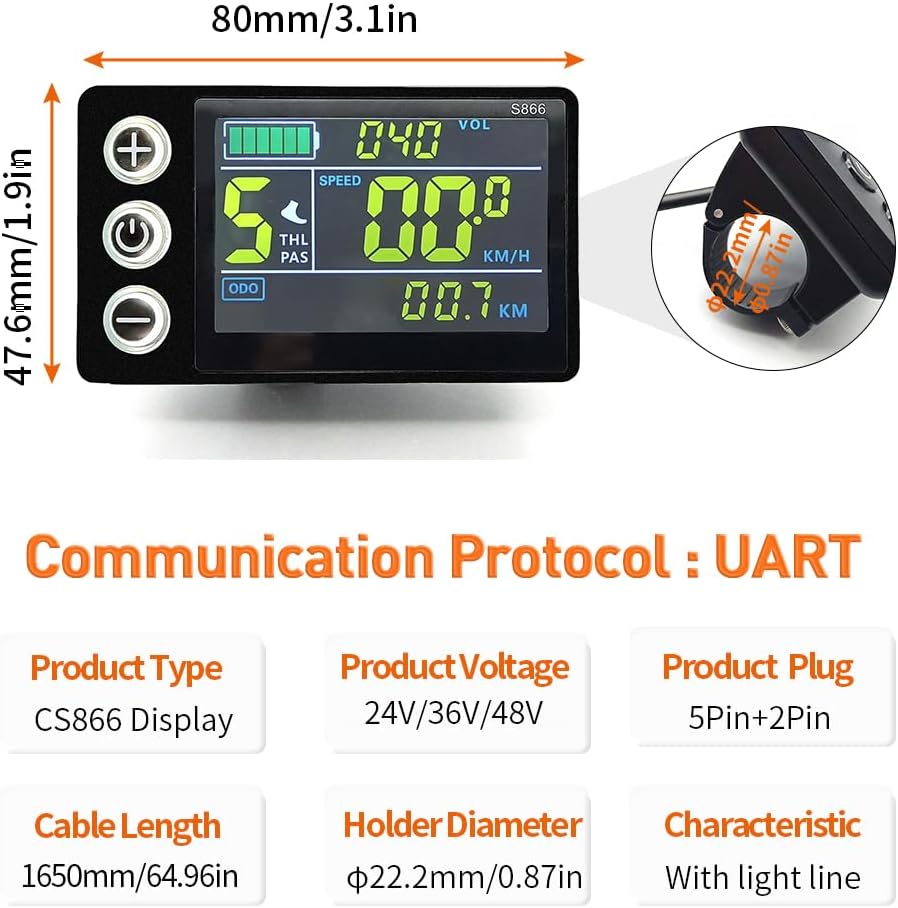
Figure 4.3: Dimensions for the thumb throttle (30mm x 22.7mm) and the BZ-4(8) PAS sensor (65mm diameter).
5. Setup and Installation
5.1 Wiring Diagram
Carefully follow the wiring diagram below to connect the controller to your e-bike components. Ensure each connector is securely fastened.

Figure 5.1: Detailed wiring diagram for the 40A controller, showing connections for Phase Line, Hall Line, Battery, Throttle, PAS, Display, E-Brakes, Tail Light, Limit Line, and Self-study wires.
Connection Details:
- Phase Line: Blue, Green, Yellow (Connect to motor phase wires)
- Hall Line: Blue, Green, Red, Yellow (Connect to motor Hall sensor wires)
- Battery: Black, Red (Connect to e-bike battery, XT60 plug recommended for safety)
- Throttle: Black, White, Red (Connect to throttle unit)
- PAS: Yellow, Black, Brown (Connect to Pedal Assist Sensor)
- Display: Blue, Green, Red, Black (Connect to CS866 display)
- E-Brake: Black, Red (Connect to e-brake levers)
- Light: Black, Red (Connect to e-bike lighting system)
- Self-study: White (Used for motor phase learning)
- Limit Line: Blue (Optional speed limit function)

Figure 5.2: Illustration of the XT60 battery plug for secure connection and the dual-mode controller's learning line for motor direction correction.
The controller features a dual-mode design with a learning line. If the motor rotates in reverse after initial connection, disconnect the two learning lines and reconnect them briefly to correct the motor's rotation direction. Do not keep them connected long-term.
5.2 Component Installation
- Controller: Mount the controller in a secure location on your e-bike, ensuring good airflow for optimal heat dissipation.
- CS866 Display: Attach the display to your handlebars using the provided holder. The holder diameter is Φ22.2mm (0.87in).
- Throttle: Install the throttle on either the left or right side of your handlebars, according to your preference.
- PAS Sensor: Install the PAS sensor on your pedal crank. Ensure it is correctly aligned to detect pedal rotation.
- Motor Phase Learning: After all connections are made, power on the system. The controller will automatically learn the motor phases for seamless integration with both Hall and non-Hall brushless motors.
6. Operating Instructions
6.1 Power On/Off
Press and hold the power button on the CS866 display to turn the system on or off.
6.2 CS866 Display Functions

Figure 6.1: Overview of CS866 display functions, including key entry for mode settings and various customizable parameters.
The CS866 display provides real-time information and allows for customization:
- Information Display: Speed, battery level, total mileage (ODO), trip distance (DST), error codes (ERR), voltage (VOL), current (CUR), wattage (WATT).
- Light Control: Long-press the 'Up' button to turn the e-bike lights on or off. The light circuit provides 0.15A current at battery voltage.
- Throttle and PAS Modes: The system supports both throttle and Pedal Assist System (PAS) modes. You can use either independently or together.
6.3 Programming Parameters (P-Settings)
To enter programming mode, long-press the 'Key Enter Mode Settings' button (usually the 'M' or 'Set' button, or a combination of 'Up' and 'Down' buttons depending on the display version). Navigate through the parameters using the 'Up' and 'Down' buttons and confirm with the 'Set' button.

Figure 6.2: CS866 display wiring for instrument line sequence and light line, crucial for understanding parameter settings.
- P03 (Voltage Selection): Set the correct battery voltage (24V, 36V, or 48V) to ensure accurate battery level display.
- P05 (Assist Levels): Adjust the number of pedal assist levels (e.g., 3, 5, 9 levels).
- P06 (Wheel Diameter): Input the correct wheel diameter in inches for accurate speed and distance readings.
- Other parameters may include Start Mode Setting, Drive Mode Setting, and Power Switch Control. Refer to the display's specific manual or contact support for a full list of P-settings.
7. Maintenance
- Regularly check all electrical connections for tightness and corrosion.
- Keep the controller and display clean and free from dust and debris. Use a soft, dry cloth for cleaning.
- Inspect wiring for any signs of wear or damage. Replace damaged wires immediately.
- Ensure the controller's aluminum housing remains unobstructed to allow for proper heat dissipation.
8. Troubleshooting
- System Not Powering On: Check battery connection, ensure the battery is charged, and verify display wiring.
- Motor Not Responding: Check motor phase and Hall sensor connections. Perform motor phase learning if necessary. Verify throttle and PAS sensor connections.
- Inaccurate Speed/Distance: Ensure the correct wheel diameter (P06) is set in the display parameters.
- Display Error Codes: Refer to the CS866 display's specific manual for interpretation of error codes. Common issues include sensor malfunctions or communication errors.
- Motor Reverses Direction: Briefly connect and then disconnect the 'Self-study' wires to correct motor rotation.
If you encounter persistent issues, consult a qualified e-bike technician or contact customer support.
9. Warranty and Support
Warranty information for this product is typically provided by the seller at the time of purchase. Please retain your proof of purchase for any warranty claims.
For technical support, troubleshooting assistance beyond this manual, or warranty inquiries, please contact the seller or manufacturer directly. Provide your product model number (40A and CS866) and a detailed description of the issue.