1. Introduction
This manual provides detailed instructions for the installation, operation, and maintenance of your WELLFOR Dual Heads Shower Faucet System, Model 88059. Please read this manual thoroughly before installation and use to ensure proper function and longevity of the product. This system features a dual-head design with a 7-spray function, a 3-way diverter, and a metal tub spout, all controlled by a pressure-balanced brass valve.
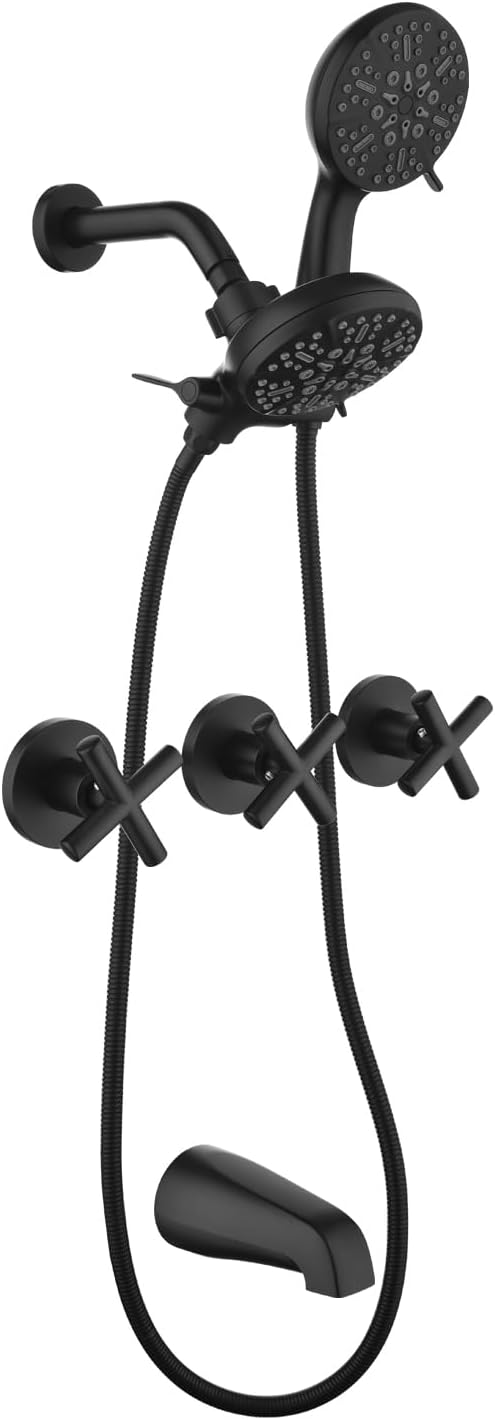
Image 1.1: Overview of the WELLFOR Dual Heads Shower Faucet System in Matte Black.
2. Product Features
- Durable Brass Valve: Constructed with a SUS304 brass body and valve core for long-term performance and durability. Includes a handheld shower and a solid metal tub spout.
- 3-Way Diverter: Allows seamless switching between the main shower head, handheld shower, and tub spout for a customized water flow experience.
- 7-Spray Function: Both shower heads feature 7 versatile spray settings, crafted from durable ABS material, to provide a personalized shower experience.
- High-Quality Valve Trim Kit: Intuitive design with separate handles for hot and cold water, and a central switch for mode selection, ensuring precise temperature control.
- Extra Long Stainless Steel Hose: Features a 59-inch stainless steel hose for flexibility and extended reach with the handheld shower.
3. Package Contents
Verify that all components are present and undamaged before beginning installation. The package typically includes the following items:
- Main Shower Head
- Handheld Shower Head
- Shower Arm
- 3-Way Diverter
- Valve Trim Kit (Hot/Cold handles, Mode switch)
- Pressure-Balanced Brass Valve Body
- Metal Tub Spout
- 59-inch Stainless Steel Hose
- Mounting Hardware and Seals

Image 3.1: Visual representation of the components included in the package.
4. Setup and Installation
Installation of this shower system is designed for wall-mount applications. It is recommended that installation be performed by a qualified professional to ensure proper function and compliance with local plumbing codes. Ensure the main water supply is turned off before beginning any installation work.
4.1. Pre-Installation Checks
- Confirm all package contents are present.
- Review local plumbing codes and ensure necessary tools are available.
- Ensure wall structure can support the fixture.
4.2. Dimensional Drawing
Refer to the dimensional drawing for precise measurements and rough-in specifications required for installation.
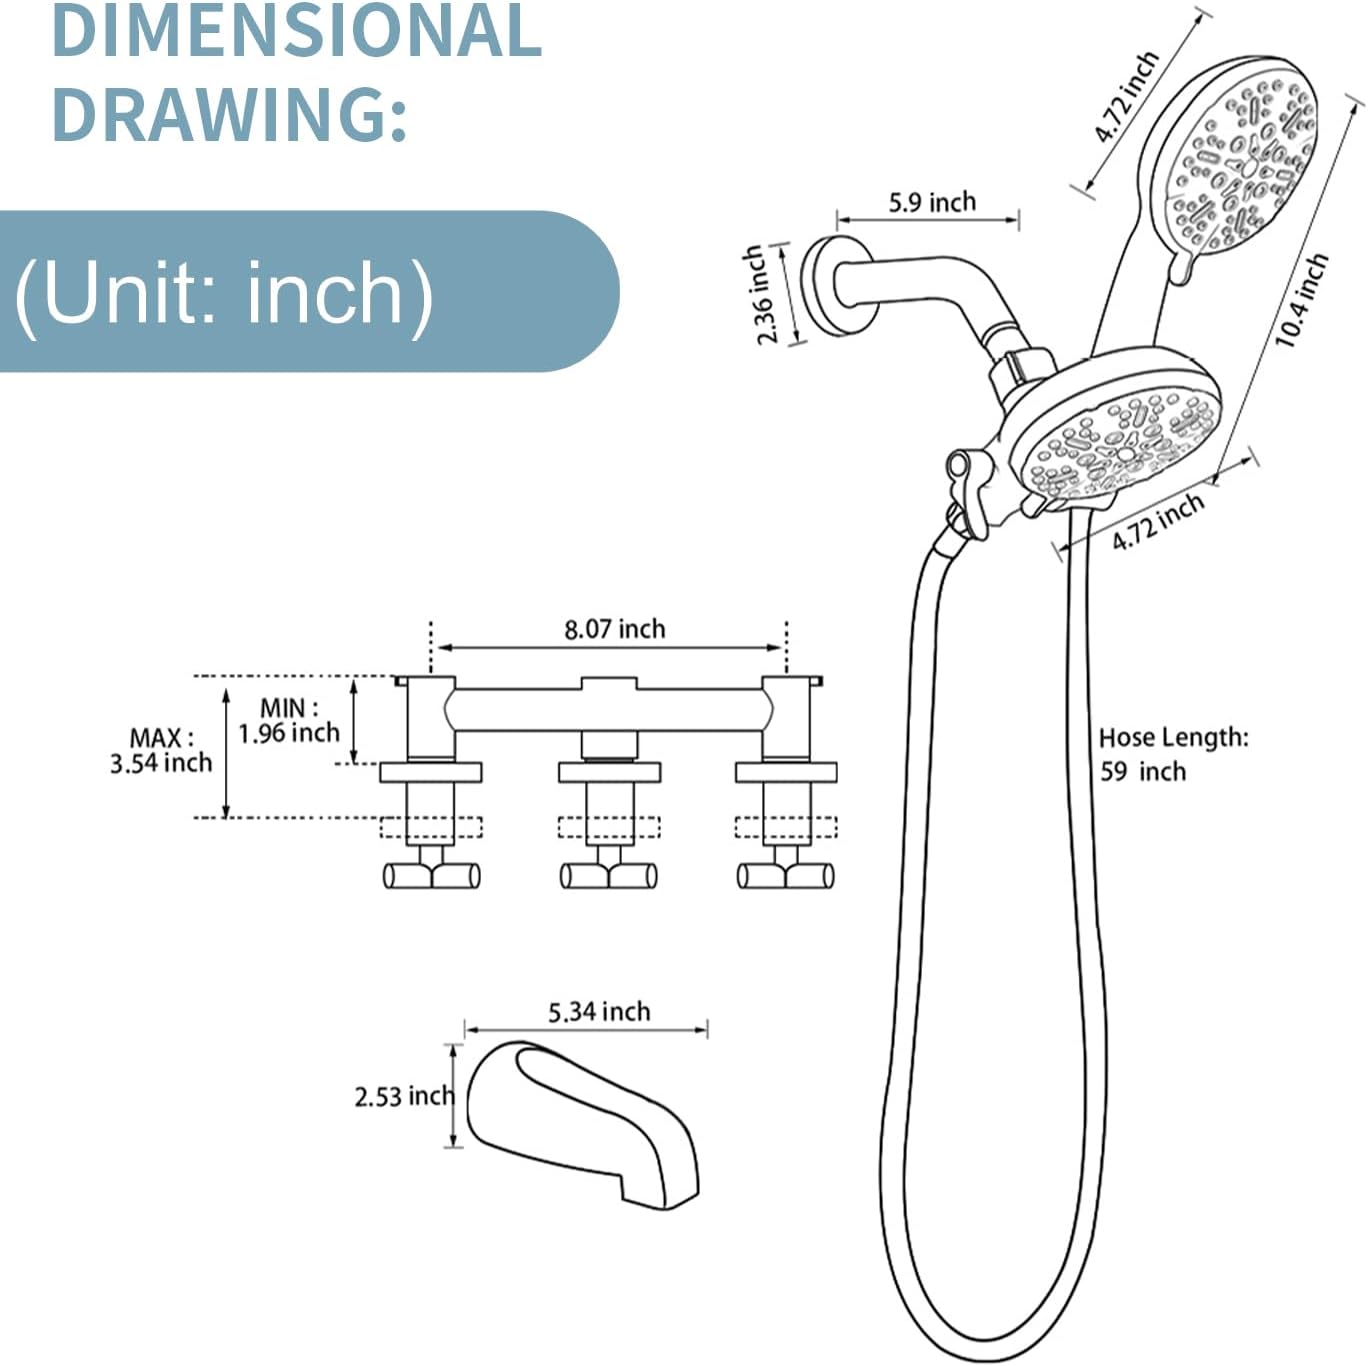
Image 4.1: Dimensional drawing showing key measurements for installation, including hose length (59 inches) and shower head dimensions.
4.3. Valve Installation
Install the pressure-balanced brass valve body into the wall according to the dimensional drawing and local plumbing codes. Ensure secure connections for hot and cold water lines.

Image 4.2: The high-quality valve trim kit and the brass valve body before and after installation.
4.4. Component Assembly
- Attach the shower arm to the wall outlet.
- Connect the main shower head to the shower arm.
- Install the tub spout onto its designated outlet.
- Connect the 59-inch stainless steel hose to the handheld shower head and the diverter outlet.
- Install the trim plate and handles onto the valve body.
5. Operating Instructions
The WELLFOR Dual Heads Shower Faucet System is designed for intuitive operation, allowing you to customize your shower experience.
5.1. Water Flow and Temperature Control
- The left handle controls the hot water flow.
- The right handle controls the cold water flow.
- Adjust both handles to achieve your desired water temperature and flow intensity.
5.2. 3-Way Diverter Function
The central switch on the valve trim kit acts as a 3-way diverter, allowing you to select the water output source.
- Rotate the central switch to direct water to the main shower head.
- Rotate the central switch to direct water to the handheld shower head.
- Rotate the central switch to direct water to the tub spout.
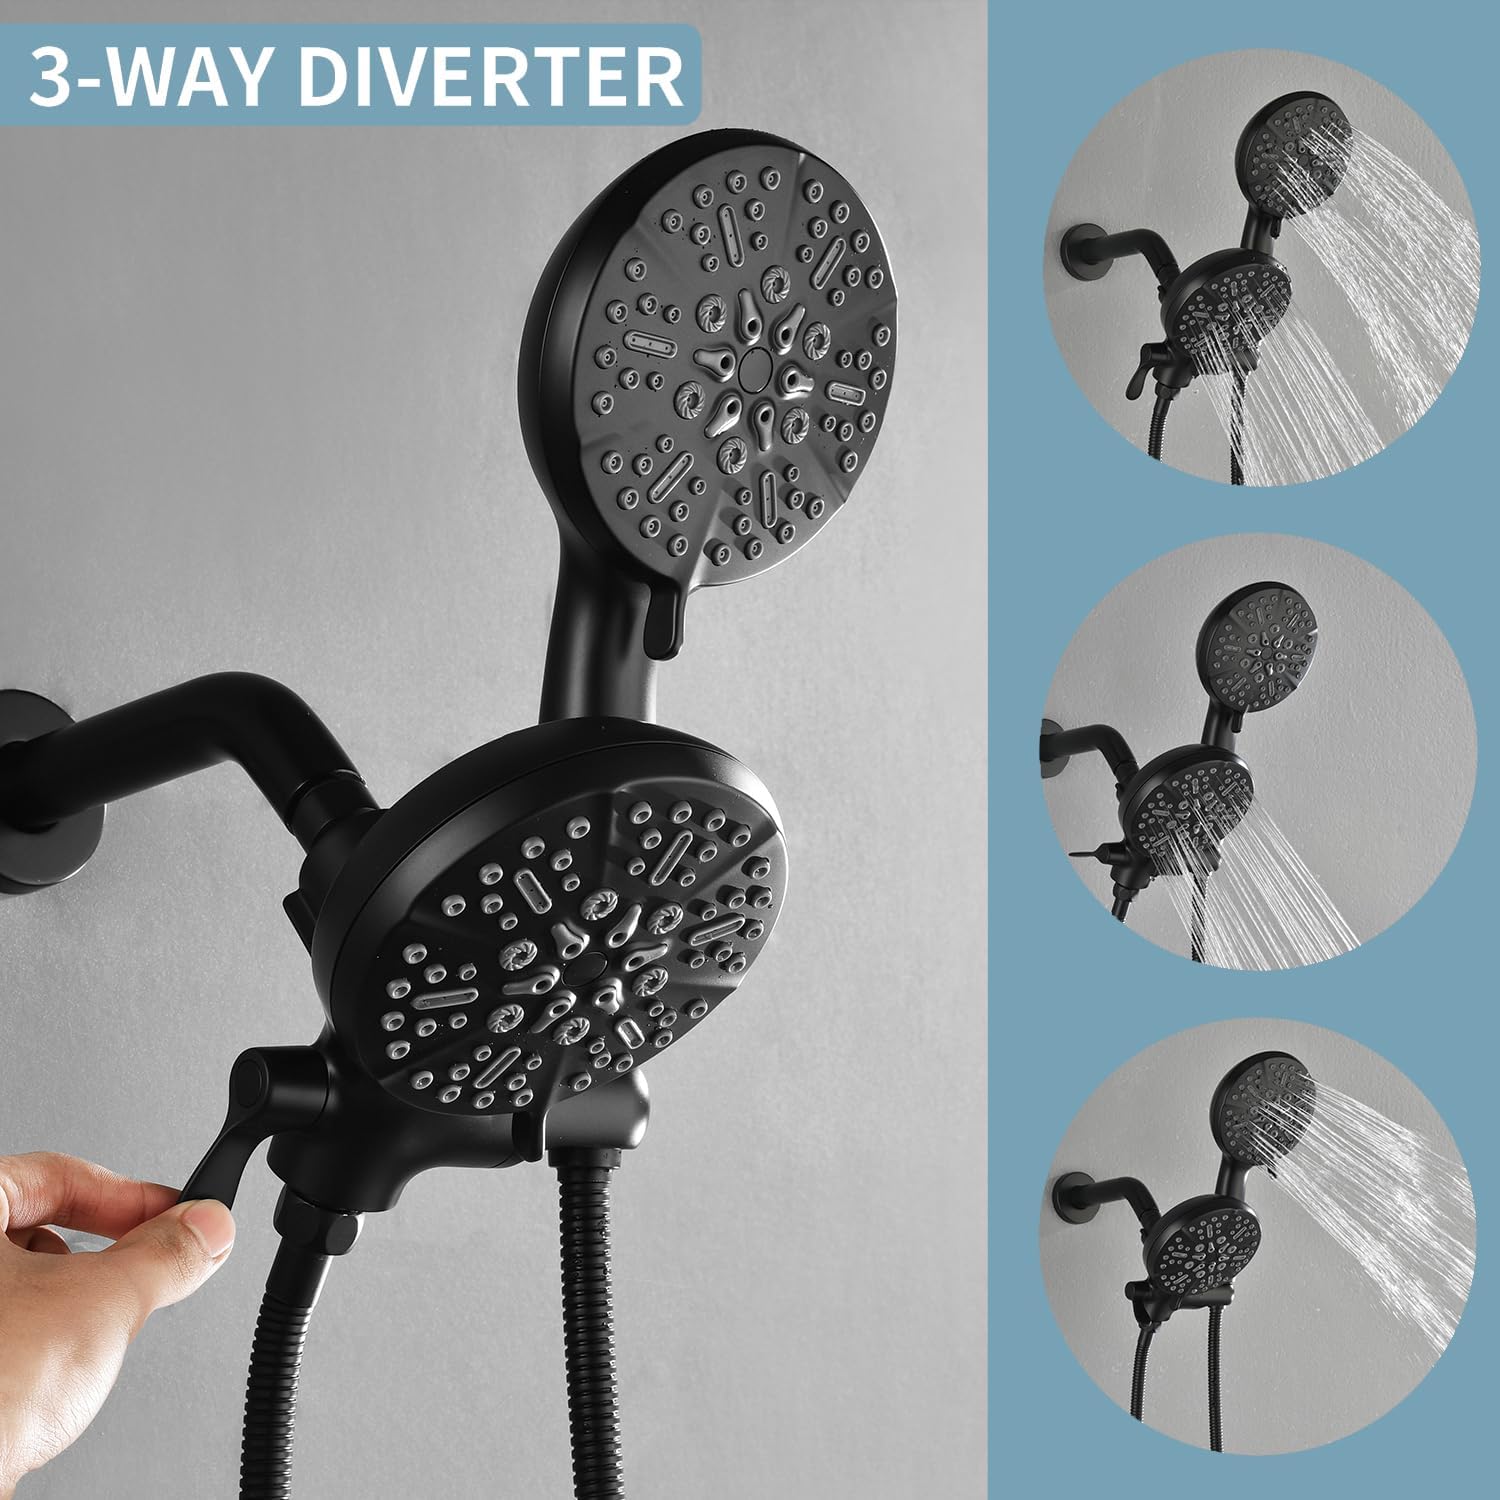
Image 5.1: The 3-way diverter in action, illustrating how water can be directed to the main shower head, handheld shower, or tub spout.
5.3. 7-Spray Function
Both the main and handheld shower heads offer 7 distinct spray patterns. To change the spray pattern, rotate the outer ring on the shower head face until the desired pattern is selected.
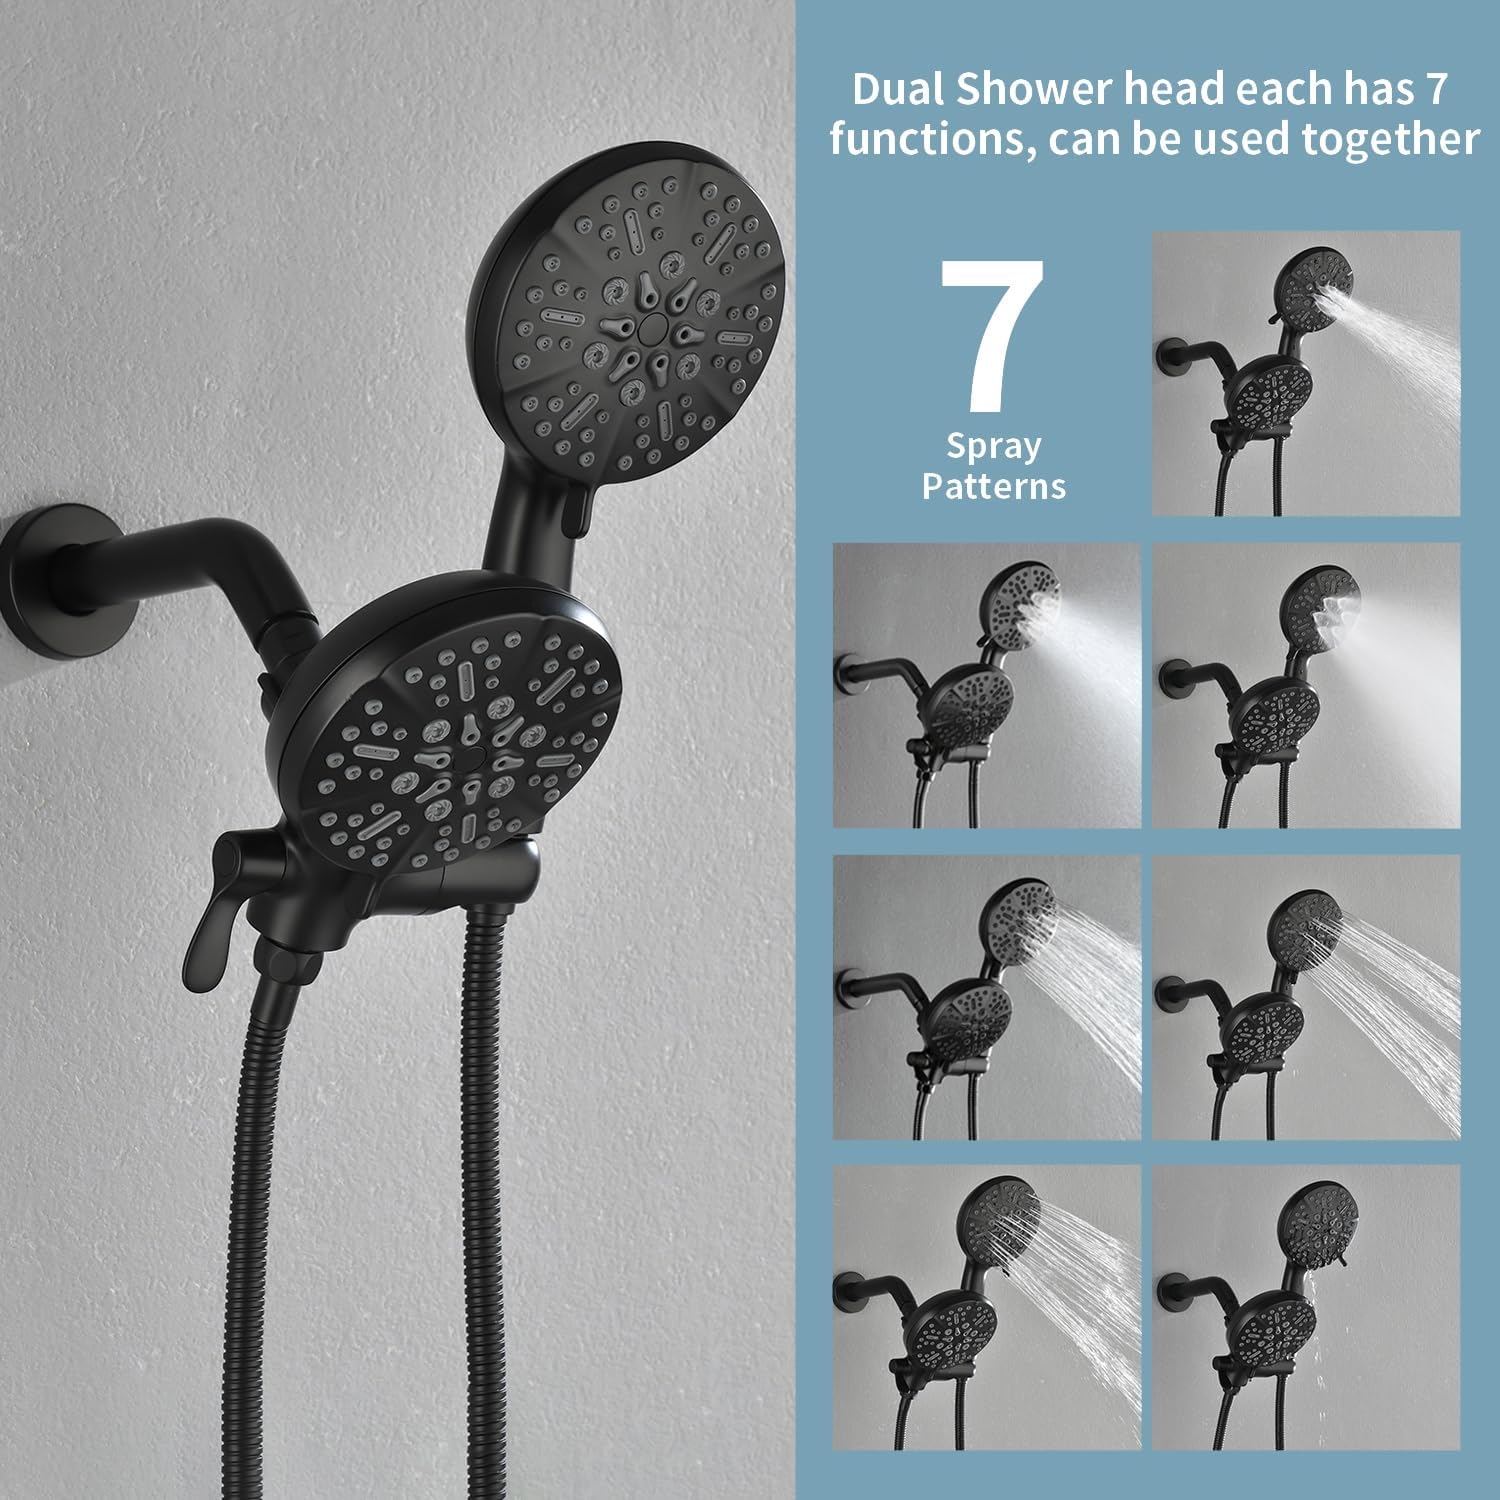
Image 5.2: Illustration of the 7 distinct spray patterns available on each shower head.
5.4. Tub Spout Operation
When the diverter is set to the tub spout, water will flow from the metal tub spout. This is ideal for filling a bathtub.

Image 5.3: The metal tub spout delivering water.
6. Maintenance
Regular cleaning and maintenance will help preserve the finish and functionality of your WELLFOR shower system.
- Cleaning the Finish: Use a soft cloth and mild soap or a non-abrasive cleaner specifically designed for bathroom fixtures. Avoid abrasive cleaners, harsh chemicals, or scouring pads, as these can damage the matte black finish.
- Cleaning Shower Head Nozzles: Over time, mineral deposits can build up in the shower head nozzles. Gently rub the rubber nozzles with your finger or a soft brush to dislodge any deposits. For stubborn buildup, a solution of white vinegar and water can be used.
- Hose Care: Periodically wipe down the stainless steel hose to prevent dirt and grime buildup.
- Leak Checks: Regularly inspect all connections for any signs of leaks. Tighten connections as needed, but do not overtighten.
7. Troubleshooting
This section addresses common issues you might encounter with your shower system. For problems not listed here, please contact customer support.
| Problem | Possible Cause | Solution |
|---|---|---|
| Low Water Pressure | Clogged shower head nozzles; partially closed shut-off valve; low household water pressure. | Clean shower head nozzles. Ensure shut-off valves are fully open. Consult a plumber if household pressure is consistently low. |
| Water Leaks from Connections | Loose connections; worn out seals/gaskets; improper installation. | Tighten connections (do not overtighten). Replace worn seals or gaskets. Re-evaluate installation steps. |
| Difficulty Changing Spray Patterns | Mineral buildup in the spray selector mechanism. | Clean the shower head face and rotate the selector ring firmly. Soaking in a vinegar solution may help. |
| Diverter Not Switching Properly | Internal debris or wear in the diverter mechanism. | Flush the system. If the issue persists, the diverter cartridge may need inspection or replacement by a professional. |
8. Specifications
| Brand | WELLFOR |
| Model Number | 88059 |
| Color | Matte Black |
| Material | Acrylonitrile Butadiene Styrene (ABS), Brass, Stainless Steel |
| Finish Type | Brushed |
| Number of Handles | 3 |
| Handle Material | Stainless Steel |
| Item Weight | 7 Pounds (approximately 3.17 kg) |
| Mounting Type | Wall Mount |
| Product Dimensions | 4.72 x 4.72 x 59 inches (approximate, refers to overall system components) |
| UPC | 769047274507 |
9. Warranty and Support
For warranty information or technical support, please contact WELLFOR customer service. Keep your purchase receipt as proof of purchase for any warranty claims.
Contact information can typically be found on the WELLFOR official website or through your retailer.


