1. Introduction
Thank you for choosing the Veeconn Dog Clippers Grooming Kit. This manual provides essential information for the safe and effective use, maintenance, and troubleshooting of your pet grooming clippers. Please read this manual thoroughly before first use and retain it for future reference.
2. Safety Instructions
- Always keep the appliance dry. Do not use near water or in wet conditions.
- Do not disassemble the product. For repairs, contact customer support.
- Keep out of reach of children and pets when not in use.
- Ensure the pet's coat is clean and dry before grooming to prevent blade damage and ensure efficient cutting.
- Do not use the clipper on irritated or wounded skin.
- Unplug the clipper before cleaning or performing maintenance.
- Use only the provided charging cable and accessories.
- If the clipper makes unusual noises, overheats, or emits smoke, discontinue use immediately and contact customer support.
3. Package Contents
Please check the package contents upon receipt. If any items are missing or damaged, contact customer support.
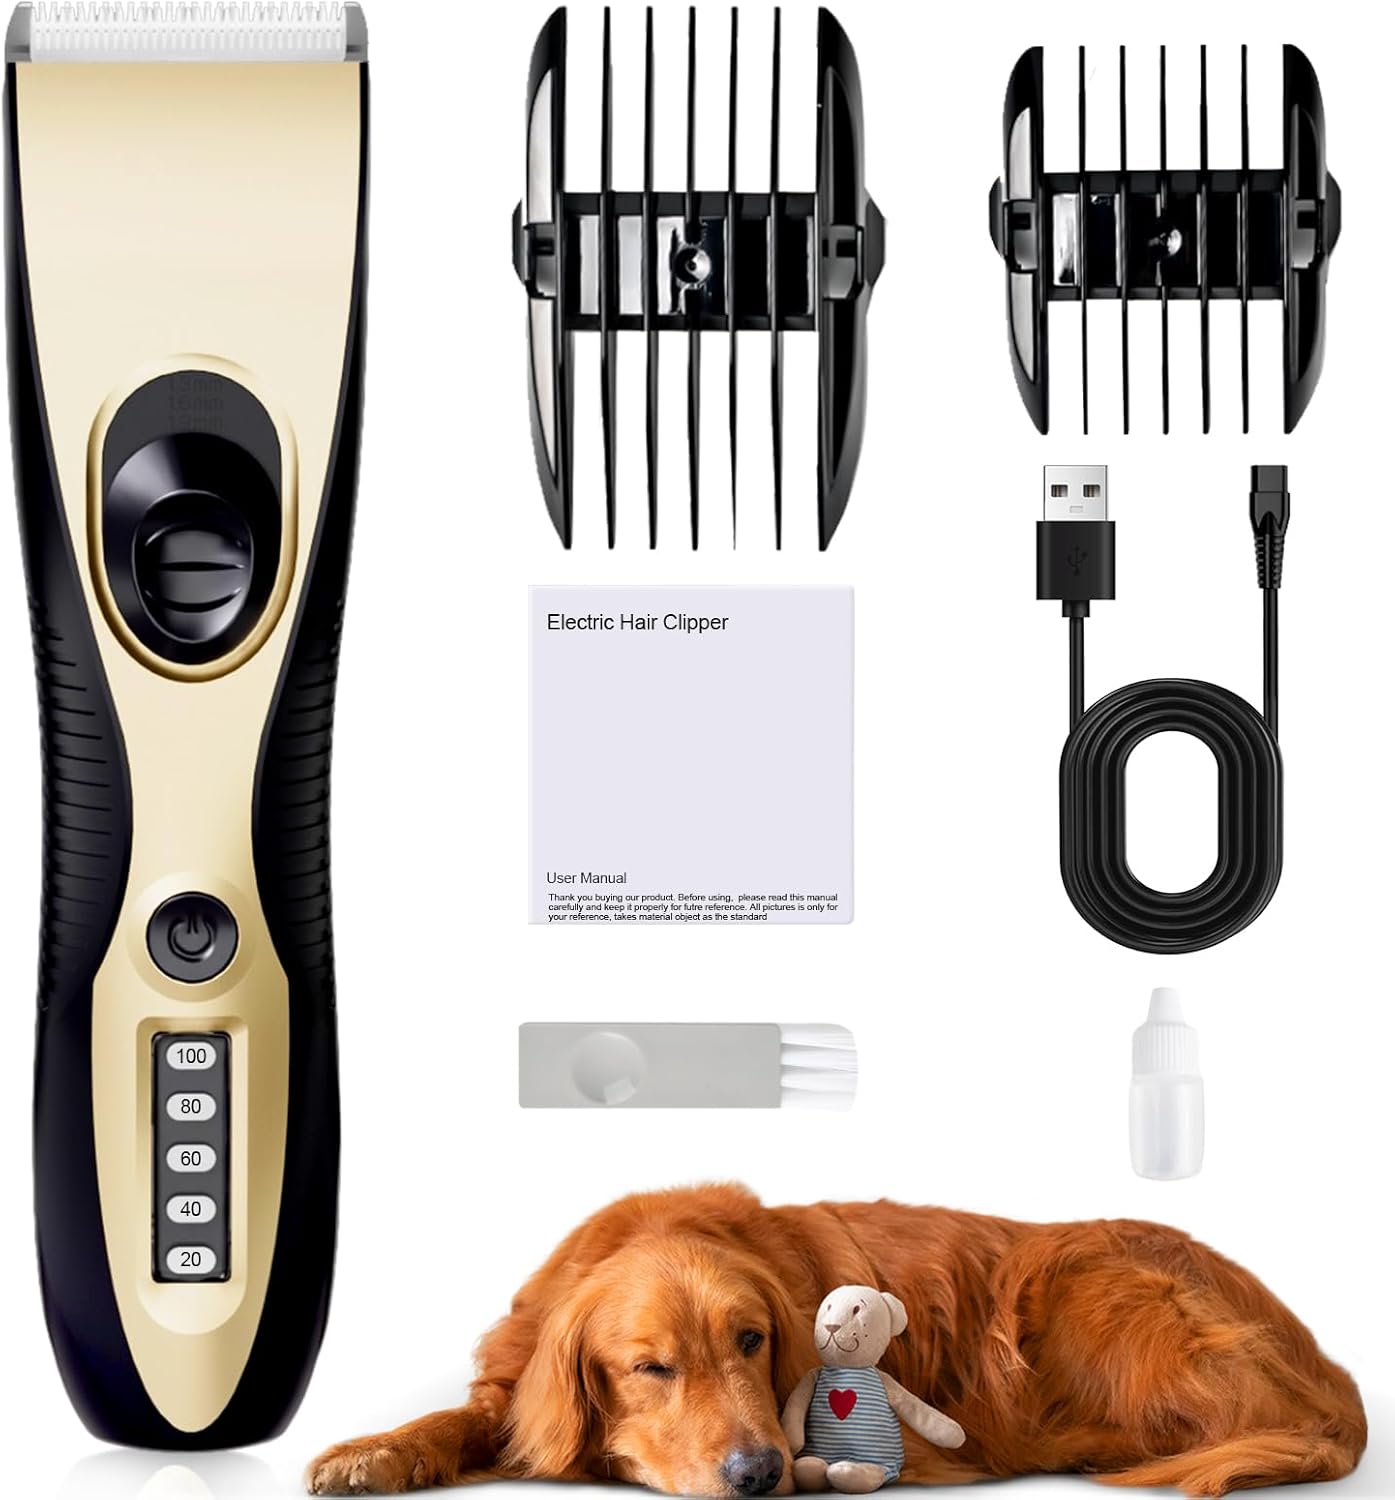
Image: The complete Veeconn Dog Clippers Grooming Kit, including the clipper, two guide combs, USB charging cable, cleaning brush, lubricating oil, and user manual.
- 1 x Dog Clipper Unit
- 2 x Guide Combs (providing 4 adjustable sizes: 3mm, 6mm, 9mm, 12mm)
- 1 x USB Charging Cable
- 1 x Cleaning Brush
- 1 x Lubricating Oil Bottle
- 1 x User Manual (paper version)
4. Product Overview
The Veeconn Dog Clippers are designed for efficient and comfortable pet grooming, featuring a low-noise motor and durable blades.
4.1 Low Noise & Low Vibration

Image: A diagram illustrating the low noise output of the clipper (49dB) compared to other common sounds, designed to keep pets calm during grooming.
Equipped with a superior motor and whisper-quiet technology, these clippers operate with minimal noise and vibration (approximately 49dB), reducing stress for pets during grooming sessions.
4.2 Safe & Durable Blade

Image: A close-up view of the clipper's ceramic and stainless steel blade, highlighting its safe design, alongside a comparison showing a less safe blade.
The clipper features an upgraded stainless steel fixed blade and a ceramic moving blade, providing excellent cutting performance while being gentle on your pet's skin. The blades are sharp and designed for long-term use, and are detachable for easy cleaning and replacement.
4.3 Cordless & Charging Use

Image: Two panels demonstrating the flexibility of the clipper, showing it in use wirelessly and also while connected to a charging cable.
The cordless design allows for unrestricted movement during grooming. It can also be used while charging, providing flexibility for longer grooming sessions.
4.4 Powerful Motor
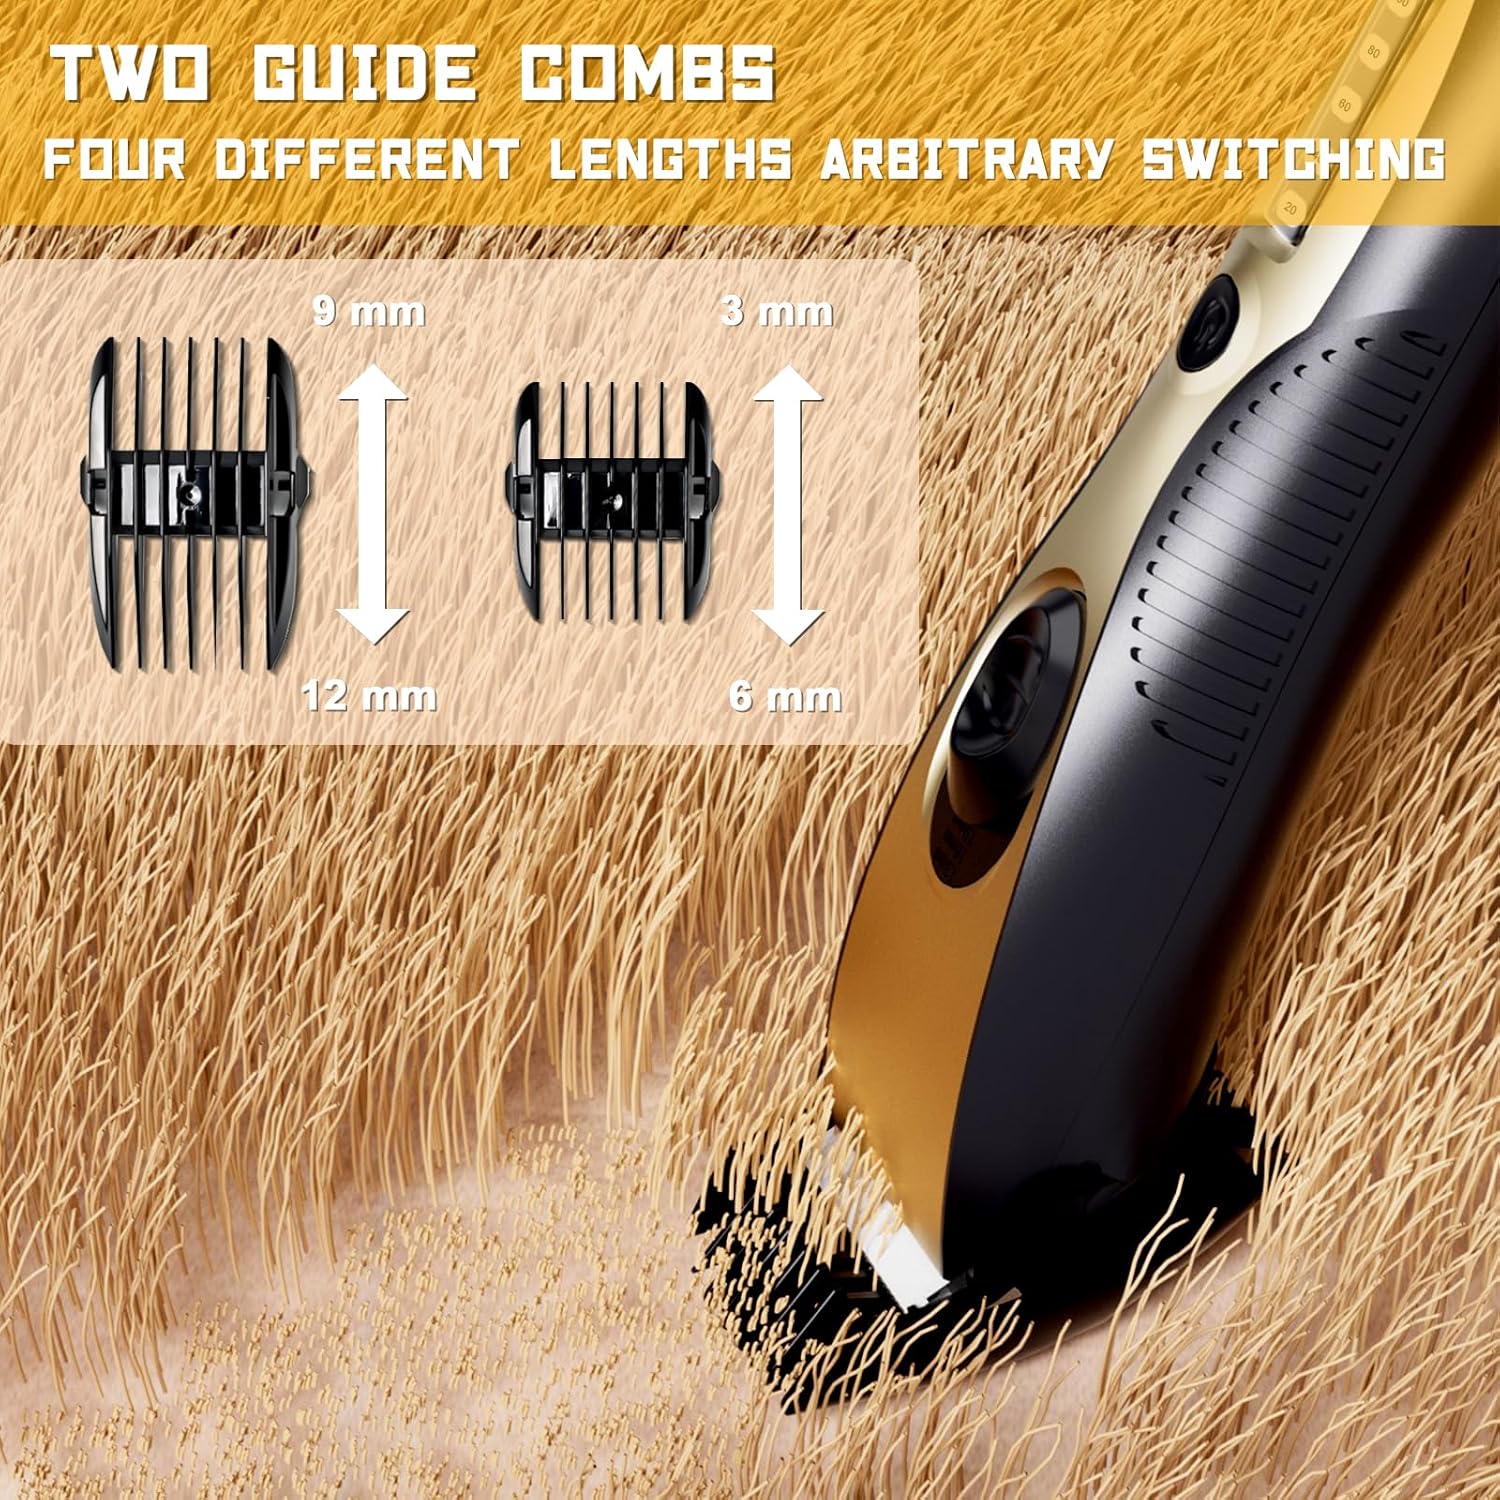
Image: An X-ray view of the clipper highlighting its powerful 7000 RPM motor, designed to prevent hair jamming.
A powerful 7000 RPM motor ensures efficient cutting and helps prevent hair from jamming, making grooming smoother even for thick coats.
4.5 Adjustable Guide Combs

Image: A detailed view of the clipper with two guide combs, indicating four different length settings (3mm, 6mm, 9mm, 12mm) for varied grooming styles.
The kit includes two guide combs that offer four adjustable trimming lengths (3mm, 6mm, 9mm, 12mm), allowing you to achieve your desired hair length for your pet.
4.6 USB Portable Charging

Image: The clipper being charged via a USB cable connected to a power bank, illustrating its portable charging capability. It shows a 2-hour charge time for 120 minutes of run time.
The clipper features USB portable charging, allowing you to charge it conveniently anywhere. A full charge takes approximately 2 hours and provides up to 120 minutes of continuous use.
5. Setup
5.1 Charging the Clipper
- Connect the USB charging cable to the charging port on the clipper.
- Plug the other end of the USB cable into a compatible USB power adapter (not included), computer, or power bank.
- The indicator lights on the clipper will show the charging status. A full charge typically takes 2 hours.
- Disconnect the charger once fully charged to preserve battery life.
5.2 Attaching/Detaching Guide Combs
- To Attach: Align the guide comb with the clipper blade and slide it on until it clicks securely into place.
- To Detach: Gently push the comb upwards from the base of the blade until it slides off.
5.3 Blade Installation/Removal
- To Remove: With the clipper turned off, push the blade unit upwards with your thumb until it detaches from the clipper body.
- To Install: Align the blade unit with the slot on the clipper body and press down firmly until it clicks into place. Ensure it is securely fastened before use.
6. Operating Instructions
6.1 Preparing Your Pet
- Bathe and dry your pet thoroughly before grooming.
- Brush your pet's coat to remove any tangles or mats. This helps prevent the blades from pulling hair and ensures a smooth cut.
- Ensure your pet is calm and comfortable. Introduce the clipper slowly, allowing them to get used to the sound and vibration.
6.2 Grooming Process
- Select the appropriate guide comb for the desired hair length and attach it securely to the clipper.
- Turn on the clipper by pressing the power button.
- Hold the clipper firmly and move it in the direction of hair growth.
- Use long, even strokes. Avoid pressing too hard against the pet's skin.
- Regularly clear accumulated hair from the blade and comb during grooming to maintain cutting efficiency.
- Pay extra attention to sensitive areas such as around the ears, eyes, and paws.
- After grooming, turn off the clipper and clean it as described in the Maintenance section.
6.3 Tips for Best Results
- Always groom a clean, dry, and detangled coat.
- Take breaks if your pet becomes anxious.
- Use a lower comb setting for shorter cuts and a higher setting for longer styles.
- Keep the blades lubricated for optimal performance and longevity.
7. Maintenance and Cleaning
Proper maintenance ensures the longevity and performance of your clippers.
7.1 Cleaning the Blades
- Turn off the clipper and detach the blade unit.
- Use the provided cleaning brush to remove any hair trapped between the blades.
- For a more thorough clean, the blades can be rinsed under running water. Ensure the clipper body remains dry.
- Allow the blades to air dry completely before reattaching or lubricating.
7.2 Lubricating the Blades
After each cleaning or extended use, apply a drop of the provided lubricating oil between the blades. This reduces friction, prevents overheating, and maintains cutting efficiency. Do not use other oils.
7.3 Storage
Store the clipper in a cool, dry place, away from direct sunlight and moisture. Ensure the blades are clean and oiled before storage.
8. Troubleshooting
| Problem | Possible Cause | Solution |
|---|---|---|
| Clipper does not turn on. | Battery is depleted. | Charge the clipper for at least 2 hours. |
| Poor cutting performance / Pulling hair. | Blades are dull, dirty, or not lubricated. Hair is matted. | Clean and lubricate the blades. Ensure pet's coat is clean and detangled. Replace blades if dull. |
| Clipper overheats. | Blades are not lubricated or are clogged with hair. Extended continuous use. | Clean and lubricate blades. Take short breaks during long grooming sessions. |
| Clipper makes unusual noise. | Blades are not properly installed or are damaged. | Check blade installation. If noise persists or blades are damaged, contact customer support. |
9. Specifications
| Feature | Detail |
|---|---|
| Model Number | T4 |
| Product Dimensions | 7.87 x 5.7 x 2.2 inches |
| Item Weight | 12.63 ounces |
| Brand | Veeconn |
| Power Source | Electric (Rechargeable via USB) |
| Material | Plastic, Stainless Steel, Ceramic |
| Charging Time | Approx. 2 hours |
| Run Time | Approx. 120 minutes |
| Noise Level | Low Noise (approx. 49dB) |
| Motor Speed | 7000 RPM |
10. Customer Support
For any questions, concerns, or assistance with your Veeconn Dog Clippers Grooming Kit, please contact our customer service team. We offer 24-hour customer support to ensure your satisfaction.

Image: A visual representation of available 24-hour customer service.
Please refer to the contact information provided on the product packaging or the official Veeconn website for the most up-to-date support channels.


