Introduction
Thank you for choosing the dé 3.7kW Electric Car Charger. This portable Type 2 charging cable is designed to provide efficient and reliable charging for your electric vehicle. This manual provides essential information on the product's features, setup, operation, maintenance, and troubleshooting to ensure safe and optimal use.

Image: Overview banner of the dé Electric Car Charger, highlighting its 3.7kW power and 7m cable length, along with current ratings and scheduled charging duration.
Safety Instructions
Please read and understand all safety instructions before using the charger. Failure to follow these instructions may result in electric shock, fire, or serious injury.
- Ensure the charging cable and connectors are free from damage before each use. Do not use if any part is damaged.
- Connect the charger only to a properly grounded Schuko socket that meets local electrical standards.
- Do not immerse the control box or connectors in water or other liquids.
- Avoid placing the control box in direct sunlight or near heat sources during charging to prevent overheating.
- Do not attempt to open, disassemble, or modify the charger. Refer all servicing to qualified personnel.
- Keep children and pets away from the charging area during operation.
- Always disconnect the charger from the vehicle and power outlet when not in use.
- Verify the current capacity of your electrical outlet before setting the charging current. For non-dedicated outlets, select 6A/8A/10A (max 2.3kW). For dedicated outlets, select 13A/16A (max 3.7kW).

Image: Diagram illustrating safety considerations for electrical outlets, showing that a dedicated outlet supports up to 16A (3.7kW) while a non-dedicated outlet supports up to 10A (2.3kW).
Package Contents
Upon unpacking, please ensure all items listed below are present and undamaged:
- 1 x dé 3.7 kW Electric Vehicle Charger (Mode 2)
- 1 x Waterproof Cover
- 1 x Carrying Handle
- 1 x Microfiber Cloth
- 1 x Carrying Case
- 1 x Plug Holder (Wall Mount)

Image: Visual representation of the package contents, including the EV charger, plug holder, waterproof cover, carrying handle, microfiber cloth, and carrying case.
Product Overview
The dé 3.7kW Electric Car Charger features a robust design for portable use, offering adjustable current settings and a digital LCD for real-time charging information.
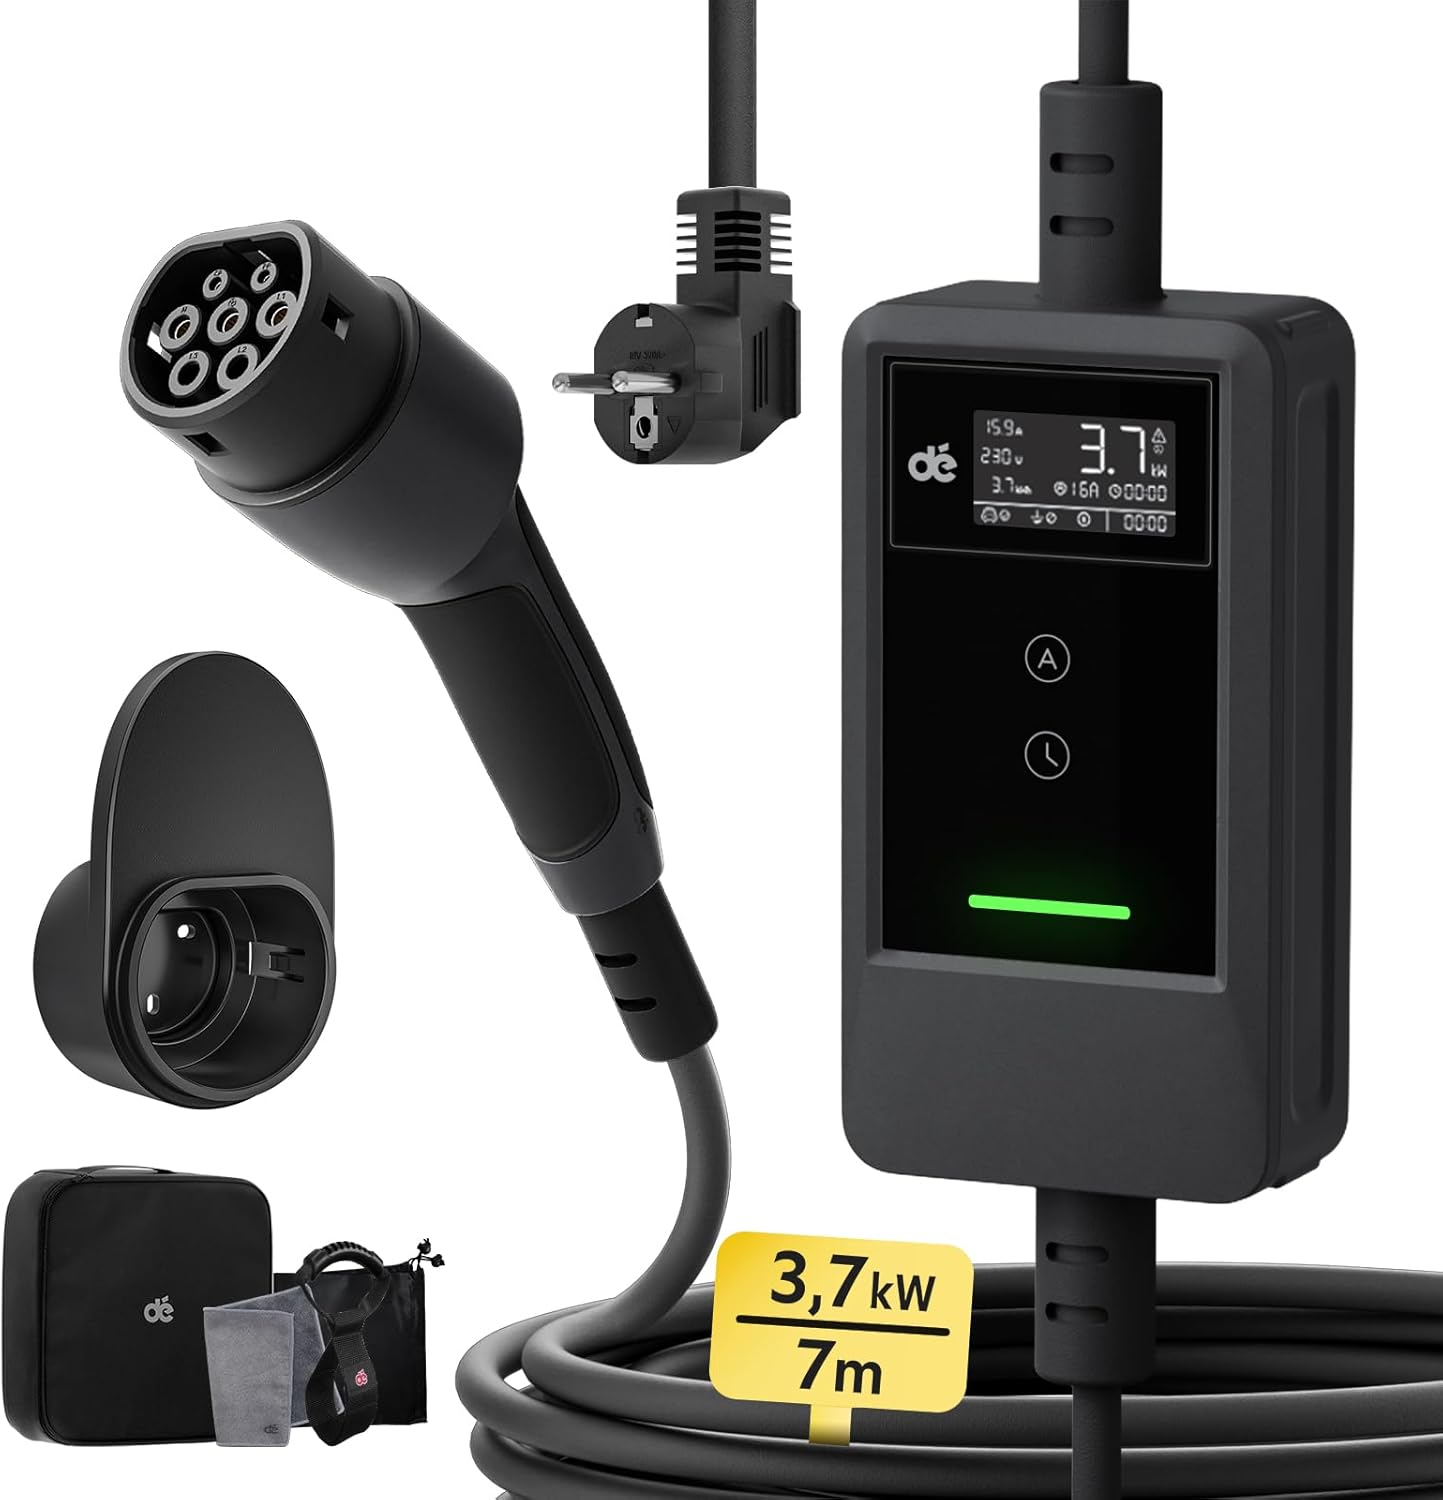
Image: The dé Electric Car Charger, showing the Type 2 connector, Schuko plug, control box with LCD, and included accessories like the wall mount and carrying bag.

Image: A detailed view of the charger's control box, highlighting the LCD screen displaying charging status, current, voltage, and power, along with the two control buttons for current adjustment and delayed charging.
Key Components:
- Control Box: Houses the intelligent charging circuitry, LCD display, and control buttons.
- Type 2 Connector: Connects to your electric vehicle's charging port.
- Schuko Plug: Connects to a standard household electrical outlet.
- LCD Display: Shows real-time charging data, including current, voltage, power, and charging duration.
- Control Buttons: Two buttons for adjusting charging current and setting delayed charging.
Setup
1. Wall Mount Installation (Optional)
The included plug holder can be mounted on a wall for convenient storage of the Type 2 connector and cable when not in use.
- Choose a suitable location near your charging spot, ensuring it's protected from direct weather exposure.
- Use appropriate screws and wall plugs (not included) to securely fasten the plug holder to the wall.

Image: An electric car charging in a driveway, with the dé charger's control box mounted on the wall next to a Schuko outlet, demonstrating a typical home setup.
2. Connecting to Power Source
The charger is designed for use with a standard 16A Schuko socket. Ensure the socket is in good condition and properly grounded.
- Insert the Schuko plug firmly into a reinforced electrical outlet.
- Position the control box on a stable surface or hang it securely. The cable length from the plug to the control box is 1.5m, offering flexibility.

Image: Comparison showing the advantage of a 1.5m cable from the Schuko plug to the control box, allowing for more flexible and safer placement of the control box compared to shorter cables.
Operating Instructions
1. Basic Charging Steps
- Insert the Schuko Plug: Connect the charger's Schuko plug into a suitable electrical outlet. The LCD screen will illuminate.
- Adjust Current and Delay (Optional): Before connecting to the vehicle, use the control buttons on the charger to set your desired charging current (6A/8A/10A/13A/16A) or to program a delayed start time (0.5 to 8 hours).
- Connect to Vehicle: Insert the Type 2 connector firmly into your electric vehicle's charging port. Ensure a secure connection.
Note: All parameters cannot be modified after connecting the Type 2 connector to the vehicle's charging port.

Image: A three-step visual guide demonstrating how to use the charger: Step 1, insert the Schuko plug; Step 2, adjust current and delay on the control box; Step 3, insert the Type 2 plug into the car's charging port.
2. Adjusting Charging Current
The charger allows you to select from multiple current settings to match your power supply and charging needs.
- Press the 'A' button (Current Adjustment) on the control box to cycle through available current options: 6A, 8A, 10A, 13A, 16A.
- The charger has a memory function and will retain the last selected current setting for future use.

Image: A hand pressing the current adjustment button on the charger's control box, illustrating how to select between 6A, 8A, 10A, 13A, and 16A settings, with a note about the memory function.
3. Setting Delayed Charging
Utilize the delayed charging feature to charge during off-peak hours, potentially saving on electricity costs.
- Press the 'L' button (Delay Timer) on the control box to set a delay from 0.5 to 8 hours in 30-minute increments.
- The charging process will automatically begin after the set delay period.

Image: A graphic illustrating smart charging reservation, showing how to schedule charging during less expensive off-peak hours (e.g., starting at 22:00) to optimize electricity costs.
4. LCD Display Information
The LCD screen provides comprehensive real-time information about the charging process.

Image: A detailed diagram explaining each indicator on the LCD screen, including real-time current, voltage, charged capacity, real-time power, error indication, current setting, programmed charging duration, vehicle connection status, grounding status, pause, and charging timer.
- Current (A): Real-time charging current.
- Voltage (V): Real-time voltage.
- Power (kW): Real-time charging power.
- Charged Capacity (kWh): Total energy delivered during the current session.
- Charging Duration: Elapsed charging time or programmed delay.
- Status Indicators: Icons for vehicle connection, grounding, and error messages.
Compatibility
The dé Electric Car Charger is universally compatible with most electric vehicles (BEV) and plug-in hybrid vehicles (PHEV) equipped with a Type 2 charging port, conforming to IEC 62196-2 standards.
Compatible Models Include:
- Tesla (Model Y/3/X/S)
- Audi (Q3/Q4/Q5/E-Tron/...)
- Volvo (XC40/XC60/XC90/...)
- Renault (Twingo/Kangoo/...)
- Fiat (500e/...)
- MG (MG4/MG5/...)
- Volkswagen (ID.3/ID.4/ID.5/...)
- BMW (X1/X3/iX/i4)
- And other BEV/PHEV models.
Note: This product is NOT compatible with Renault Zoe, Smart EQ, Dacia Spring, and BMW i3.

Image: A visual chart displaying various compatible electric vehicle brands and models (Tesla, Audi, Volvo, Renault, Fiat, MG, Volkswagen, BMW) that use a Type 2 connector, along with a list of incompatible models.
Maintenance
Proper maintenance ensures the longevity and safe operation of your dé Electric Car Charger.
1. Cleaning
- Always disconnect the charger from the power source and vehicle before cleaning.
- Use the provided microfiber cloth or a soft, dry cloth to wipe down the control box and cables.
- For stubborn dirt, a slightly damp cloth can be used, but ensure no moisture enters the connectors or control box.
- Do not use harsh chemicals, solvents, or abrasive cleaners.
2. Storage
- Store the charger in a cool, dry place, away from direct sunlight and extreme temperatures.
- Use the included carrying case and plug holder to keep the cable neatly coiled and protected.
- Avoid bending or kinking the cable sharply, especially near the connectors.
3. Durability and Protection Features
The charger is built with durable TPU material and incorporates multiple safety protections:
- Overcurrent Protection
- Overvoltage/Undervoltage Protection
- Leakage Protection
- Grounding Protection
- Overheating Protection (Pause at 77°C, Resume at 67°C)
- Short-circuit Protection

Image: The charger's control box displaying icons representing various safety features, including protection against overcurrent, over/undervoltage, leakage, grounding faults, overheating, and short-circuits.

Image: A graphic illustrating the charger's operational temperature range (-25°C to 50°C) and its resistance to rain (IP66 for control box, IP54 for Type 2 plug), snow, dust, and heat.
Troubleshooting
If you encounter issues with your dé Electric Car Charger, refer to the following common problems and solutions:
| Problem | Possible Cause | Solution |
|---|---|---|
| Charger not powering on / LCD blank | No power from outlet; Faulty outlet; Damaged cable/plug. | Check the electrical outlet with another device. Ensure the Schuko plug is fully inserted. Inspect the cable for visible damage. |
| Charging not starting | Type 2 connector not fully inserted; Vehicle not ready to charge; Delayed charging set; Current setting too high for outlet. | Ensure Type 2 connector is securely latched. Check vehicle's charging status. Verify if a delay timer is active. Reduce current setting if the outlet is not dedicated. |
| Error message on LCD | Overcurrent, overvoltage, overheating, grounding fault, etc. | Refer to the LCD display information section for error codes. Disconnect and reconnect the charger. If overheating, allow it to cool down. If persistent, contact support. |
| Slow charging speed | Low current setting; Vehicle's onboard charger limitation; Power supply limitation. | Increase the current setting on the charger if your outlet supports it. Consult your vehicle's manual for its maximum AC charging rate. |
If the problem persists after attempting these solutions, please contact customer support for further assistance.
Specifications
Technical specifications for the dé 3.7kW Electric Car Charger (Model: deM2D03B7).
| Feature | Specification |
|---|---|
| Model | deM2D03B7 |
| Brand | dé |
| Manufacturer | deAccessories |
| Charging Power | 3.7 kW (Max) |
| Current Rating | Adjustable: 6A / 8A / 10A / 13A / 16A |
| Output Voltage | 230 Volts |
| Cable Length | 7 meters |
| Connector Type (Vehicle) | Type 2 (IEC 62196-2) |
| Connector Type (Wall) | Schuko Plug |
| Item Weight | 2.91 Kilograms |
| Product Dimensions (Control Box) | 32 x 32 x 11.3 cm (approximate, as per product dimensions) |
| Operating Temperature | -25°C to 50°C |
| IP Rating (Control Box) | IP66 |
| IP Rating (Type 2 Plug) | IP54 |
| Certifications | CE, DEKRA, IEC |
Warranty and Support
The dé Electric Car Charger comes with a 2-year warranty from the date of purchase.
If you require assistance, have questions about the product, or need to claim warranty service, please do not hesitate to contact our customer support team. We are committed to providing you with the best possible solution.
Please refer to your purchase documentation or the retailer's website for specific contact details.


