1. Introduction
This manual provides detailed instructions for the proper installation, operation, and maintenance of the Radiolink CrossRace Pro APM Flight Controller. Designed for racing drones and multi-rotors, this flight controller integrates advanced features for stable and high-performance flight. Please read this manual thoroughly before use to ensure safe and optimal performance.
2. Product Overview
The Radiolink CrossRace Pro is a compact and powerful flight controller featuring a built-in gyroscope, accelerometer, and barometer. It supports 4-in-1 ESCs and ESC telemetry, offering dual 5V and 12V BEC outputs. Its design is optimized for various multi-rotor applications, from 2-axis to 8-axis configurations.

Image 2.1: Overview of the Radiolink CrossRace Pro Flight Controller highlighting its features including 12 PWM channels, OSD, dual BEC, and GPS support.
Key Features:
- High-Speed PosHold Mode: Achieves flight speeds up to 180 km/h in Position Hold mode, suitable for high-altitude aerial photography.
- 4-in-1 ESC and ESC Telemetry Support: Simplifies wiring and enhances flight stability by reducing external interference.
- DJI/CADDX HD Digital Video Transmission Plug and Play: Compatible with mainstream HD digital image transmission systems.
- Built-in 5V&12V Dual BEC: Provides stable power for various components.
- Small and Lightweight Design: Mini size (37x37mm) adaptable to 2-8 axis multi-rotors.
- ArduPilot Flight Controller: Combines high-precision PosHold with professional manual control, including automatic return to home.
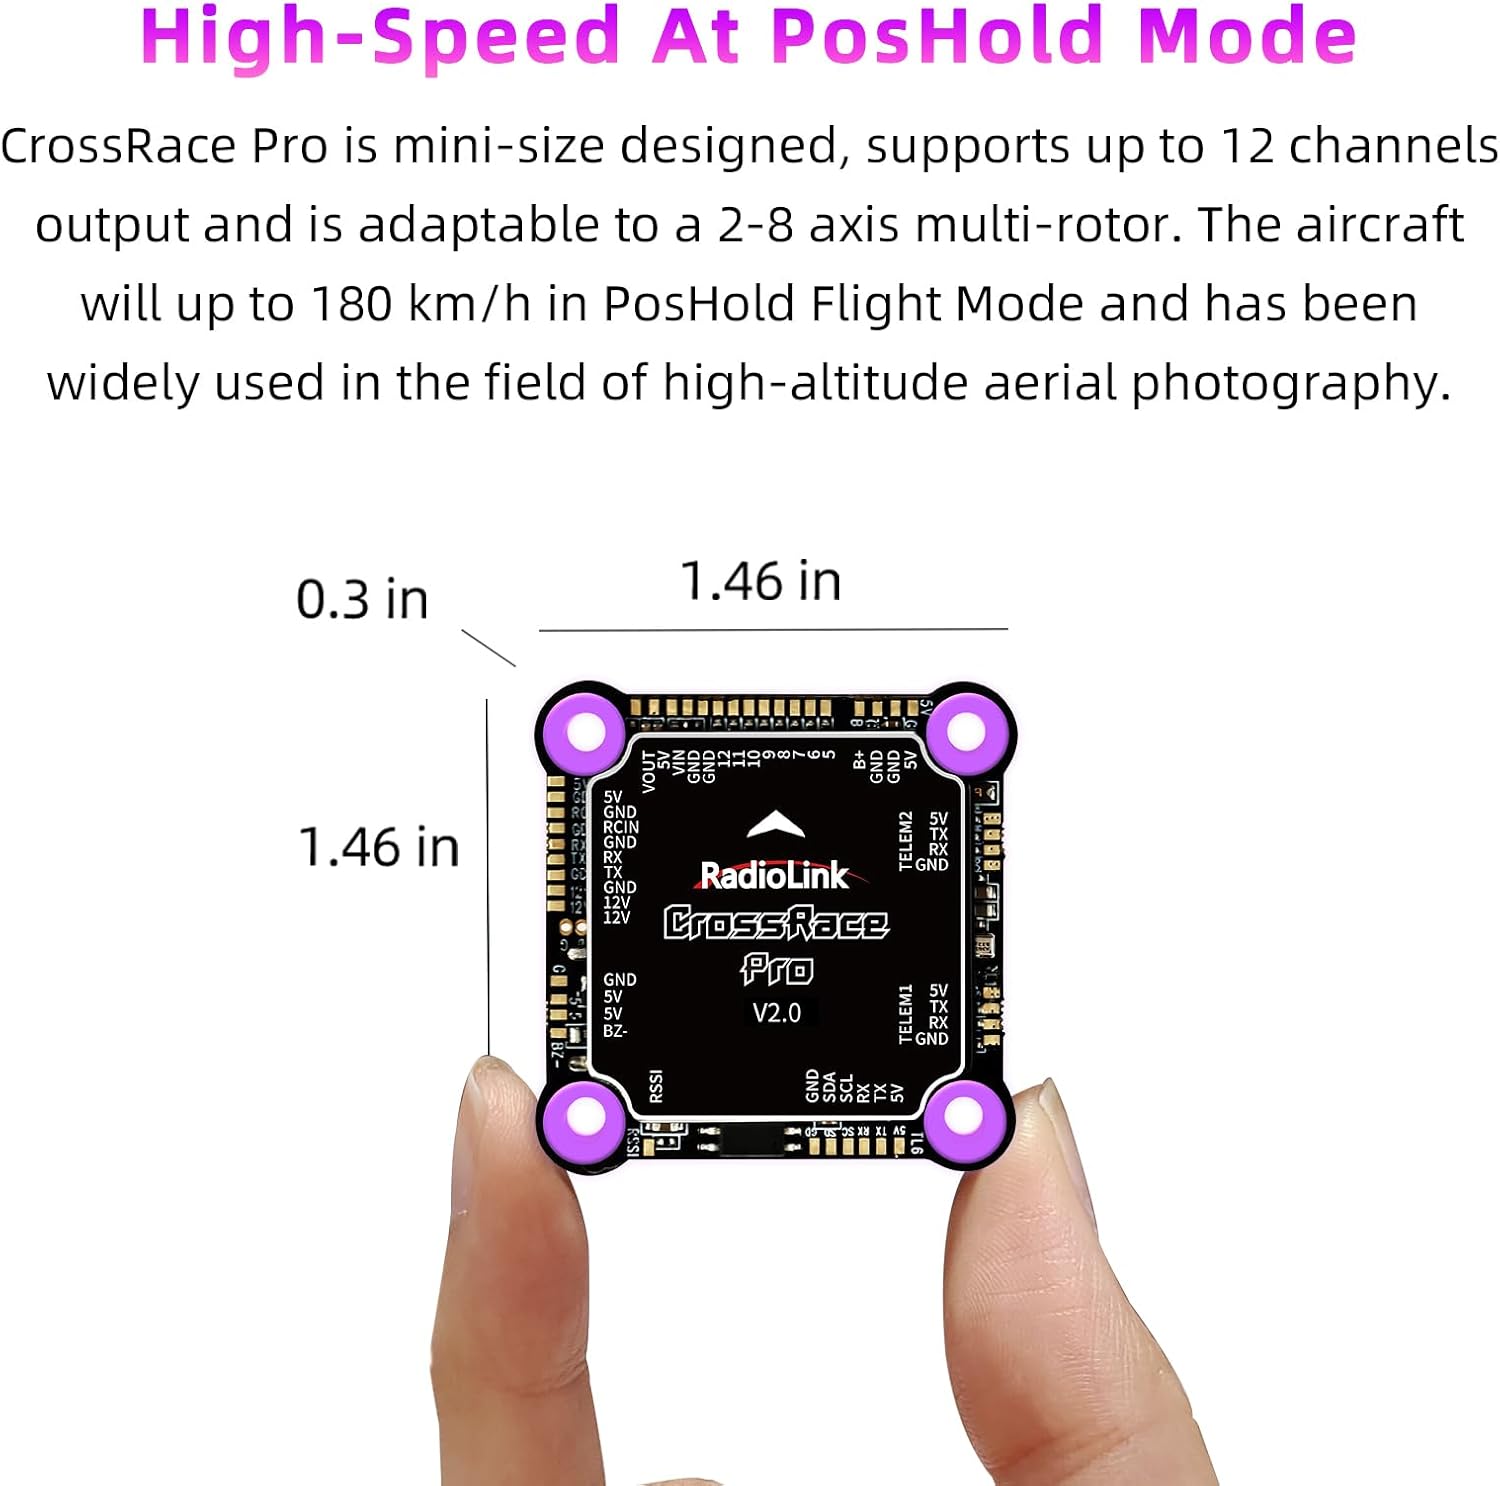
Image 2.2: The compact size of the CrossRace Pro Flight Controller, measuring approximately 1.46 x 1.46 x 0.3 inches.

Image 2.3: The CrossRace Pro supports various mainstream throttle signals including DShot, OneShot, and PWM signals, thanks to its built-in 5V&12V Dual BEC.
3. What's in the Box
Verify that all components are present before proceeding with installation:
- Radiolink CrossRace Pro Flight Controller (x1)
- Buzzer (requires soldering) (x1)
- TELEM1&2 Ports Connect Cable (x2)
- USB Cable (for upgrade or setup) (x1)
- Four-in-one ESC Connect Cable (x1)
- Receiver Connect Cable (x1)
4. Setup
Follow these steps for initial setup and connection of your CrossRace Pro Flight Controller.
4.1 Component Connection
Refer to the connection diagram and port layout for proper wiring. Ensure all connections are secure before powering on the device.

Image 4.1: Detailed port layout of the CrossRace Pro Flight Controller for connecting various components.
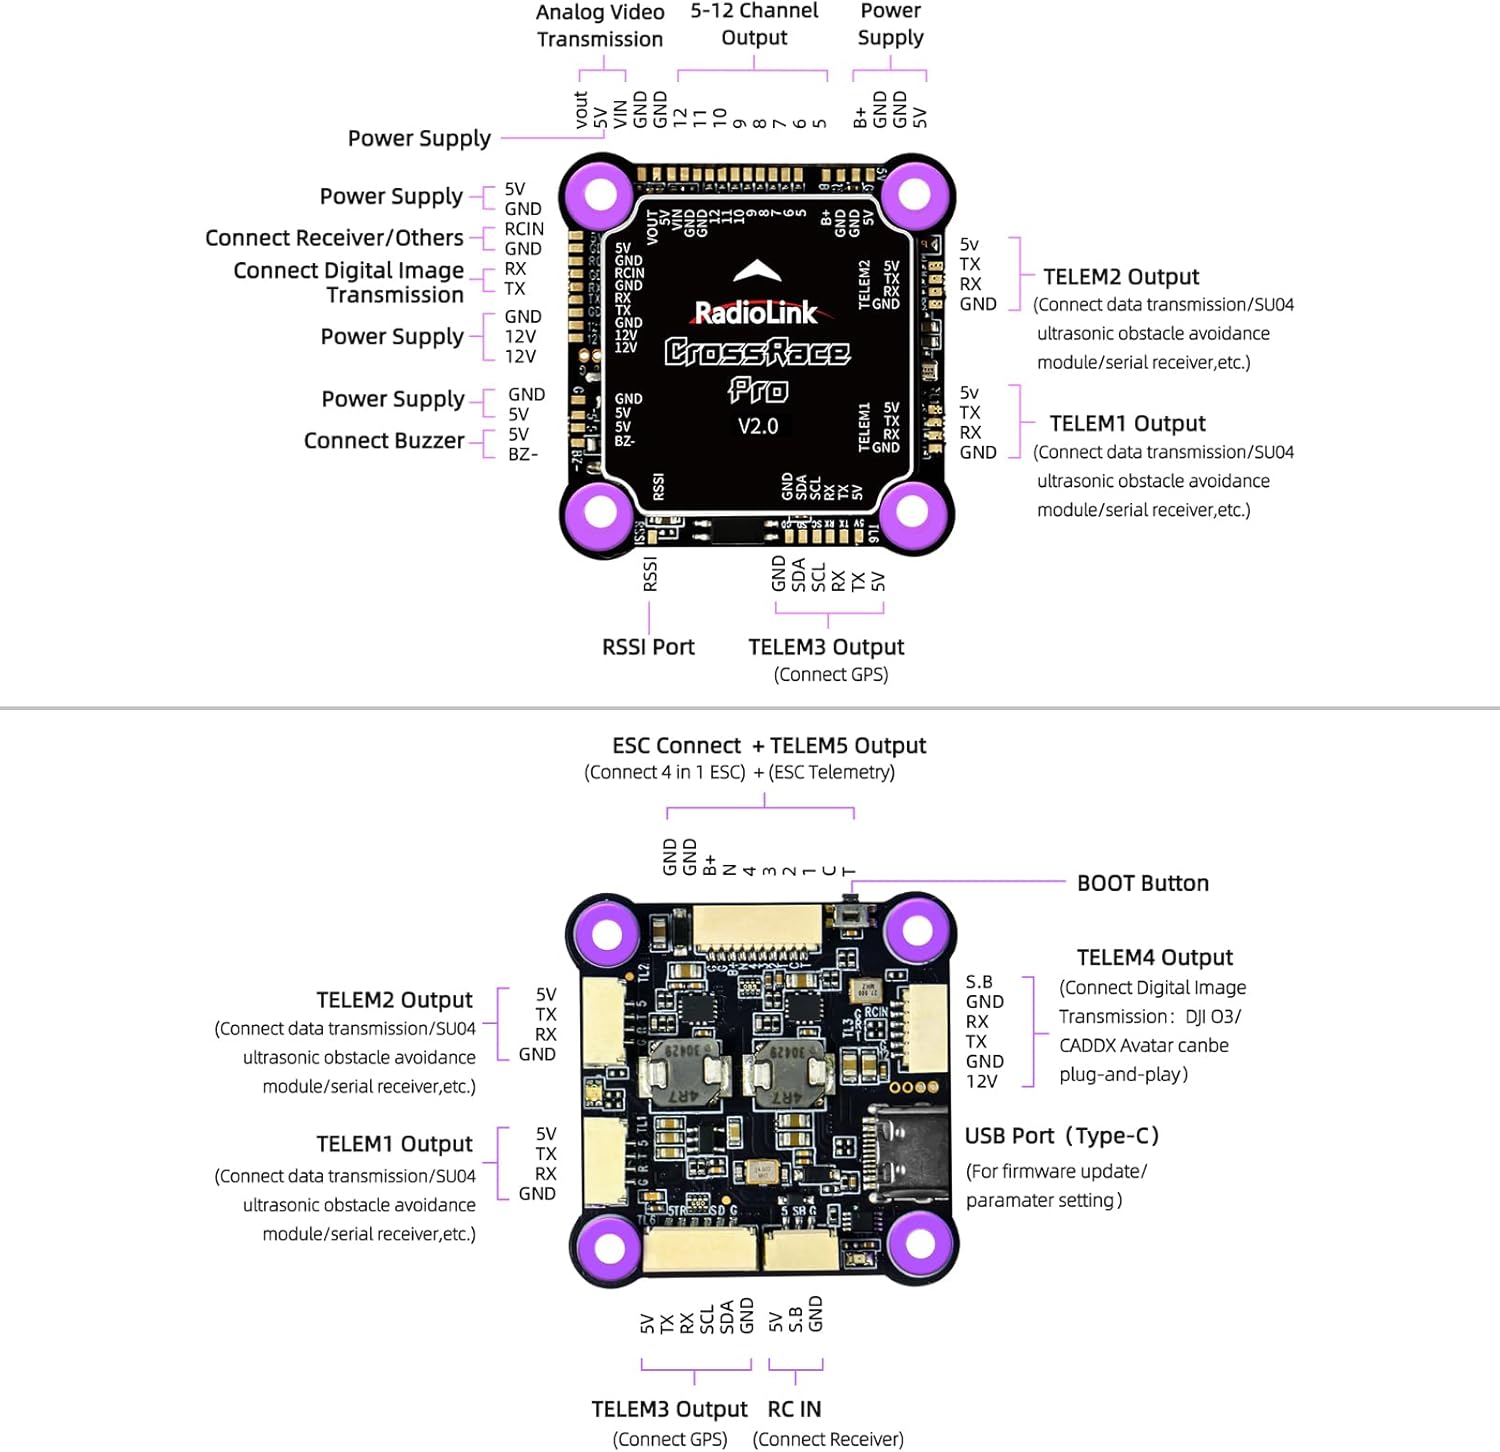
Image 4.2: General connection diagram for the CrossRace Pro Flight Controller within a multi-rotor system.
4.2 Software Configuration
The CrossRace Pro Flight Controller uses ArduPilot firmware. Parameters can be configured using Radiolink Mission Planner, ArduPilot Mission Planner, or QGC Mission Planner software. Connect the flight controller to your computer using the provided USB cable.

Image 4.3: The CrossRace Pro supports multiple mission planner software for parameter configuration.
The flight controller supports DJI O3 and CADDX high-definition digital image transmission systems for plug-and-play integration.

Image 4.4: The Radiolink GPS TS100 module is supported, enhancing navigation and reducing signal interference.
An integrated OSD module allows for real-time display of flight information without the need for an external OSD unit.

Image 4.5: The integrated OSD module displays critical flight data directly on your video feed.
5. Operating Instructions
Ensure all pre-flight checks are completed before operating your multi-rotor.
5.1 Flight Modes
- PosHold Mode: This mode maintains the drone's position and altitude, allowing for stable flight and precise control, even at high speeds up to 180 km/h.
- Return to Home (RTH): An accurate automatic return to home function is available, guiding the aircraft back to its takeoff point.
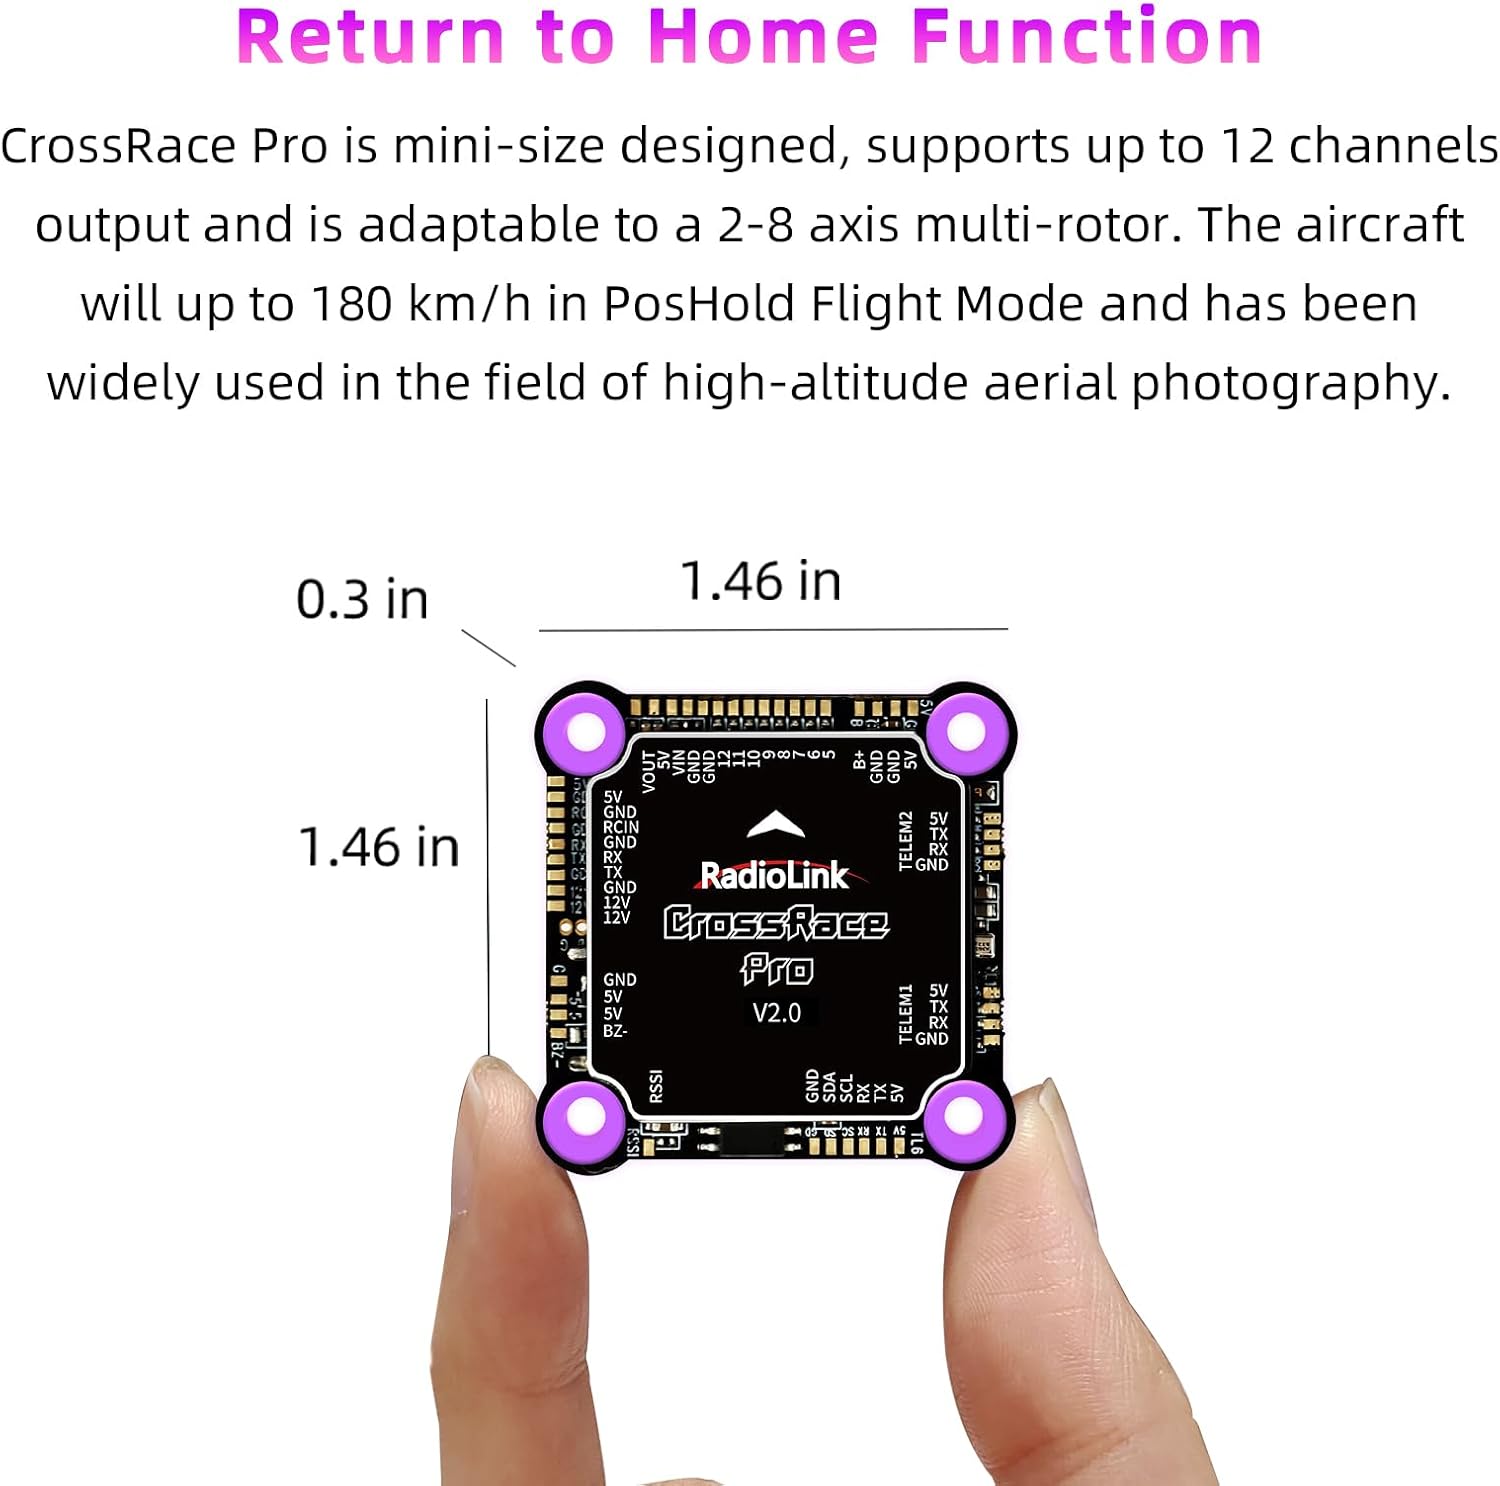
Image 5.1: The compact design of the CrossRace Pro supports various flight modes, including precise Position Hold and Return to Home functions.
5.2 General Operation
Always operate your drone in an open area, away from obstacles, people, and animals. Monitor battery levels and environmental conditions. Familiarize yourself with your remote controller's functions and emergency procedures.
Video 5.2: Demonstration of a Radiolink M435 Heavy Lift Drone in flight, showcasing its stability and payload capacity. This video illustrates the capabilities of drones utilizing Radiolink flight control systems.
6. Maintenance
Regular maintenance ensures the longevity and reliability of your flight controller.
- Cleaning: Keep the flight controller free from dust, dirt, and moisture. Use a soft, dry cloth for cleaning. Avoid using liquids or solvents.
- Inspection: Periodically check all connections for looseness or damage. Inspect cables for wear and tear.
- Firmware Updates: Check the official Radiolink website for the latest firmware updates to ensure optimal performance and access to new features.

Image 6.1: Quality tests are performed to ensure the reliability and durability of the CrossRace Pro Flight Controller.
7. Troubleshooting
This section addresses common issues you might encounter.
7.1 General Issues
- No Power: Check battery connections and ensure the power source is adequate. Verify all cables are correctly plugged into the flight controller.
- Unstable Flight: Recalibrate the gyroscope and accelerometer. Ensure propellers are balanced and undamaged. Check for proper motor rotation direction.
- Connection Problems: Verify USB cable integrity and driver installation. Ensure the correct COM port is selected in your Mission Planner software.
7.2 Firmware and Compatibility
The CrossRace Pro Flight Controller is designed for ArduPilot firmware and is not compatible with Betaflight firmware. Firmware updates should only be performed using official Radiolink tools or compatible ArduPilot Mission Planner software. The Radiolink firmware primarily supports 5-inch quadcopters.
8. Specifications
| Feature | Detail |
|---|---|
| Product Dimensions | 1.57 x 1.57 x 0.51 inches (37x37mm) |
| Item Weight | 0.43 ounces |
| Model Number | CrossRace Pro |
| Supported Multi-Rotor Types | 2-8 axis |
| BEC Output | Built-in 5V & 12V Dual BEC |
| ESC Support | 4-in-1 ESC, ESC Telemetry |
| Throttle Signals | DShot, OneShot, PWM |
| Video Transmission | DJI O3 and CADDX HD Digital (Plug and Play) |
| Max Speed (PosHold) | Up to 180 km/h |
9. Warranty Information
Please refer to the product packaging or the official ATA HOBBY website for detailed warranty terms and conditions. Typically, products are covered against manufacturing defects for a specified period from the date of purchase. Keep your proof of purchase for warranty claims.
10. Support
For technical assistance, troubleshooting, or further inquiries, please contact ATA HOBBY customer support through their official website or the contact information provided with your product. Online resources, including FAQs and forums, may also be available.


