Introduction
This manual provides detailed instructions for the installation, operation, and maintenance of your ASUS Prime X870-P WiFi Motherboard. Designed for AMD Socket AM5 processors, this ATX motherboard features PCIe 5.0, DDR5 memory support, advanced power stages, multiple M.2 slots, WiFi 7, 2.5 Gb Ethernet, and USB-C 40Gbps connectivity. Please read this manual thoroughly before proceeding with installation to ensure proper setup and optimal performance.

Image: The ASUS Prime X870-P WiFi Motherboard alongside its retail packaging, showcasing the product and its box.
Safety Information
Always observe the following safety precautions to prevent damage to the motherboard or injury to yourself:
- Disconnect the power cord from the wall outlet before touching any components.
- Wear an anti-static wrist strap or frequently touch a grounded metal object to discharge static electricity before handling components.
- Handle components by their edges to avoid touching sensitive parts.
- Ensure proper ventilation within your PC case to prevent overheating.
- Do not expose the motherboard to moisture or extreme temperatures.
What's in the Box
Verify that all items are present in your package:
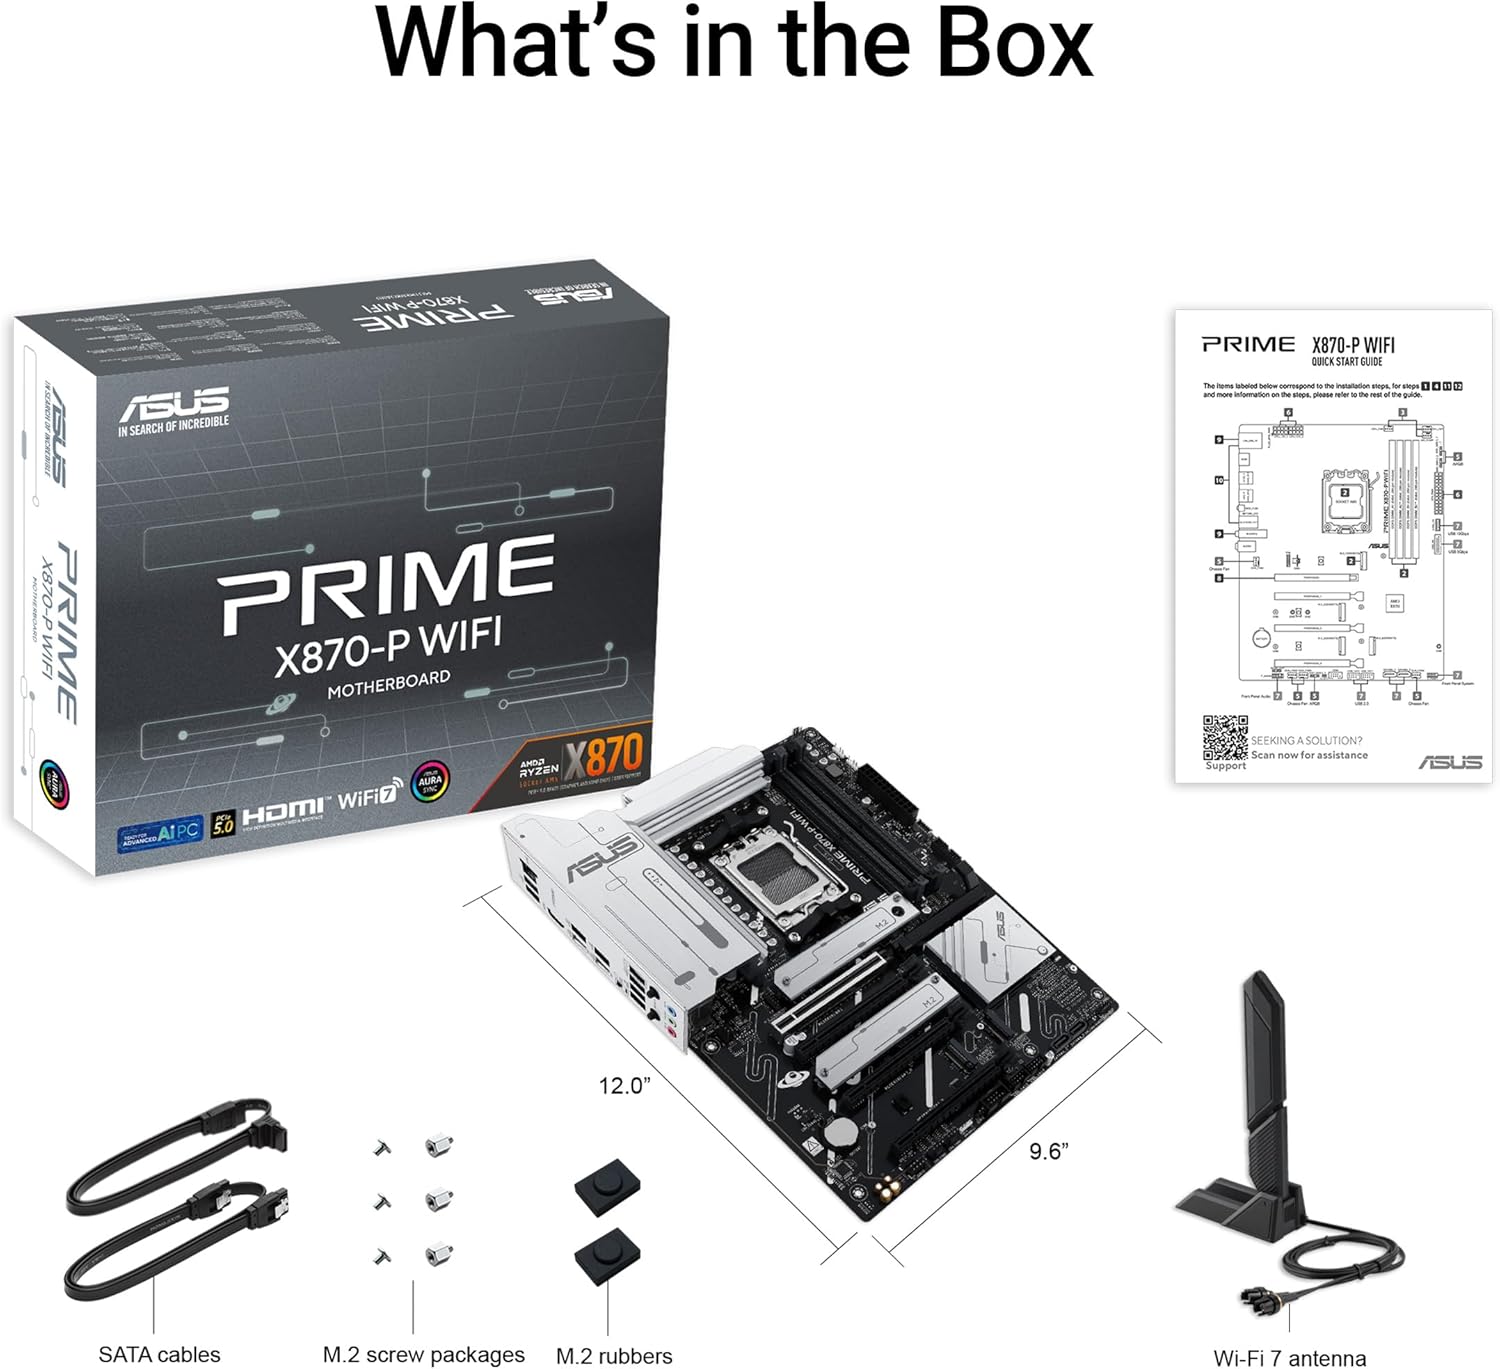
Image: A visual representation of the items included in the ASUS Prime X870-P WiFi Motherboard package, such as the motherboard, WiFi antenna, SATA cables, M.2 screw packages, and M.2 rubbers.
- ASUS Prime X870-P WiFi Motherboard
- Wi-Fi 7 antenna
- SATA cables
- M.2 screw packages
- M.2 rubbers
- User Manual and Support DVD/QR Code
Setup
1. Motherboard Installation
Carefully align the motherboard with the standoffs in your PC case. Ensure the pre-mounted I/O shield aligns with the case's I/O opening. Secure the motherboard with screws.
2. CPU and Cooler Installation
Open the CPU socket lever, align the AMD Socket AM5 processor with the triangle marker, gently place it into the socket, and close the lever. Install your CPU cooler according to its manufacturer's instructions.
3. Memory (RAM) Installation
Insert DDR5 memory modules into the DIMM slots. Push down firmly on both ends of the module until the clips snap into place. Refer to your motherboard's specific manual for recommended slot population for optimal performance (e.g., dual-channel configuration).
4. M.2 SSD Installation
The motherboard features four M.2 card slots, including a PCIe 5.0 slot. To install an M.2 SSD, insert it into the slot at an angle, then gently push it down and secure it with the M.2 Q-Latch mechanism. This DIY-friendly innovation allows for simple M.2 SSD setup without tools.
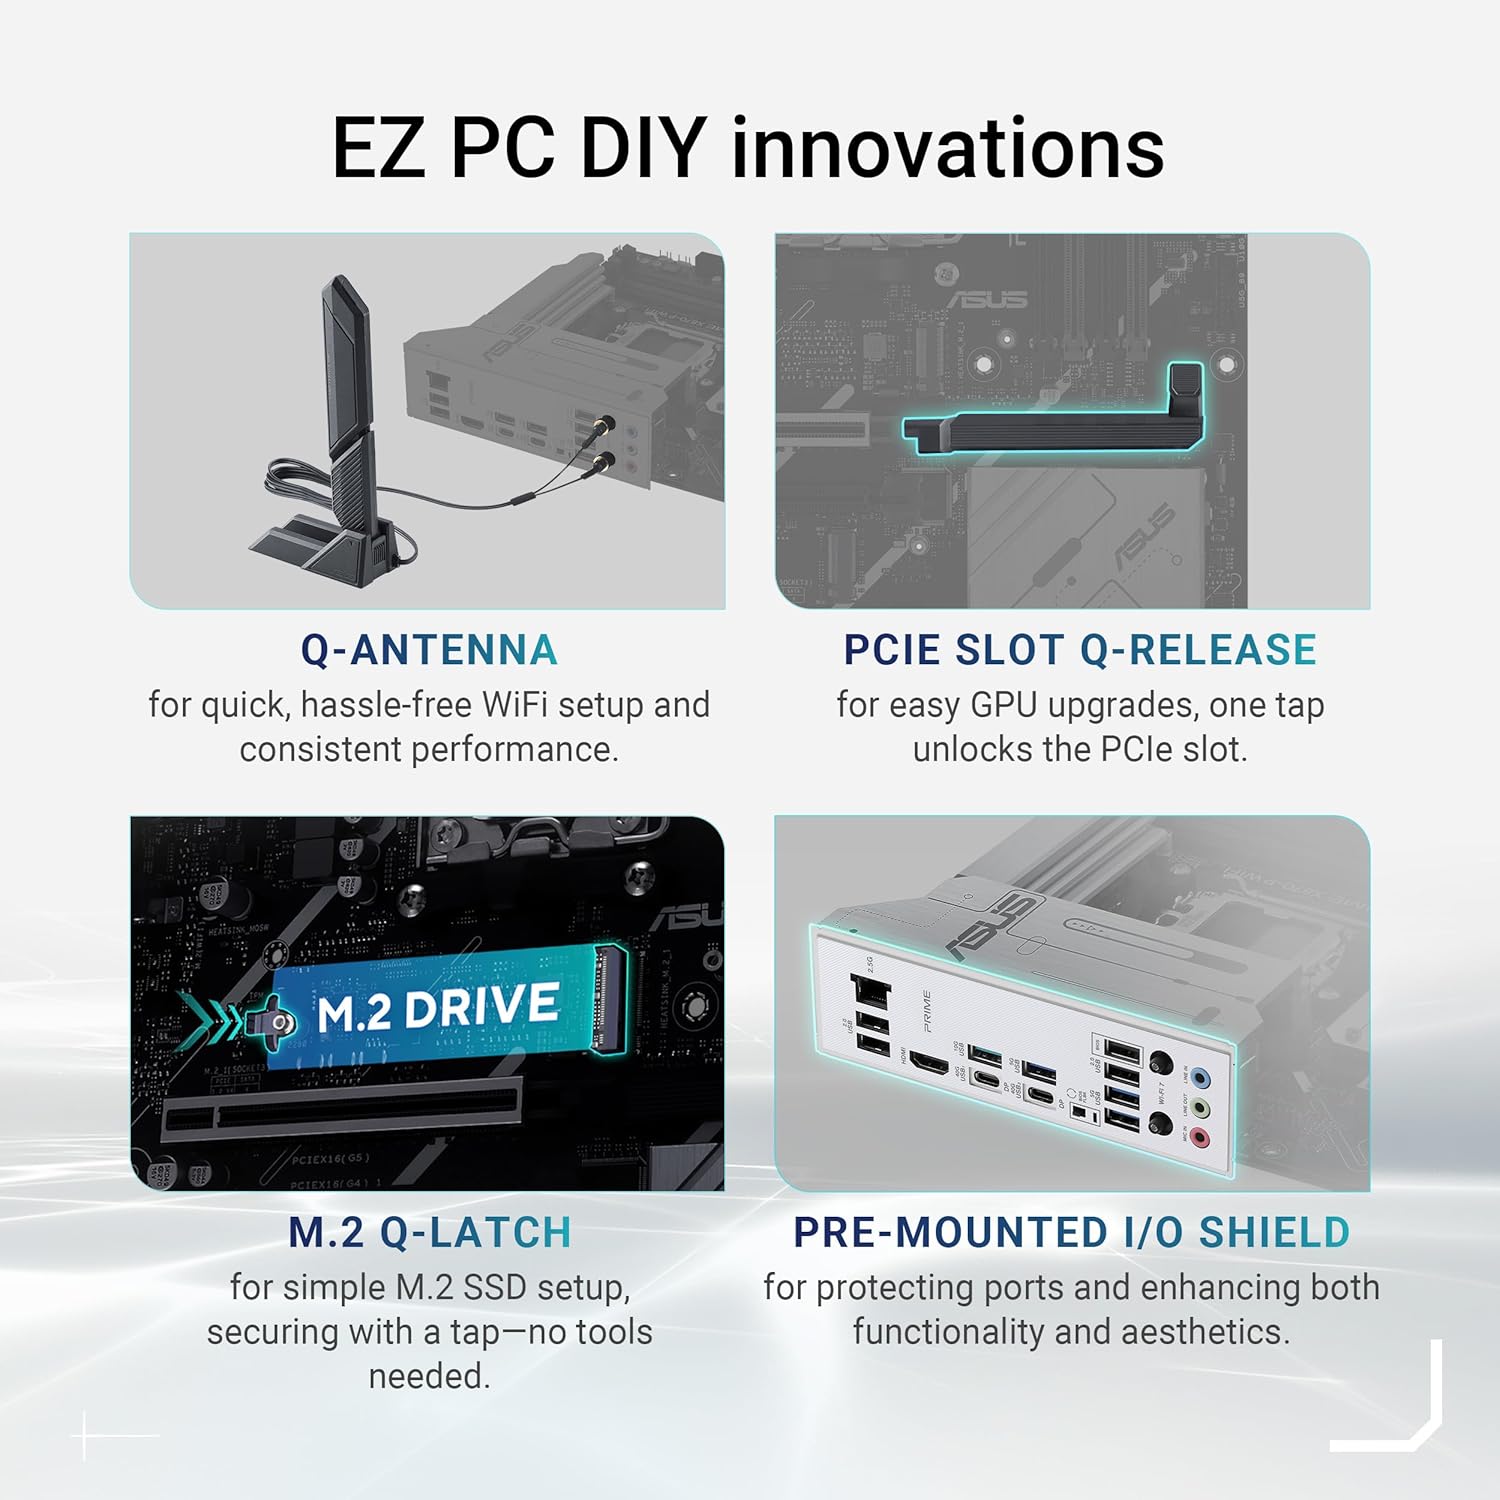
Image: Depicts EZ PC DIY innovations including Q-Antenna for WiFi setup, PCIe Slot Q-Release for GPU upgrades, M.2 Q-Latch for SSD installation, and the pre-mounted I/O Shield.
5. Graphics Card (GPU) Installation
Insert your PCIe 5.0 graphics card into the primary PCIe x16 slot. Ensure it is fully seated. The PCIe Slot Q-Release feature allows for easy GPU upgrades by unlocking the PCIe slot with a single tap.
6. Power Supply Connections
Connect the 24-pin ATX power connector and the 8-pin (or 4+4-pin) CPU power connector from your power supply to the motherboard.
7. Peripheral Connections
Connect front panel headers (power button, reset button, USB, audio), SATA devices, and case fans to their respective headers on the motherboard.
8. Initial Boot and BIOS Setup
After all components are installed, connect your monitor, keyboard, and mouse. Power on your system. Press the designated key (usually DEL or F2) during startup to enter the BIOS/UEFI setup. Configure boot order, enable XMP/EXPO for memory, and update BIOS if necessary using the BIOS FlashBack feature.
Operating
Software and Driver Installation
Once your operating system is installed, install the latest drivers for the chipset, graphics, audio, LAN, and Wi-Fi from the ASUS support website. Also, install ASUS utilities such as Armoury Crate for system monitoring and control.
Key Features and Technologies
- AI Networking II: Optimizes network performance for seamless connectivity and maximized WiFi 7 speeds.
- AI Cooling II: Optimizes thermals and reduces noise via dynamic adjustment of fan speeds based on CPU temperatures.
- PCIe 5.0: Supports the latest graphics cards and provides ultra-fast data speeds of up to 128 Gbps for compatible M.2 SSDs.
- WiFi 7 & 2.5 Gb Ethernet: Ensures stable, low-latency wireless connections and high-speed wired networking.
- USB 40Gbps Type-C: Offers fastest data transfers for the latest super-speed devices and drives.
- Flexible M.2 Heatsink: Provides better thermal performance for M.2 SSDs.
- ASUS Fan Xpert 4: For ultimate cooling control and fan management.

Image: Highlights the motherboard's Exclusive AI Intelligence features, specifically AI Networking II for optimized network performance and AI Cooling II for optimized thermals and reduced noise.

Image: Illustrates additional features for speed and cooling, including WiFi 7, 2.5Gb Ethernet, USB 40Gbps Type-C, Flexible M.2 Heatsink, and ASUS Fan Xpert 4.

Image: Details the motherboard's Premium Power Stages & Performance, showing the 14+2+1 power stages, AMD EXPO & AEMP for DDR5 performance, and the Onboard PCIe 5.0 M.2 slot.
Maintenance
Cleaning
Regularly clean dust from your PC case and motherboard components using compressed air. Ensure the system is powered off and unplugged before cleaning. Avoid using liquids or abrasive materials.
BIOS Updates
Periodically check the ASUS support website for the latest BIOS updates. Updating your BIOS can improve system stability, compatibility, and performance. The BIOS FlashBack feature allows for easy updates, even without a CPU or RAM installed.
Driver Updates
Keep your drivers updated to ensure optimal performance and compatibility with new software and hardware. Visit the official ASUS support page for your motherboard model to download the latest drivers.
Troubleshooting
- No Power: Ensure all power cables (24-pin ATX, 8-pin CPU) are securely connected to the motherboard and power supply. Check the power supply switch and wall outlet.
- No Display: Verify that the graphics card is properly seated in its PCIe slot and connected to the power supply (if required). Ensure the monitor cable is securely connected to the graphics card.
- System Instability/Crashes: Check RAM seating and try running with one stick at a time. Ensure CPU cooler is properly installed and making good contact. Update BIOS and drivers.
- Boot Device Not Found: Check SATA/M.2 cable connections. Verify boot order in BIOS. Ensure the storage drive is detected in BIOS.
- Network Connectivity Issues: Ensure Ethernet cable is connected or WiFi antenna is properly installed. Check driver installation for LAN/WiFi.
For more detailed troubleshooting, refer to the comprehensive manual available on the ASUS support website or contact ASUS customer support.
Specifications
| Feature | Detail |
|---|---|
| Brand | ASUS |
| Model Name | 90MB1IS0-M0EAY0 |
| CPU Socket | Socket AM5 |
| Compatible Processors | AMD |
| Chipset Type | AMD X870 |
| RAM Memory Technology | DDR5 |
| RAM Memory Maximum Size | 192 GB |
| Product Dimensions | 12.01 x 9.61 x 0.39 inches |
| Item Weight | 3.08 pounds |
| Platform | Windows 11 |
| Date First Available | September 30, 2024 |
Warranty and Support
ASUS products come with a limited warranty. Please refer to the warranty card included with your product or visit the official ASUS support website for detailed warranty terms and conditions specific to your region. For technical assistance, driver downloads, and further support, please visit the ASUS Support Website.
You can also find additional resources and FAQs on the ASUS official store page on Amazon: ASUS Store on Amazon.


