Introduction
This manual provides instructions for the Xech Solaris-X Moon Digital Alarm Clock with Wireless Speaker. Please read this manual thoroughly before using the product to ensure proper operation and to prevent damage.
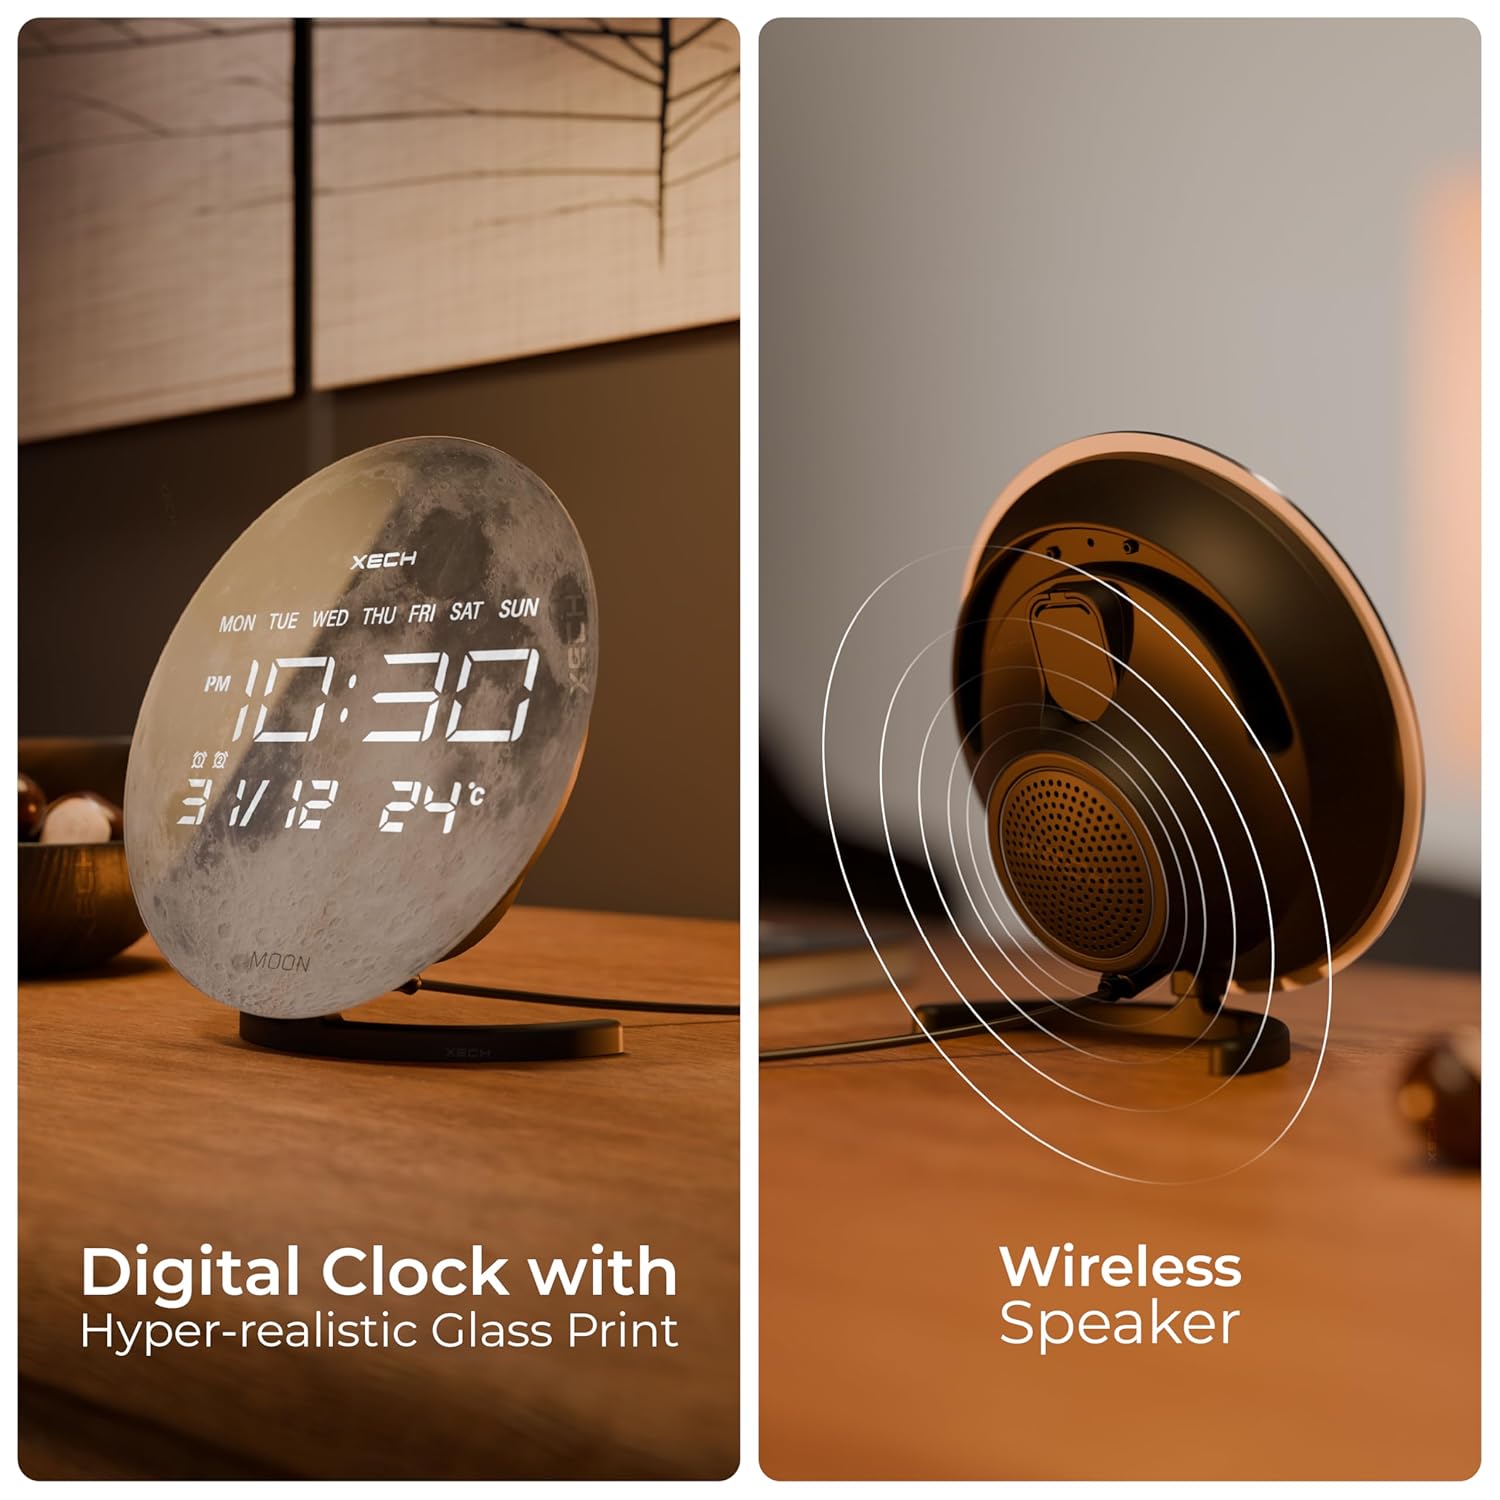
Image: The Xech Solaris-X Moon Digital Alarm Clock, showcasing its moon-themed display and integrated wireless speaker.
Setup
Package Contents
- Xech Solaris-X Moon Digital Alarm Clock
- Detachable Stand
- USB-C Power Cable
- Power Adapter
- User Manual (this document)
- CR2032 Battery (for temporal memory, may be pre-installed or separate)

Image: Contents of the Xech Solaris-X package, including the clock, stand, USB-C cable, and power adapter.
Initial Setup Steps
- Install Stand: Attach the detachable stand to the back of the clock. Ensure it is securely fitted.
- Insert CR2032 Battery (if not pre-installed): Locate the battery compartment, typically on the back or bottom of the unit. Insert one CR2032 battery with the correct polarity. This battery powers the temporal memory function, allowing the clock to retain time settings during power outages.
- Connect Power: Plug the USB-C power cable into the clock's USB-C port and connect the other end to the provided power adapter. Plug the adapter into a standard wall outlet. The display should illuminate.
- Automatic Time Synchronization: The clock features Bluetooth auto time sync. Pair your smartphone with the Xech Solaris-X via Bluetooth. Allow necessary permissions on your smartphone for the clock to automatically set the correct time. Refer to the "Bluetooth Pairing" section under Operation for detailed pairing instructions.

Image: Visual guide demonstrating the steps for installing the stand, inserting the battery, connecting power, and pairing for automatic time synchronization.
Operation
Display Overview
The LED display shows the time, day of the week, date (DD/MM), and temperature in Celsius. The display is designed for clear visibility.

Image: Close-up of the clock display, highlighting the digital clock, day of week, dual alarms indicator, calendar (DD/MM), and temperature (°C).
Setting Alarms
The Solaris-X features dual alarms. Specific buttons on the in-line control panel are used to set and activate alarms. Consult the physical manual for precise button functions and sequences to set alarm times and choose alarm tones.

Image: The clock showing its in-line control panel on the side, used for various settings including alarms.
Bluetooth Speaker Functionality
The integrated 5W wireless speaker allows for audio playback and hands-free calls.
Bluetooth Pairing:
- Ensure the clock is powered on.
- Activate Bluetooth on your smartphone or audio device.
- Search for available devices and select "Xech Solaris-X" (or similar name).
- Once paired, the clock will confirm connection, and you can stream audio.
Audio Playback & Calls:
- Use your connected device to control music playback (play/pause, skip tracks).
- For incoming calls, the speaker will act as a hands-free device. Use the control panel buttons to answer or end calls.

Image: Diagram illustrating the internal components of the hi-fidelity speaker with large 57mm drivers.
Temporal Memory
The Xech Solaris-X is equipped with an inbuilt temporal memory function. This feature allows the clock to retain its time settings even during a power outage, provided the CR2032 backup battery is installed and functional. When power is restored, the clock should display the correct time without requiring manual reset.
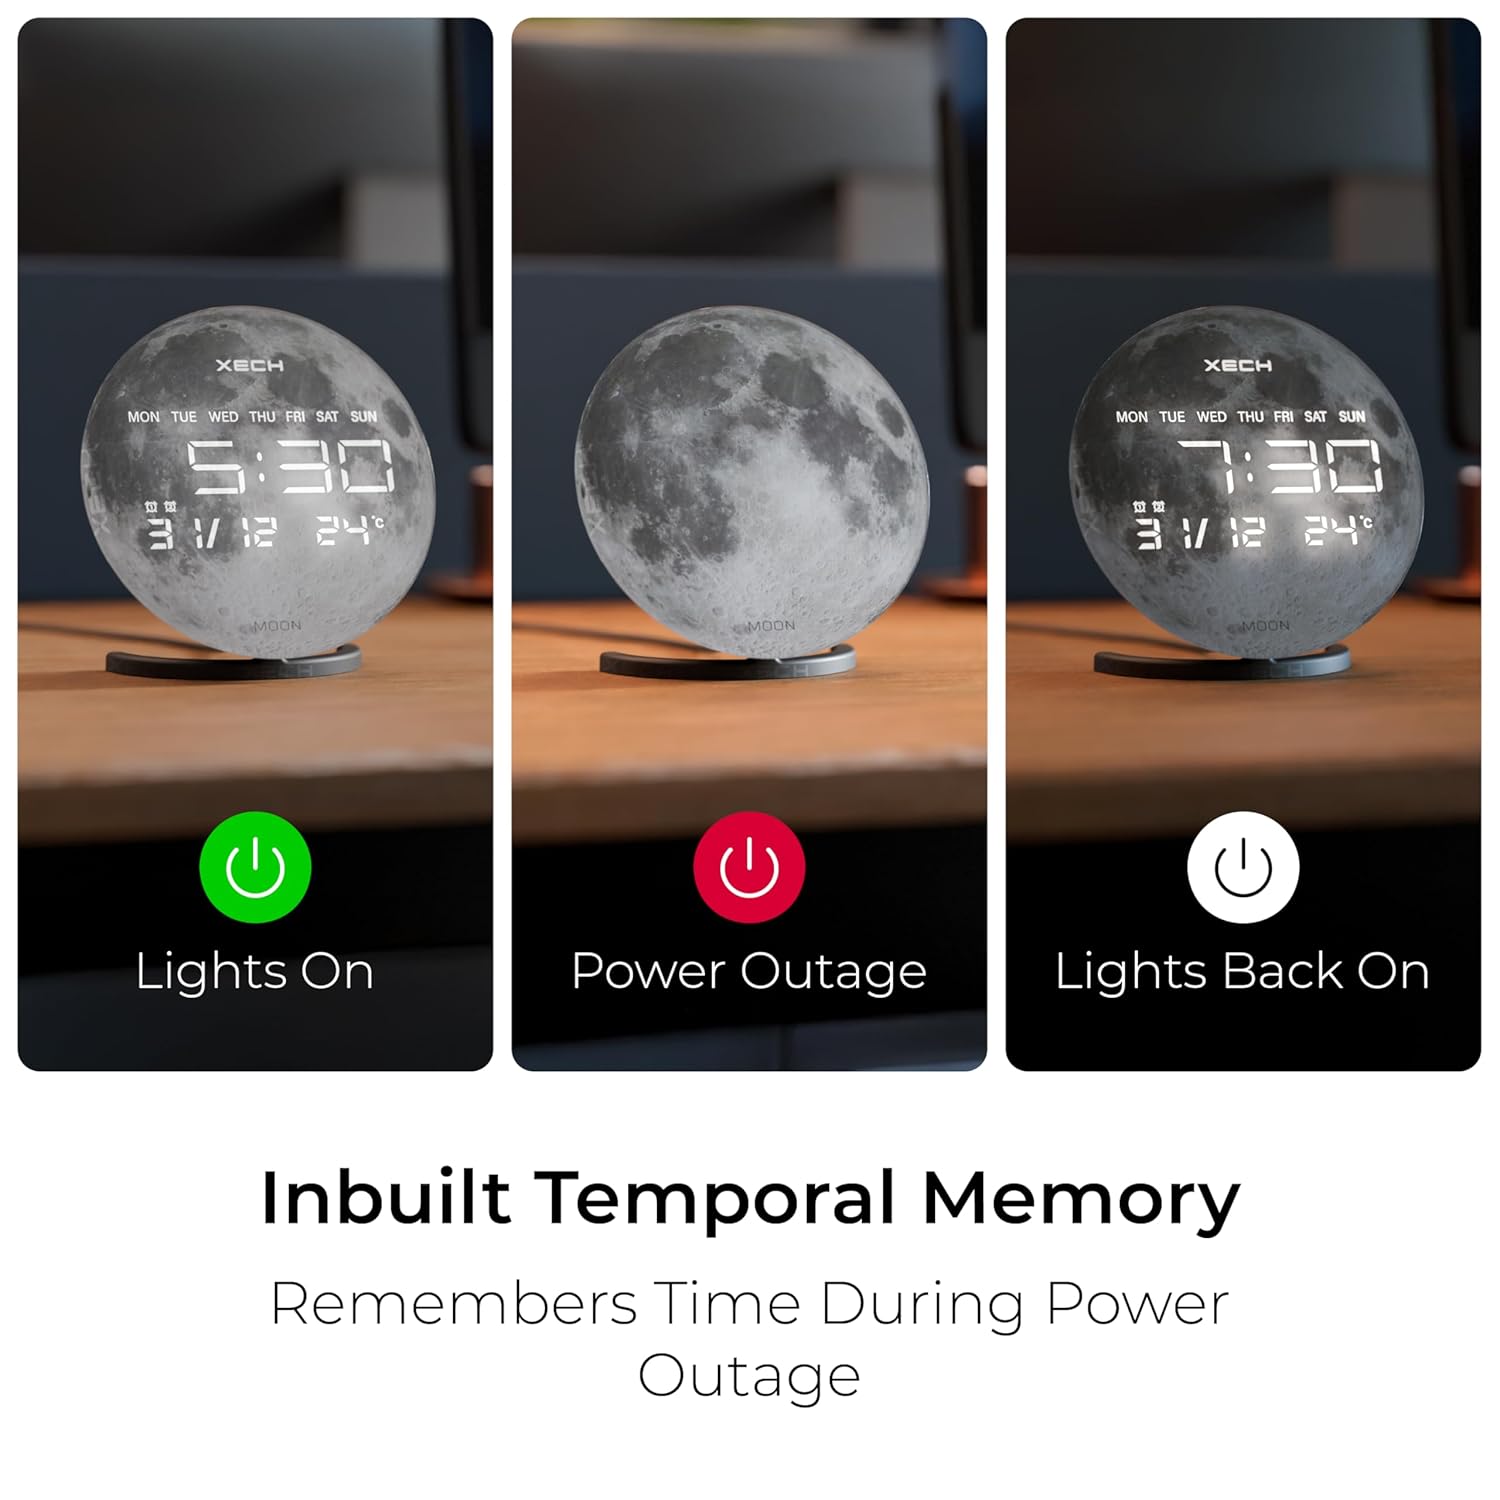
Image: Three panels showing the clock with lights on, during a power outage (display off but time retained), and with lights back on, illustrating the temporal memory feature.
Maintenance
- Cleaning: Wipe the clock's surface with a soft, dry cloth. Avoid using abrasive cleaners, solvents, or chemical sprays, as these can damage the finish or display.
- Power Source: Always use the provided USB-C cable and power adapter. Using incompatible power sources may damage the device.
- Battery Replacement: If the temporal memory function fails (i.e., the clock loses time during a power outage), replace the CR2032 backup battery. Refer to the "Initial Setup Steps" for battery compartment location.
- Placement: Place the clock on a stable, flat surface. Avoid areas with extreme temperatures, direct sunlight, or high humidity.
Troubleshooting
| Problem | Possible Cause | Solution |
|---|---|---|
| Clock loses time after power outage. | CR2032 backup battery is dead or not installed. | Install or replace the CR2032 battery. Ensure correct polarity. |
| Bluetooth speaker not pairing. | Bluetooth on device is off, clock is out of range, or already paired to another device. | Ensure Bluetooth is enabled on your device. Move device closer to the clock. Disconnect from other devices if necessary. Restart both devices. |
| No sound from speaker or poor audio quality. | Volume too low on clock or connected device, or device not properly paired. | Increase volume on both the clock and your connected device. Re-pair the Bluetooth connection. Ensure no physical obstructions are blocking the speaker. |
| Display is dim or not visible. | Power issue or brightness setting. | Ensure the clock is properly powered. Check the brightness settings using the control panel buttons. |
| Temperature reading appears inaccurate. | External factors affecting sensor, or sensor calibration. | Ensure the clock is not placed near heat sources, direct sunlight, or air vents. Allow time for the sensor to stabilize in a new environment. |
Specifications
| Feature | Detail |
|---|---|
| Brand | Xech |
| Model Number | X-610 |
| Colour | Moon |
| Display Type | Digital LED |
| Special Features | Alarm, Bluetooth, Illuminated, LED Display, Large Display, Temporal Memory |
| Product Dimensions | 5W x 17H Centimeters |
| Power Source | Corded Electric (USB-C Powered) |
| Material | Acrylonitrile Butadiene Styrene (ABS), Glass |
| Speaker Wattage | 5W |
| Number of Alarms | 2 (Dual Alarms) |
| Backup Battery | 1 x CR2032 (for temporal memory) |
| Item Weight | 410 Grams |
Warranty & Support
The Xech Solaris-X Digital Alarm Clock comes with a Limited Warranty. For specific details regarding warranty coverage, duration, and terms, please refer to the warranty card included in your product packaging or contact Xech customer support directly.
Customer Support
If you encounter any issues not covered in this manual or require further assistance, please contact Xech customer support. Contact information can typically be found on the product packaging, the official Xech website, or the warranty card.


