
1. Introduction
This manual provides comprehensive instructions for the safe and proper installation, operation, and maintenance of your monTEK Long Arm TV Wall Mount. Please read all instructions carefully before beginning installation and retain this manual for future reference.
2. Product Overview
The monTEK Long Arm TV Wall Mount is designed to provide a versatile and secure mounting solution for your television. Its full-motion capabilities allow for optimal viewing angles from various positions within a room.
Key Features:
- Long Extension: Extends up to 42.5 inches from the wall for flexible viewing, and retracts to a slim 2.4 inches.
- Full Motion: Offers a 120° swivel range, a tilt angle of 12° down to 3° up, and a ±3° post-installation level adjustment.
- Robust Construction: Supports TVs up to 132 lbs, designed for durability and safety.
- Cable Management: Integrated Velcro straps help conceal and organize cables for a tidy appearance.
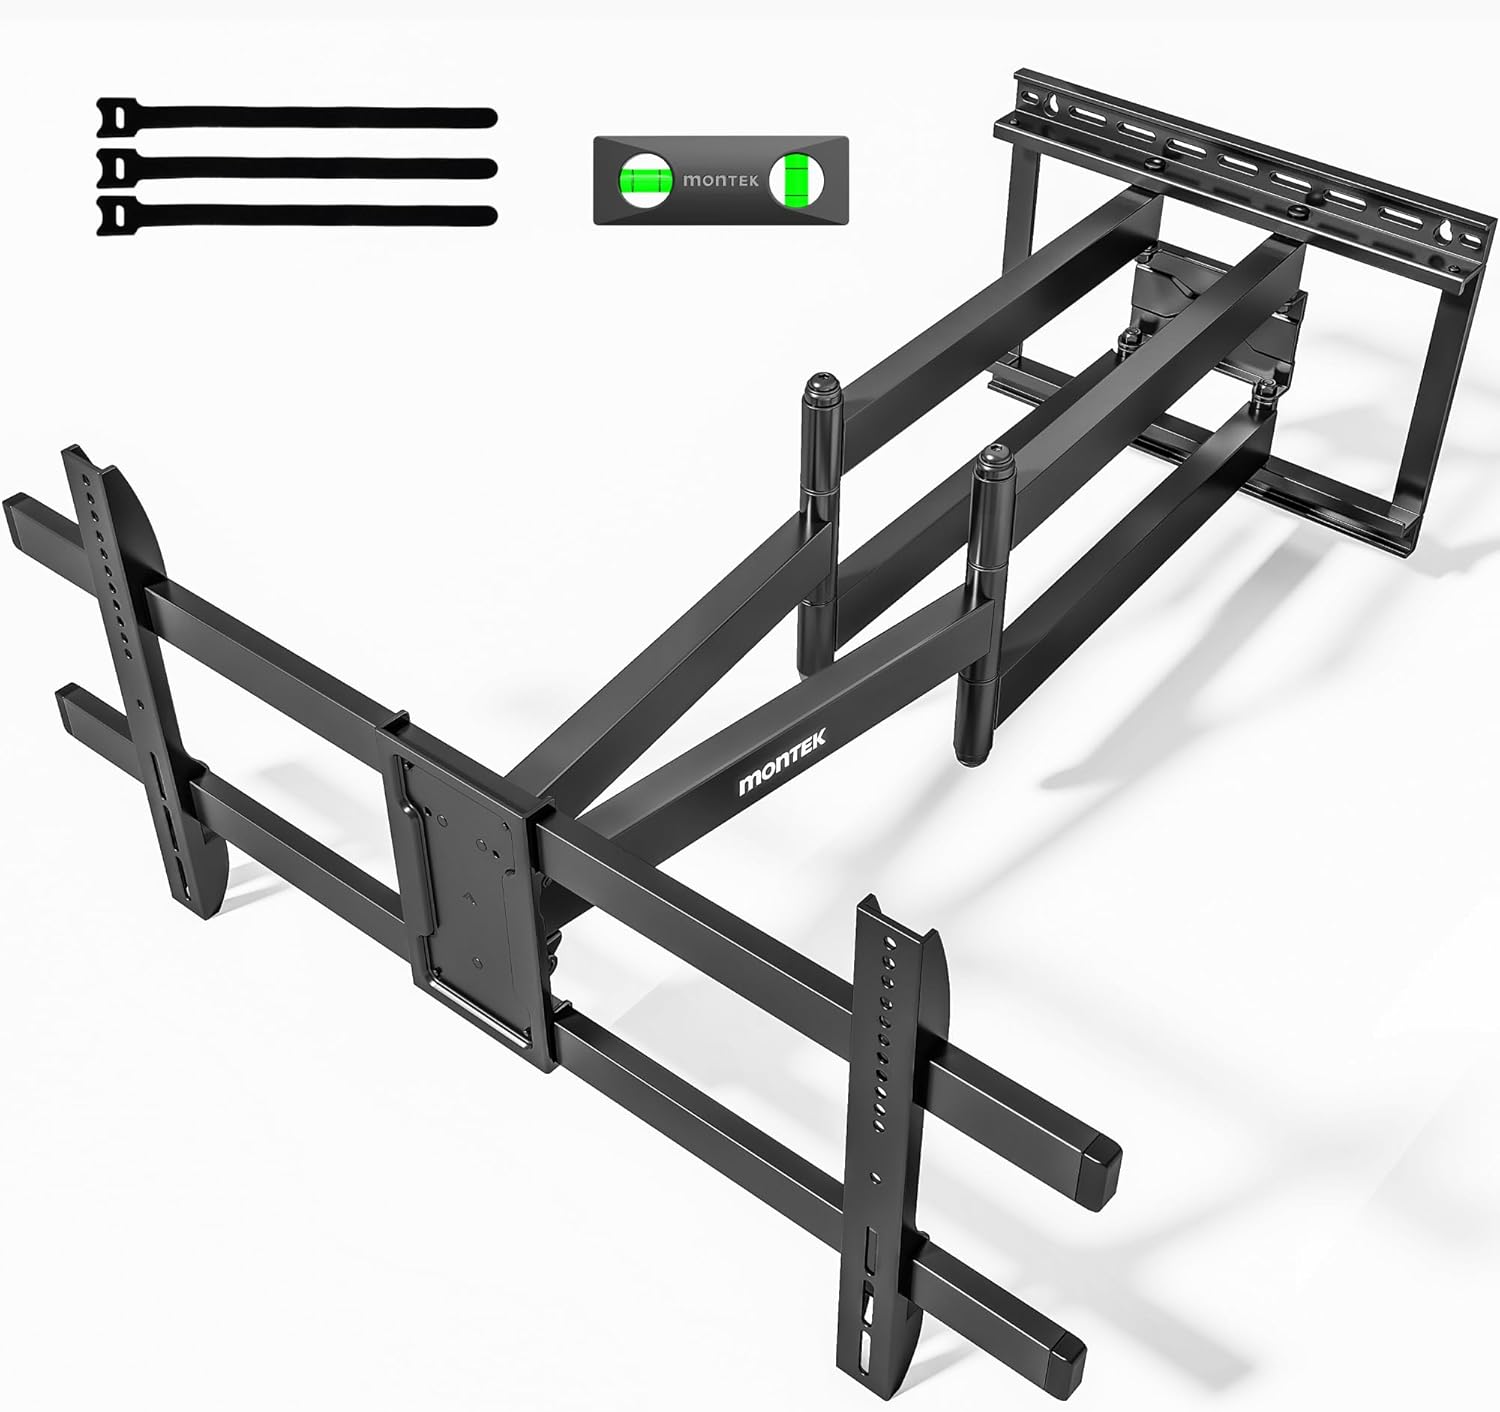
Figure 2.1: monTEK Long Arm TV Wall Mount with accessories including cable ties and a bubble level.
3. Compatibility
Ensure your TV and wall type are compatible with this mount before installation.
TV Size & Weight:
- Fits most 43-90 inch LCD/LED/OLED 4K flat screen or curved TVs.
- Maximum weight capacity: 132 lbs.
VESA Patterns:
- Compatible with VESA patterns from 200x200 mm up to 800x400 mm.
Wall Types:
- Designed for installation on 16-inch or 18-inch wood studs.
- Also suitable for concrete and brick walls (anchors included).
- CAUTION: Do not install the mount on drywall alone.

Figure 3.1: Visual guide for TV and wall compatibility.
4. Safety Information
Improper installation can lead to serious injury or damage. Always follow these safety guidelines:
- Ensure the mounting surface can safely support the combined weight of the mount and your TV.
- Always locate wall studs or use appropriate anchors for concrete/brick walls.
- Do not install on drywall alone.
- Use all provided hardware and tools as instructed.
- If you are unsure about any part of the installation, seek professional assistance.
- Keep children and pets away during installation.
5. Package Contents
Verify that all components are present and undamaged before installation. If any parts are missing or damaged, contact customer service.
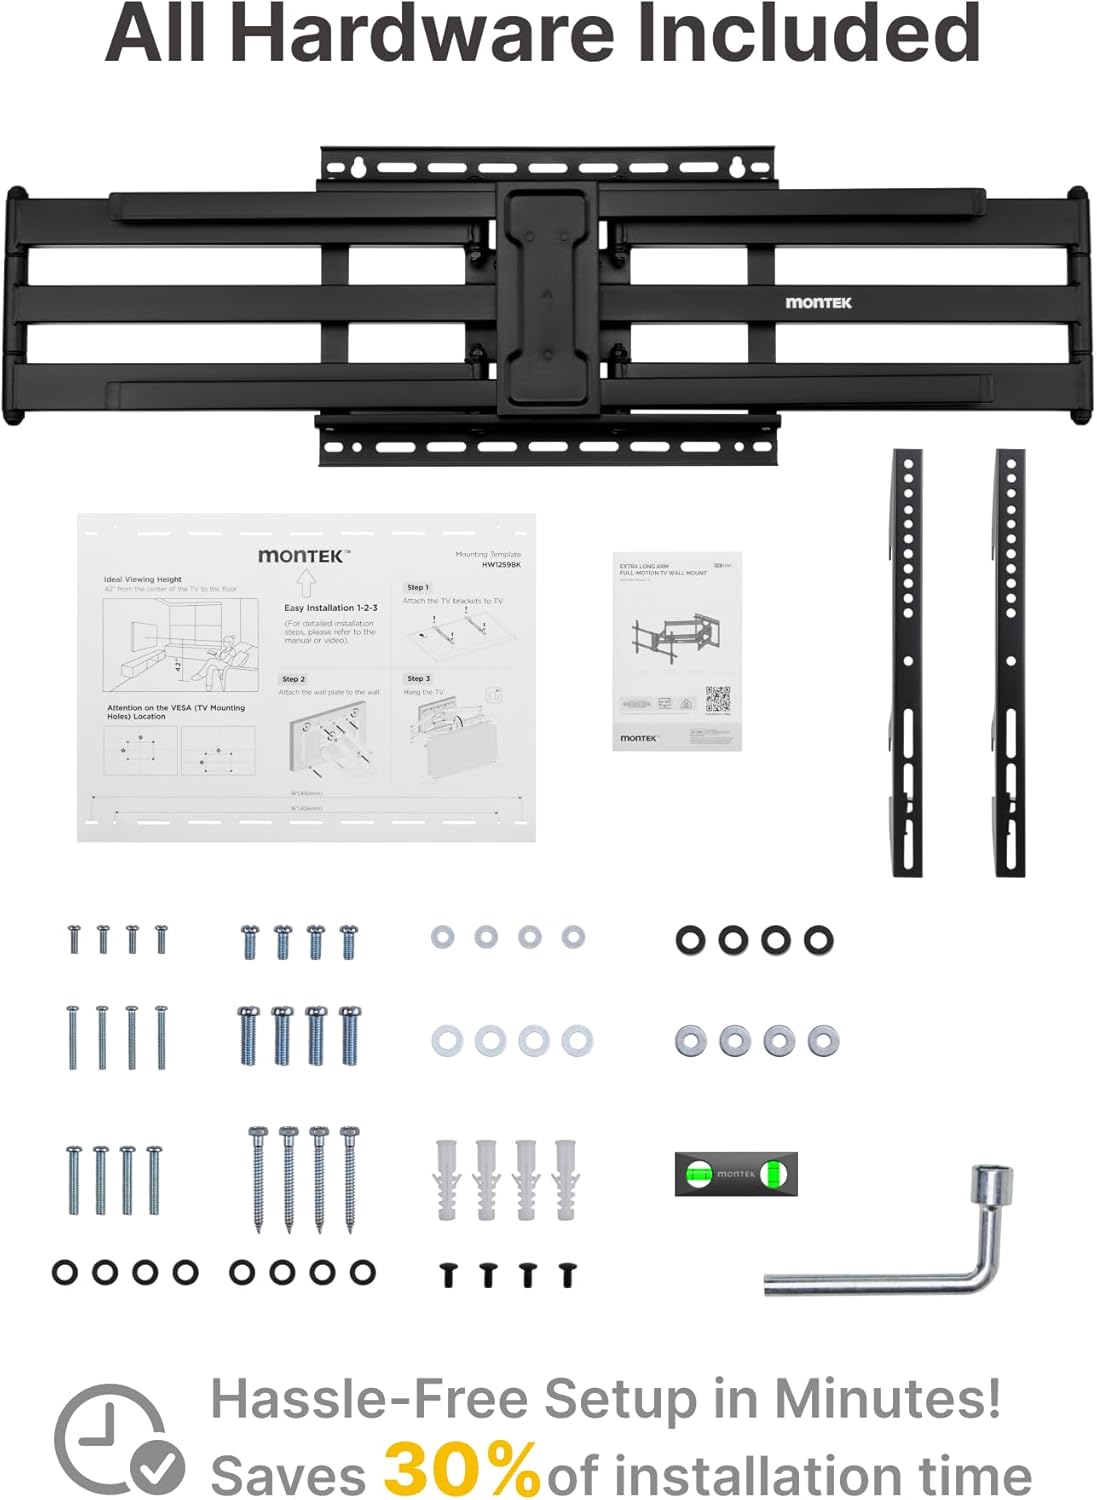
Figure 5.1: All hardware and tools included in the package.
Included Items:
- TV Wall Mount Assembly
- TV Brackets (for attaching to TV)
- Mounting Template
- Bubble Level
- Various TV Screws (M4, M6, M8)
- Washers and Spacers
- Lag Bolts (for wood studs)
- Concrete Anchors (for concrete/brick walls)
- Wrench
- Velcro Cable Ties
- Instruction Manual
6. Setup and Installation
The installation process is designed to be quick and easy, saving up to 30% of installation time. Follow these steps carefully.
Step 1: Prepare for Installation
- Clear the installation area of any obstructions.
- Locate wall studs using a stud finder, or mark drill points for concrete/brick walls.
- Determine the desired height for your TV.
Step 2: Attach Brackets to TV
- Carefully place your TV face-down on a soft, clean surface to prevent scratches.
- Identify the correct VESA mounting holes on the back of your TV.
- Select the appropriate screws, washers, and spacers from the hardware kit that fit your TV's mounting holes.
- Attach the TV brackets to the back of your TV using a screwdriver. Ensure they are securely fastened but do not overtighten.
Step 3: Mount Wall Plate
- Tape the mounting template to the wall at your desired TV height.
- Use the included bubble level to ensure the template is perfectly horizontal.
- Mark the drill points through the template.
- Drill pilot holes at the marked locations. For wood studs, use a drill bit appropriate for the lag bolts. For concrete/brick, use a masonry drill bit and insert the plastic anchors.
- Align the wall plate of the TV mount with the drilled holes and secure it to the wall using the lag bolts. Tighten all bolts firmly.
Step 4: Hang the TV
- With assistance, carefully lift your TV and hook the attached TV brackets onto the wall plate.
- Ensure the TV is securely seated on the mount.
- Tighten the security screws located at the bottom of the TV brackets to prevent accidental dislodgement.

Figure 6.1: Simplified 3-step installation overview.
Installation Video:
Video 6.1: A seller-provided video demonstrating the installation process for the monTEK Long Arm TV Wall Mount.
7. Operating and Adjustments
Your monTEK TV mount offers extensive adjustability for an optimal viewing experience.
Extension and Retraction:
- Gently pull the TV away from the wall to extend the arm up to 42.5 inches.
- Push the TV back towards the wall to retract the arm to a minimum of 2.4 inches.
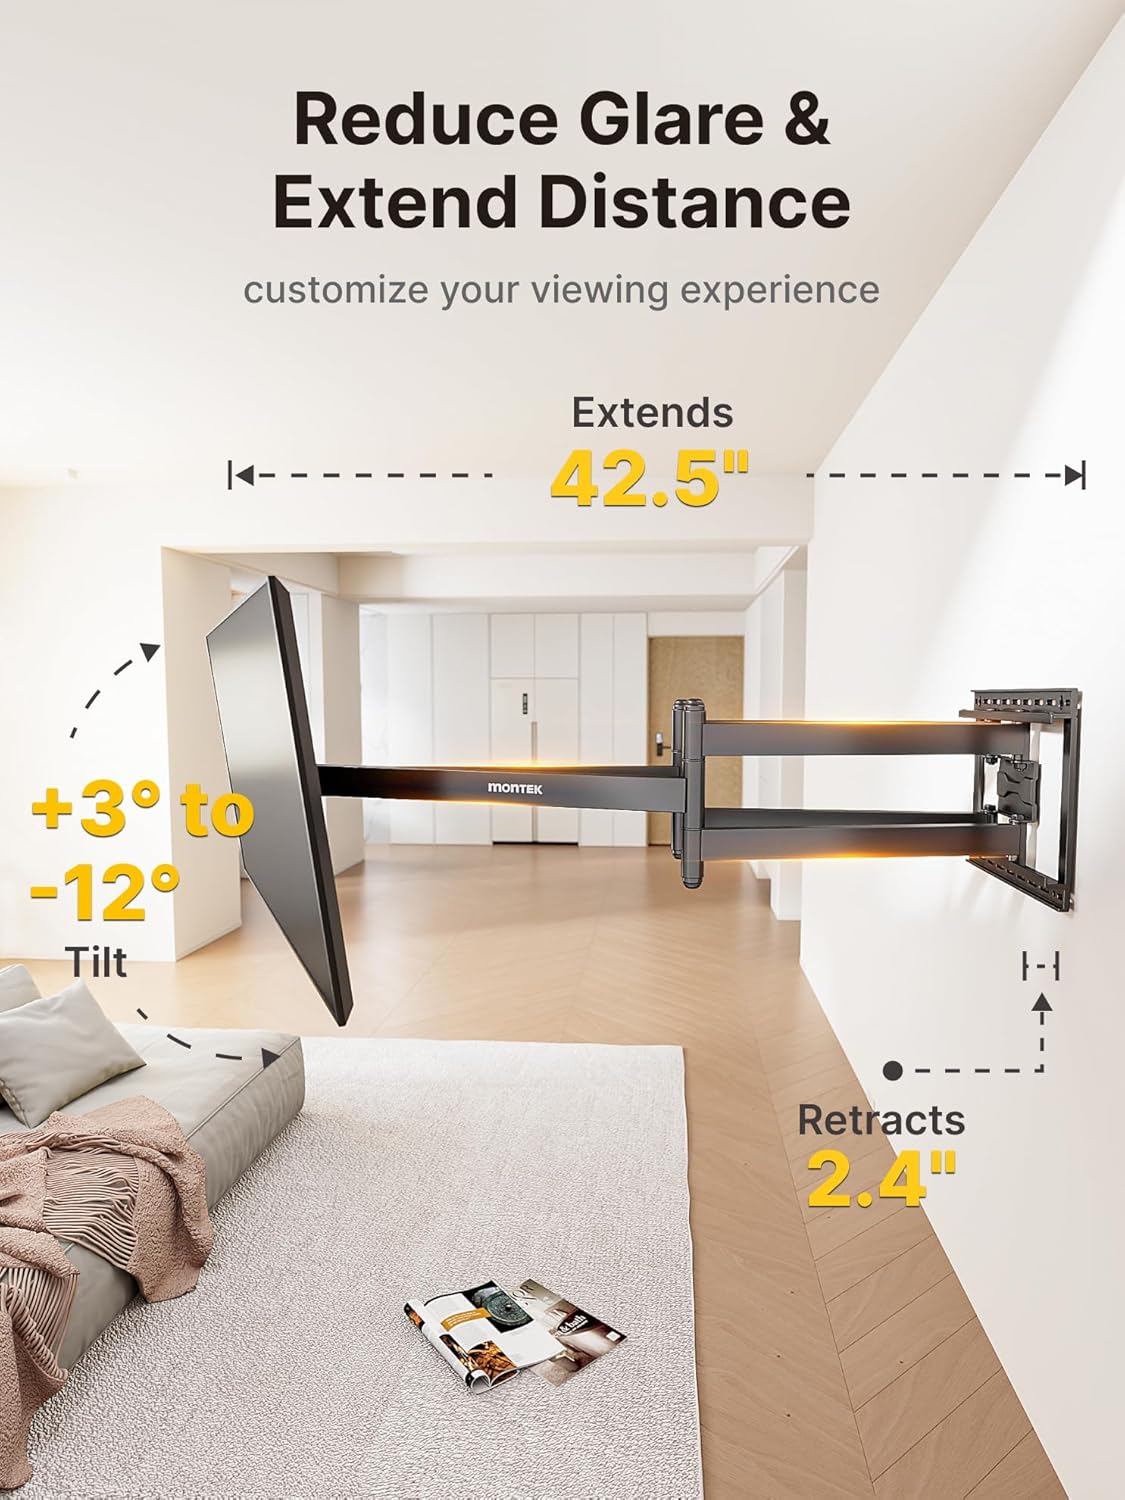
Figure 7.1: Illustration of the mount's extension, retraction, and tilt capabilities.
Swivel:
- The mount allows for a 120° swivel range, enabling you to adjust the TV's horizontal viewing angle.

Figure 7.2: Detailed view of adjustment points for level, tilt, extension, and cable management.
Tilt:
- Adjust the TV's vertical angle from 12° down to 3° up to reduce glare and optimize viewing comfort.
Level Adjustment:
- After installation, you can make a ±3° level adjustment to ensure your TV is perfectly horizontal.

Figure 7.3: Post-installation leveling for fine-tuning TV position.
Cable Management:
- Use the provided Velcro straps to secure and organize cables along the mount arms, preventing tangles and ensuring a clean look.
Feature Video:
Video 7.1: A seller-provided video highlighting the features and motion capabilities of the monTEK Long Arm TV Wall Mount.
8. Maintenance
Regular maintenance ensures the longevity and safe operation of your TV mount.
- Periodic Inspection: Regularly check all screws and bolts to ensure they remain tight. Retighten if necessary.
- Cleaning: Wipe the mount with a soft, dry cloth to remove dust. Avoid using abrasive cleaners or solvents.
- Lubrication: The moving parts are designed for smooth operation and generally do not require lubrication. If movement becomes stiff, contact customer support.
9. Troubleshooting
If you encounter any issues during or after installation, refer to the following common solutions or contact customer support.
Common Issues:
- TV not level: Use the ±3° post-installation level adjustment feature. Ensure the wall plate was installed level initially.
- Mount feels loose: Recheck all lag bolts securing the wall plate to the wall and all screws attaching the TV brackets to the TV. Ensure they are tightened securely.
- Difficulty moving arms: Ensure no cables are obstructing movement. Check for any debris in the joints.
For further assistance, please refer to the detailed instruction manual or contact monTEK customer support.
10. Specifications
| Model Number | HW1259BK |
| TV Size Compatibility | 43-90 inches |
| Weight Capacity | Up to 132 lbs |
| VESA Compatibility | 200x200 mm to 800x400 mm |
| Extension from Wall | 2.4 inches (retracted) to 42.5 inches (extended) |
| Swivel Range | 120° |
| Tilt Angle | 12° down to 3° up |
| Level Adjustment | ±3° post-installation |
| Material | Metal |
| Color | Black |
| Product Dimensions | 47 x 13 x 2.5 inches |
| Item Weight | 24.2 pounds |
11. Warranty and Support
monTEK provides reliable after-sales service and technical support for this product. If you have any queries, issues, or require assistance, please contact monTEK customer service through the retailer's platform or the contact information provided in your product packaging.