
1. Product Overview
The ORICO 9958RU3 is a high-capacity 5-bay external hard drive enclosure designed for 2.5/3.5-inch SATA HDDs and SSDs. It supports a total capacity of up to 110 TB (5 x 22 TB drives) and offers flexible RAID modes including RAID 0, 1, 3, 5, 10, JBOD, Clone, and ClearMode. Featuring a USB 3.0 interface for high-speed data transmission up to 230MB/s, a built-in 150W power supply, and an aluminum alloy shell with an 80mm cooling fan for efficient heat dissipation, this enclosure provides a robust and reliable storage solution for various applications, from video editing to data backup.

Figure 1: Front view of the ORICO 5-Bay RAID External Hard Drive Enclosure.
2. Package Contents
Please verify that all items listed below are included in your package. If any items are missing or damaged, please contact ORICO customer support.
- 1 x 5-Bay RAID Hard Drive Enclosure
- 1 x Screwdriver
- 1 x Power Cable
- 1 x Data Cable (USB 3.0 Type-A)
- 1 x Screw Pack
- 1 x User Manual
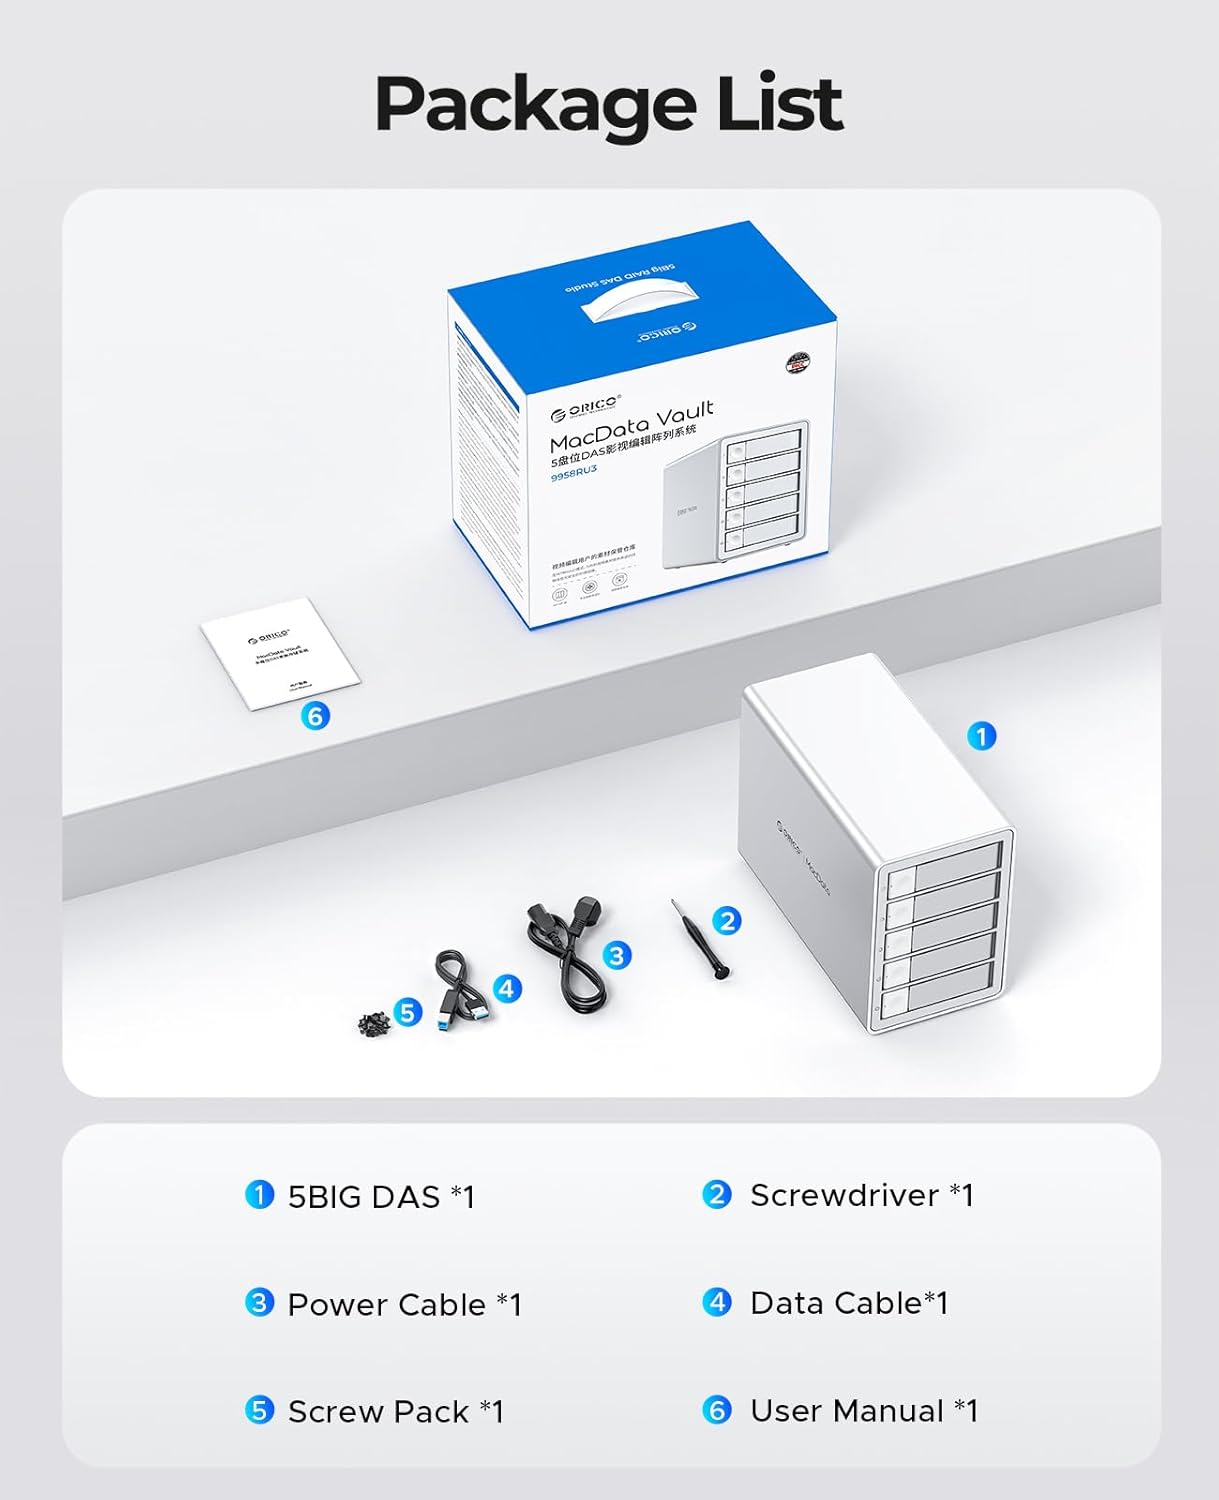
Figure 2: Illustration of the package contents, including the enclosure, cables, screwdriver, screws, and user manual.
3. Setup and Installation
Follow these steps to install your 2.5-inch or 3.5-inch SATA HDDs/SSDs into the enclosure.
- Open the Drive Bay: Press the door button located on the left side of the enclosure to release and open the drive tray.
- Install Drive onto Bracket: Pull out the hard drive bracket. For 3.5-inch HDDs or 2.5-inch HDDs/SSDs, align the drive with the screw holes on the bracket and secure it using the provided screws. Ensure the SATA connector on the drive faces the rear of the bracket.
- Insert Bracket into Enclosure: Carefully slide the bracket with the installed drive back into the corresponding bay in the enclosure until it clicks into place. Close the bay door.
- Repeat for Additional Drives: Repeat steps 1-3 for each hard drive you wish to install.
- Connect Cables: Connect the power cable to the enclosure and a power outlet. Connect the USB 3.0 data cable from the enclosure to your computer.

Figure 3: Visual guide for hard drive installation steps.
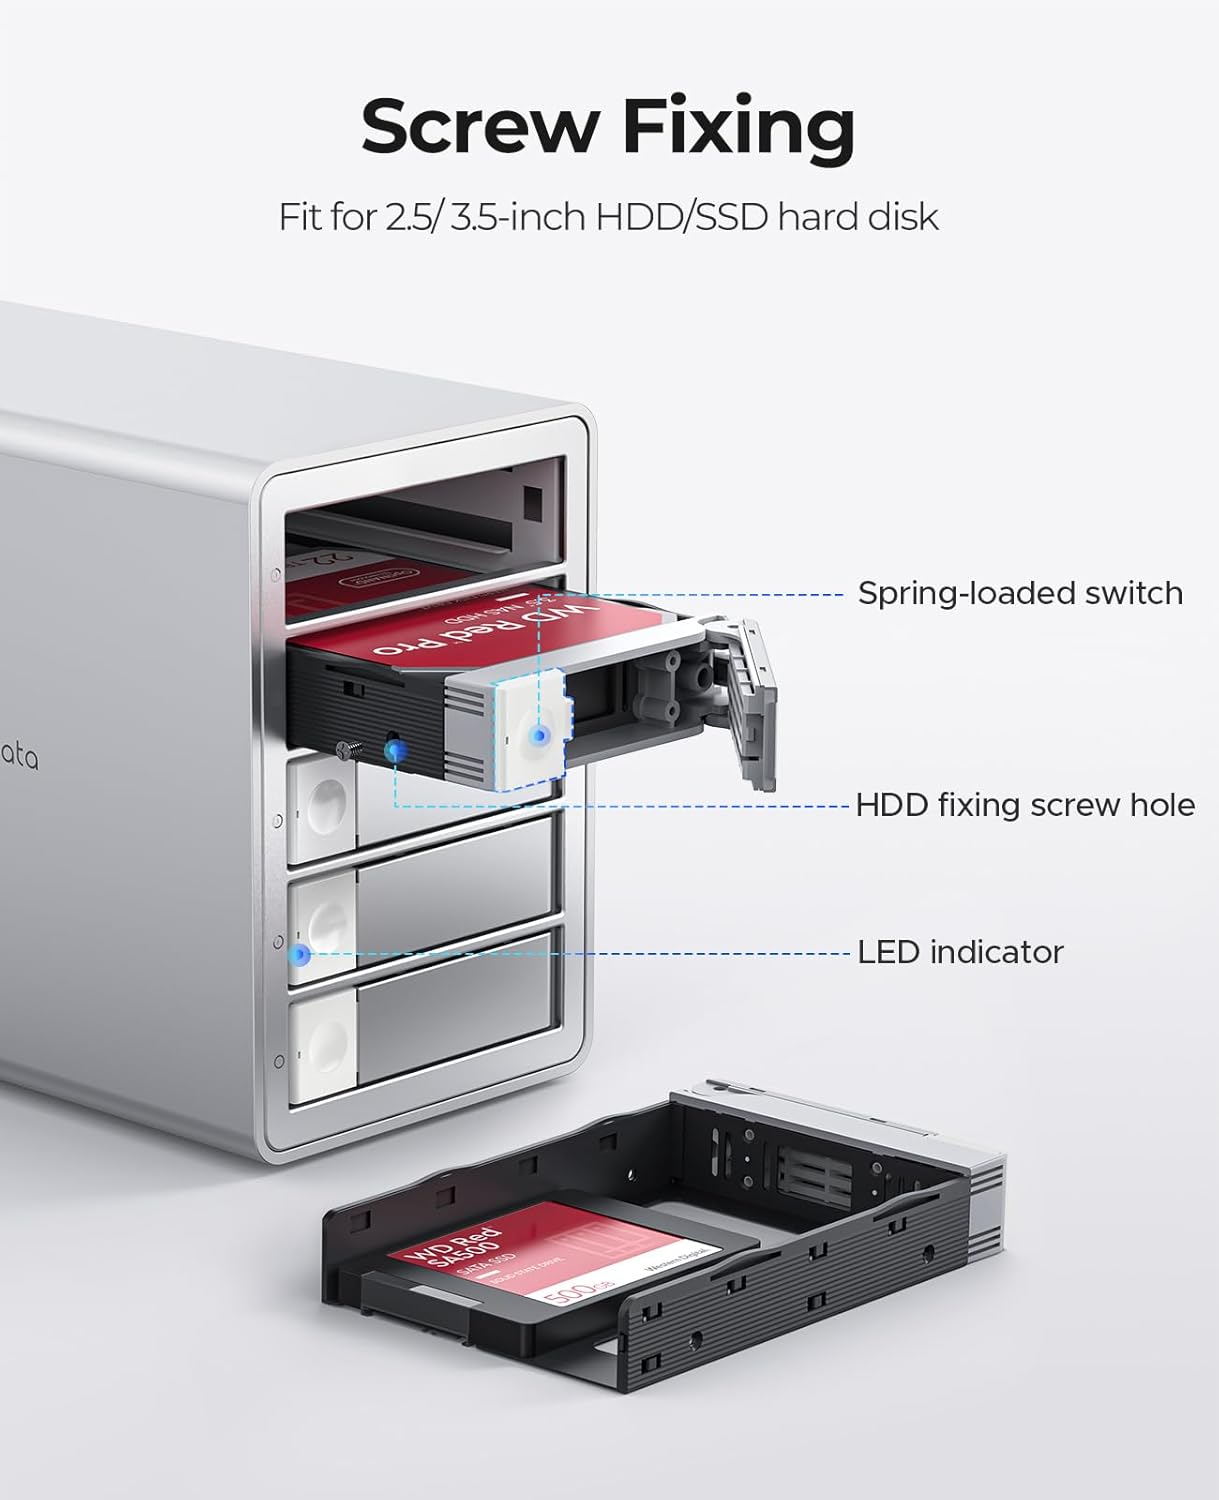
Figure 4: Detail of the screw fixing mechanism for securing drives within the bracket.
4. RAID Configuration
The ORICO 9958RU3 supports various hardware RAID modes. It is crucial to back up all data before changing the RAID mode, as this process will erase all data on the drives. RAID management software is not supported for Mac OS and Linux systems; you will need to manually group RAID.
RAID modes are configured using DIP switches located on the rear of the enclosure. Refer to the diagram below for switch settings for each mode:

Figure 5: Overview of supported RAID modes and their corresponding DIP switch configurations.
- RAID 0 (Striping): Provides faster data transfer speeds by striping data across multiple drives. Offers no data redundancy.
- RAID 1 (Mirroring): Provides data redundancy by mirroring data across two drives. Offers protection against single drive failure.
- RAID 3 (Striping with Parity): Stripes data at a byte level with a dedicated parity drive. Good for large data transfers.
- RAID 5 (Striping with Distributed Parity): Stripes data and parity information across all drives. Offers good performance and data redundancy.
- RAID 10 (Striping of Mirrors): Combines RAID 1 and RAID 0 for both performance and redundancy. Requires at least four drives.
- JBOD (Just a Bunch Of Disks): Combines multiple drives into a single logical volume without striping or mirroring.
- Clone Mode: Creates an exact copy of one drive onto another.
- ClearMode (Normal): Each drive operates independently as a separate volume.
After setting the DIP switches, press the 'SET' button to apply the new RAID configuration. The enclosure also supports software management for certain operating systems, though manual configuration is always an option.

Figure 6: Dual methods for RAID management, including manual DIP switch configuration.
5. Operating Instructions
5.1 Data Transmission
The ORICO 9958RU3 utilizes a USB 3.0 interface, providing high-speed data transfer rates up to 5Gbps, with actual mechanical hard disk transmission speeds reaching up to 230MB/s. Ensure your computer's USB port supports USB 3.0 for optimal performance.

Figure 7: High-speed data transmission via USB 3.0.
5.2 Power Supply
The enclosure features a built-in 150W power supply, ensuring stable and smooth data transfer even when multiple disks are actively reading or writing. This integrated power supply eliminates the need for bulky external power adapters, contributing to a cleaner workspace.
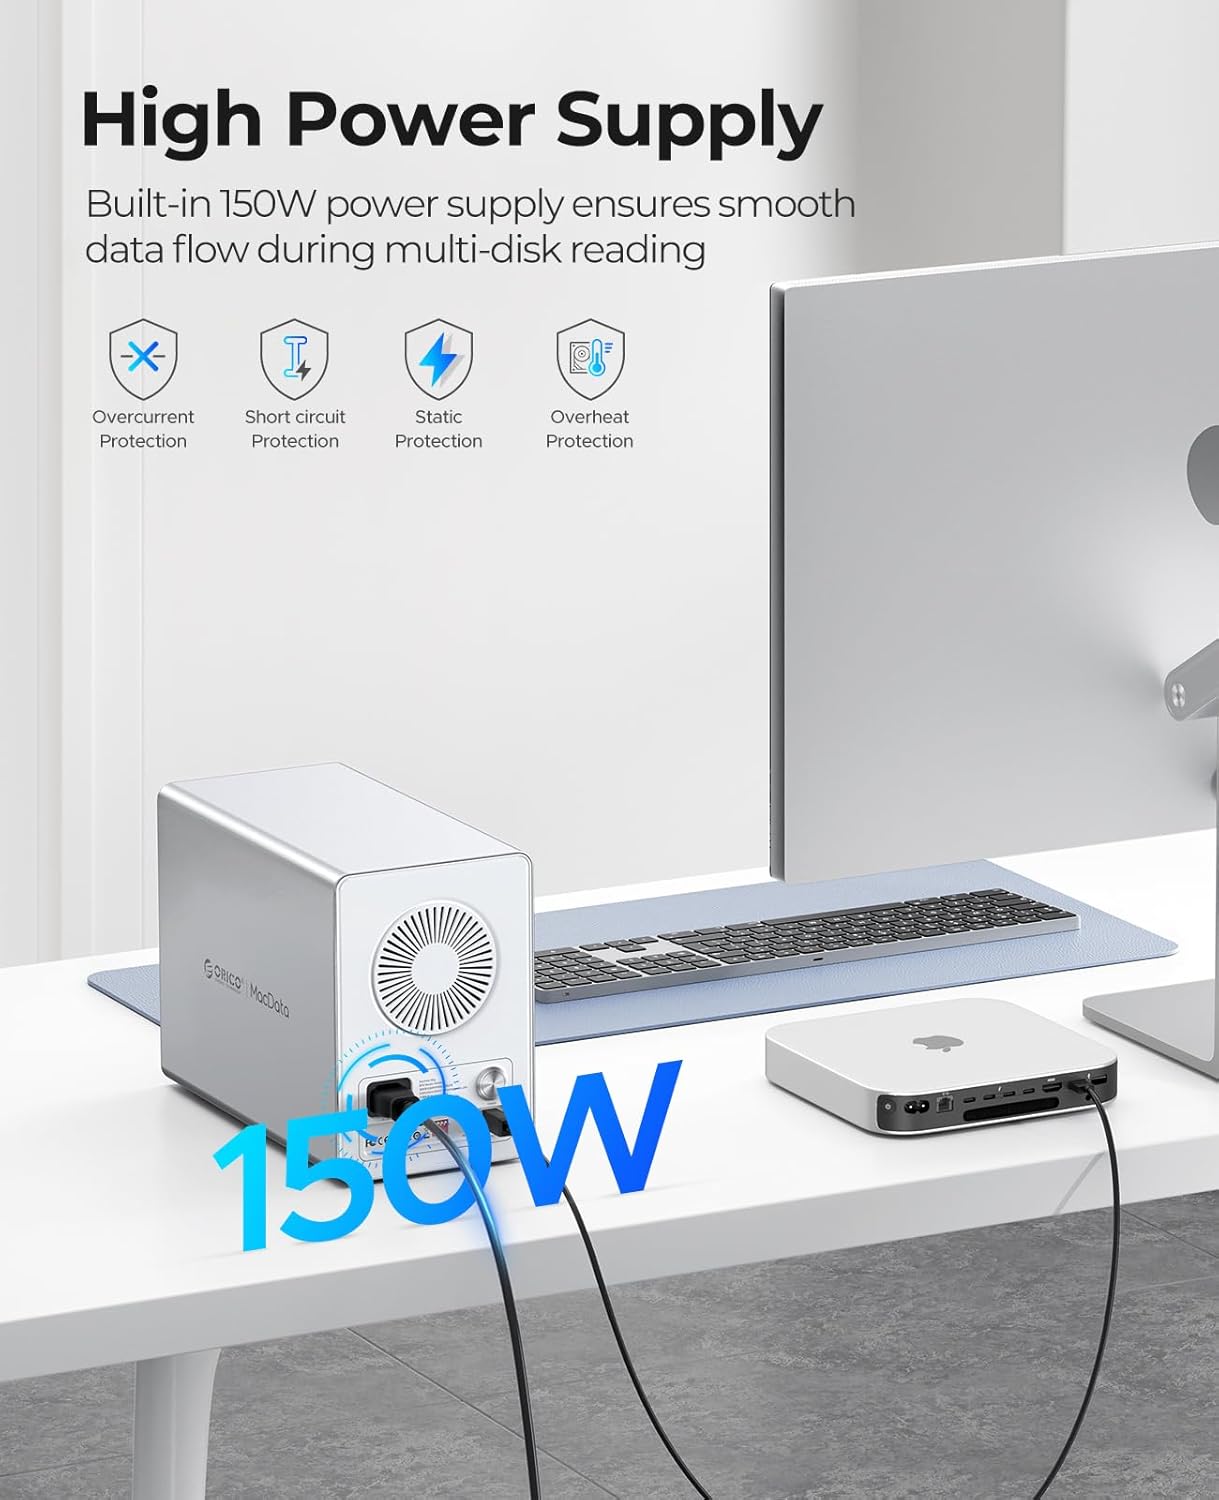
Figure 8: Built-in 150W power supply with protection features.
5.3 Smart Sleep Mode
To reduce hard drive wear and power consumption, the enclosure automatically enters hibernation (sleep mode) after 10 minutes of data-free interaction. This feature helps prolong the lifespan of your hard drives and conserves energy.

Figure 9: Smart Sleep Mode for power saving and drive longevity.
6. Maintenance
6.1 Heat Dissipation
The ORICO 9958RU3 features an aluminum alloy metal shell combined with an 80mm cooling fan and front/rear heat dissipation airflow design. This system effectively discharges heat, ensuring stable and efficient operation even under high load conditions. To maintain optimal cooling, ensure the fan vents are not obstructed and the enclosure is placed in a well-ventilated area.

Figure 10: Rear view highlighting the 80mm cooling fan and heat dissipation design.
6.2 Cleaning
To clean the enclosure, disconnect it from power and your computer. Use a soft, dry cloth to wipe the exterior. For dust accumulation in the fan vents, use compressed air. Do not use liquid cleaners or abrasive materials.
7. Troubleshooting
This section addresses common issues you might encounter with your ORICO 5-Bay RAID Enclosure.
| Problem | Possible Cause | Solution |
|---|---|---|
| Enclosure not recognized by computer after restart/update. | Temporary connection issue or driver conflict. | Power down the enclosure, then power it back on. Disconnect and reconnect the USB data cable. Ensure your operating system's drivers are up to date. |
| Drives are running hot. | Insufficient airflow, high load, or environmental temperature. | Ensure the enclosure is placed in a well-ventilated area. Check that the fan vents are clear of obstructions. Reduce continuous heavy load if possible. |
| Drives disconnect randomly. | Loose cable connection, power fluctuations, or drive issues. | Check all cable connections (power and data). Ensure the power outlet is stable. Test individual drives outside the enclosure if possible to rule out drive failure. Update USB drivers on your computer. |
| RAID configuration not applying. | Incorrect DIP switch settings or 'SET' button not pressed. | Double-check the DIP switch settings against the manual's RAID configuration diagram. Ensure you press the 'SET' button firmly after changing switches. Remember to back up data before any RAID changes. |
8. Specifications
| Feature | Detail |
|---|---|
| Brand | ORICO |
| Model Number | 9958RU3 |
| Supported Drive Type | 2.5/3.5-inch SATA HDD/SSD |
| Max Single Drive Capacity | Up to 22 TB |
| Max Total Capacity | Up to 110 TB (5 x 22 TB) |
| RAID Modes Supported | RAID 0/1/3/5/10/JBOD/Clone/ClearMode |
| Interface | USB 3.0 Type-A |
| Data Transfer Rate | Up to 5 Gbps (USB 3.0), 230MB/s (mechanical HDD) |
| Power Supply | Built-in 150W |
| Cooling System | Aluminum alloy shell, 80mm cooling fan |
| Compatible Operating Systems | Windows, Mac OS, Linux |
| Product Dimensions | 10 x 2 x 2.7 inches |
| Item Weight | 10.58 pounds |
| Material | Aluminum |
8.1 Universal Compatibility
The ORICO 9958RU3 is compatible with a wide range of devices and operating systems, ensuring broad usability across different computing environments.

Figure 11: Universal compatibility across various devices and operating systems.
9. Warranty and Support
ORICO products are designed and manufactured to the highest quality standards. This product comes with a standard manufacturer's warranty. For detailed warranty terms and conditions, please refer to the warranty card included in your package or visit the official ORICO website.
For technical support, troubleshooting assistance, or any inquiries regarding your ORICO 5-Bay RAID External Hard Drive Enclosure, please contact ORICO customer support through their official channels. You can often find support information, FAQs, and driver downloads on the ORICO official website.
Visit the ORICO Store on Amazon for more products and information.