1. Introduction
This manual provides detailed instructions for the installation, operation, and maintenance of your Jansite MT10 Motorcycle Carplay & Android Auto System. This device integrates a 7-inch display with wireless Carplay/Android Auto functionality and a dual 2K dash camera system, designed for enhanced navigation, communication, and recording during motorcycle rides. Please read this manual thoroughly before using the product to ensure proper function and safety.
2. Important Safety Information
Observe the following safety precautions to prevent damage to the device or injury to yourself and others:
- Installation: Ensure the device is securely mounted and all cables are properly routed to avoid interference with motorcycle controls or moving parts. Improper installation can lead to accidents.
- Power Connection: Connect the device to the motorcycle's power supply according to the instructions. Incorrect wiring can cause electrical shorts or damage.
- Operation While Riding: Avoid operating the device or making complex adjustments while riding. Focus on the road and traffic conditions. Use voice commands or the wired remote for essential functions.
- Water Resistance: The device is IP67 waterproof. However, avoid submerging it in water or exposing it to high-pressure water jets. Ensure all ports are securely covered when not in use.
- Temperature: Do not expose the device to extreme temperatures.
- Maintenance: Do not attempt to disassemble or repair the device yourself. Refer to qualified service personnel for any repairs.
3. Package Contents
Verify that all items are present in the package:
- Jansite MT10 Display Unit (7-inch)
- Front Camera (2K)
- Rear Camera (2K)
- Camera Cables
- 64GB TF Card (pre-installed or separate)
- Mounting Bracket Kit
- Power Cable
- Wired Remote Control
- Installation Tools
- User Manual

Image 1: Jansite MT10 system components including the main display, cameras, remote, and mounting hardware.
4. Product Overview
The Jansite MT10 is an integrated system designed to enhance your motorcycle riding experience. Key features include:
- 7-inch HD IPS Touch Screen: Provides clear visuals and responsive touch control.
- Wireless Carplay & Android Auto: Seamless integration with your smartphone for navigation, music, and calls.
- Dual 2K Dash Cameras: Simultaneous front and rear recording for comprehensive coverage.
- IP67 Waterproof Design: Ensures reliable operation in various weather conditions.
- Dual Bluetooth 5.0: Stable connection to your phone and Bluetooth helmet/earphones.
- Wired Remote Control: Safe and convenient access to essential functions while riding.
- Built-in WiFi: For real-time viewing, playback, and downloading of dash cam footage.
- Loop Recording & G-Sensor: Automatic recording management and emergency video locking.

Image 2: Illustration of the dual 2K cameras providing 150-degree coverage for front and rear recording.

Image 3: Key features including loop recording, G-sensor for emergency video locking, and built-in WiFi for video management.
5. Setup and Installation
Proper installation is crucial for the device's performance and your safety. It is recommended to have this installed by a professional if you are unsure.
5.1 Mounting the Display Unit
- Attach the mounting bracket to the display unit.
- Securely fasten the display unit with the bracket to your motorcycle's handlebar. Ensure it does not obstruct your view or interfere with controls.
- Adjust the viewing angle for optimal visibility.
5.2 Camera Installation
- Mount the front camera in a position that provides a clear, unobstructed view of the road ahead.
- Mount the rear camera to capture the view behind your motorcycle.
- Route the camera cables securely along the motorcycle frame, away from hot or moving parts, and connect them to the main display unit.
5.3 Power Connection
- Connect the power cable to the main display unit.
- Connect the red wire (ACC) to the motorcycle's ignition power source (switched 12V).
- Connect the black wire (GND) to a suitable ground point on the motorcycle chassis.
- Ensure all connections are secure and waterproof.
5.4 Wired Remote Control Installation
- Mount the wired remote control in an easily accessible location on your handlebar, ensuring it does not interfere with riding.
- Connect the remote control cable to the designated port on the main display unit.

Image 4: Detailed installation diagram showing connections for front camera, rear camera, wired controller, dash cam, power, and ground.
6. Operating Instructions
6.1 Powering On/Off
The device will power on automatically when the motorcycle ignition is turned on and power is supplied. It will power off when the ignition is turned off.
6.2 Wireless Carplay & Android Auto Connection
- Ensure Bluetooth and Wi-Fi are enabled on your smartphone.
- On the MT10 display, navigate to the Carplay or Android Auto icon and tap it.
- On your smartphone, search for and connect to the MT10's Bluetooth signal.
- Follow the on-screen prompts on both the MT10 and your phone to establish the wireless connection.
- Once connected, your phone's Carplay or Android Auto interface will appear on the MT10 display, allowing access to navigation, music, and communication apps.
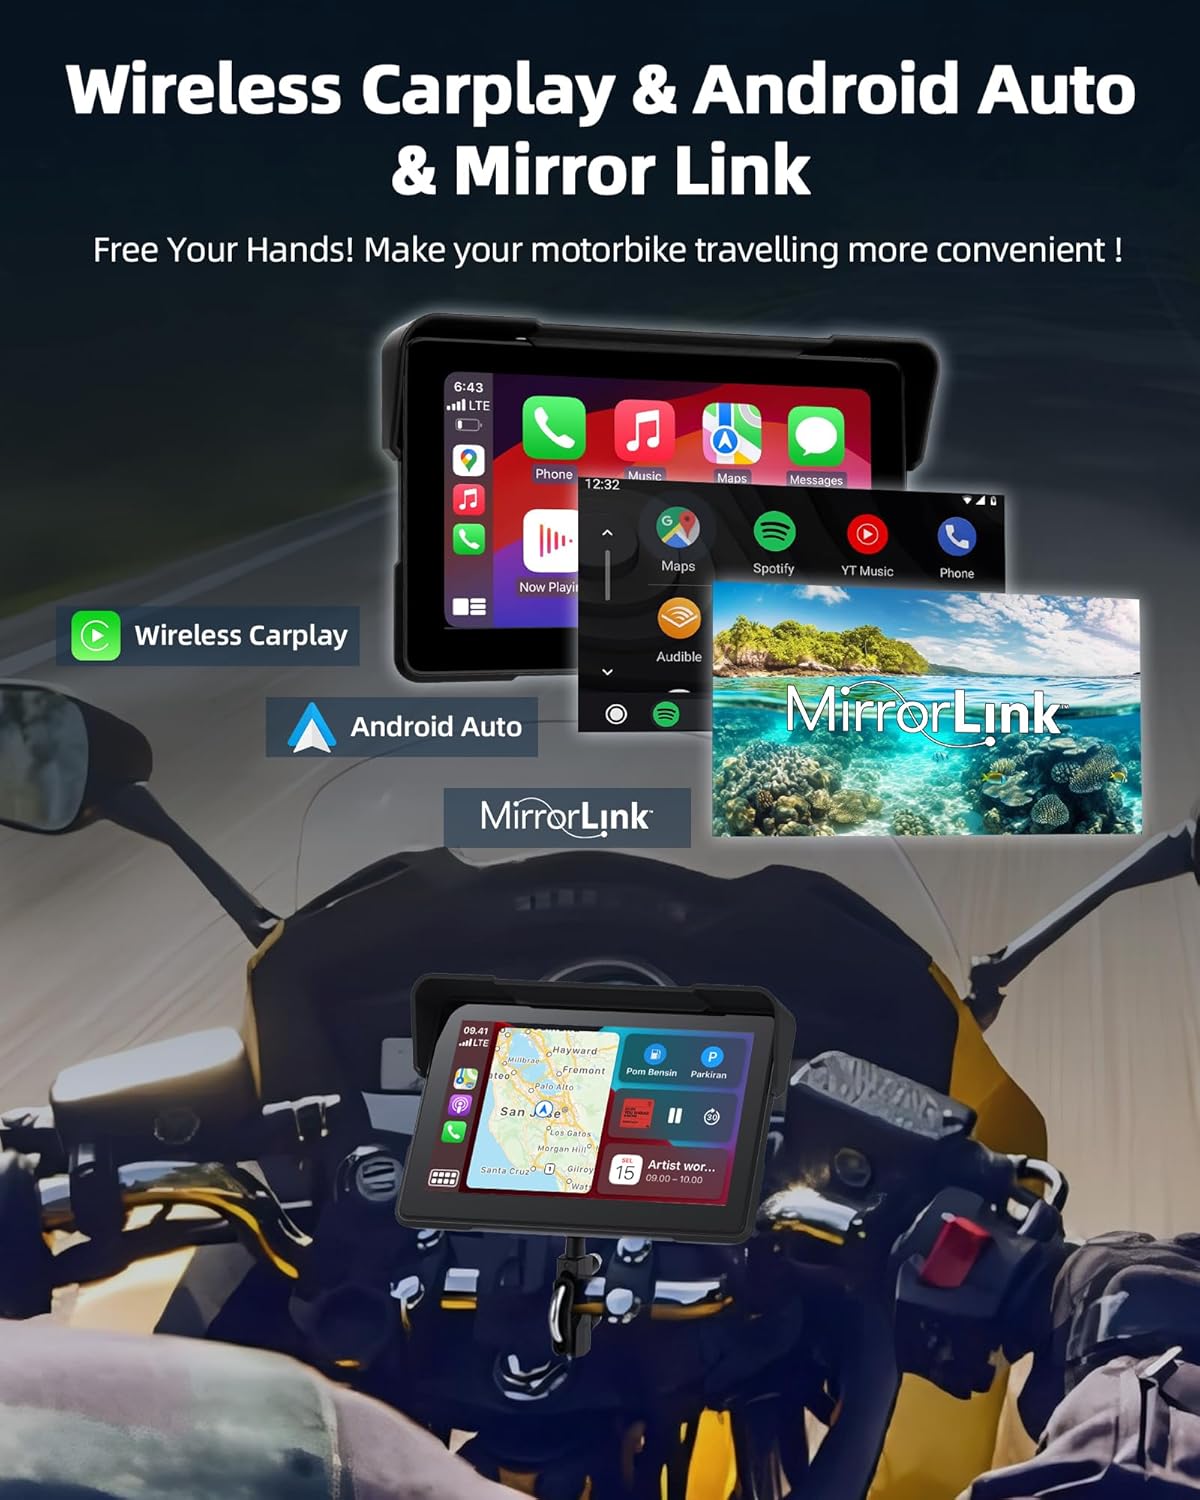
Image 5: Display showing wireless Carplay, Android Auto, and Mirror Link options for smartphone integration.
6.3 Dual Bluetooth Connectivity
The MT10 supports dual Bluetooth connections for enhanced audio and communication.
- Connect Phone to MT10: Pair your smartphone to the MT10 via Bluetooth for Carplay/Android Auto functionality (as described in 6.2).
- Connect MT10 to Bluetooth Helmet/Earphones: On the MT10, go to Bluetooth settings and pair with your Bluetooth-enabled helmet or earphones.
- Once both connections are established, audio from your phone (music, navigation prompts, calls) will be routed through the MT10 to your helmet/earphones. You can manage volume and calls hands-free.

Image 6: Diagram illustrating the dual Bluetooth connection process: phone to Carplay screen, then Carplay screen to Bluetooth helmet or earphones.
6.4 Dash Cam Operation
The integrated dual 2K dash cameras automatically begin recording when the device powers on.
- Loop Recording: The system continuously records, overwriting the oldest files when the 64GB TF card is full. Important footage can be locked to prevent overwriting.
- G-Sensor: In the event of a sudden impact or collision, the built-in G-sensor will automatically lock the current recording, protecting it from being overwritten.
- WiFi Function: Connect your smartphone to the MT10's Wi-Fi network to access the dash cam app. From the app, you can view live footage, play back recorded videos, and download files directly to your phone.
6.5 Wired Remote Control Functions
The wired remote control provides convenient access to key functions without needing to touch the main display.
- Take a Picture: Capture still images from the dash cam.
- Switch Monitors: Toggle between front camera, rear camera, or split-screen views.
- Answer/Reject Calls: Manage incoming phone calls.
- Menu Switcher: Navigate through device menus.
- GPS Location: Access GPS-related functions.

Image 7: Wired remote control with buttons for taking pictures, switching monitors, answering calls, and menu navigation.
6.6 Voice Control
When connected to Carplay or Android Auto, you can utilize your smartphone's voice assistant (Siri or Google Assistant) for hands-free control. Activate the voice assistant through the display or a dedicated button on your phone/helmet, then issue commands for navigation, music playback, calls, and more.
7. Maintenance
- Cleaning: Use a soft, damp cloth to clean the display and camera lenses. Avoid abrasive cleaners or solvents.
- Waterproofing: While IP67 rated, regularly inspect all cable connections and port covers to ensure they are secure and free from damage, maintaining the waterproof seal.
- TF Card: Periodically format the 64GB TF card (e.g., once a month) through the device settings to maintain optimal recording performance and prevent data corruption. Back up any important footage before formatting.
- Storage: If storing the motorcycle for an extended period, consider disconnecting the device or storing it in a cool, dry place.

Image 8: Illustration highlighting the IP67 waterproof rating of the display unit, durable cameras, and waterproof power supply route.
8. Troubleshooting
| Problem | Possible Cause | Solution |
|---|---|---|
| Device does not power on. | No power supply; incorrect wiring; blown fuse. | Check power cable connections. Verify ACC and GND are correctly wired. Check motorcycle's fuse box. |
| Carplay/Android Auto not connecting. | Bluetooth/Wi-Fi off on phone; phone not compatible; incorrect pairing steps. | Ensure phone's Bluetooth/Wi-Fi is on. Confirm phone supports wireless Carplay/Android Auto. Re-attempt pairing process. Restart both devices. |
| No camera recording or footage issues. | TF card full or corrupted; cameras disconnected; incorrect settings. | Format the TF card (back up data first). Check camera cable connections. Verify recording settings in the device menu. |
| Bluetooth helmet/earphones not pairing. | Helmet/earphones in pairing mode; MT10 Bluetooth off; interference. | Ensure helmet/earphones are in pairing mode. Check MT10 Bluetooth settings. Try pairing in a location with less interference. |
| Time needs to be reset after each start. | Internal battery issue or specific firmware behavior. | This may indicate a specific operational characteristic or a need for a firmware update. Consult customer support if persistent. |
9. Specifications
| Feature | Detail |
|---|---|
| Brand | Jansite |
| Model Name | MT10 |
| Screen Size | 7 Inches |
| Screen Type | HD IPS Capacitive Touch Screen (1920 x 600 resolution) |
| Connectivity Technology | Bluetooth 5.0 (Dual Mode), Wi-Fi |
| Camera Resolution | Dual 2K (Front & Rear) |
| Storage Capacity | 64GB TF Card (included) |
| Waterproof Rating | IP67 |
| Vehicle Service Type | Motorcycle |
| Mounting Type | Handlebar Mount |
| Included Components | Display, 2 Cameras with cables, 64GB SD Card, Mounting Bracket, Power Cable, Wired Remote Control, Installation Tools, User Manual |
10. Warranty and Support
Specific warranty information for the Jansite MT10 is not provided in this manual. Please refer to the product packaging, the seller's website, or contact Jansite customer support for details regarding warranty coverage and technical assistance.
For support, you may visit the official Jansite website or contact their customer service department using the contact information provided with your purchase.


