
1. Product Overview
The Walrusled 4FT LED Wraparound Emergency Stairwell Light is a versatile lighting fixture designed for various commercial and industrial applications. This fixture features selectable wattage and brightness levels, along with a built-in battery backup system for emergency operation. It is suitable for environments such as stairwells, warehouses, workshops, and other large spaces requiring efficient and reliable illumination.
2. Key Features
- Power Selectable & Built-In Battery Backup: Offers 2 wattages (20W / 40W) and 2 brightness levels (2500lm / 5000lm). The emergency backup can last over 200 minutes, powered by a LiFePO4 battery (6.4V/3000mAh) designed for over 3 years of use. Features a 5W emergency output and automatic battery charge/discharge.
- High Performance & Flexibility: Constructed with a premium metal base for excellent heat dissipation and a milky PC cover to prevent yellowing and ensure uniform light distribution. Wet-rated design with a 120-degree beam angle. Sleek profile (3.45"H x 4.33"W) and IP20 protection.
- Energy Saving & Easy Installation: Provides 125lm/w high lumen efficiency, saving up to 75% energy. Offers over 54,000 hours of maintenance-free operation. Includes mounting accessories for surface mount, flushmount, or hanging mount options.
- Wide Application: Delivers soft, glare-free, ambient lighting suitable for kitchens, walk-in closets, laundry rooms, warehouses, workshops, basements, garages, schools, offices, and more.
- Certifications: Passed CE, FCC, SAA & UKCA certification for safety and reliability.
3. Safety Information
WARNING: Turn off the power before installation or maintenance.
- Always disconnect power at the circuit breaker before installing or servicing the fixture.
- Ensure all electrical connections comply with local and national electrical codes.
- If you are not qualified to perform electrical installations, consult a licensed electrician.
- Do not modify the fixture in any way.
- Handle the product with care to avoid damage.
4. Package Contents
Verify that all components are present before beginning installation:
- LED Wraparound Light Fixture (2-Pack)
- Mounting Hardware (screws, anchors, hanging chains/cables if applicable)

Figure 4.1: Included Mounting Hardware
This image illustrates the various mounting accessories provided, such as screws, wall anchors, and components for hanging installation, ensuring a complete setup for different mounting preferences.
5. Setup and Installation
This fixture supports surface mount, flushmount, and hanging mount installations. Follow the instructions carefully.
5.1. Component Identification

Figure 5.1: Internal Components
This diagram provides an exploded view of the light fixture, labeling its main internal parts including the LED strips, battery, microwave sensor, driver, and the base housing, along with the diffuser.
5.2. Installation Steps (General)
For a visual guide on installation, please refer to the official product video below. Detailed steps for surface and suspension mounting are also provided in Figure 5.2.
Video 5.1: Walrusled LED Wraparound Light Installation Guide
This official video from Walrusled demonstrates the installation process for the LED wraparound light fixture, including component breakdown and mounting procedures. It provides a comprehensive visual aid for setup.
5.3. Detailed Installation Instructions

Figure 5.2: Detailed Installation Steps
This image provides a comprehensive guide for installing the light fixture, detailing both surface mount and suspension mount methods with clear diagrams and corresponding textual instructions for each step.
Important: Always turn off the power before installation.
5.3.1. Surface Mount
- Slide the fixture body: Open the OPEN-CLOSE mark on the side of the luminaire. Pull out and pull down the OPEN direction mark (Figure 1).
- Drill holes: Drill 6mm holes on the ceiling in the corresponding positions according to the distance of the luminaire bracket. Insert M6 wall plugs into the holes (Figure 2).
- Pull power cable: Pull the power cable into the luminaire bracket from the cable entry hole. Fix the luminaire bracket to the ceiling with the provided M4 screws (Figure 3).
- Connect power: Connect the power cable which pulled into the bracket according to the right wires sequence to the terminal block on the luminaire bracket (Figure 4).
- Insert luminaire body: Secure the luminaire body to the bracket with the sling which is fixed on the luminaire bracket and insert the female connector to the male connector on the driver (Figure 5).
- Close fixture: Push the luminaire body up and align the position mark (CLOSE position) on the luminaire bracket. The luminaire body will lock with the luminaire bracket (Figure 6).
5.3.2. Suspension Mount
Refer to steps 1-6 of the Surface Mount installation, adapting for suspension. Use the hanging ropes/cables provided.
6. Operating Instructions
6.1. Power and Lumen Selection
This fixture allows you to select between two wattages and corresponding brightness levels:
- 20W Setting: Provides 2500 lumens.
- 40W Setting: Provides 5000 lumens.
The wattage selection switch is located on the fixture. Adjust this switch to your desired power output before final installation or during maintenance (with power off).

Figure 6.1: Control Panel and Dimensions
This image displays the overall dimensions of the light fixture and provides a detailed view of the control panel, which includes indicator lights for power and battery status, along with a test button for emergency functions.
6.2. Emergency Battery Backup Operation
The built-in LiFePO4 battery backup system ensures continuous illumination during power outages.
- Automatic Activation: The emergency light will automatically turn on when the main power supply is interrupted.
- Duration: The emergency backup can last for over 200 minutes.
- Charging: The battery charges automatically when the main power is on. Full charging time is 16 to 24 hours.
- Indicator Lights:
- Green LED: Indicates full charge.
- Red LED: Indicates charging.
- Yellow LED: Indicates self-test fault.
- Test Button:
- Simulated Emergency Testing: Press and hold the test button for more than 1.5 seconds. The luminaire will simulate a main supply failure and enter emergency mode. Release the button to return to previous status.
- Force Self-test: Press and hold the test button for more than 10 seconds. The luminaire will perform a self-test. Release the button to return to previous status until self-test is finished. A yellow indicator will show the self-test result.
- Reset to Default Setting: Press the test button 3 times within 3 seconds. All three indicators will flash 3 times synchronously, and the luminaire will enter default setting mode. Yellow and Red indicators will flash synchronously.
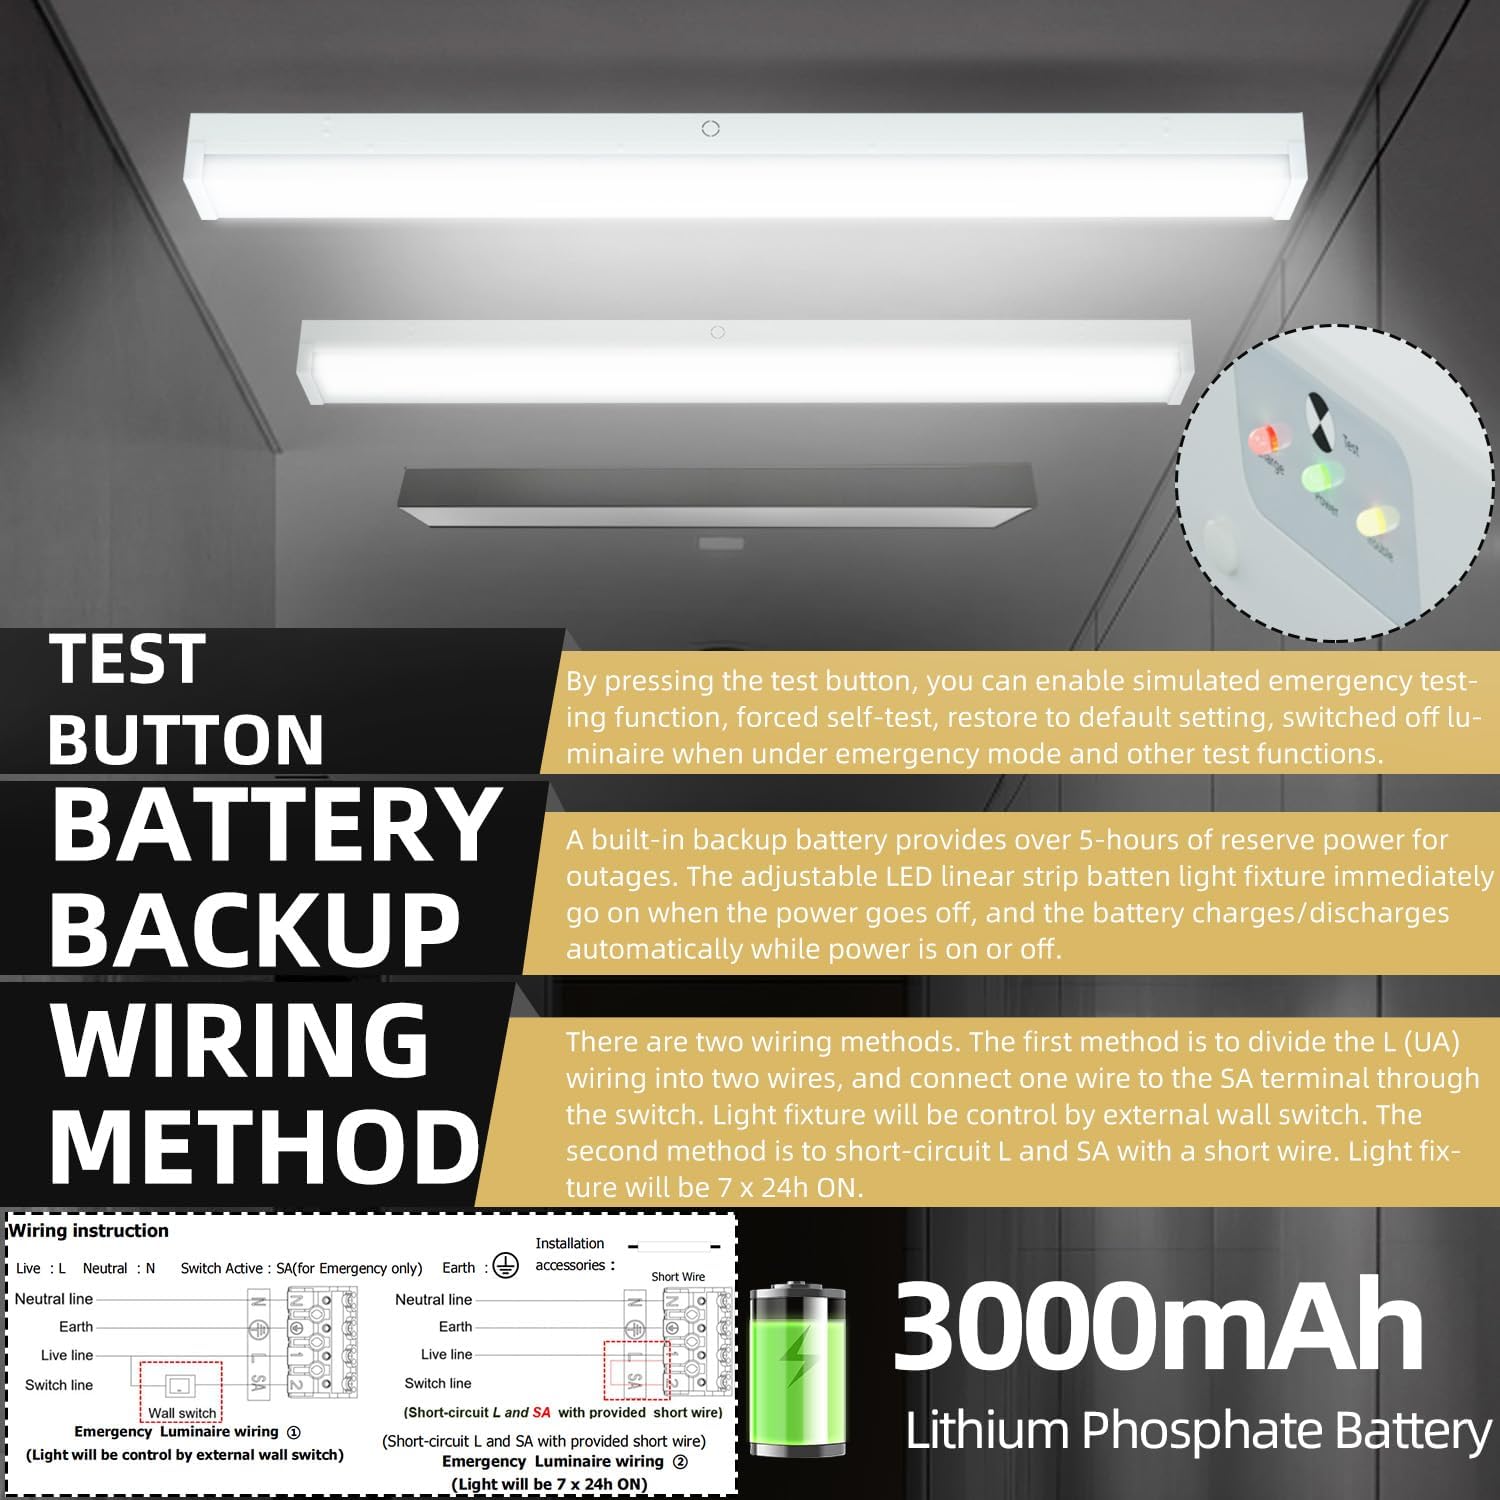
Figure 6.2: Emergency Features and Wiring
This image explains the functionality of the test button for emergency mode and self-test, details the battery backup system, and illustrates two wiring methods for the fixture, including emergency wiring instructions.
7. Maintenance
- Cleaning: Clean the fixture regularly with a soft, dry cloth. Do not use abrasive cleaners or solvents.
- Battery Check: Periodically perform the "Simulated Emergency Testing" using the test button to ensure the battery backup is functioning correctly.
- Inspection: Inspect wiring and connections annually for any signs of wear or damage.
- Replacement: LEDs are designed for long life and are not user-replaceable. If the fixture malfunctions, contact customer support.
8. Troubleshooting
| Problem | Possible Cause | Solution |
|---|---|---|
| Light does not turn on. | No power supply; loose wiring; faulty fixture. | Check circuit breaker. Verify all wiring connections are secure. If problem persists, contact support. |
| Emergency light does not activate during power outage. | Battery not charged; battery fault. | Ensure main power has been on for 16-24 hours to fully charge the battery. Perform a "Force Self-test" to check battery status. If yellow indicator lights up, there may be a fault. |
| Light flickers or dims unexpectedly. | Unstable power supply; loose connection; internal component issue. | Check power supply stability. Verify wiring. If problem persists, contact support. |
9. Specifications
| Attribute | Detail |
|---|---|
| Brand | Walrusled |
| Model Number | ZL-NSBLP36-4FT-CE |
| Size | 4FT (49.21"L x 4.33"W x 3.54"H) |
| Wattage | 20W / 40W Selectable |
| Brightness | 2500lm (20W) / 5000lm (40W) Selectable |
| Color Temperature | 5000K (Cool White) |
| Voltage | 100-277V |
| Emergency Backup Duration | Over 200 minutes |
| Battery Type | LiFePO4 (6.4V/3000mAh) |
| Emergency Output | 5W |
| Charging Time | 16-24 hours |
| Material | Alloy Steel, Polycarbonate |
| IP Rating | IP20 |
| Beam Angle | 120 degrees |
| Lifespan | 54,000+ hours |
| CRI | 85.00 |
| Mounting Type | Flushmount, Surface Mount, Hanging Mount |
| Certifications | CE, FCC, SAA & UKCA |
| UPC | 698746437473 |
10. Warranty and Support
Walrusled provides a one-year warranty for this 4FT LED Wraparound Emergency Stairwell Light. Additionally, a 5-year technical support is offered to ensure customer satisfaction.
For any defects or issues, please contact Walrusled customer service. We aim to reply within 24 hours and provide a satisfactory solution.
For further assistance, visit the official Walrusled Store: Walrusled Store