Introduction
The Womier RD75 Pro is a versatile 75% mechanical keyboard designed for gaming and productivity. It features tri-mode connectivity (wired, 2.4GHz wireless, and Bluetooth), QMK/VIA support for extensive customization, and a durable aluminum alloy construction. This manual provides essential information for setting up, operating, maintaining, and troubleshooting your keyboard.

Figure 1: Womier RD75 Pro 75% Keyboard, showcasing its compact layout and vibrant RGB backlighting.
Key Features
- Tri-Mode Connectivity: Supports wired (USB-C), 2.4GHz wireless, and Bluetooth 5.0 connections for flexible usage across various devices.
- QMK/VIA Compatibility: Allows for advanced customization of key mappings, macros, and lighting effects through open-source firmware.
- Hot-Swappable Switches: Compatible with 3-pin or 5-pin mechanical switches, enabling easy switch replacement without soldering.
- Gasket-Mounted Design: Provides a softer, more comfortable typing experience and improved acoustics.
- Full POM Linear Switches: Pre-lubricated switches offer a smooth and consistent keystroke feel.
- Durable CNC Aluminum Body: Constructed from high-quality aluminum for a robust and premium feel.
- Dynamic RGB Backlighting: Features over 40 preloaded lighting effects, customizable via shortcuts.
- High-Capacity Battery: Equipped with an 8000mAh battery for extended wireless usage.
- Quick Release Structure: Tool-free ball-catch mechanism and magnetic PCB connector for rapid disassembly and maintenance.
- Integrated Dongle Storage: A hidden slot for the 2.4GHz wireless dongle ensures convenient storage and portability.

Figure 2: The quick-release aluminum housing and magnetic PCB connector, designed for easy disassembly and customization.

Figure 3: VIA/Open Source support allows for comprehensive customization of key functions and lighting.
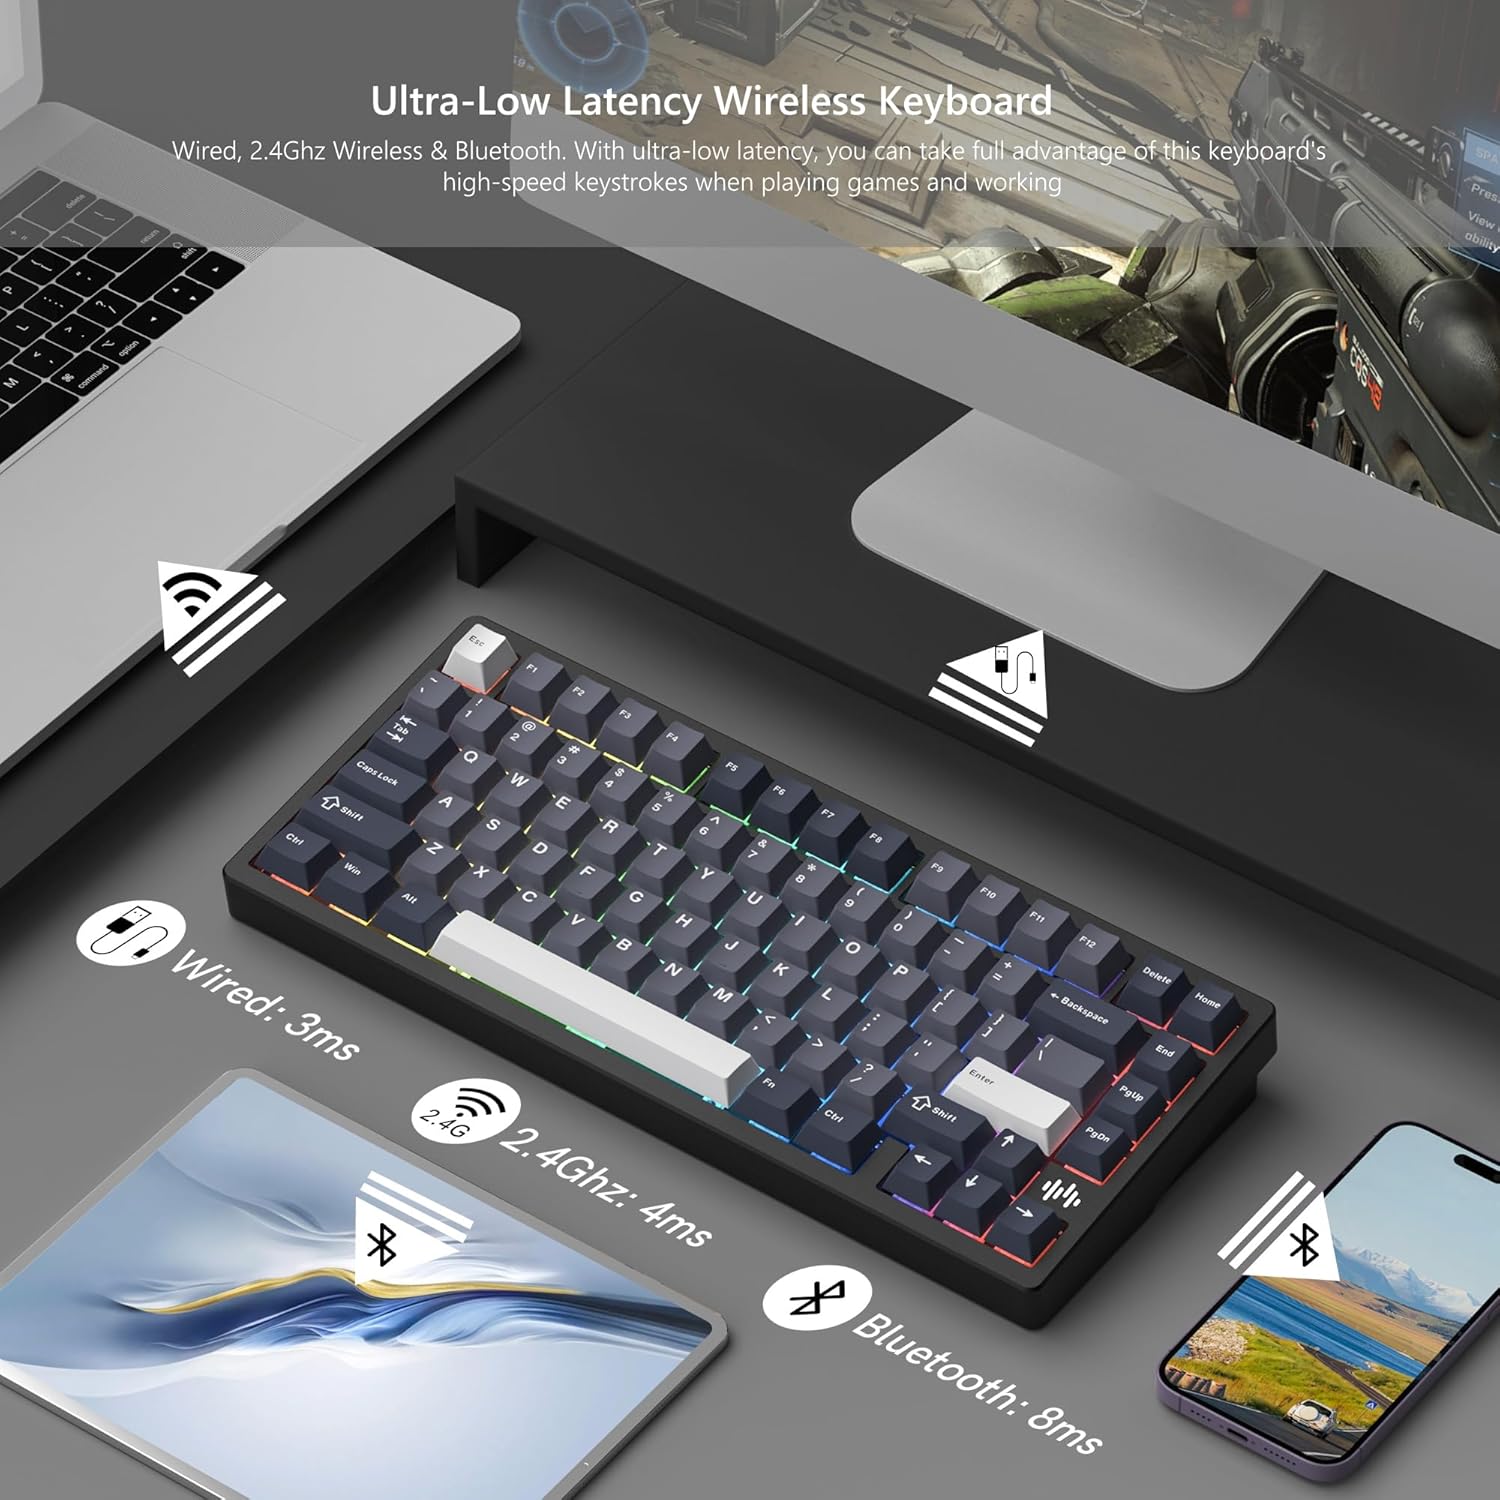
Figure 4: Illustration of the keyboard's ultra-low latency across wired (3ms), 2.4GHz wireless (4ms), and Bluetooth (8ms) modes.

Figure 5: Detail of the hot-swappable switch sockets and the force curve diagram for Womier POM linear switches.
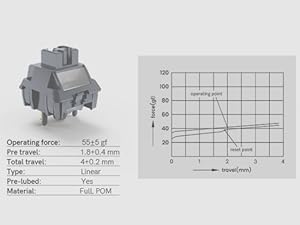
Figure 6: The convenient hidden storage slot for the 2.4GHz wireless dongle.
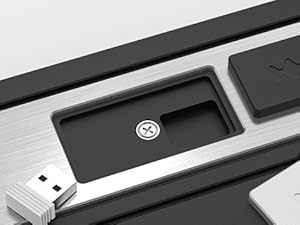
Figure 7: The magnetic daughter board connection, simplifying internal access and assembly.
Figure 8: Exploded view illustrating the multi-layered internal structure, including FR4 flex-cut plate, Poron plate foam, FR4 flex-cut PCB, IXPE switch pad, PET acoustic pad, EPDM case foam, and PET insulation film.
Setup Guide
1. Wired Connection
Connect the provided USB-C cable to the keyboard's port and the other end to your computer's USB port. The keyboard will be recognized automatically.
2. 2.4GHz Wireless Connection
- Locate the 2.4GHz USB dongle in its hidden storage slot on the keyboard.
- Plug the dongle into an available USB port on your computer.
- Ensure the keyboard is in 2.4GHz mode (refer to keyboard's mode switch or indicator). The keyboard should connect automatically.
3. Bluetooth Connection
- Switch the keyboard to Bluetooth mode (refer to keyboard's mode switch or indicator).
- On your device (computer, tablet, smartphone), enable Bluetooth and search for new devices.
- Select "Womier RD75 Pro" (or similar name) from the list of available devices to pair.
- Follow any on-screen prompts to complete the pairing process.
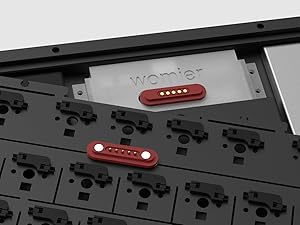
Figure 9: Contents of the Womier RD75 Pro package, including the keyboard, USB-C cable, and switch/keycap puller.
Operating Instructions
QMK/VIA Customization
The Womier RD75 Pro supports QMK and VIA firmware, allowing for extensive customization of key functions, macros, and lighting. To utilize these features:
- Download the latest VIA software and the corresponding JSON keymap file for the RD75 Pro from the official Womier website or VIA's website.
- Connect the keyboard via USB-C cable to your computer.
- Open the VIA software. The keyboard should be automatically detected.
- Use the VIA interface to remap keys, create complex macros, and configure RGB lighting effects. Changes are applied in real-time.
RGB Lighting Control
The keyboard features dynamic RGB backlighting with over 40 preloaded effects. Specific key combinations (often involving the 'Fn' key) are used to cycle through lighting modes, adjust brightness, and change colors. Refer to the quick start guide included with your keyboard for specific key combinations.
Battery Management
The 8000mAh battery provides long-lasting performance. To charge the keyboard, connect it via the USB-C cable to a power source. The RGB lighting may indicate charging status (e.g., a specific color or animation). Disconnect the cable once fully charged to preserve battery health.

Figure 10: The 8000mAh large capacity built-in battery provides extended usage time.

Figure 11: The dynamic RGB backlighting offers a wide range of customizable effects.
Maintenance
Disassembly for Customization
The Womier RD75 Pro features a quick-release design for easy access to internal components. To disassemble:
- Ensure the keyboard is powered off and disconnected from all cables.
- Gently separate the top and bottom housing components. The ball-catch structure allows for tool-free separation.
- The magnetic PCB connector simplifies detaching the main board from the case.
- When reassembling, align the components and press firmly until the ball-catch mechanism secures the housing.
Switch and Keycap Replacement
The hot-swappable sockets allow for easy replacement of switches without soldering. Use the included switch puller to carefully remove switches. Use the keycap puller to remove keycaps. Ensure new switches are aligned correctly before pressing them into the PCB to avoid bending pins.
Cleaning
Regularly clean your keyboard to maintain performance and appearance. Use a soft brush or compressed air to remove dust and debris from between keycaps. For stubborn dirt, gently wipe keycaps with a damp cloth and mild soap solution, ensuring no liquid enters the keyboard's internal components.
Troubleshooting
Q: Why keyboard keys are not sensitive?
A: The keyboard adopts the latest quick disassembly structure. During the transportation of the keyboard, the upper cover and the lower cover of the keyboard may be loose due to bumps in the road. Please check the keyboard according to the following steps after receiving the keyboard:
- Before using the keyboard, remove the upper cover of the keyboard, and then press the keyboard from top to bottom with both hands, so that the keyboard key switch is completely consistent with the keyboard PCB board.
- After installing the keyboard cover, press and hold the Fn+END key for 5-7 seconds to restore the keyboard factory settings.
Q: Why is my WIN key not working?
A: In the case of locking the WIN key by pressing FN+WIN, the WIN key cannot be triggered for use. To unlock it, simply press FN+WIN again.
Q: What should I do if I want to customize the buttons and use the macro function?
A: You can download the latest drivers and JSON files first, and then experience all the functions of the RD75 keyboard according to the operation guide in the operation manual. Keyboard supports VIA open source to customize keys and edit macros.
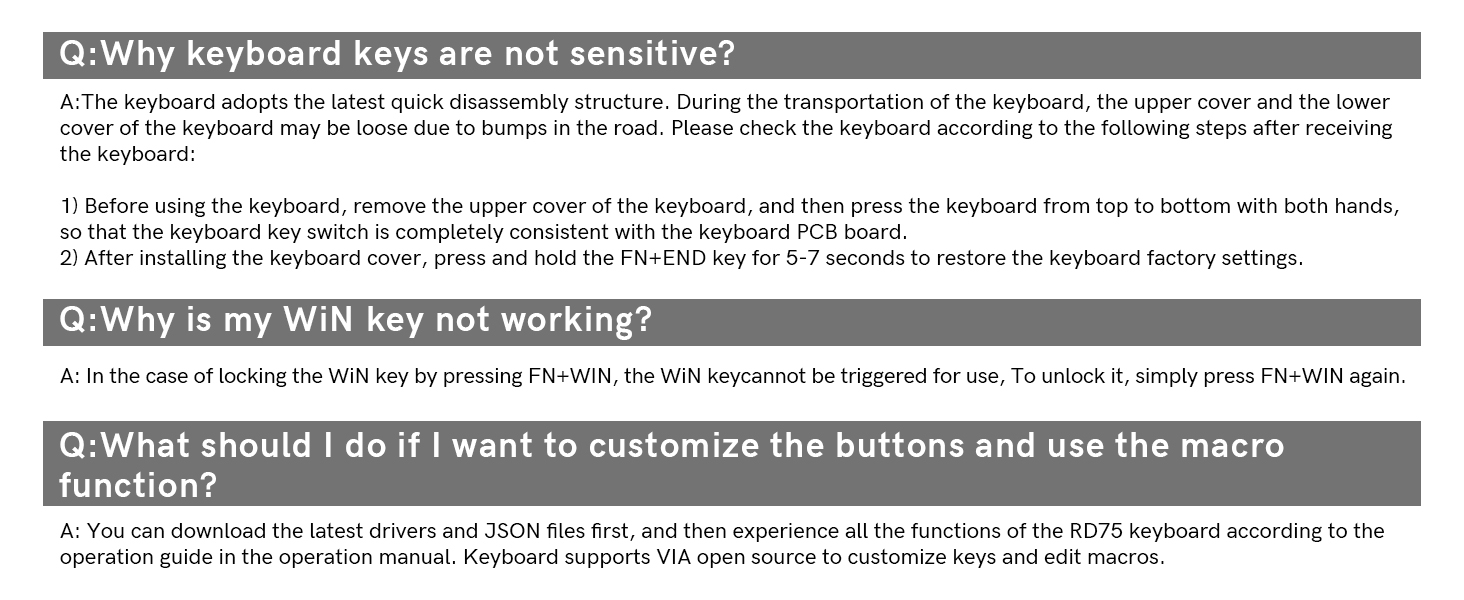
Figure 12: Common troubleshooting questions and their solutions as provided in the manual.
Technical Specifications
| Feature | Detail |
|---|
| Brand | Womier |
| Model | RD75 Pro |
| Connectivity Technology | 2.4GHz Wireless, Bluetooth 5.0, USB-C Wired |
| Keyboard Layout | 75% (84 Keys) |
| Switches | Full POM Linear Switches, Hot-Swappable (3-pin/5-pin) |
| Keycaps | Double-Shot PBT Keycaps |
| Body Material | CNC Aluminum Alloy |
| Mounting Style | Gasket Mounted |
| Battery Capacity | 8000mAh Lithium Polymer |
| Backlighting | Dynamic RGB (40+ effects) |
| Compatibility | Windows, Mac, PC, Laptop, Tablet, Smartphone |
| Dimensions | 15.16 x 8.35 x 3.39 inches |
| Item Weight | 5.57 pounds |
| Date First Available | October 1, 2024 |
Warranty and Support
For warranty information and technical support, please refer to the official Womier website or contact their customer service directly. Keep your purchase receipt as proof of purchase for any warranty claims.
For the latest drivers, firmware updates, and detailed VIA configuration guides, visit the Womier support page.


