1. Introduction
The TESmart 4x4 Seamless HDMI Matrix Switch HMA404-ES23-USBK allows you to connect up to four HDMI input sources to four HDMI displays. This device supports seamless switching between sources in less than 50 milliseconds, ensuring a smooth transition without screen interruption. It also features audio separation, preview mode, and multiple control options including front panel buttons, IR remote, RS-232, and LAN.

Image 1.1: The TESmart 4x4 Seamless HDMI Matrix Switch, showing the main unit, remote control, and rack-mount ears.
2. Package Contents
Please verify that all items listed below are included in your package. If any components are missing or damaged, please contact TESmart support.
- 1 x 4x4 HDMI Matrix Switch (HMA404-ES23-USBK)
- 1 x IR Remote Control
- 1 x IR Extension Cable
- 1 x 3 Pins Connector (for RS-232)
- 1 x DC 12V Power Adapter
- 2 x Rack-ears
- 1 x User Manual

Image 2.1: All components included in the TESmart 4x4 HDMI Matrix Switch package.
3. Product Overview
3.1 Front Panel
The front panel provides direct control and status indication for the matrix switch.
- LCD Preview Mode: Displays real-time video thumbnails of each port.
- Dial: For navigation and selection within the OSD menu.
- Keypad: Buttons for direct input/output selection and menu control.
- Power Switch: To turn the device on or off.
3.2 Rear Panel
The rear panel houses all input and output connections, along with control ports.
- DC 12V: Power input port.
- IR Signals: Port for the IR extension cable to receive remote control signals.
- RS-232 Port: For serial communication and control via PC.
- Audio I/O: Ports for independent audio separation.
- LAN Port: For network control via PC.
- HDMI Inputs (In 1-4): Connect your HDMI source devices.
- HDMI Outputs (Out A-D): Connect to your HDMI displays.
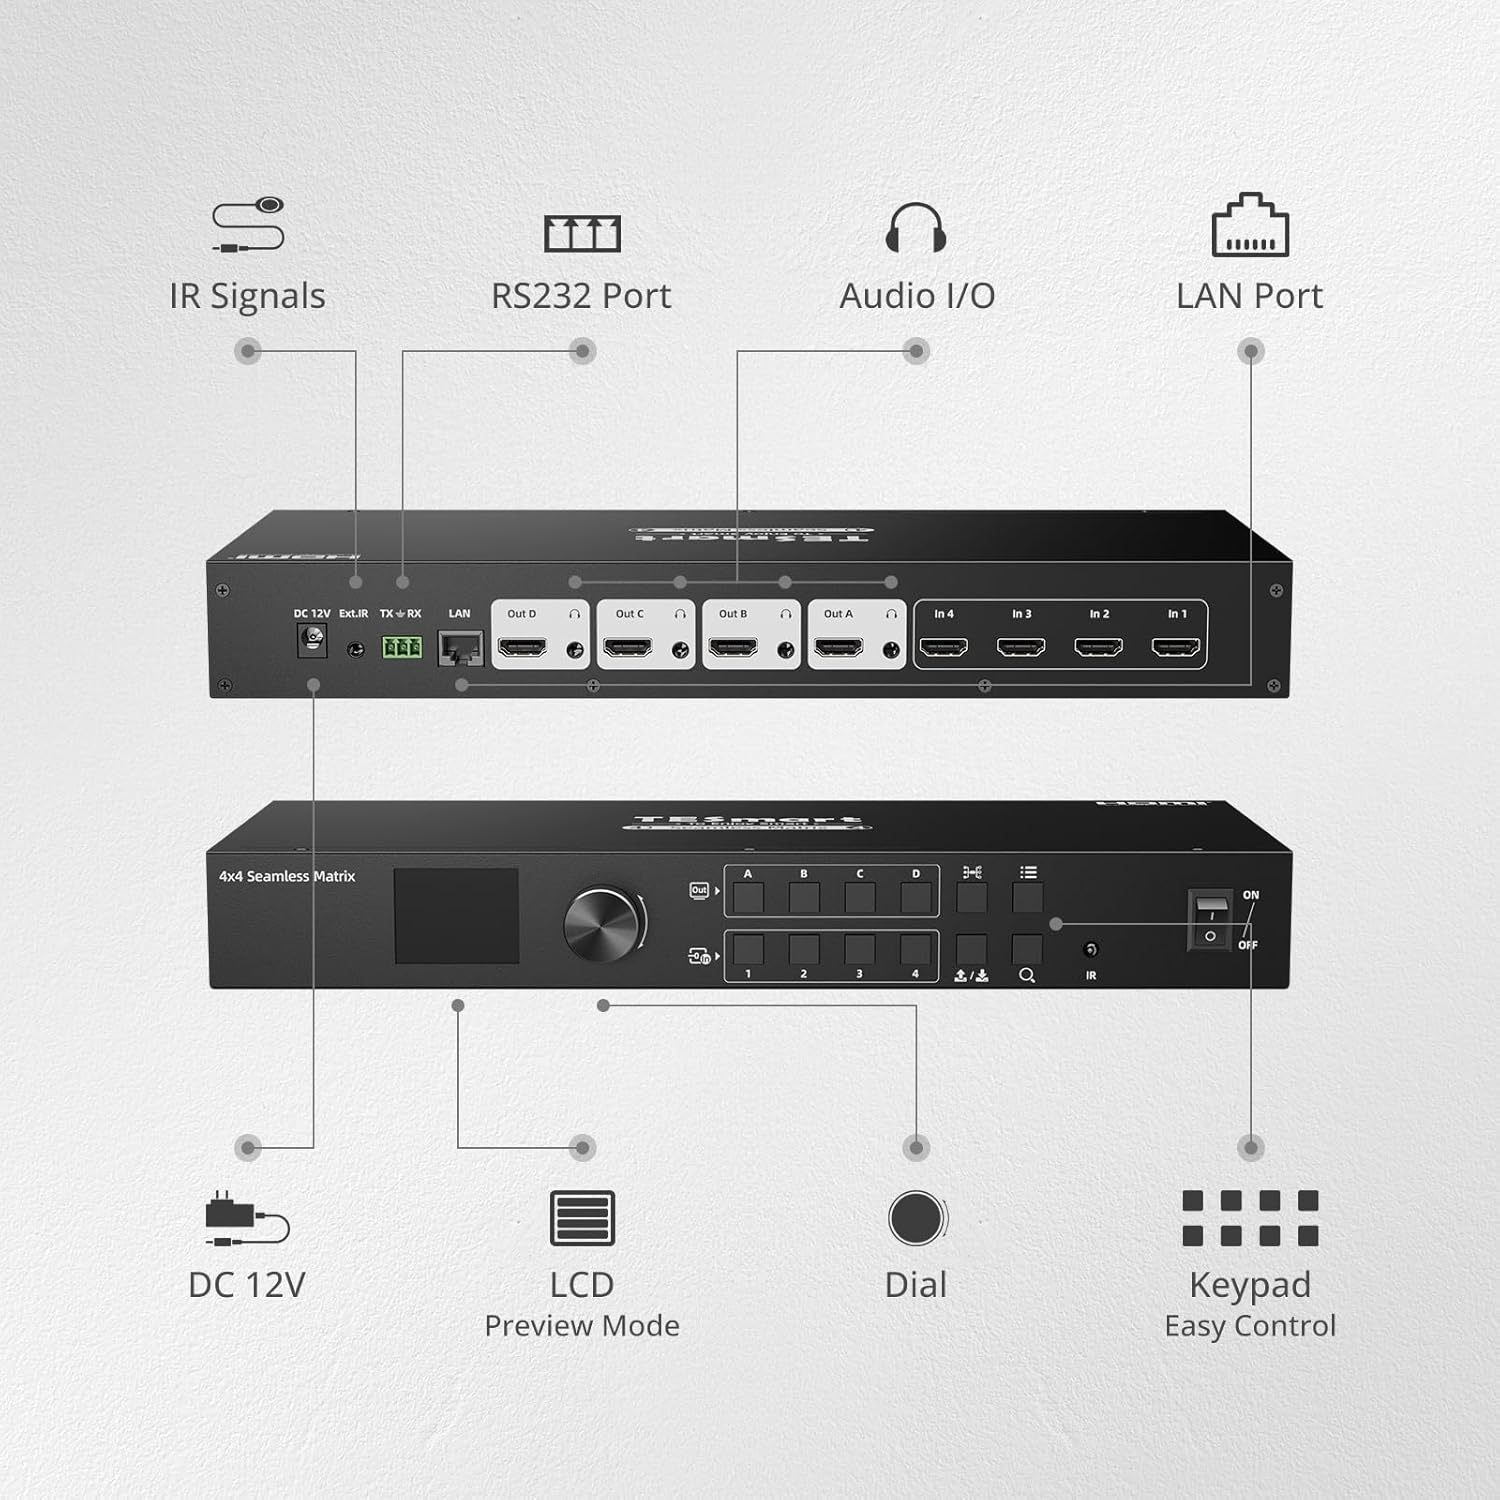
Image 3.1: Front and rear panel layout of the TESmart 4x4 HDMI Matrix Switch with labeled components.
4. Setup and Installation
- Power Off Devices: Ensure all HDMI source devices and displays are powered off before making connections.
- Connect HDMI Sources: Connect your HDMI source devices (e.g., gaming console, laptop, camera) to the HDMI Input ports (In 1-4) on the rear panel of the matrix switch using high-quality HDMI cables.
- Connect HDMI Displays: Connect your HDMI displays (e.g., monitors, projectors) to the HDMI Output ports (Out A-D) on the rear panel of the matrix switch using high-quality HDMI cables.
- Connect Power: Plug the DC 12V power adapter into the matrix switch and then into a power outlet.
- Optional Connections:
- IR Extension: If using the IR remote control from a distance or obstructed view, connect the IR extension cable to the IR port and position the receiver in a visible location.
- Audio Output: If using audio separation, connect external audio devices to the Audio I/O ports.
- LAN/RS-232: For PC control, connect an Ethernet cable to the LAN port or use the 3-pin connector for RS-232 serial connection.
- Power On: Power on the matrix switch, then power on your HDMI displays, and finally your HDMI source devices.
5. Operation
5.1 Seamless Switching
The TESmart matrix switch provides seamless switching between input sources, occurring in less than 50 milliseconds. This eliminates black screens or delays during transitions.
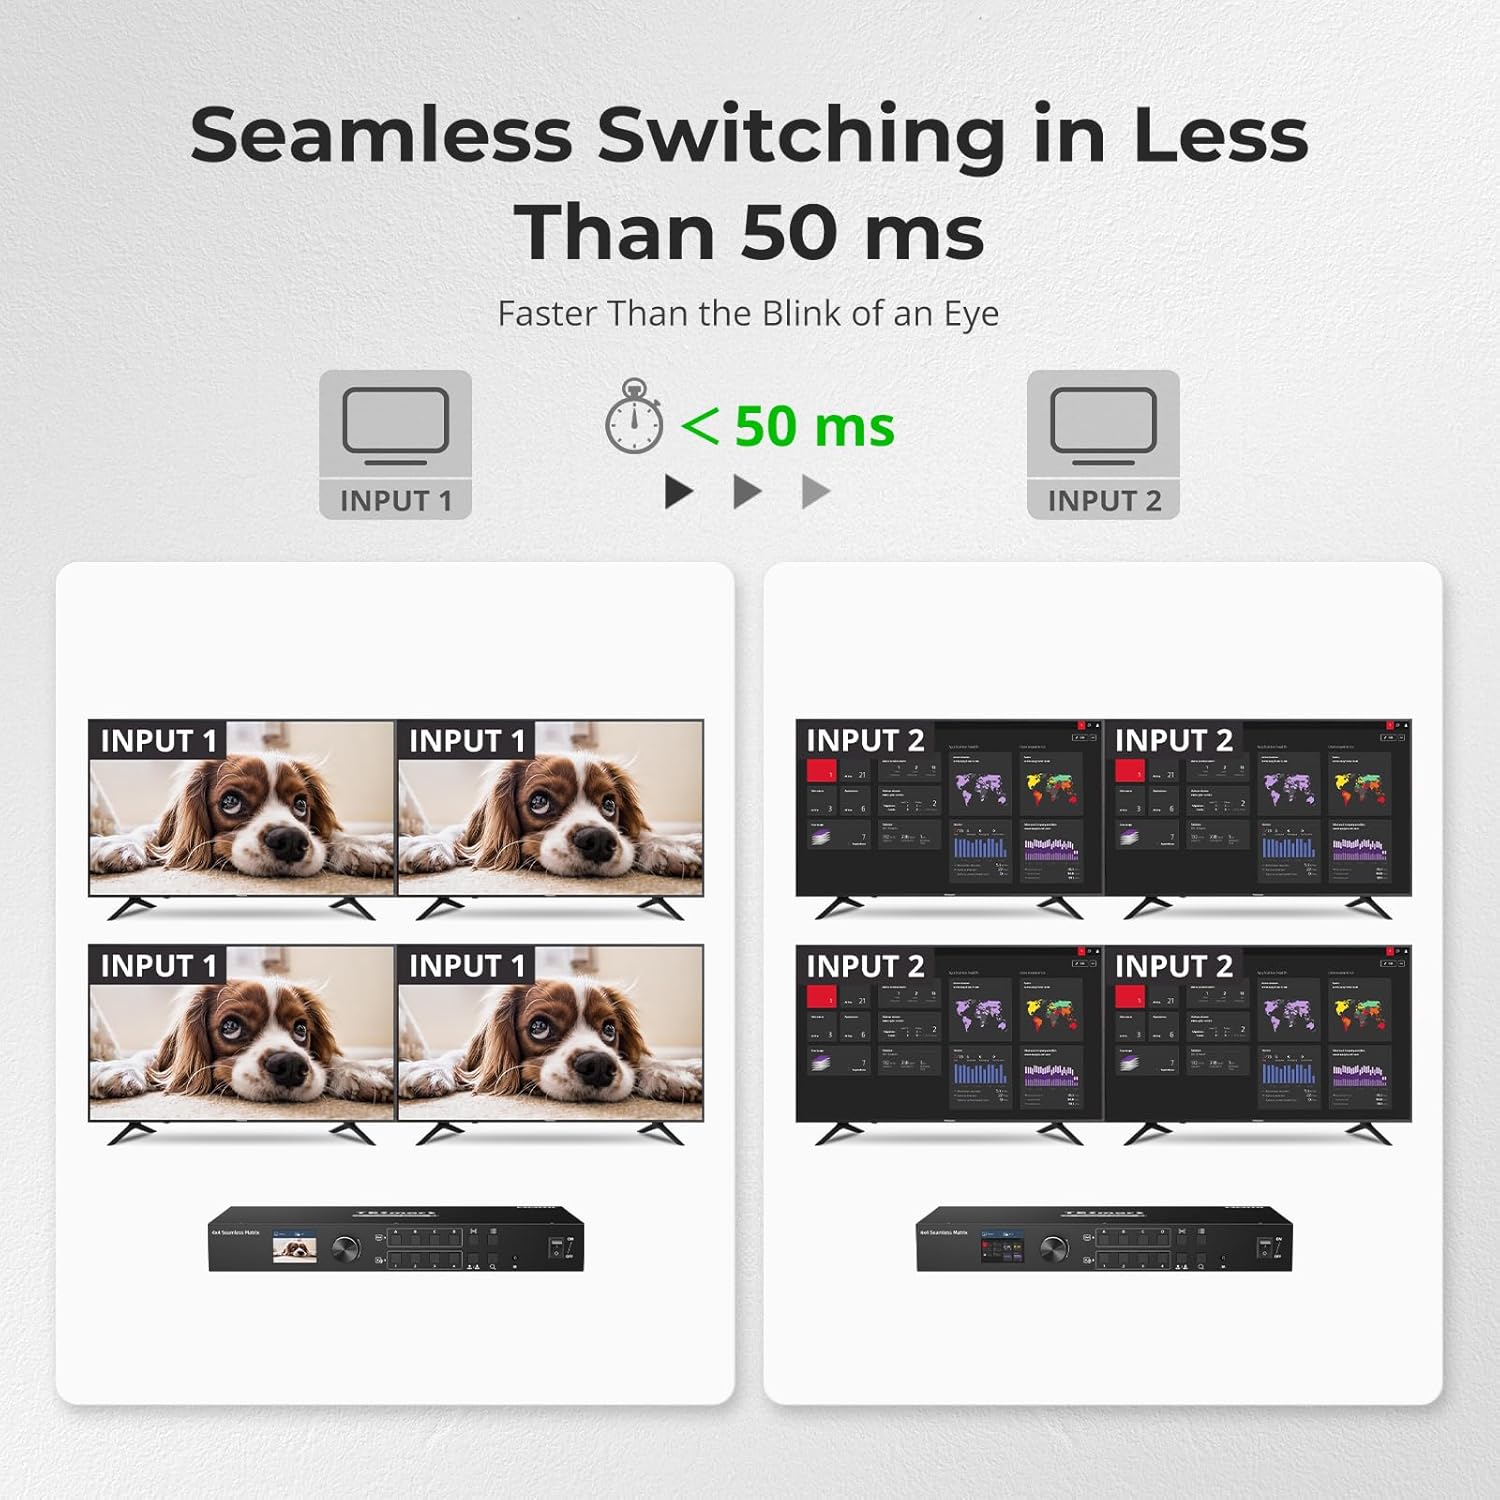
Image 5.1: Seamless switching in action, demonstrating rapid transitions between input sources.
5.2 Control Methods
The matrix switch can be controlled using various methods:
- Front Panel Buttons: Directly select inputs and outputs using the buttons on the front panel.
- Dial: Use the dial to navigate through the On-Screen Display (OSD) menu and make selections.
- IR Remote Control: Use the included IR remote for convenient wireless control. Ensure the IR receiver (or extension cable) has a clear line of sight.
- LAN Control: Connect the device to your network and use PC software for advanced control. Refer to the software manual for detailed instructions.
- RS-232 Connection: Connect to a PC via RS-232 for serial command control. Refer to the RS-232 command set documentation for details.

Image 5.2: Overview of the five control methods for the matrix switch.
5.3 Audio Separation
The matrix switch supports independent audio separation, allowing you to extract audio from any HDMI output and route it to a separate audio system. This enables playing audio independently corresponding to the HDMI output port.

Image 5.3: Real-time audio separation setup, demonstrating independent sound output.
5.4 Preview Mode and Custom Port Naming
The integrated LCD on the front panel provides a preview mode, allowing real-time viewing of the screen content on each port. This is particularly useful for quickly checking display status, especially when displays are far from the matrix.
You can also customize the names of each input and output port through the OSD menu, making it easier to identify sources and destinations.
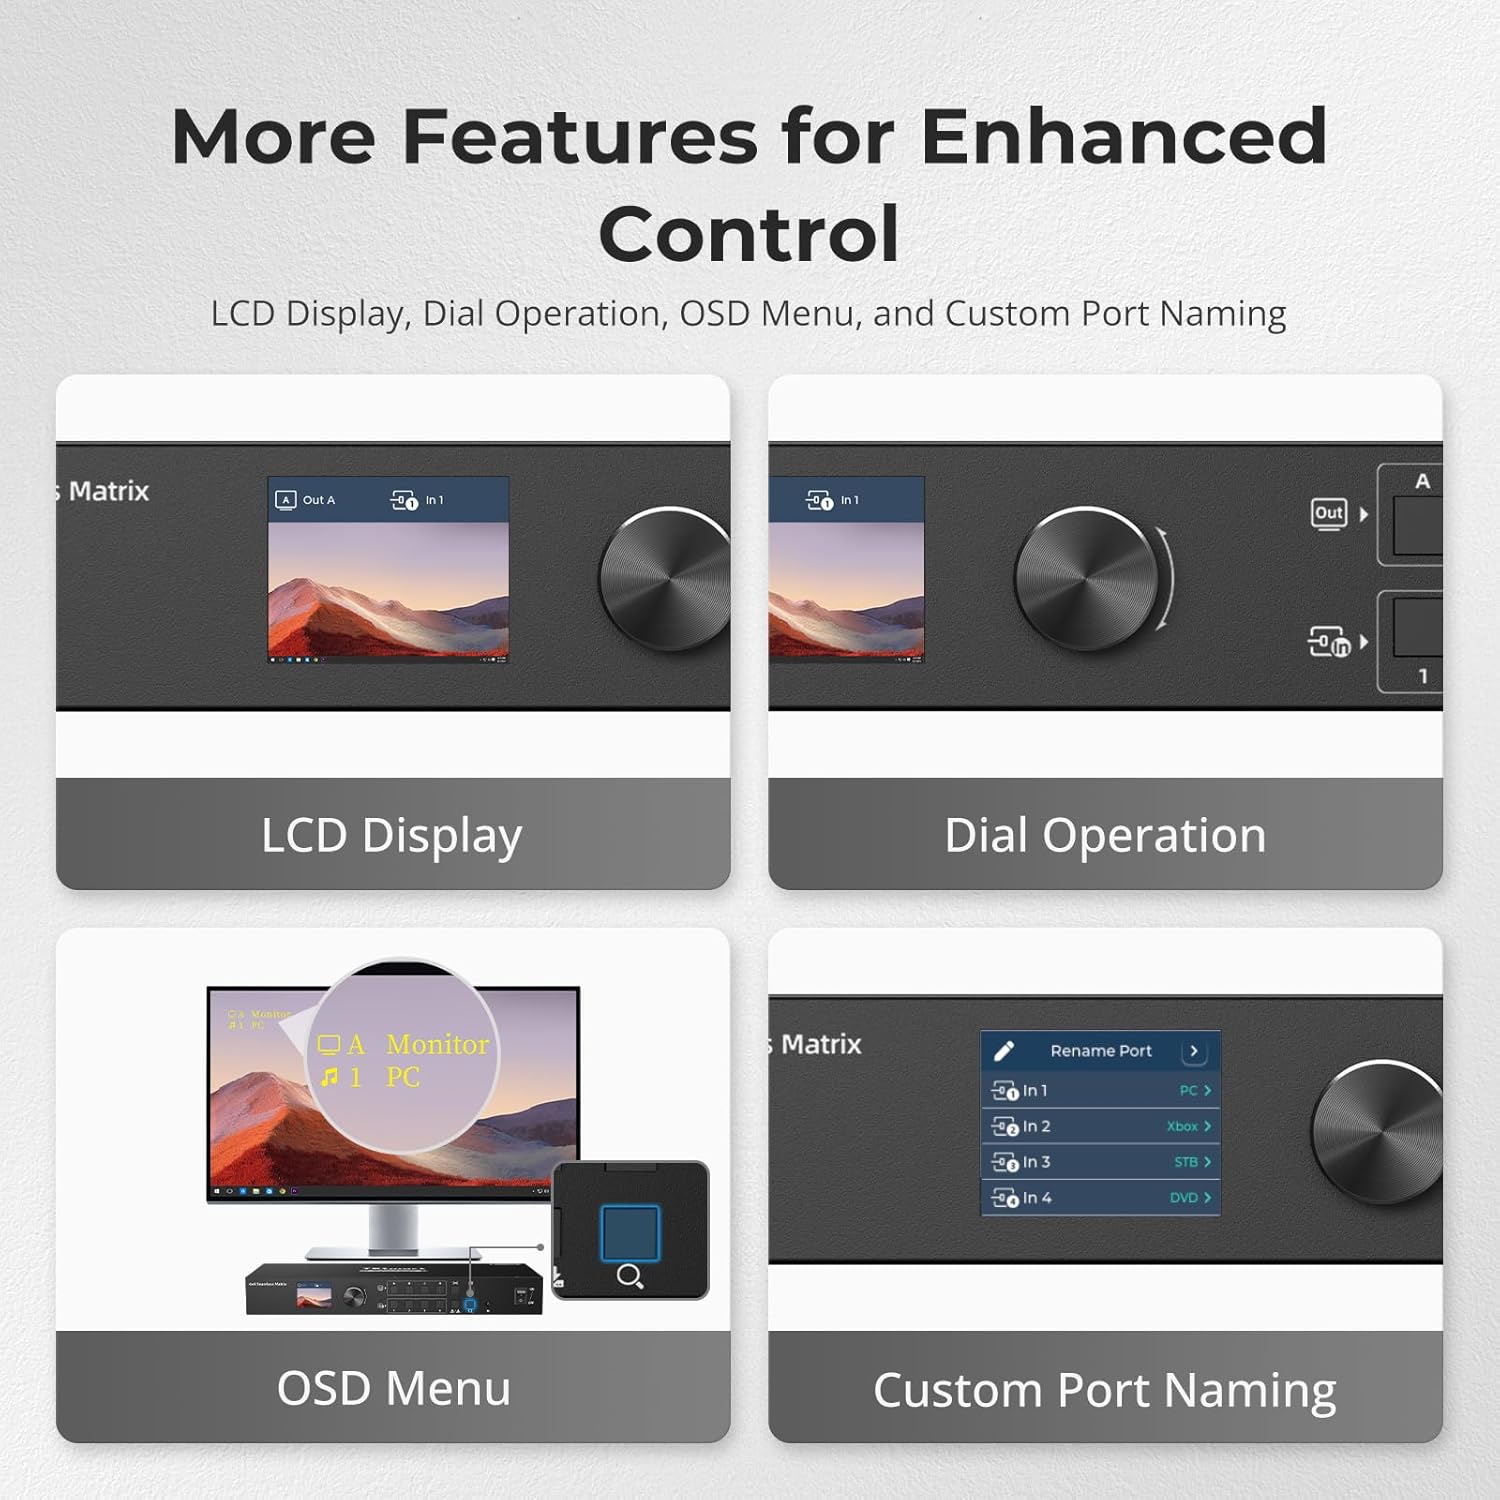
Image 5.4: Features for enhanced control, including LCD preview and custom port naming.
6. Maintenance
- Cleaning: Use a soft, dry cloth to clean the exterior of the device. Avoid liquid cleaners or abrasive materials.
- Ventilation: Ensure the device has adequate ventilation to prevent overheating. Do not block ventilation openings.
- Cable Management: Keep cables organized and free from kinks or excessive bending to prevent damage.
- Firmware Updates: Periodically check the TESmart website for any available firmware updates to ensure optimal performance and access to new features.
7. Troubleshooting
| Problem | Possible Cause | Solution |
|---|---|---|
| No video output on display. | Loose HDMI cable connections. Incorrect input selected. Power issue. | Check all HDMI cable connections. Ensure the correct input is selected for the output. Verify the matrix switch and display are powered on. Try a different HDMI cable. |
| No audio output. | Audio separation not configured correctly. Display audio settings. | Check audio separation settings on the matrix switch. Ensure your display's audio is not muted or set to an incorrect output. |
| Remote control not working. | Batteries low/dead. IR receiver obstructed. | Replace remote control batteries. Ensure the IR receiver has a clear line of sight to the remote. Use the IR extension cable if needed. |
| Intermittent signal. | Poor quality HDMI cables. Cable length too long. | Use certified high-speed HDMI cables. Ensure cable lengths are within recommended limits for your resolution. |
| Device not responding to LAN/RS-232 commands. | Incorrect network settings. Wrong serial port configuration. | Verify network connectivity and IP address settings. Check RS-232 port settings (baud rate, data bits, parity, stop bits) against the documentation. |
8. Specifications
| Feature | Detail |
|---|---|
| Model Number | HMA404-ES23-USBK |
| Product Dimensions | 13.78 x 5.91 x 1.77 inches |
| Item Weight | 4.63 pounds |
| Max Resolution | 1920x1080@60Hz |
| Switching Speed | Less than 50 ms (seamless) |
| Control Methods | Front Panel Buttons, Dial, IR Remote, RS-232, LAN |
| Special Features | Audio Separation, Preview Mode, Custom Port Naming, Power-down Memory |
| Compatible Devices | Camera, Gaming Console, Laptop, Projector, VCR |
| Connector Type | HDMI |
| Power Supply | DC 12V |
9. Warranty and Support
9.1 Product Warranty
This TESmart product is covered by a 1-year standard warranty, with an additional 2-year extended warranty available upon registration, totaling up to 3 years of coverage. Please refer to the warranty card included in your package or visit the official TESmart website for detailed terms and conditions.
9.2 Technical Support
TESmart offers 24/7 technical support to assist you with any questions or issues regarding your product. For assistance, please visit the TESmart official website or contact our support team directly through the contact information provided on our website.


