1. Introduction
This user manual provides essential information for the proper installation, operation, and maintenance of your SITERWELL GS562A Hardwired Interconnected Photoelectric Smoke Alarm. This device is designed to provide early warning of smoke, enhancing the safety of your home. Please read this manual thoroughly before installation and retain it for future reference.

Figure 1.1: The SITERWELL GS562A smoke alarm contributes to a safe home environment.
2. Safety Information
- Important: This smoke alarm is designed for residential use only.
- Installation: Ensure all wiring is performed by a qualified electrician in accordance with local electrical codes.
- Placement: Install smoke alarms on every level of your home, inside each sleeping area, and in the hallway outside each sleeping area. Avoid installing near cooking appliances, bathrooms, or areas with high humidity.
- Testing: Test the smoke alarm weekly to ensure proper operation.
- Do Not Paint: Never paint the smoke alarm. Paint can clog the sensing chambers and prevent the alarm from functioning correctly.
- Battery: The 9V backup battery provides protection during power outages. Replace the battery immediately when a low battery warning is indicated.
3. Product Overview
The SITERWELL GS562A is a hardwired interconnected photoelectric smoke alarm with a 9V battery backup. It is UL217-10th Listed, ensuring compliance with safety standards. Its photoelectric sensor is designed for quick response to smoke from smoldering fires, reducing false alarms from cooking.
- Model: GS562A
- Sensor Type: Photoelectric
- Power Source: Hardwired (AC) with 9V DC battery backup
- Interconnection: Up to 12 units can be interconnected.
- Product Life: 10 years
- Features: Test/Silence button, LED indicators, Do Not Disturb mode.

Figure 3.1: Advanced Photoelectric Sensor for fast and accurate smoke detection.
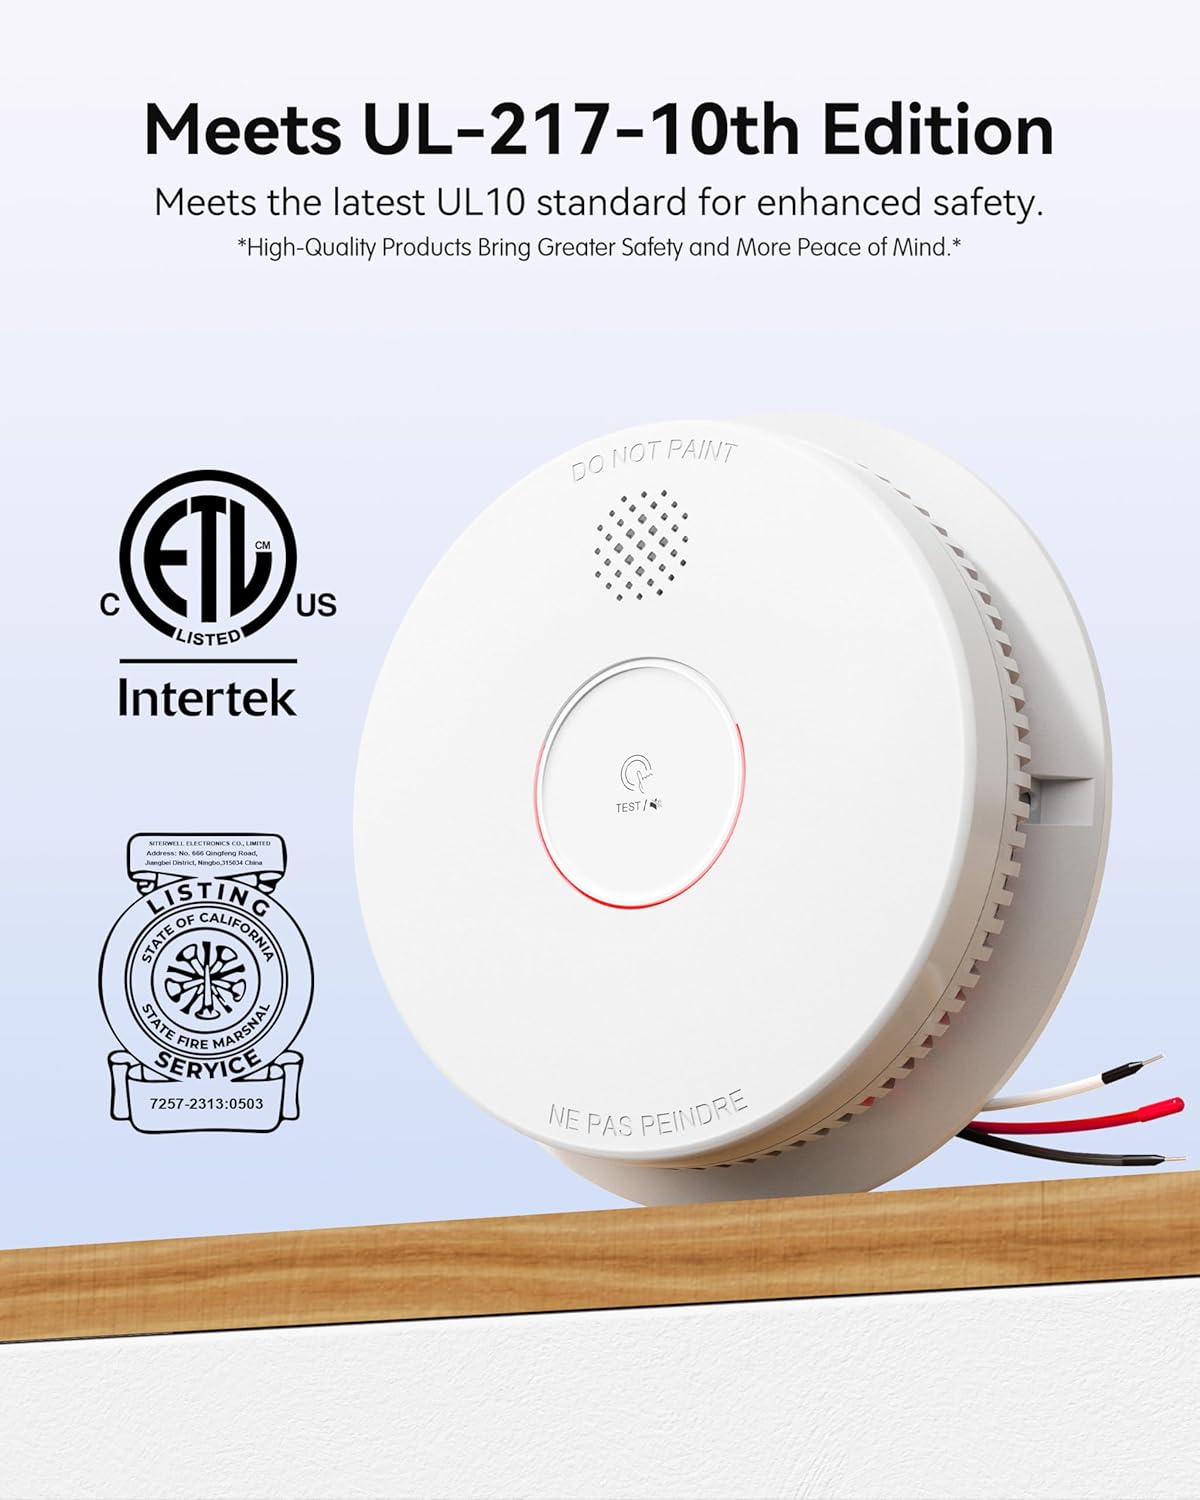
Figure 3.2: The GS562A meets UL-217 10th Edition standards.

Figure 3.3: Bug-Proof Precision Alerts with dual-layer micro-mesh design.
4. Setup and Installation
Proper installation is crucial for the effective operation of your smoke alarm. Follow these steps carefully.
4.1. Mounting Location
Choose a central location on the ceiling or high on a wall, away from corners and obstructions. Refer to local codes for specific placement requirements.
4.2. Hardwired Connection
- Turn off Power: Before beginning, ensure the power to the circuit where the alarm will be installed is turned off at the main fuse or circuit breaker box.
- Connect Wiring: Connect the alarm's wiring harness to your household wiring. The black wire connects to the hot wire, the white wire to the neutral wire, and the red wire to the interconnect wire (if interconnecting multiple alarms). Use wire nuts to secure connections.
- Attach Mounting Plate: Secure the mounting plate to the electrical box on the ceiling or wall using the provided screws.
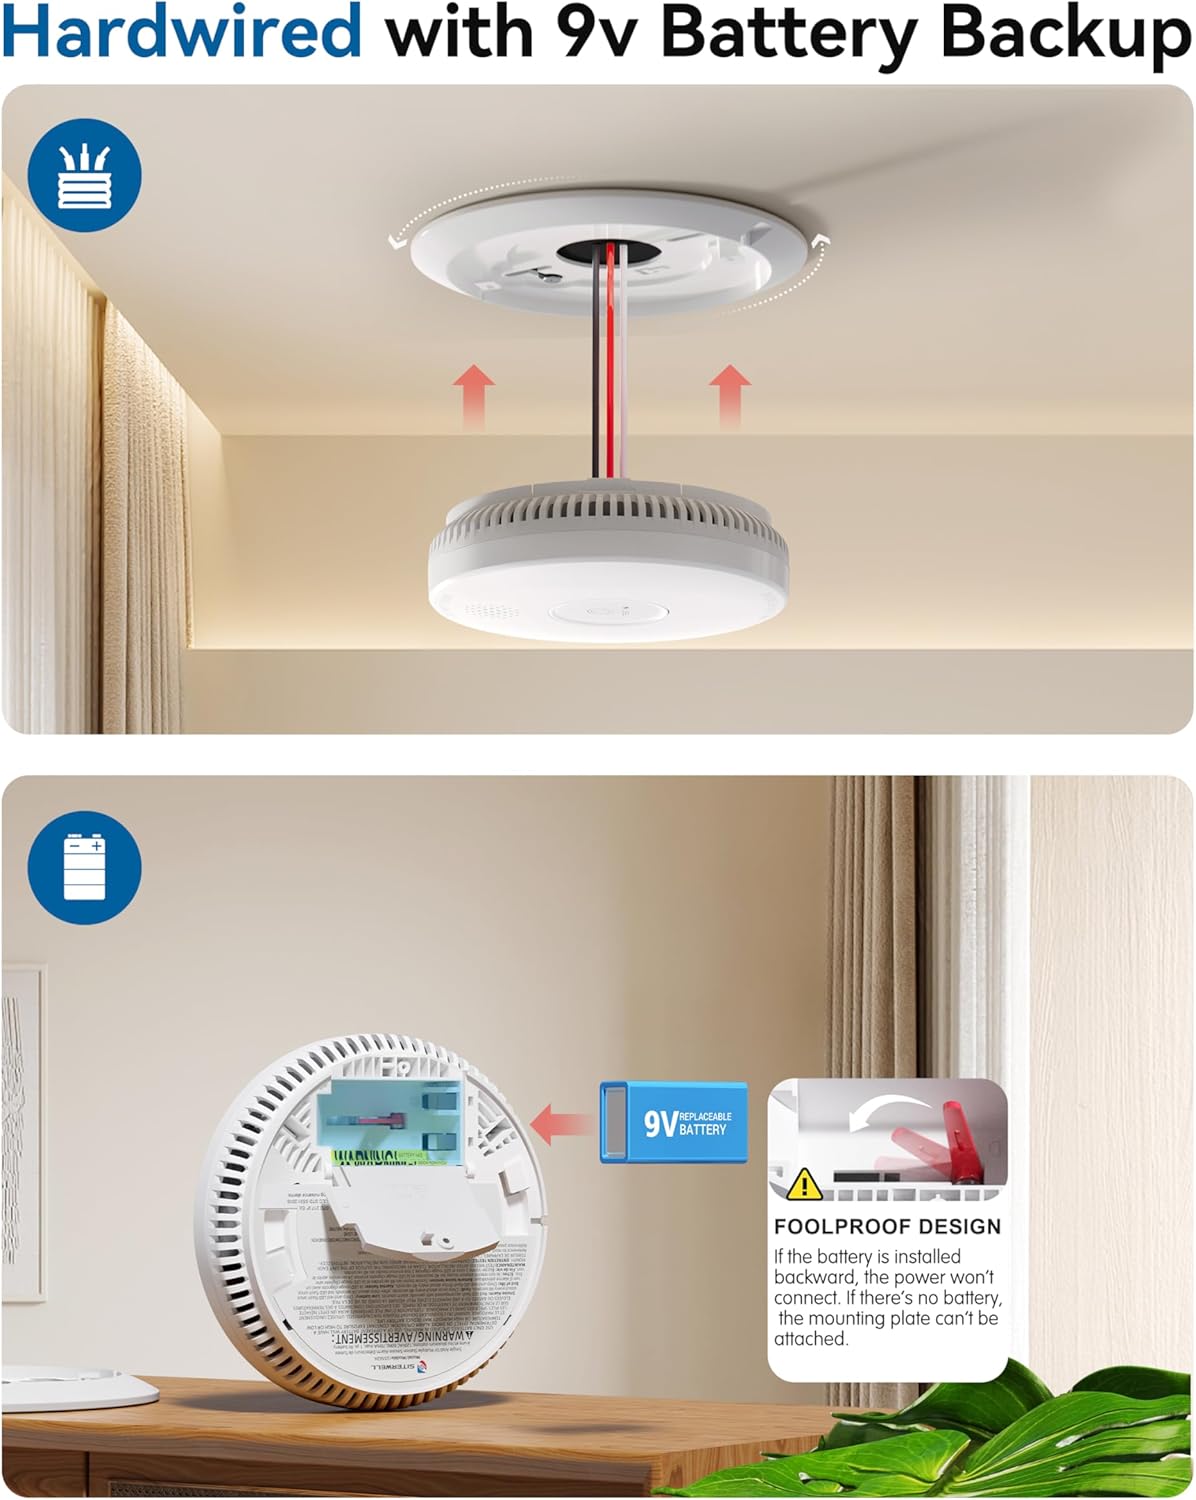
Figure 4.1: Hardwired installation and 9V battery backup.
4.3. Battery Installation
Insert the provided 9V battery into the battery compartment on the back of the alarm. Ensure correct polarity. The alarm will not attach to the mounting plate if the battery is not installed or installed incorrectly.
4.4. Attaching the Alarm
Align the alarm with the mounting plate and twist clockwise until it locks securely into place.
4.5. Interconnection
The SITERWELL GS562A can be interconnected with up to 12 compatible alarms. When one interconnected alarm detects smoke, all connected alarms will sound. Connect the red interconnect wire between all units. Ensure all interconnected units are on the same circuit.

Figure 4.2: Hardwired Interconnect system for comprehensive protection.

Figure 4.3: When one alarm sounds, all interconnected alarms activate.
4.6. Power On and Initial Test
Once all alarms are installed and connected, restore power to the circuit. The alarm will perform a self-test. Press the Test/Silence button on one alarm to test the entire interconnected system. All connected alarms should sound.
Video 4.1: Official SITERWELL video demonstrating the features and interconnection of the Hardwired Interconnected Smoke Detector.
5. Operating the Alarm
5.1. Normal Operation and LED Indicators
- Green LED: Always on, indicating AC power is supplied.
- Red LED: Flashes every 40 seconds during normal operation.
- Alarm State: When smoke is detected, the red LED flashes rapidly, and the alarm sounds loudly.
5.2. Testing the Alarm
Test your smoke alarm weekly. Press and hold the Test/Silence button for a few seconds. The alarm will sound, and the red LED will flash. If interconnected, all alarms should sound. Release the button to stop the test.
5.3. Silence Feature (Do Not Disturb Mode)
If a nuisance alarm occurs (e.g., from cooking smoke), press the Test/Silence button to temporarily silence the alarm for approximately 10 hours. The red LED will continue to flash every 40 seconds during this period. The alarm will automatically reset after 10 hours or if smoke levels increase significantly.
6. Maintenance
Regular maintenance ensures your smoke alarm remains functional and reliable.
6.1. Battery Replacement
The alarm will chirp periodically (e.g., every 40 seconds) and the red LED will flash to indicate a low 9V battery. Replace the battery immediately:
- Turn off AC power to the alarm circuit.
- Twist the alarm counter-clockwise to remove it from the mounting plate.
- Open the battery compartment and remove the old 9V battery.
- Insert a new 9V battery, observing polarity.
- Reattach the alarm to the mounting plate by twisting clockwise.
- Restore AC power and test the alarm.
6.2. Cleaning Your Smoke Alarm
Clean your smoke alarm at least once a month to remove dust and debris. Use a soft brush or a vacuum cleaner with a soft brush attachment to gently clean the exterior and the openings around the alarm. Do not use water, cleaners, or solvents.
6.3. End of Product Life
The SITERWELL GS562A has a 10-year product life. After 10 years from the manufacturing date, the alarm should be replaced, even if it appears to be working. The manufacturing date is printed on the back of the alarm.
7. Troubleshooting
If your smoke alarm is not functioning correctly, refer to the table below for common issues and solutions.
| Problem | Possible Cause | Solution |
|---|---|---|
| Alarm chirps every 40 seconds | Low 9V battery. | Replace the 9V battery. |
| Alarm sounds frequently without smoke | Nuisance alarm (e.g., cooking smoke, steam), dust accumulation. | Press Test/Silence button. Clean the alarm. Relocate if nuisance alarms persist. |
| Alarm does not sound during test | No AC power, dead 9V battery, faulty unit. | Check circuit breaker. Replace 9V battery. Replace the alarm if still unresponsive. |
| Interconnected alarms do not all sound | Wiring issue, incompatible units, too many units. | Check interconnect wiring. Ensure all units are compatible and on the same circuit. Max 12 units. |
8. Specifications
| Feature | Detail |
|---|---|
| Brand | SITERWELL |
| Model Number | GS562A |
| Sensor Type | Photoelectric |
| Power Source | Hardwired (AC) with 9V DC Battery Backup |
| Alarm Sound Level | 85 dB at 10 feet |
| Operating Temperature | 40°F (4.4°C) to 100°F (37.8°C) |
| Operating Humidity | 10-95% RH non-condensing |
| Product Dimensions | 5.67"D x 5.67"W x 1.5"H |
| Item Weight | 0.53 Pounds (approx. 8.5 ounces) |
| Certifications | UL217-10th Listed |
9. Warranty and Support
The SITERWELL GS562A smoke alarm is designed for a 10-year product life, reflecting its durability and reliability. For specific warranty details, technical support, or further assistance, please contact SITERWELL customer service or visit the official SITERWELL store on Amazon: SITERWELL Store.


